

Key Takeaways
- Braintree Payment Solutions offers Transparent Redirect and Braintree.js as solutions to help minimize the PCI Compliance burden for small businesses.
- Transparent Redirect allows credit card data to be transmitted directly to Braintree’s servers, bypassing the business owner’s system, thus reducing the risk of data breaches.
- The Braintree PHP Client Library simplifies the integration process for Transparent Redirect, but it can complicate the collection and validation of non-payment related information on the same form as the customer’s credit card information.
- To implement Transparent Redirect, the business owner must integrate their website with the payment gateway’s API, set up a form that posts customer’s payment information directly to the gateway, and handle the response sent back to their website.
- While Transparent Redirect enhances security and improves website performance, it requires a deeper understanding of web development and payment gateway APIs, which can be a potential drawback for some business owners.
The mere mention of “PCI Compliance” usually elicits a combination of confused looks and sweaty palms from business owners who accept credit card payments online. But what does it really mean?
It’s a complicated topic, but the short version is that the major credit card companies founded a council called the Payment Card Industry Security Standards Council (PCI SSC) in 2006 in order to create a set of rules standardizing the security policies and procedures that merchants should follow (PCI DSS) when processing and storing sensitive credit card information. In order to determine whether your systems are compliant, you would normally choose the appropriate Self Assessment Questionnaire (SAQ) from one of eight options, and then answer a series of questions to determine whether you were, in fact, compliant. Large corporations often employ the services of a Qualified Security Assessor (QSA) to help them fill out SAQ D (the most involved of the SAQS), which can cost hundreds of thousands of dollars. And to make matters worse: if your systems are compromised and it is determined that they were not compliant when they were breached, you could be liable for fines of up to $500,000 per incident.
So what is a small business owner supposed to do? That’s where Braintree Payment Solutions comes in. They offer two solutions to minimize your PCI Compliance burden: Transparent Redirect and Braintree.js. I should mention that neither Braintree nor any other PCI DSS compliant service provider can tell you which SAQ to fill out, or whether your systems are compliant. But they have paired with Security Metrics, an industry-leading QSA, to provide a cost-free solution to help all of their customers achieve and maintain PCI Compliance. And in their experience, customers using either Transparent Redirect or Braintree.js have typically been able to fill out SAQ A, which is much less involved (and therefore costly) than SAQ D. You can read more here.
But enough background; let’s write some code.
Getting Started
This article is going to focus on the Transparent Redirect method. The first thing we have to do is head over to Braintree to get our server-side API keys. For those of you without a production account, point your browser to the Braintree Sandbox and sign up for a test account. Log in, and click on “Account -> API Keys.” Then, click the “Generate New” button, and finally click “View” under the Private Key column of the newly generated API key. You’ll be brought to the following screen, which contains all of the information you need to configure the Braintree Client Library.
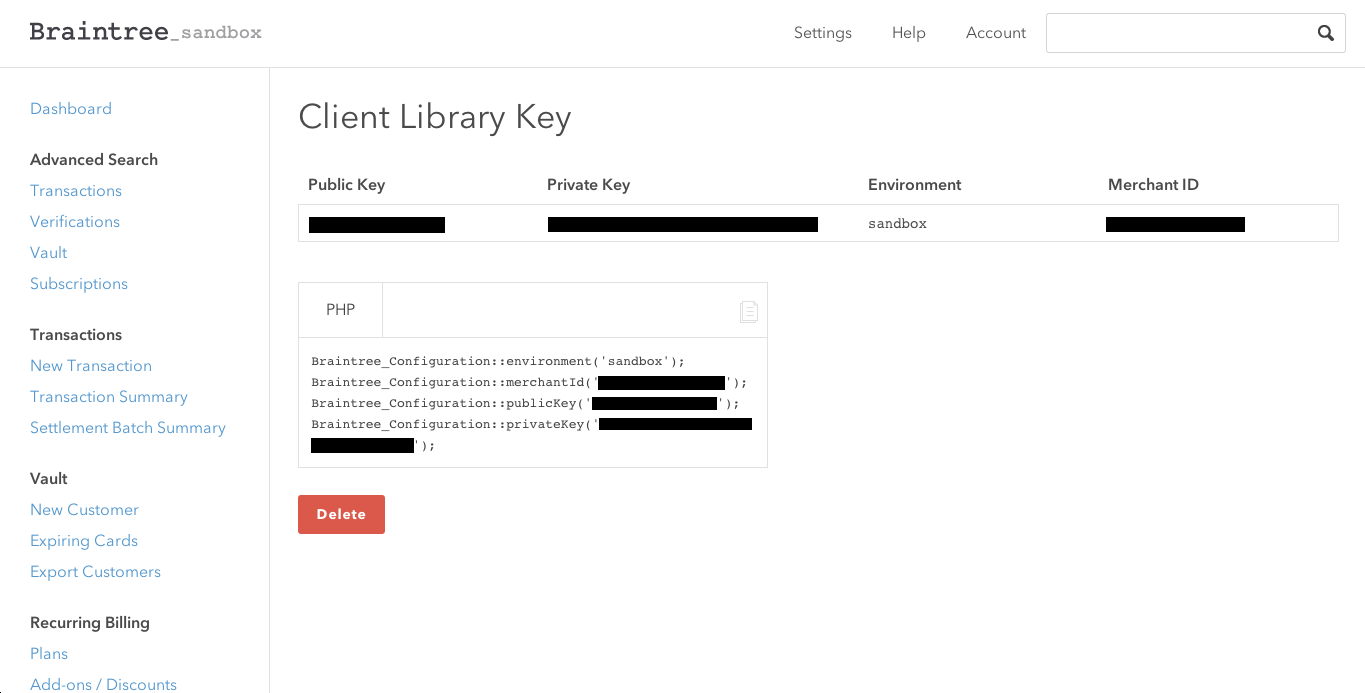
You can see it even has a tool that generates the configuration code for you in a variety of languages.
Now it’s time to install the actual Braintree PHP Client Library. We can do that with Composer by running the following command:
composer require braintree/braintree:*
Transparent Redirect
One of the main factors that helps determine whether you have to fill out SAQ D or SAQ A is whether credit card data is transmitted through your system. And in the beginning of the typical Server to Server (S2S) model, your web server would send a payment form to the customer’s browser. After filling out the form, the customer would press submit, which would POST the data back to your web server, which would in turn forward some of that data on to Braintree for validation and processing. That would look something like this:
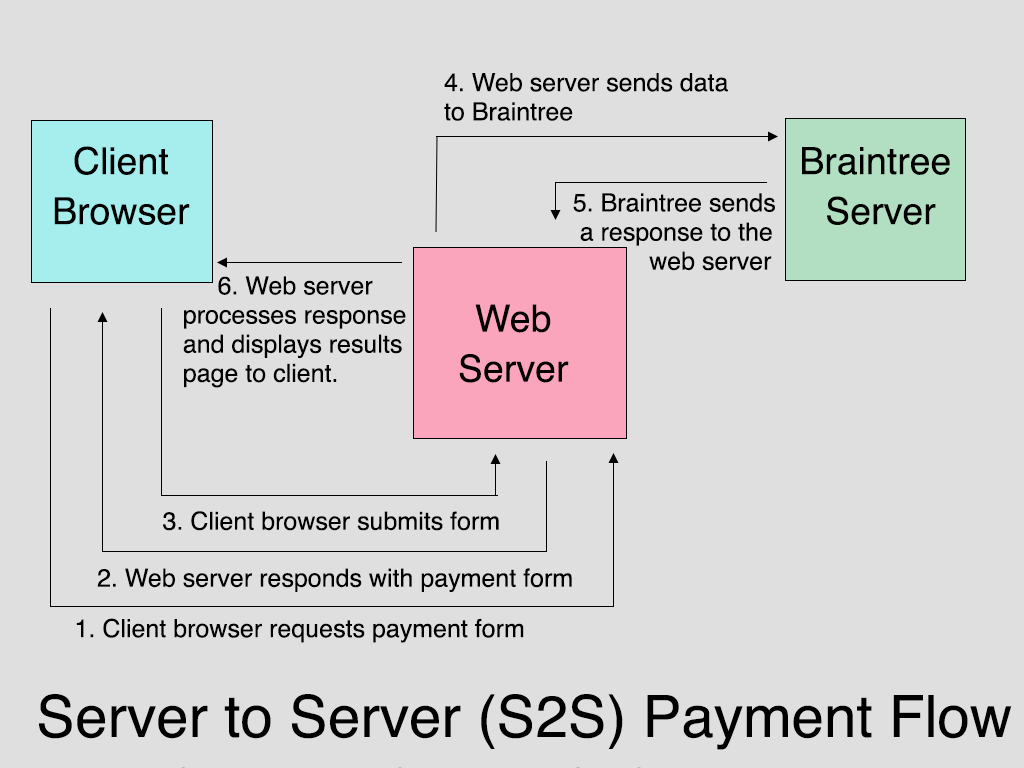
With Transparent Redirect, however, the form action is set so that the form will POST directly to Braintree’s servers, and the response is sent back to the client browser. The browser is then redirected to a script on the web server using an HTTP 303 redirect. Finally, the web server script confirms the transaction with Braintree, and presents the results to the client browser. So that model looks more like this:

Now that we have the theory under our belt, let’s go ahead and write some code. Those of you who would like to see the complete version can find it on Github.
The first thing we’re going to do is create a very basic HTML form so that we can enter some data to send to Braintree for processing. I’m going to make this as simple as possible so we can focus on functionality.
    <!doctype html>

	<html lang="en">

		<body>

		    <div id="wrap">

		        <form method="post" action="" autocomplete="off">

		            <label>Name on Card: <input type="text" name="transaction[credit_card][cardholder_name]"></label>

					<label>Card Number: <input type="text" name="transaction[credit_card][number]"></label>

					<label>CVV: <input type="text" name="transaction[credit_card][cvv]" class="short"></label>

					<label>Expiration Date (MM/YYYY): <input type="text" name="transaction[credit_card][expiration_date]" class="short"></label>

					<input type="submit" value="submit payment">

			    </form>

		    </div>

		</body>

	</html>
There’s nothing complicated going on here. The only thing that you’ll notice is that the input field names are in array format. You can see a full list of valid field names here. The other thing that I’ll point out from that page is that if you are using a framework that has issues with using arrays for input names (I’m looking at you, Zend Framework!), then you can use an alternate double underscore syntax. So your expiration date input would look like this:
<input type="text" name="transaction__credit_card__expiration_date">
The only other thing you may notice is that I’ve added an “autocomplete” attribute to my form, and set its value to off. Braintree recommends doing this, and I hope the reason for this is obvious…
There are a few other things we need to do in order to harness the magic of Transparent Redirect on our form. But before we do that, we need to configure our script to work with Braintree’s API.
Before I tell you how to do that, I’m going to just mention that, for the sake of clarity, I’ve put all of the PHP and HTML in the same file in my sample code. I hope it goes without saying that in a production project that the setup code would go in my project’s bootstrap file, and that the form processing code would go into a controller action or other separate file. OK, enough apologizing – let’s get this thing set up!
	<?php

		require('vendor/autoload.php');
		Braintree_Configuration::environment('sandbox');

	    Braintree_Configuration::merchantId('YOUR_MERCHANT_ID');

	    Braintree_Configuration::publicKey('YOUR_PUBLIC_KEY');

		Braintree_Configuration::privateKey('YOUR_PRIVATE_KEY');
	?>
The first line simply allows us to take advantage of Composer’s autoloader and use Braintree’s library without explicitly including any additional files. Hopefully, the next four lines look familiar, because they were copied verbatim from the Sandbox Control Panel API Key tool that I introduced you to in the previous section. Obviously you’ll replace this with the code from your own Control Panel account.
The next thing I want to do is set the form action so that our customer will send their sensitive data directly to Braintree, which is the whole point of using TR. Fortunately, the Braintree library makes this very easy by providing a helper object/method. So simply modify your form code like so:
<form ... action="<?= Braintree_TransparentRedirect::url()?>">
The only other thing we have to do is create a hidden input which contains a hashed representation of the URL you want Braintree to redirect the customer to after they have submitted the form, as well as any information that you don’t want them to be able to specify. For example, this is where you might put the transaction amount. Just as a matter of style, I like to set the return URL to the payment form itself so that I can display any errors to the user and give them the chance to resubmit. So this is what that would look like:
	$tr_data = Braintree_TransparentRedirect::transactionData([

        'transaction' => [

            'type' => Braintree_Transaction::SALE,

            'amount' => '100.00'

        ],

        'redirectUrl' => 'https://YOUR-DOMAIN.COM/transparent-redirect-form-basic.php'

    ]);
Obviously I’m hard-coding the amount here, but in a production app you would either generate this using some server-side logic, or in the case of a donation form with an unspecified total, you would create a form field and allow the user to provide one. I also usually set the “submit for settlement” option to true. Otherwise this transaction will simply
Now I just need to add this as a hidden field to my form like so:
<input type="hidden" name="tr_data" value="<?=$tr_data?>">
Now that we’re ready to submit our data to Braintree, we need to add some code to process the actual Transparent Redirect response.
	$status = '';

	if(isset($_GET['http_status']) && $_GET['http_status'] == '200') {

		try {

            $result = Braintree_TransparentRedirect::confirm($_SERVER['QUERY_STRING']);

            if ($result->success) {

                $status = 'Your transaction was processed successfully.';

            } else {

                $status = $result->message;

            }

        } catch (Braintree_Exception_NotFound $e) {

            $status = 'Due to security reasons, the reload button has been disabled on this page.';

        }

	}
Now let’s figure out what we’ve just done. When the user presses the submit button, the form POSTed directly to Braintree, and all of the customer’s sensitive information is stored safely on their PCI CSS compliant servers. Then, an HTTP 303 redirect is sent to the browser, which sends the user to the URL you specified when generating the $tr_data variable, and appends several parameters to the URL’s query string.
When the data is successfully submitted, one of those parameters will be http_status, and if everything is running smoothly with Braintree’s servers, it will be set to 200. Obviously in production you would want to also handle non-200 response codes, but for now we’re just making sure to only execute the code inside this if statement if we have successfully submitted our payment information to their system.
The next thing that happens is that we have to take the query string from our Transparent Redirect and send it back to Braintree to complete the transaction. So we run another library function (Braintree_TransparentRedirect::confirm) and provide it with our URL query string, in order to tell Braintree to go ahead and process our payment. Once that happens, Braintree sends our script back a result object. Internally, that object can either be a Braintree_Result_Error or Braintree_Result_Successful, but both objects have a boolean success property so you can see whether the transaction succeeded or not.
You’ve also probably noticed that I wrapped the entire confirmation in a try/catch block. The one drawback of using the same page to display the form and process the results is that you can only confirm a TR query string once. That means if someone hits the reload button after a failed transaction, your code will try to reconfirm an expired query string, and Braintree will throw an exception.
Now that we have everything we need we can go ahead and run some test transactions. Full documentation on using the Sandbox can be found here, but if you’re really excited and want to run a successful transaction right away, go ahead and enter your name in the “Name on Card”, 4111111111111111 (4 followed by fifteen ones) as a “Card Number” , 123 in the CVV box, and any date in the future as an expiration date. If everything goes well, you should be able to head back to the Sandbox, click “Transactions” under “Advanced Search”, and after clicking the “Search” button, see your first successful transaction.
Getting Fancy
Transparent Redirect is a great way to help minimize your PCI Compliance burden, but it does have a few quirks that you’ll need to get used to. First of all, if you want to include any data on your payment form that doesn’t correspond to one of Braintree’s transactions, customers or credit card objects, then you have to use their “custom field” feature. Let’s say I wanted to capture a user’s favorite color. The first thing I would do is head over to the control panel and click on “Settings -> Processing.” Scroll down to the “Custom Fields” section and click “New.” You’ll find yourself on the following screen:
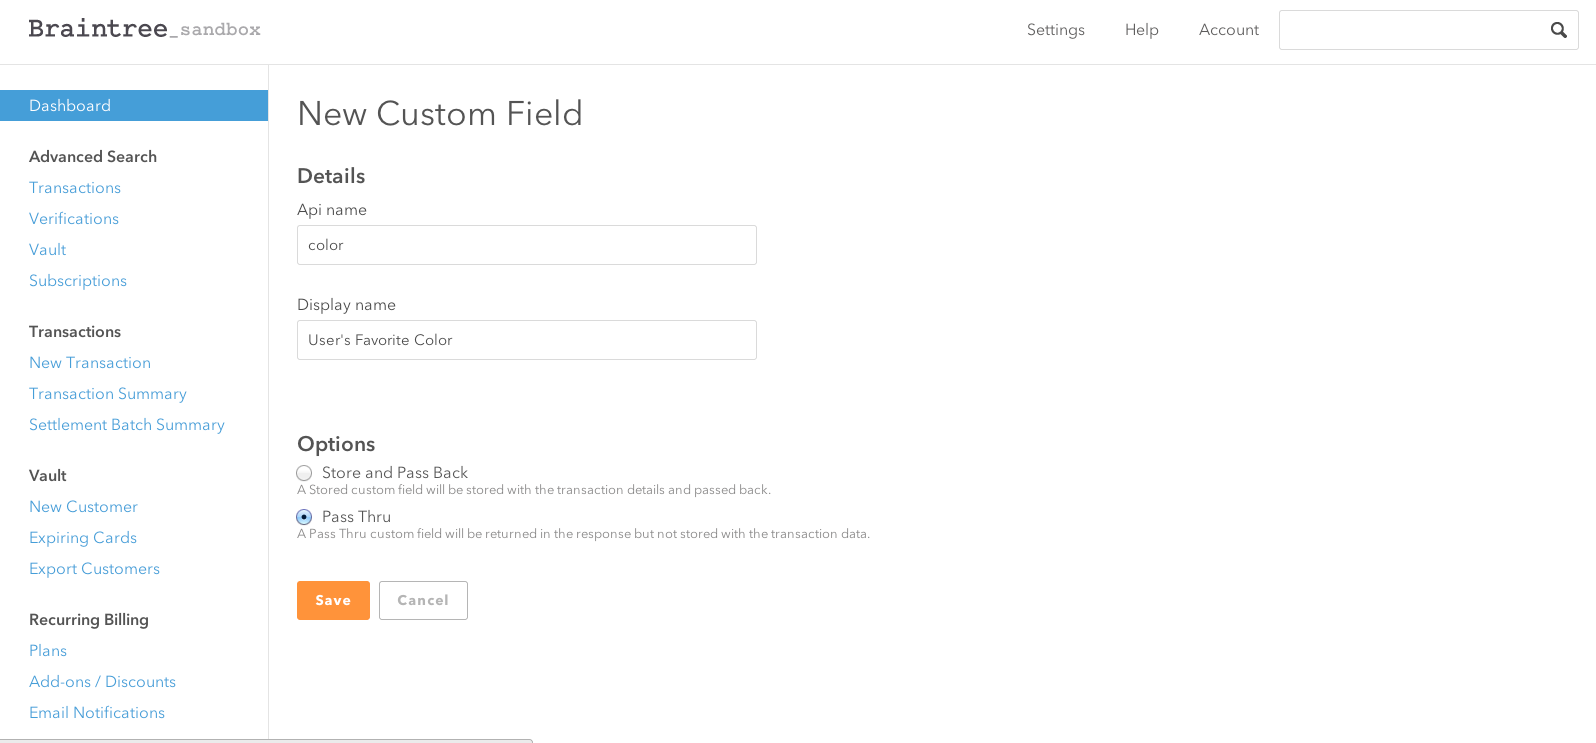
The Api name is what you will reference in the form input’s name attribute. The display name is for your reference, and you can specify whether you want to store your custom field’s value on Braintree with your transaction, or simply pass it back to your server.
Collecting it is then simply a matter of adding the following field to your form.
<label>Customer Favorite Color: <input type="text" name="transaction[custom_fields][color]"></label>
If you tried to do that without adding the custom field in the Braintree Control panel, you would trigger a validation error.
Speaking of validation, TR can complicate server-side validation of your payment form. Let’s say I wanted to require my customer’s email address. I wouldn’t know that the user had left it blank until after the transaction had already been confirmed. The solution I have found is to run my validation in the success block of my TR script, and then void the transaction if my validations don’t pass. So that would alter our code like this:
	if ($result->success) {

		// transaction was successful, but email is missing

	    if ($result->transaction->customer['email'] == '') {

	        Braintree_Transaction::void($result->transaction->id);

            $status = 'Email address is a required field';

		} else {

	        $status = 'Your transaction was processed succesfully.';

        }

	}
As you can see, if my local validations don’t pass, I use the client library to void the transaction, using the transaction id from my Braintree_Result_Success object.
Finally, in our basic example, I didn’t bother repopulating form fields for the user, because all of our fields contain sensitive credit card data that Braintree hides from our server. But now that we’ve added some customer data, I can pre-fill those less sensitive fields with data from the Braintree result object. You can see the full code in my Github sample, but the trick to understanding what’s going on is to know that the Braintree_Result_Success object stores the user-submitted form data in its transaction property, whereas the Braintree_Result_Error stores it in a params property. So for instance, the first name variable would found in $result->transaction->customer['firstName'] when the transaction was successful, while a failed transaction would store it in $result->params['transaction']['customer']['firstName'].
Wrapping Up
Braintree’s Transparent Redirect is one way to minimize your application’s exposure to sensitive customer data, thereby reducing your PCI Compliance burden, and their PHP Client Library greatly simplifies the process of integration, but it does make it more difficult to collect and validate non payment-related information on the same form as your customer’s credit card information.
Next time, we’ll take a look at their other clever solution: Braintree.js.
Frequently Asked Questions about Transparent Redirects
What is the main purpose of using transparent redirects in payment processing?
Transparent redirects are used in payment processing to enhance the security of transactions. They allow the customer’s sensitive data to be sent directly to the payment gateway, bypassing the merchant’s server. This reduces the risk of data breaches and helps merchants comply with Payment Card Industry Data Security Standards (PCI DSS).
How does a transparent redirect work in the context of website optimization?
In website optimization, a transparent redirect can help reduce the number of HTTP requests, thereby improving the site’s loading speed. When a user visits a webpage, the server sends an HTTP response with a status code. If the status code indicates a redirect, the browser has to make an additional HTTP request, which can slow down the loading time. A transparent redirect can eliminate this extra step, making the website faster and more efficient.
What is the difference between a transparent redirect and a traditional redirect?
A traditional redirect involves the merchant’s server in the transaction process, which can expose sensitive customer data to potential security risks. On the other hand, a transparent redirect bypasses the merchant’s server and sends the data directly to the payment gateway, enhancing the security of the transaction.
How can I implement a transparent redirect on my website?
Implementing a transparent redirect requires some technical knowledge. You’ll need to integrate your website with the payment gateway’s API. This involves setting up a form on your website that posts the customer’s payment information directly to the gateway. The gateway then processes the transaction and sends a response back to your website.
What are the benefits of using a transparent redirect?
The main benefits of using a transparent redirect are enhanced security and improved website performance. By bypassing the merchant’s server, a transparent redirect reduces the risk of data breaches. It also helps improve the loading speed of your website by reducing the number of HTTP requests.
Are there any drawbacks to using a transparent redirect?
One potential drawback of using a transparent redirect is that it can be more complex to implement than a traditional redirect. It requires a deeper understanding of web development and payment gateway APIs. However, the enhanced security and performance benefits often outweigh this challenge.
Is a transparent redirect compatible with all payment gateways?
Not all payment gateways support transparent redirects. It’s important to check with your payment gateway provider to see if they offer this feature. Some popular payment gateways that support transparent redirects include Braintree, Bluefin, and PayPal.
How does a transparent redirect affect the user experience?
From a user’s perspective, a transparent redirect is seamless. The user simply enters their payment information on the merchant’s website and clicks “Submit”. The redirect happens in the background, so the user doesn’t notice any difference compared to a traditional transaction process.
Can a transparent redirect help with PCI compliance?
Yes, a transparent redirect can help with PCI compliance. By sending the customer’s payment information directly to the payment gateway, a transparent redirect reduces the scope of PCI compliance for the merchant. This can make it easier for merchants to meet the stringent security standards set by the Payment Card Industry.
What happens if a transparent redirect fails?
If a transparent redirect fails, the transaction will not be processed. The exact response will depend on the payment gateway’s API. In most cases, the gateway will send an error message back to the merchant’s website, which can then be displayed to the user. It’s important to handle these errors gracefully to ensure a good user experience.