


We previously demonstrated the proper way to get started with Sulu CMS by setting up a Hello World installation on a Vagrant machine. Simple stuff, but can be tricky.
If you’re a stranger to Vagrant and isolated environments, our excellent book about that very thing is available for purchase.
This time we’ll look into basic Sulu terminology, explain how content is formed, created, stored, and cached, and look into building a simple online magazine with different locales (languages).
![]()
Recommended reading before you continue:
- Setting up Isolated Development Environments for PHP – 5 minute read
- Getting started with Sulu on Vagrant the Right Way – 10 minute read
Key Takeaways
- Utilize Sulu CMS for setting up a multi-language online magazine, leveraging its support for various locales and customizable page templates.
- Configure page templates using a combination of Twig for rendering and XML for structure definitions to effectively manage content in multiple languages.
- Implement caching strategies to optimize content delivery, ensuring changes are reflected immediately during development by adjusting environment variables and cache settings.
- Install and configure the ArticleBundle for managing large volumes of articles, necessary for a magazine format, while addressing the technical requirements of ElasticSearch for search functionality.
- Set up a multi-locale environment by editing the webspace file to add new languages, ensuring each locale is properly initialized with the Sulu document management system.
- Enhance user experience by creating a language switcher in the UI, allowing easy navigation and interaction across different language versions of the magazine.
Pages and Page Templates
A page is exactly what you’d expect it to be: a block of content, often composed of smaller blocks. A page template is a two-part recipe for how a page is assembled.
A page template has two parts: the twig template, and the XML configuration. The Twig part is responsible for rendering the content of the page’s sub-blocks, like so:
{% extends "master.html.twig" %}

{% block meta %}
    {% autoescape false %}
        {{ sulu_seo(extension.seo, content, urls, shadowBaseLocale) }}
    {% endautoescape %}
{% endblock %}

{% block content %}
    <h1 property="title">{{ content.title }}</h1>

    <div property="article">
        {{ content.article|raw }}
    </div>
{% endblock %}
This is the full content of the default twig template that comes with sulu-minimal, found at app/Resources/Views/Templates/default.html.twig. It extends a master layout, defines some blocks, and renders their content.
The XML configuration on the other hand is a bit more convoluted (as most things with XML are):
...
    <key>default</key>

    <view>templates/default</view>
    <controller>SuluWebsiteBundle:Default:index</controller>
    <cacheLifetime>2400</cacheLifetime>

    <meta>
        <title lang="en">Default</title>
        <title lang="de">Standard</title>
    </meta>

    <properties>
        <section name="highlight">
            <properties>
                <property name="title" type="text_line" mandatory="true">
                    <meta>
                        <title lang="en">Title</title>
                        <title lang="de">Titel</title>
                    </meta>
                    <params>
                        <param name="headline" value="true"/>
                    </params>

                    <tag name="sulu.rlp.part"/>
                </property>

...
If you’re new to Sulu, none of this will make sense yet – but we’ll get there. For now, we’re introducing concepts. The main takeaways from the above snippet of XML are:
- the
keyis the unique slug of the template, and its entry into the admin template selection menu (it must be identical to the filename of the xml file, without the extension). - the
viewis where itstwigcounterpart can be found. A template will only appear in the menu if it has both the XML and corresponding Twig file! - the controller is where its logic is executed. We’ll go into more detail on controllers later on, but in general you can leave this at its default value for simple content.
- meta data is how the template will appear in the admin template selection menu, depending on the language selected in the UI:
- properties are various elements of the page – in this case, a field to input a title and a non-editable URL field
You define new page types (templates) by defining new combinations of properties in this XML file, and then rendering them out in the corresponding twig file.
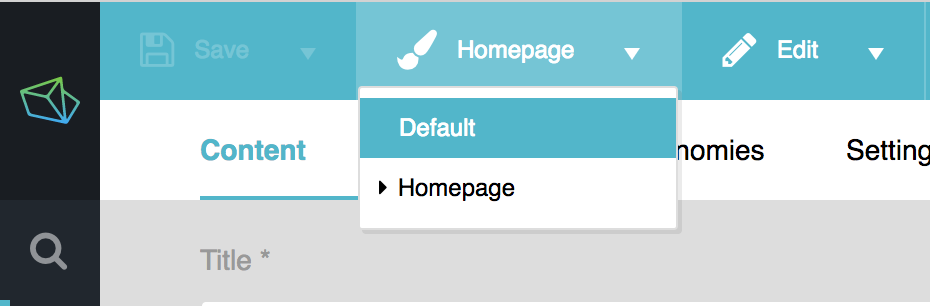
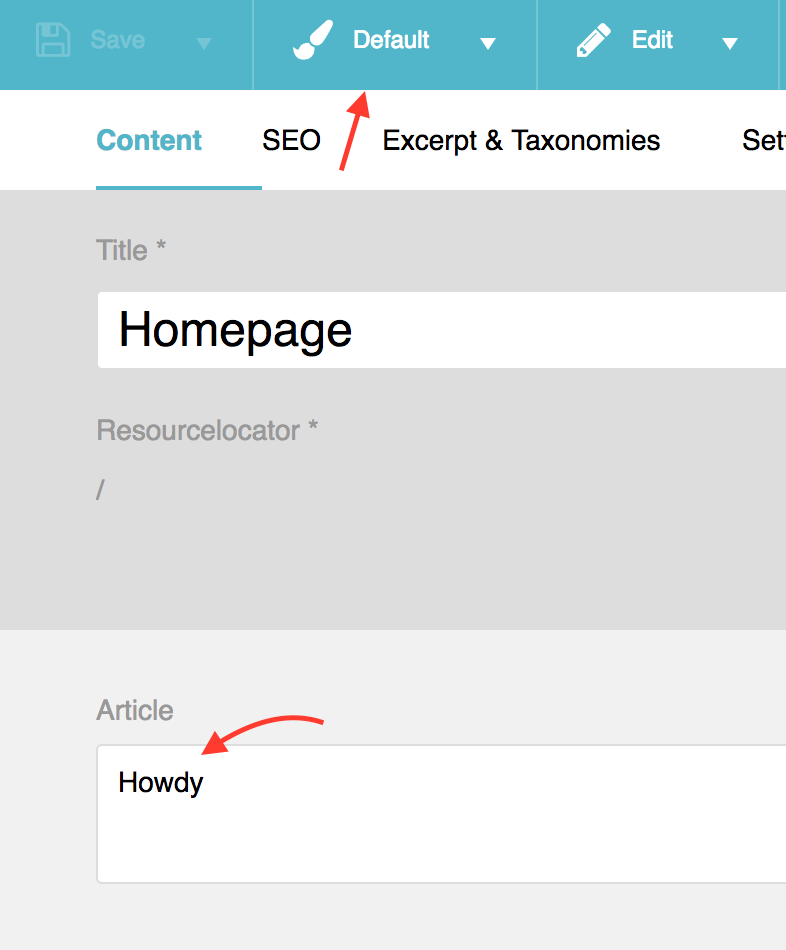
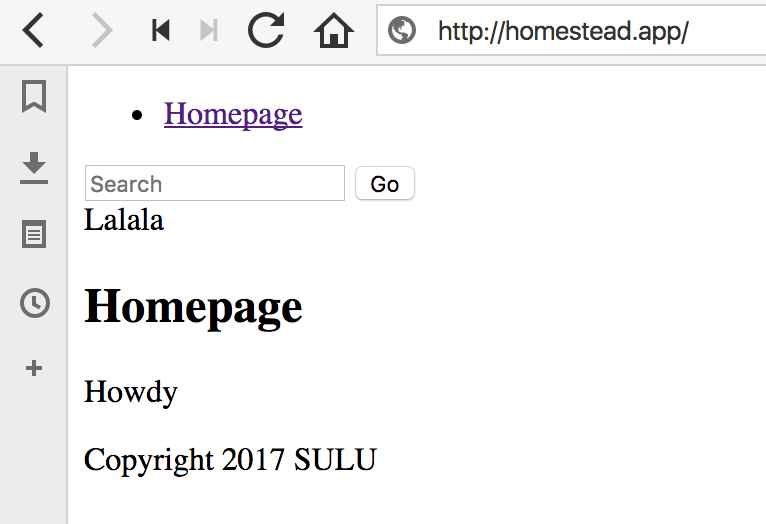
As an experiment, try using the menu in the admin interface to switch the Homepage to the Default template, then in the master.html.twig layout file (one folder above), add nonsense into the HTML. Feel free to also populate the article property in the UI.
...
        <form action="{{ path('sulu_search.website_search') }}" method="GET">
            <input name="q" type="text" placeholder="Search" />
            <input type="submit" value="Go" />
        </form>
Lalala
        <section id="content" vocab="http://schema.org/" typeof="Content">
            {% block content %}{% endblock %}
        </section>
...
If you click Save and Publish in the top left corner now and refresh the homepage, you should see the changes.
For the curious: you may be wondering why they took the XML route instead of having users manage everything in the database. Reason one is being able to version-control these files. Reason two is that even if one were to add a property in a GUI, it would still be missing from the twig template. At that point, they would either have to make twig templates editable in the GUI via a DB too, or the user would again be forced to edit files – and if they’re already editing them, they may as well edit XML files.
Pages vs Themes
So what’s a theme in all this?
A theme is a collection of page types. Contrary to popular belief, a theme is not a master layout which is then extended by the page template twigs – it’s a whole collection of page templates and master layouts to use. A theme will also contain all the necessary assets to fully render a site: CSS, JS, images, fonts, and more.
For the curious: We won’t be dealing with themes in this tutorial but feel free to read up on them here.
About Caching
If the homepage content doesn’t change when you modify it and refresh, it might have something to do with cache. Here are important things to keep in mind:
- during development, your server setup should set Symfony development environment variables. This allows you to deploy the app directly to production without modifying the environment value manually in files like
web/admin.phporweb/website.php, and makes your app highly debuggable in development. The values areSYMFONY_ENVandSYMFONY_DEBUG, and are automatically set if you’re using Homestead Improved. If not, copy them over from here if you’re on Nginx. - the command line of Symfony apps (so, when using
bin/adminconsoleorbin/websiteconsolein the project) defaults to thedevenvironment. In order to execute commands for another environment, pass the--env=flag with the environment to match, like so:bin/adminconsole cache:clear --env=prod. This might trip you up if your app is inprodmode and you’re trying to clear cache but nothing is happening – could be the environments don’t match, and the command is clearing the wrong cache.
An Online Magazine
Let’s consider wanting to launch an online magazine. By definition, such a magazine has:
- pages that explain things, like “About”, “Contact”, “Careers”, etc.
- many articles, often grouped by month (as evident by the common URL pattern: mysite.com/05/2017/some-title-goes-here)
- different permissions for different staff member levels (author, editor, guest, admin…)
- a media library in which to store static files for inclusion in posts and pages (images, CSS, JS, etc.)
These are all things Sulu supports, with a caveat. When building something like this, we need keep storage in Sulu in mind.
Jackawhat?
This section might sound confusing. There’s no way to make it easier to understand. Be comforted by the fact that you don’t need to know anything about it at all, and treat it as “for those who want to know more” material.
Jackalope is a PHP implementation of PHPCR which is a version of JCR. The rabbit hole is very deep with these terms, so I recommend avoiding trying to learn more about them. If you insist, it’s somewhat covered in this gist.
In a nutshell, if you don’t need to version your content, you’re fine with the default Jackalope-Doctrine-DBAL package that Sulu pulls in automatically. It’ll store content in a usual RDBMS (e.g. MySQL) but without versions.
If you do need versioning, you need to install Jackrabbit – an Apache product that’s basically a database server with a non-obvious twist, and use a different PHP implementation to store the content: Jackalope-Jackrabbit (also pulled in automatically). Note that an RDBMS is still needed – Jackrabbit merely augments it by providing a different storage mechanism for the actual content, but permissions, settings, etc. are still stored in a regular database.
The catch is that Jackrabbit (and PHPCR in general) has a limit of 10000 children per node. Since articles on online magazines and blogs are usually sequential and don’t have a hierarchy (i.e. they’re flat), they would end up being children of “root”, and after 10k posts you’d be in trouble.
This is why the Sulu team have developed a bundle which will auto-shard content by month and emulate a flat structure. By setting each month as a parent, each month can have 10000 posts. If need be, this can be further fragmented by week, or even by day. Keep this in mind:
The ArticleBundle is a prerequisite if you’re building a news site, blog site, or magazine because otherwise, after 10000 units of content, you’d be in trouble.
Note: The ArticleBundle is currently under heavy development, and is likely to have some API changes before a 1.0 release. Use with caution.
Okay, let’s install the ArticleBundle to get support for our online magazine website.
ElasticSearch
Unfortunately, the bundle requires ElasticSearch, which could be more straightforward to install. If you’re using Ubuntu 16.04 (like our Homestead Improved box):
sudo add-apt-repository ppa:webupd8team/java
sudo apt-get update
sudo apt-get install oracle-java8-installer
After it’s done (it’ll take a while, as anything with Java), the newly installed version should be set as default on Ubuntu. Elsewhere, you can configure it with:
sudo update-alternatives --config java
Finally, set the JAVA_HOME environment variable permanently by editing /etc/environment and adding the line JAVA_HOME="/usr/lib/jvm/java-8-oracle" to the top or bottom of it. Reload this file with source /etc/environment.
Java is now ready, but we still have to install ES.
wget -qO - https://artifacts.elastic.co/GPG-KEY-elasticsearch | sudo apt-key add -
sudo apt-get install apt-transport-https
echo "deb https://artifacts.elastic.co/packages/5.x/apt stable main" | sudo tee -a /etc/apt/sources.list.d/elastic-5.x.list
sudo apt-get update && sudo apt-get install elasticsearch
sudo service elasticsearch start
Phew.
Note: Due to RAM requirements, ES takes a while to start up, even if the command executes immediately, so wait a while before trying to curl http://localhost:9200 to test it. If it doesn’t work after a minute or so, go into /etc/elasticsearch/elasticsearch.yml, uncomment network.host and set it to 0.0.0.0. Then restart ES, wait a minute, and try curling again.
ArticleBundle
Now we can finally install the bundle.
Note: At the time of writing, ArticleBundle is in an experimental state, and Sulu itself is undergoing an RC process. To work with the latest versions of these two main packages, I recommend the following composer.json setup:
...
"sulu/sulu": "dev-develop as 1.6.0-RC1",
"sulu/article-bundle": "dev-develop"
...

...
  "repositories": [
    {
      "type": "vcs",
      "url": "https://github.com/sulu/SuluArticleBundle"
    },
    {
      "type": "vcs",
      "url": "https://github.com/sulu/sulu"
    }
  ],
...

...
    "minimum-stability": "dev",
    "prefer-stable": true
...
Then, install things with composer install, or update with composer update if you’re already working on a running installation. Once both packages are stable, the bundle will be installable via:
composer require sulu/article-bundle
Now that the bundle is downloaded, we need to add it to the AbstractKernel.php file:
new Sulu\Bundle\ArticleBundle\SuluArticleBundle(),
new ONGR\ElasticsearchBundle\ONGRElasticsearchBundle(),
In app/config/config.yml we add the following (the sulu_core section should be merged with the existing one):
sulu_route:
    mappings:
        Sulu\Bundle\ArticleBundle\Document\ArticleDocument:
            generator: schema
            options:
                route_schema: /articles/{object.getTitle()}

sulu_core:
    content:
        structure:
            default_type:
                article: "article_default"
                article_page: "article_default"
            paths:
                article:
                    path: "%kernel.root_dir%/Resources/templates/articles"
                    type: "article"
                article_page:
                    path: "%kernel.root_dir%/Resources/templates/articles"
                    type: "article_page"

ongr_elasticsearch:
    managers:
        default:
            index:
                index_name: su_articles
            mappings:
                - SuluArticleBundle
        live:
            index:
                index_name: su_articles_live
            mappings:
                - SuluArticleBundle

sulu_article:
    documents:
        article:
            view: Sulu\Bundle\ArticleBundle\Document\ArticleViewDocument
    types:

        # Prototype
        name:
            translation_key:      ~

    # Display tab 'all' in list view
    display_tab_all:      true
Then, in app/config/admin/routing.yml, we add routes:
sulu_arictle_api:
    resource: "@SuluArticleBundle/Resources/config/routing_api.xml"
    type: rest
    prefix: /admin/api

sulu_article:
    resource: "@SuluArticleBundle/Resources/config/routing.xml"
    prefix: /admin/articles
Add example templates. For templates/articles/article_default.xml:
<?xml version="1.0" ?>
<template xmlns="http://schemas.sulu.io/template/template"
          xmlns:xsi="https://www.w3.org/2001/XMLSchema-instance"
          xmlns:xi="https://www.w3.org/2001/XInclude"
          xsi:schemaLocation="http://schemas.sulu.io/template/template http://schemas.sulu.io/template/template-1.0.xsd">

    <key>article_default</key>

    <view>articles/article_default</view>
    <controller>SuluArticleBundle:WebsiteArticle:index</controller>
    <cacheLifetime>144000</cacheLifetime>

    <meta>
        <title lang="en">Default</title>
        <title lang="de">Standard</title>
    </meta>

    <tag name="sulu_article.type" type="article"/>

    <properties>
        <section name="highlight">
            <properties>
                <property name="title" type="text_line" mandatory="true">
                    <meta>
                        <title lang="en">Title</title>
                        <title lang="de">Titel</title>
                    </meta>
                    <params>
                        <param name="headline" value="true"/>
                    </params>
                </property>

                <property name="routePath" type="route">
                    <meta>
                        <title lang="en">Resourcelocator</title>
                        <title lang="de">Adresse</title>
                    </meta>
                </property>
            </properties>
        </section>

        <property name="article" type="text_editor">
            <meta>
                <title lang="en">Article</title>
                <title lang="de">Artikel</title>
            </meta>
        </property>
    </properties>
</template>
For views/articles/article_default.html.twig:
{% extends "master.html.twig" %}

{% block content %}
    <h1 property="title">{{ content.title }}</h1>

    <div property="article">
        {{ content.article|raw }}
    </div>
{% endblock %}
Finish initialization:
php bin/console assets:install # this installs JS, CSS, etc for the UI. Defaults to hard copy, if you want symlinks use `--symlinks`
php bin/console sulu:translate:export # creates translations
php bin/console sulu:document:init # initializes some PHPCR nodes
php bin/console ongr:es:index:create # initializaes the elasticsearch index
Add permissions: in the Admin UI, go to Settings -> User Roles. Select the User role, and scroll down to “Articles”. Select all, save, and refresh the UI to see the changes. The “Articles” option should now appear in the left menu.
Note: If you see the loader spinning indefinitely on this screen, it’s possible your ElasticSearch server powered down because of a lack of RAM on the VM (lack of notification about this has been reported as a bug). ES is very resource intensive, and just running it idle will waste approximately 1.5GB of RAM. The solution is to either power up a machine with more RAM or to restart the ES instance with sudo service elasticsearch start. You can always check if it’s running with sudo service elasticsearch status.
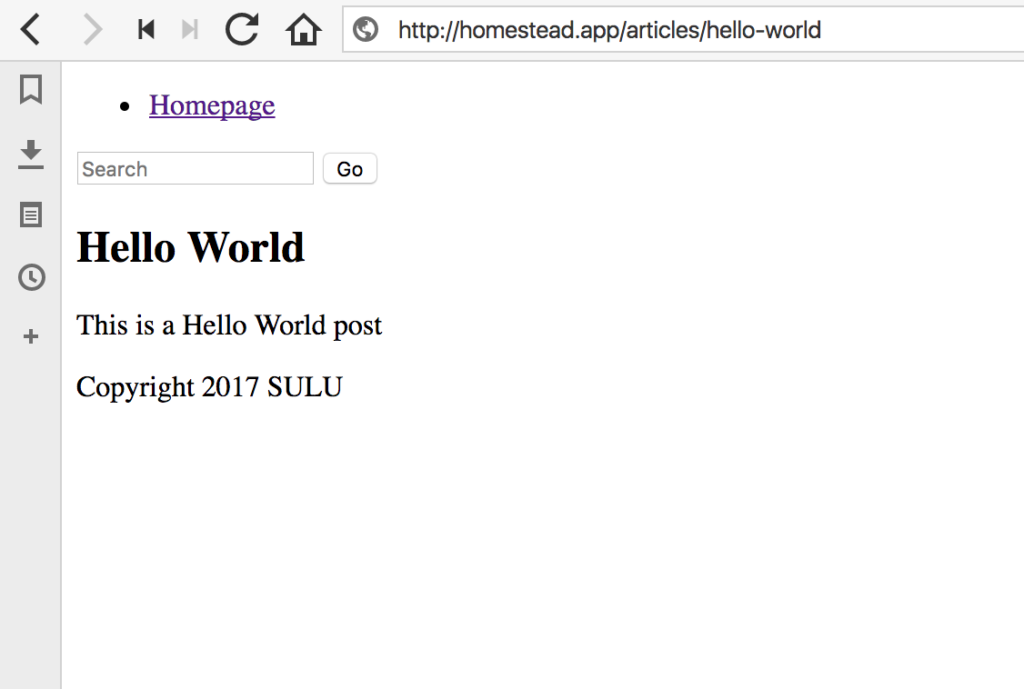
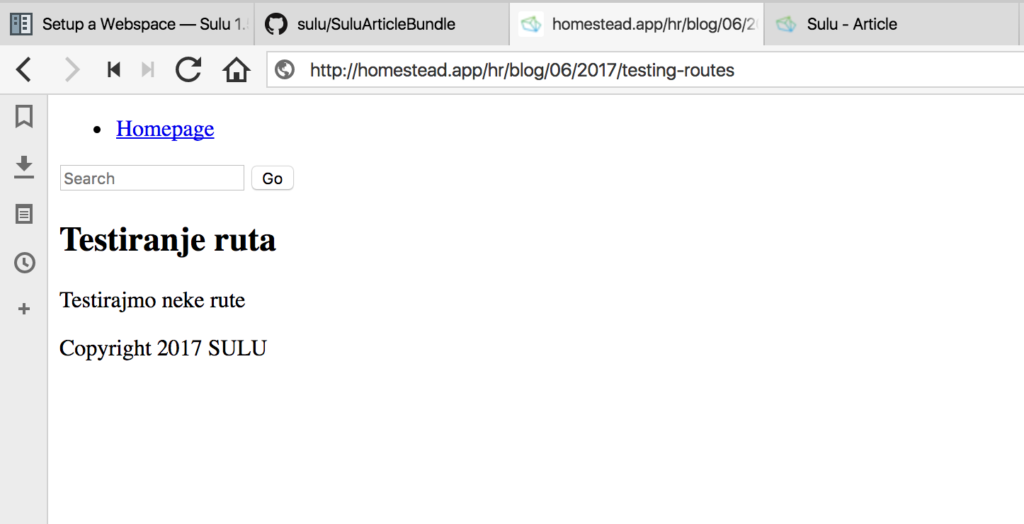
Try writing an example Hello World post and publishing it. It should appear at the url /articles/hello-world if you titled it Hello World.
URL Schemes
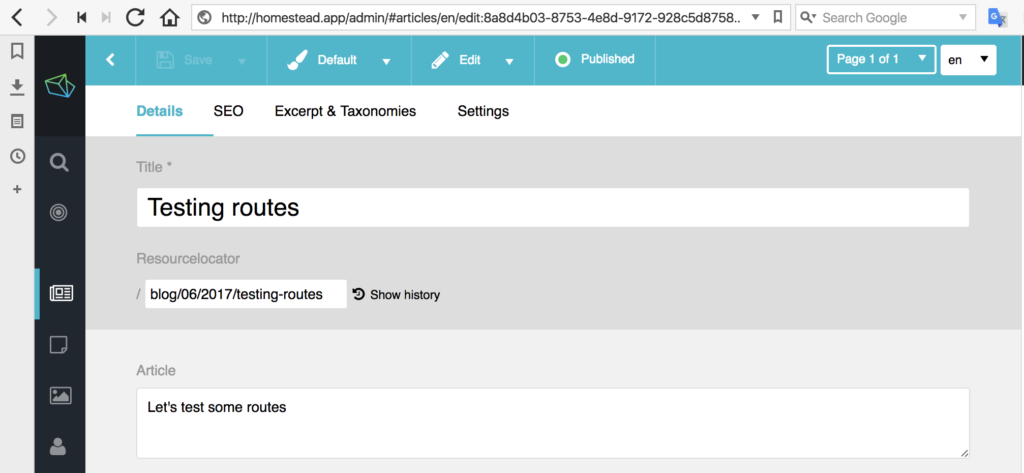
The default route setup, as seen in config.yml previously, is articles/{object.getTitle()} for articles. And sure enough, when generated, our article has this URL scheme. But what if we want something like /blog/06/2017/my-title? It’s easy enough to change. Modify config.yml so that route_schema is changed from:
/articles/{object.getTitle()}
to
/blog/{object.getCreated().format('m')}/{object.getCreated().format('Y')}/{object.getTitle()}
The route fragments between curly braces are being eval’d, and full-stops are being interpreted as method accessors, so, for example, object.getCreated().format('Y') turns into object->getCreated()->format('Y').
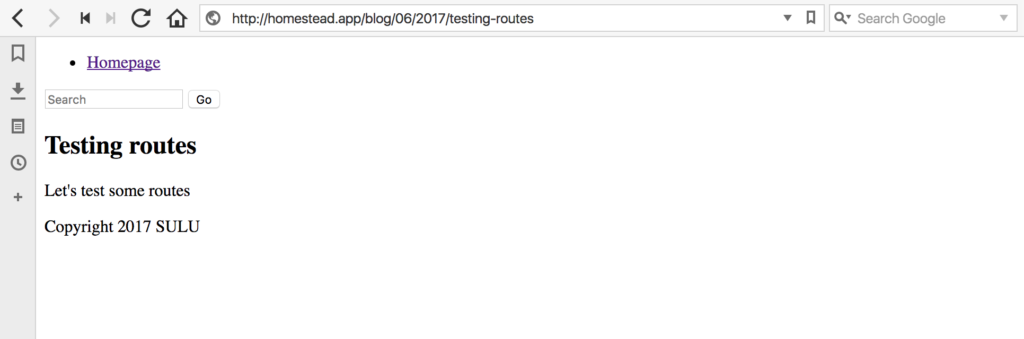
If we try saving a new post now and leaving the resource locator field blank (so that it autogenerates), we get the new route format nicely generated:
Locales
Let’s set up a different language of our site now – we want to cover a wide market, so we’ll build our UI and our content in two languages, when applicable. To add a new language, we edit the webspace file in app/Resources/webspaces. Under localizations, all we need to do is add a new locale:
    <localizations>
        <localization language="en" default="true"/>
        <localization language="hr"/>
    </localizations>
HR is for Hrvatski, which is the local name for the Croatian language.
Refreshing the Admin UI now shows a new option in the language selector:

Before we can use this, we must allow the current user to manage this locale. Every locale is by default disallowed for every existing user. To let the current user edit this locale, we go to Contacts -> People -> [YOUR USER HERE] -> Permissions, and under locale we select the new locale, then save and reload the Admin UI.
A Word of Warning
After this is done, we MUST run the following console command:
php bin/adminconsole sulu:document:initialize
This will initialize the PHPCR documents for the new locale. This CANNOT be done after you already create content for the new locales or things will break.
Remember to run the
sulu:document:initializecommand after every locale-related webspace change!
If you ever forget and end up creating content after a locale was added but before the initialize command was run, the following commands will delete all content related to that locale (so use with care!) and allow you to restart the locale (replace hr in the commands with your own locale identifier(s)).
php bin/adminconsole doctrine:phpcr:nodes:update --query "SELECT * FROM [nt:base]" --apply-closure="foreach(\$node->getProperties('i18n:hr-*') as \$hrNode) {\$hrNode->remove();};"
php bin/websiteconsole doctrine:phpcr:nodes:update --query "SELECT * FROM [nt:base]" --apply-closure="foreach(\$node->getProperties('i18n:hr-*') as \$hrNode) {\$hrNode->remove();};"
php bin/adminconsole sulu:document:initialize
A discussion on how to best warn people about this in the UI is underway.
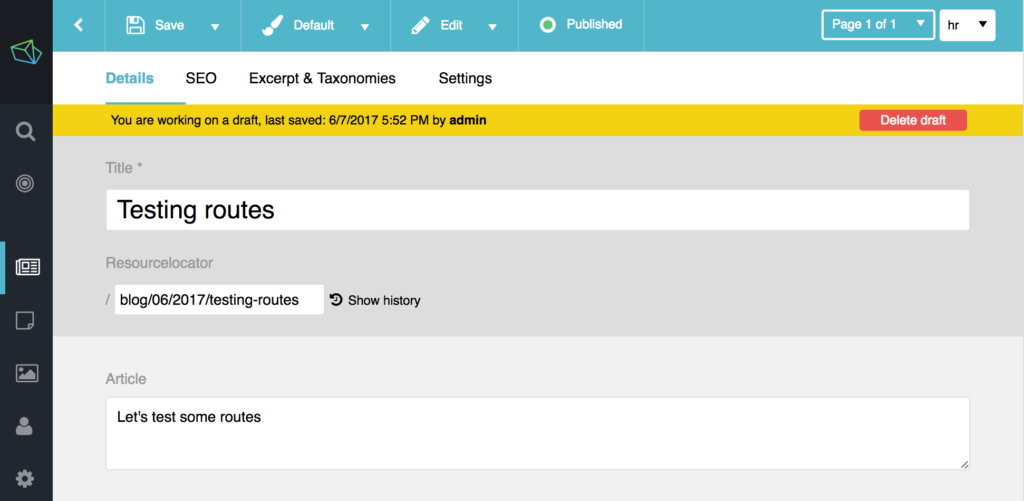
Back to articles now. When on an existing article, switching the locale will summon a popup which lets you either create a new blank article in this language, or create a new article with content that exists in another language (in our case en). Let’s pick the latter.
The resulting article will be a draft copy of the one we had before.
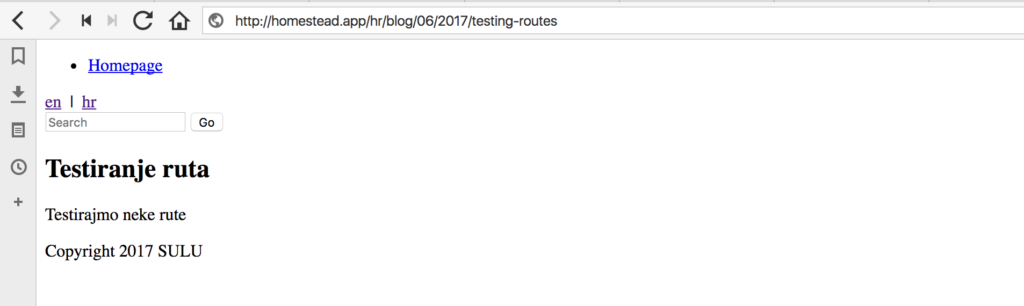
You’ll notice that the URL is the same for this post as it is for its English counterpart. This means we can’t visit it in the browser unless we switch the locale, but we don’t have any kind of locale switcher.
Webspaces and Locales
If you look at the webspace file again, you’ll notice there are portals at the bottom. Portals are like sub-sites of webspaces. In most cases, portals and webspaces will have a 1:1 relationship, but we use portals to define URL routes for different environments. The default sets a specific language via an attribute, and defines the root of all our URLs as merely {host}. Ergo, we get homestead.app in the screenshots above, appended by things like /articles/something or /hello-world.
To get our different languages to render, we need to change this section. Replace every <url language="en">{host}</url> with <url>{host}/{localization}</url>. This will produce URLs in the form of homestead.app/en/hello-world.
Sure enough, we can now manually switch locale by prefixing all URLs with the locale identifier. It’d be easier if we could just flip a literal switch on the page, though, wouldn’t it?
Theming for Locales
Let’s modify our layout so that we have an actual language selector on screen that we can use to change the site’s language.
In app/Resources/views/master.html.twig, we’ll make the following modification. Right above the form, we’ll put this:
        <div>
            {% for locale, url in urls %}
                {% set extra="/"~request.locale %}
                <a href="{{ sulu_content_path((url|replace({(extra): ""})?:'/'),request.webspaceKey,locale) }}">{{ locale }}</a>
                {% if not loop.last %} | {% endif %}
            {% endfor %}
        </div>
If we look at the docs, we’ll notice that there’s a urls variable. The urls variable is an associative array from the webspace configuration, containing the URLs of all locales with locales as keys and URLs for values, so we iterate through them. Since we only have one per environment defined, Sulu auto-generates as many as there are locales, blending them with the URL schema defined in the url key.
The URLs contain the language prefix (currently a bug), so we need to strip that. We define this part as extra in Twig ("/"~request.locale means “merge / and request.locale“).
Then, we use the sulu_content_path helper function from vendor/sulu/sulu/src/Sulu/Bundle/WebsiteBundle/Twig/Content/ContentPathTwigExtension.php to feed it the current URL, stripped of the extra content we defined one line above. Additional arguments include the webspace key so it knows where to look for route values to generate, and the locale which to prepend to the content path when returning a new one. Don’t be confused by the ?:'/' part – that’s just a ternary IF which sends along the root route as the parameter (/) if there is no url.
Finally, we check if this is the last element in the for loop, and if it is, we don’t echo the pipe character, thereby creating a separator all up until the last element.
We now have a language switcher in our master layout, and can switch to and from English and Croatian easily.
Using this same approach, the language can be turned into a dropdown or any other desired format.
What We Do in the Shadows
Finally, we need to do something about the missing translations for pages. If we visit the Homepage while on the hr locale, Sulu will throw a 404 error because that page doesn’t exist in Croatian. Because some pages might not have translations, we want to load an alternative from a secondary language when they’re accessed – the audience may be bilingual and it’d be a shame to discriminate against them just because we don’t have matching content yet.
We do this with shadow pages in Sulu. To turn our Croatian version of the Homepage into a shadow page, we do the following:
- go to the homepage edit screen in the Admin UI while locale is set to English
- switch locale and pick “Empty page” in the popup
- go to “Settings” of this new page, pick “Enable Shadow”, and select “en” as the locale from which to grab content.
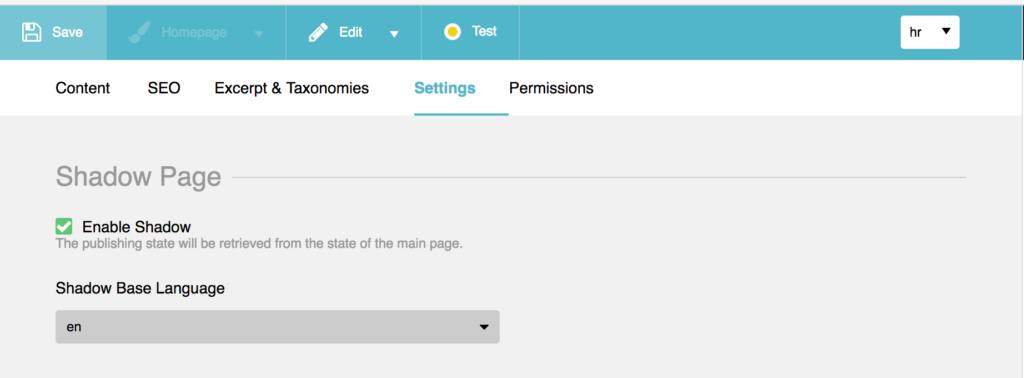
If we now visit the homepage while in the hr locale, it should produce the en homepage, whereas our blog posts will be switchable between the hr and en version. Try it out!
Conclusion
In this tutorial, we explained some basic Sulu terminology, installed a custom bundle into our Sulu installation, and played around with content. Finally, we set up a basic multi-language news site with a language selector.
One thing to note so far is that Sulu is a very expensive CMS to run – just the ElasticSearch requirement of the ArticleBundle upped the RAM needs of our server to 2-3GB which is by no means a small machine any more, and the vendor folder itself is in the hundreds of megabytes already. But Sulu is about to demonstrate its worth in the future posts – I urge patience until then.
At this point, Sulu should start feeling more and more familiar and you should be ready for more advanced content. That’s exactly what we’ll focus on in the next part.
Frequently Asked Questions (FAQs) about Setting Up an Online Multi-Language Magazine with Sulu
What is Sulu and how does it help in setting up an online multi-language magazine?
Sulu is a content management system (CMS) that is designed to help businesses create and manage their digital content in a more efficient and effective manner. It is particularly useful for setting up an online multi-language magazine because it supports multiple languages and locales. This means you can create content in different languages and have it displayed to users based on their location or language preference. Sulu also offers a range of other features such as customizable templates, user-friendly interfaces, and advanced SEO tools that can help enhance the visibility and reach of your online magazine.
How does Sulu compare to other CMS platforms in terms of multi-language support?
Sulu stands out from many other CMS platforms due to its robust multi-language support. While many CMS platforms offer some level of multi-language support, Sulu takes it a step further by offering full localization. This means that not only can you create content in different languages, but you can also customize the user interface and other elements of your site to match the language and cultural preferences of your target audience. This can greatly enhance the user experience and make your online magazine more appealing to a global audience.
How can I customize the templates in Sulu to match the look and feel of my online magazine?
Sulu offers a range of customizable templates that you can use as a starting point for your online magazine. You can customize these templates by changing the layout, colors, fonts, and other design elements to match your brand identity. You can also add custom elements such as images, videos, and interactive features to make your online magazine more engaging and unique. The customization process is user-friendly and does not require any advanced coding skills, making it accessible to users of all skill levels.
What are some of the SEO tools offered by Sulu and how can they help enhance the visibility of my online magazine?
Sulu offers a range of advanced SEO tools that can help enhance the visibility and reach of your online magazine. These include meta tag management, URL management, and sitemap generation. These tools can help improve your site’s ranking on search engine results pages, making it easier for potential readers to find your online magazine. They can also help improve the user experience by making your site more navigable and user-friendly.
Can I integrate Sulu with other software and services to enhance the functionality of my online magazine?
Yes, Sulu is designed to be highly integratable and can be easily connected with a range of other software and services. This includes social media platforms, email marketing services, analytics tools, and more. This can help enhance the functionality of your online magazine and make it easier to manage and promote. For example, you can integrate Sulu with your email marketing service to easily send out newsletters to your subscribers, or with your analytics tool to track and analyze the performance of your online magazine.
How does Sulu handle user management and permissions?
Sulu offers a robust user management system that allows you to easily manage and control access to your online magazine. You can create different user roles with varying levels of permissions, allowing you to control who can access and edit your content. This can be particularly useful if you have a team of writers and editors working on your online magazine, as it allows you to easily manage their access and permissions.
How does Sulu support mobile optimization?
Sulu is designed to be fully responsive, meaning that it automatically adjusts the layout and design of your online magazine to fit the screen size of the device it is being viewed on. This ensures that your online magazine looks and functions well on all devices, including smartphones and tablets. This can greatly enhance the user experience and make your online magazine more accessible to a wider audience.
How can I use Sulu to create a personalized user experience?
Sulu offers a range of features that can help you create a personalized user experience. This includes the ability to create personalized content based on user behavior and preferences, as well as the ability to customize the user interface and other elements of your site to match the language and cultural preferences of your target audience. This can help make your online magazine more engaging and appealing to your readers, and can also help improve user retention and loyalty.
What kind of support and resources are available for Sulu users?
Sulu offers a range of support and resources for its users. This includes comprehensive documentation that covers all aspects of using the platform, as well as a community forum where users can ask questions and share tips and advice. Sulu also offers professional support services for users who need additional help or guidance.
How can I get started with using Sulu to set up my online multi-language magazine?
Getting started with Sulu is straightforward. You can download the platform from the Sulu website and follow the installation instructions provided. Once you have installed Sulu, you can start setting up your online magazine by choosing a template, customizing it to match your brand identity, and adding your content. If you need help or guidance, you can refer to the Sulu documentation or reach out to the Sulu community or support team.