

Key Takeaways
- Symfony Console is a standalone package that provides a simple framework for creating command line tools, useful for recurring tasks like data migration, imports, or creating cron jobs.
- To create a new command, a file needs to be made executable. This is done by creating a console file in the root of the project, ensuring the file is executable, and defining the console application.
- Commands can be tested using Symfony’s CommandTester class, which provides special input and output classes to test commands without the need for a command line.
- Symfony Console is installed using Composer, a dependency management tool in PHP. It provides a simple API to create command-line commands and supports colorization of output, progress bars, tables, and other interactive features.
This popular article was updated on May 24th, 2017 to provide a more comprehensive introduction into an essential, modern tool.
“The console component eases the creation of beautiful and testable command line interfaces.”
This is how we are welcomed when we visit the Symfony Console component tool page.
As software developers, we often feel the need to resort to command line tools. These kinds of tools are helpful when we need to do a sort of recurring task like migrating data, performing imports, or creating cron jobs.
The Symfony Console component tool provides us with a simple framework to create our own command line tools.
Unlike many components in Symfony, this is a standalone package and is used by the likes of Laravel‘s Artisan and many other famous PHP packages.
To read up on alternatives to Symfony Console, see our comparison post: PHP Console Wars!
Installation
composer require symfony/console
Essential information about Composer here.
Creating a New Command
To create a new command, we need to make sure our file will be executable. In order to do that, let’s create a console file in the root of our project. This file will be our command manager.
touch console
Now, let’s make sure the file is executable.
chmod 755 console
Then, let’s make sure our file has the shebang at the beginning. The shebang is a character sequence (a number sign followed by an exclamation mark) that appears at the beginning of a script. When the shebang is present, exec() will instead run the executable specified after the shebang. In our case, it will run as a PHP script.
After this, let’s define our console application. The first iteration of our command manager will look like this:
#!/usr/bin/env php

<?php

require_once __DIR__ . '/vendor/autoload.php';

use Symfony\Component\Console\Application;

$app = new Application();
$app->run();
`
Let’s take a closer look at things. First, we are autoloading all our dependencies, then importing the Application package from the Console component. After that, we are creating a new instance of the Application and running it.
If we execute our script with ./console, we should get the following help message:
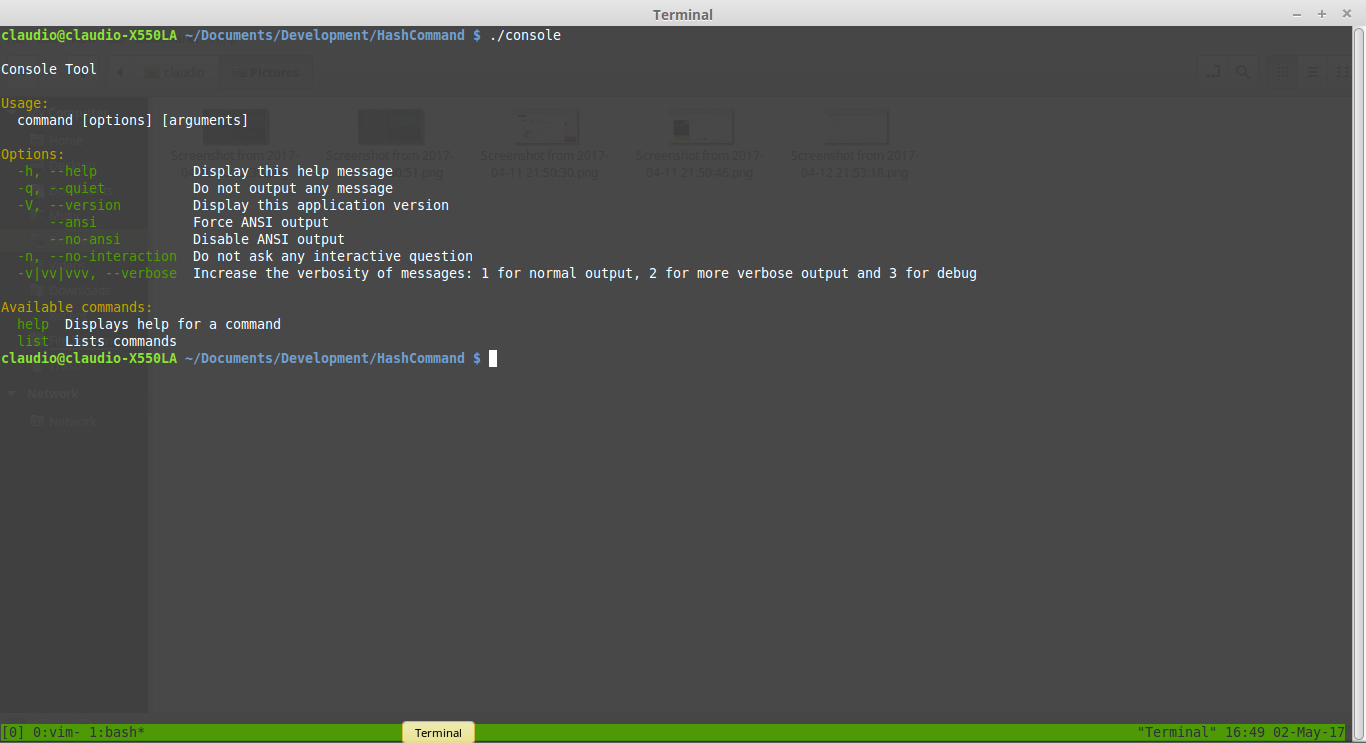
This is because we haven’t registered any commands yet, we only built the basic framework for them.
Let’s create our script and register it in our newly created command manager.
For this particular example, we will implement two simple commands: one for hashing strings, and another one for confirming a hash belongs to a given string.
We’ll create a /src folder in which we will put our Hash.php class with the contents:
<?php

namespace Hash;

class Hash{

    /**
     * Receives a string password and hashes it.
     *
     * @param string $password
     * @return string $hash
     */
    public static function hash($password){
        return password_hash($password, PASSWORD_DEFAULT);
    }

    /**
     * Verifies if an hash corresponds to the given password
     *
     * @param string $password
     * @param string $hash
     * @return boolean If the hash was generated from the password
     */
    public static function checkHash($string, $hash){
        if( password_verify( $string, $hash ) ){
            return true;
        }
        return false;
    }

}
It’s time to create our command. Let’s create a new PHP file called HashCommand.php.
This class will extend from Symfony’s Command class and implement the configure and execute methods. These methods are essential for our command as they tell it how to look and behave.
This is what the finished command looks like:
<?php

namespace Hash;

use Symfony\Component\Console\Command\Command;
use Symfony\Component\Console\Input\InputInterface;
use Symfony\Component\Console\Output\OutputInterface;
use Symfony\Component\Console\Input\InputArgument;
use Symfony\Component\Console\Input\InputOption;
use Symfony\Component\Console\Formatter\OutputFormatterStyle;

use Hash\Hash;

class HashCommand extends Command{

    protected function configure(){
        $this->setName("Hash:Hash")
                ->setDescription("Hashes a given string using Bcrypt.")
                ->addArgument('Password', InputArgument::REQUIRED, 'What do you wish to hash)');
    }

    protected function execute(InputInterface $input, OutputInterface $output){

        $hash = new Hash();
        $input = $input->getArgument('Password');

        $result = $hash->hash($input);

        $output->writeln('Your password hashed: ' . $result);

    }

}
In the configure portion, the setName method is how we will be calling our command, setDescription is a description of our command, and addArgument is where we are saying that our command will take one argument called Password, and that it is required.
In the execute portion, we are accessing the argument through the getArgument function, and then using our Hash class to hash it. Finally, we use the OutputInterface‘s writeln method to print our result to the screen.
If we run our command like this, we will see that nothing happens. That’s because we are still missing one very important step. We still need to register our command in the console.
#!/usr/bin/env php

<?php

require_once __DIR__ . '/vendor/autoload.php';

use Symfony\Component\Console\Application;
use Hash\HashCommand;

$app = new Application();

$app->add(new HashCommand());

$app->run();
With the command registered in our console, let’s run it.
If we run the ./console command once again, we can see that we now have a new command registered.
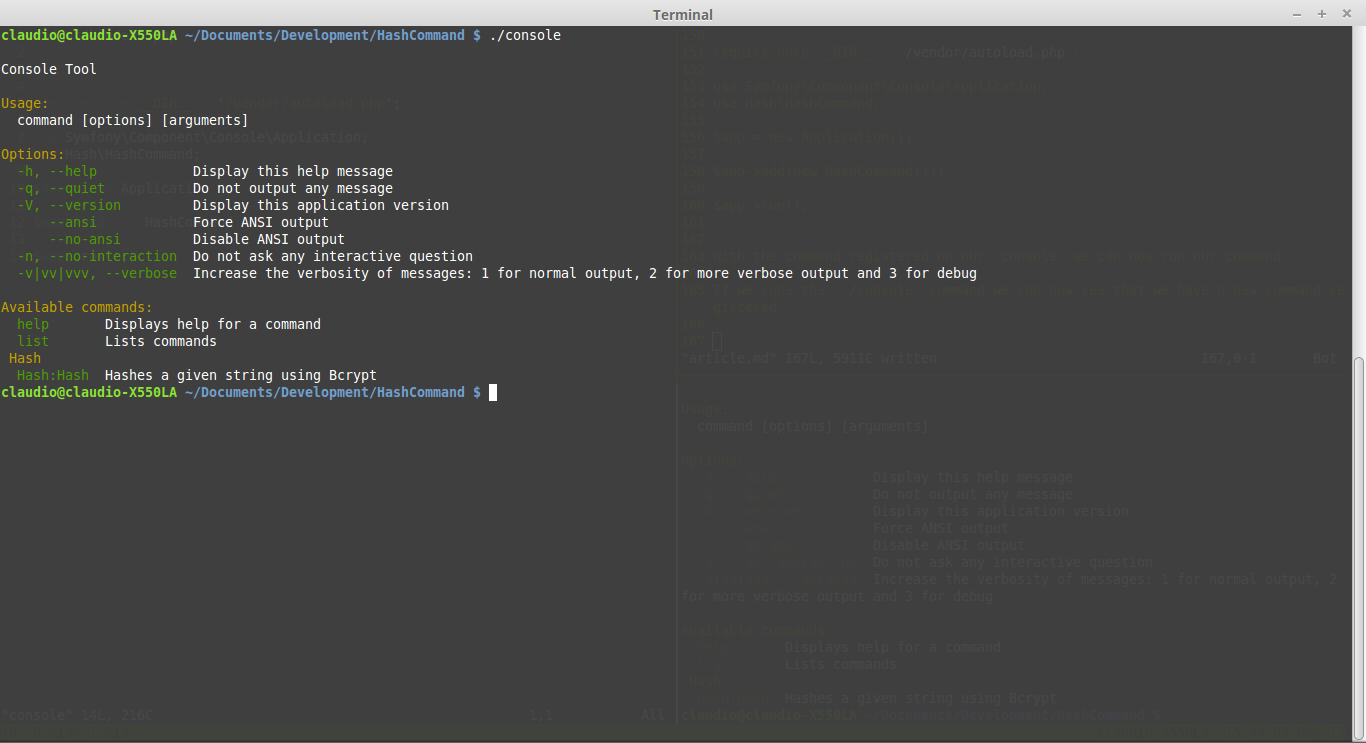
Let’s run it:
./console Hash:Hash Sitepoint
And we see the final result:
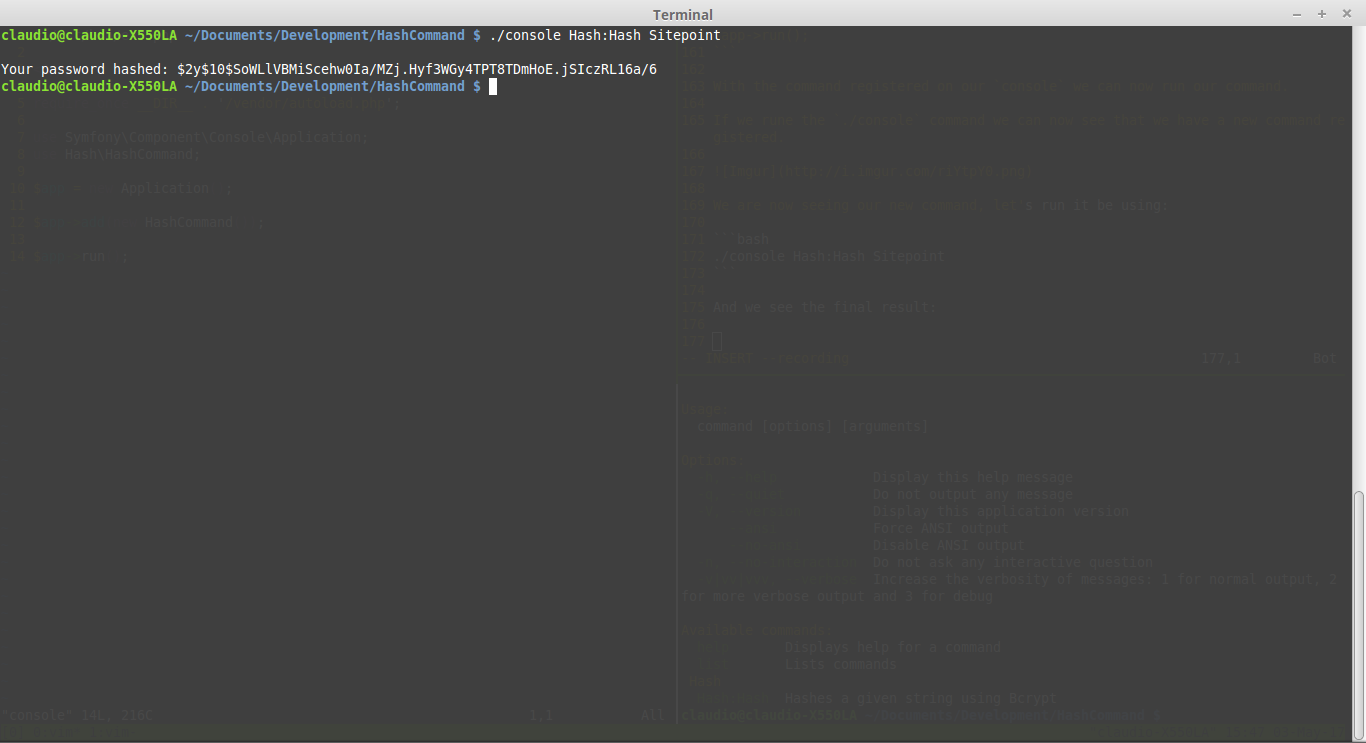
The hash is the result of running the PHP hash() method on the Sitepoint string.
For the hash-confirming functionality, we will use the same method, but instead of one, we will have two arguments. One will be the string to confirm, and the other the hash we want to validate.
We will be creating a new command file, right next to the HashCommand file. Let’s call it ConfirmCommand.
<?php

namespace Hash;

use Symfony\Component\Console\Command\Command;
use Symfony\Component\Console\Input\InputInterface;
use Symfony\Component\Console\Output\OutputInterface;
use Symfony\Component\Console\Input\InputArgument;
use Symfony\Component\Console\Input\InputOption;
use Symfony\Component\Console\Formatter\OutputFormatterStyle;

use Hash\Hash;

class ConfirmCommand extends Command{

    protected function configure(){
        $this->setName("Hash:Confirm")
                ->setDescription("Confirms an Hash given the string.")
                ->addArgument('Password', InputArgument::REQUIRED, 'What password do you wish to confirm?)')
                ->addArgument('Hash', InputArgument::REQUIRED, 'What is the hashyou want to confirm?');
    }

    protected function execute(InputInterface $input, OutputInterface $output){

        $hash = new Hash();
        $inputPassword = $input->getArgument('Password');
        $inputHash = $input->getArgument('Hash');

        $result = $hash->checkHash($inputPassword, $inputHash);

        if($result){
            $output->writeln('The hash belongs to the password!');
            return true;
        }

        $output->writeln('The hash does not belong to the password!');

    }

}
Then, register the command in the console.
#!/usr/bin/env php

<?php

require_once __DIR__ . '/vendor/autoload.php';

use Symfony\Component\Console\Application;
use Hash\HashCommand;
use Hash\ConfirmCommand;

$app = new Application();

$app->add(new HashCommand());
$app->add(new ConfirmCommand());

$app->run();
Testing
When it comes to testing, Symfony provides us with some handy tools. The most useful of them is the CommandTester class, as it provides special input and output classes to test our commands without the need of a command line.
Let’s use the CommandTester class to implement a test for our Hash:Hash command.
First, let’s create a /tests folder at the same level as our /src folder.
Then, let’s create our test class inside of it and call it HashCommandTest.php:
<?php

use Hash\HashCommand;
use Symfony\Component\Console\Application;
use Symfony\Component\Console\Tester\CommandTester;

require_once  './vendor/autoload.php';

class HashCommandTest extends \PHPUnit_Framework_TestCase{

    public function testHashIsCorrect(){

        $application = new Application();
        $application->add(new HashCommand());

        $command = $application->find('Hash:Hash');
        $commandTester = new CommandTester($command);
        $commandTester->execute(array(
            'command'      => $command->getName(),
            'Password'         => 'Sitepoint'
        ));

        $this->assertRegExp('/Your password hashed:/', $commandTester->getDisplay());

    }

}
We begin our test by loading our command using the Application class. Then, we instantiate a new CommandTester. With the CommandTester, we can configure how we want to call our command. The last step is just comparing the results of the execution with the result we are expecting using the getDisplay() method.
The getDisplay() method holds the result of our command’s execution, just as we would see it on the command line.
Conclusion
We just created two different commands using the Symfony Console Component. We also saw a good way of testing those commands. I recommend you take a look at the component’s various options and features, and give us some feedback on your experiments in the comments section below.
Would you like to see some more advanced tutorials about Symfony Console on SitePoint? Let us know!
All the code we wrote in this article is available on Github.
Frequently Asked Questions (FAQs) about Symfony Console
How do I install Symfony Console?
Symfony Console is a component of the Symfony framework and can be installed using Composer, a dependency management tool in PHP. To install Symfony Console, you need to run the following command in your terminal: composer require symfony/console. This command will download and install the Symfony Console component into your project.
What are the main features of Symfony Console?
Symfony Console provides a simple API to create command-line commands. These commands can be used for cron jobs, migrations, imports, or any other type of task that can be run via the command line. It also supports colorization of output, progress bars, tables, and other interactive features.
How do I create a new command in Symfony Console?
To create a new command, you need to create a new class that extends the Symfony\Component\Console\Command\Command class. In this class, you define the name, description, arguments, and options of the command in the configure method. The execute method contains the logic of the command.
How do I run a command in Symfony Console?
To run a command, you need to use the bin/console script followed by the name of the command. For example, if you have a command named app:my-command, you can run it with the following command: bin/console app:my-command.
How can I use Symfony Console for database migrations?
Symfony Console can be used in combination with Doctrine, a database abstraction layer in Symfony, to manage database migrations. You can create a new command that executes the necessary SQL queries to migrate your database.
How do I handle command arguments and options in Symfony Console?
Command arguments and options can be defined in the configure method of your command class. You can retrieve the values of these arguments and options in the execute method using the getArgument and getOption methods.
How do I display output in Symfony Console?
Symfony Console provides several methods to display output. You can use the writeln method to display a line of text, the write method to display text without a newline at the end, and the table method to display a table.
How do I handle errors in Symfony Console?
Errors can be handled by throwing exceptions. Symfony Console will catch these exceptions and display an error message. You can also use the exit method to stop the execution of the command and return an exit code.
How do I test commands in Symfony Console?
Symfony Console provides a CommandTester class that can be used to test commands. You can use this class to execute a command with specific arguments and options and assert the output and exit code.
How do I use Symfony Console in a Symfony project?
In a Symfony project, you can use the bin/console script to run commands. You can also create your own commands by creating a new class in the src/Command directory that extends the Symfony\Component\Console\Command\Command class.