Mail Logging in Laravel 5.3: Extending the Mail Driver


Key Takeaways
- Laravel 5.3 provides a simple way to configure and send emails through multiple popular services, with a logging helper included for development. However, it does not cover all available services, so extending the existing mail driver system can be necessary.
- To extend the mail driver system, a new service provider is created using the artisan command line helper. This service provider interacts with the application at boot time and registers services.
- The new service provider can extend the existing Illuminate\Mail\MailServiceProvider one, allowing the register method to be already implemented. This allows for the creation of a new transport manager that can bind the Swift mailer instance to the container.
- The extended mail driver system can be used to log emails to a database table for debugging purposes. This is achieved by creating a new migration for the database table and a new model to interact with the table. The provider is then added to the list of providers inside the config/app.php file, and the mail driver is registered to db inside the config/mail.php file.
This article was peer reviewed by Viraj Khatavkar. Thanks to all of SitePoint’s peer reviewers for making SitePoint content the best it can be!
One of the many goodies Laravel offers is mailing. You can easily configure and send emails through multiple popular services, and it even includes a logging helper for development.
Mail::send('emails.welcome', ['user' => $user], function ($m) use ($user) {
    $m->to($user->email, $user->name)->subject('Welcome to the website');
});
This will send an email to a new registered user on the website using the emails.welcome view. It got even simpler with Laravel 5.3 using mailables (but the old syntax is still valid).

Here’s an example:
# Generate a new mailable class
php artisan make:mail WelcomeMail
// app/Mail/WelcomeMail.php

class WelcomeUser extends Mailable
{

    use Queueable, SerializesModels;

    public $user;

    public function __construct(User $user)
    {
        $this->user = $user;
    }

    public function build()
    {
        return $this->view('emails.welcome');
    }
}
// routes/web.php

Route::get('/', function () {
    $user = User::find(2);

    \Mail::to($user->email)->send(new WelcomeUser($user));

    return "done";
});
Laravel also provides a good starting point for sending mails during the development phase using the log driver, and in production using smtp, sparkpost, mailgun, etc. This seems fine in most cases, but it can’t cover all the available services! In this tutorial, we’re going to learn how to extend the existing mail driver system to add our own.
To keep our example simple and straightforward, we’re going to log our emails to a DB table.
Creating a Service Provider
The preferred way to accomplish this is by creating a service provider to interact with our application at boot time and register our services. Let’s start by generating a new service provider using the artisan command line helper.
php artisan make:provider DBMailProvider
This will create a new class inside our app/Providers folder. If you’re familiar with Laravel service providers, you’ll know that we extend the ServiceProvider class and define the boot and register methods. You can read more about providers in the documentation.
Using the Mail Provider
Instead of using the parent service provider class, we can take a shortcut and extend the existing Illuminate\Mail\MailServiceProvider one. This means that the register method is already implemented.
// vendor/Illuminate/Mail/MailServiceProvider.php

public function register()
{
    $this->registerSwiftMailer();

    // ...
}
The registerSwiftMailer method will return the appropriate transport driver based on the mail.driver config value. What we can do here is perform the check before calling the registerSwiftMailer parent method and return our own transport manager.
// app/Providers/DBMailProvider.php

function registerSwiftMailer()
{
    if ($this->app['config']['mail.driver'] == 'db') {
        $this->registerDBSwiftMailer();
    } else {
        parent::registerSwiftMailer();
    }
}
Using the Transport Manager
Laravel resolves the swift.mailer instance from the IOC, which should return a Swift_Mailer instance of SwiftMailer. We need to bind our Swift mailer instance to the container.
private function registerDBSwiftMailer()
{
    $this->app['swift.mailer'] = $this->app->share(function ($app) {
        return new \Swift_Mailer(new DBTransport());
    });
}
You can think of the transport object as the actual driver. If you check the Illuminate\Mail\Transport namespace, you’ll find the different transport classes for every driver (like: LogTransport, SparkPostTransport, etc.).
The Swift_Mailer class requires a Swift_Transport instance, which we can satisfy by extending the Illuminate\Mail\Transport\Transport class. It should look something like this.
namespace App\Mail\Transport;

use Illuminate\Mail\Transport\Transport;
use Illuminate\Support\Facades\Log;
use Swift_Mime_Message;
use App\Emails;

class DBTransport extends Transport
{

    public function __construct()
    {
    }


    public function send(Swift_Mime_Message $message, &$failedRecipients = null)
    {
        Emails::create([
            'body'    => $message->getBody(),
            'to'      => implode(',', array_keys($message->getTo())),
            'subject' => $message->getSubject()
        ]);
    }

}
The only method we should implement here is the send one. It’s responsible for the mail-sending logic, and in this case, it should log our emails to the database. As for our constructor, we can leave it empty for the moment because we don’t need any external dependencies.
The $message->getTo() method always returns an associative array of recipients’ emails and names. We get the list of emails using the array_keys function and then implode them to get a string.
Log Email to DB
The next step is to create the necessary migration for our database table.
php artisan make:migration create_emails_table --create="emails"
class CreateEmailsTable extends Migration
{

    /**
     * Run the migrations.
     *
     * @return void
     */
    public function up()
    {
        Schema::create('emails', function (Blueprint $table) {
            $table->increments('id');
            $table->text('body');
            $table->string('to');
            $table->string('subject');
            $table->timestamps();
        });
    }


    /**
     * Reverse the migrations.
     *
     * @return void
     */
    public function down()
    {
        Schema::dropIfExists('emails');
    }
}
Our migration only contains the email body, subject and recipient email, but you can add as many details as you want. Check the Swift_Mime_Message class definition to see the list of available fields.
Now, we need to create a new model to interact with our table, and add the necessary fields to the fillable array.
php artisan make:model Emails
class Emails extends Model
{

    protected $fillable = [
        'body',
        'to',
        'subject'
    ];
}
Sending Emails
Ok, it’s time to test what we’ve got so far. We start by adding our provider to the list of providers inside the config/app.php file.
return [
    // ...

    'providers' => [
        // ...

        App\Providers\DBMailProvider::class,

        // ...
    ],

    // ...
];
Then we register our mail driver to db inside the config/mail.php file.
return [
    'driver' => 'db',

    // ...
];
The only remaining part is to send a test email and check if it gets logged to the database. I’m going to send an email when the home URL is hit. Here’s the code.
// routes/web.php

Route::get('/', function () {
    $user = User::find(2);

    Mail::send('emails.welcome', ['user' => $user], function ($m) use ($user) {
        $m->to($user->email, $user->name)->subject('Welcome to the website');
    });

    return "done";
});
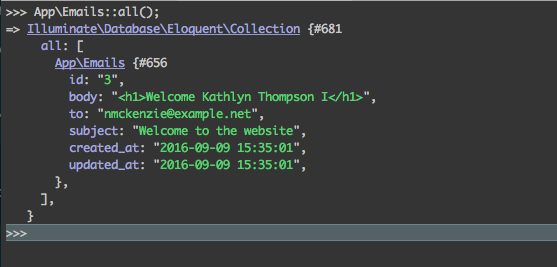
After hitting the home route, we can run the php artisan tinker command to check the emails table records.

Conclusion
In this article, we saw how to extend the mail driver system to intercept emails for debugging purposes. One of the things I admire in Laravel is its unparalleled extensibility: you can alter or extend almost any functionality from router and IOC, to Mail and beyond.
If you have any questions or comments, be sure to post them below and I’ll do my best to answer them!
Frequently Asked Questions (FAQs) about Mail Logging in Laravel 5.3
How can I extend the mail driver in Laravel 5.3?
Extending the mail driver in Laravel 5.3 involves creating a new service provider. This service provider will extend the existing mail driver and allow you to add additional functionality. You can create a new service provider using the php artisan make:provider command. Once the provider is created, you can register it in the config/app.php file. In the provider, you can use the extend method to add your custom functionality to the mail driver.
What is the purpose of mail logging in Laravel?
Mail logging in Laravel is a feature that allows you to keep track of all outgoing emails sent by your application. This can be useful for debugging purposes, as it allows you to see exactly what emails are being sent, when they are sent, and who they are sent to. It can also be useful for auditing purposes, as it provides a record of all email communication sent by your application.
How can I configure Laravel to log all outgoing emails?
To configure Laravel to log all outgoing emails, you need to modify the config/mail.php file. In this file, you can set the log option to true. This will instruct Laravel to log all outgoing emails. The logs will be stored in the storage/logs directory.
How can I view the mail logs in Laravel?
The mail logs in Laravel are stored in the storage/logs directory. You can view these logs by navigating to this directory and opening the log files. The log files are named according to the date, so you can easily find the logs for a specific day.
Can I customize the format of the mail logs in Laravel?
Yes, you can customize the format of the mail logs in Laravel. This can be done by extending the mail driver and overriding the log method. In this method, you can specify the format of the log messages.
How can I send test emails in Laravel?
You can send test emails in Laravel using the Mail facade’s send method. This method accepts three parameters: the view that should be used as the email’s body, the data that should be passed to the view, and a closure that defines the message’s recipients and subject.
How can I handle errors when sending emails in Laravel?
Laravel provides several ways to handle errors when sending emails. One way is to use the try/catch block to catch any exceptions that are thrown when sending an email. Another way is to use the failed method on the Mail facade, which allows you to define a callback that will be executed if the email fails to send.
Can I use third-party services for sending emails in Laravel?
Yes, Laravel supports several third-party services for sending emails, including Mailgun, Postmark, Amazon SES, and Sendmail. You can configure Laravel to use these services by modifying the config/mail.php file.
How can I schedule emails to be sent at a later time in Laravel?
Laravel’s task scheduling feature can be used to schedule emails to be sent at a later time. You can define a scheduled task in the app/Console/Kernel.php file. In this task, you can use the Mail facade’s send method to send the email.
How can I attach files to emails in Laravel?
You can attach files to emails in Laravel using the attach method on the Mail facade. This method accepts the path of the file as its first parameter. You can also specify the display name of the file and its MIME type as optional second and third parameters.
Younes is a freelance web developer, technical writer and a blogger from Morocco. He's worked with JAVA, J2EE, JavaScript, etc., but his language of choice is PHP. You can learn more about him on his website.

Published in
·APIs·CMS & Frameworks·E-Commerce·Frameworks·Laravel·Libraries·PHP·Web Services·January 17, 2017

Published in
·APIs·CMS & Frameworks·Frameworks·Laravel·Libraries·Miscellaneous·PHP·Web Services·June 19, 2017
Published in
·APIs·Authentication·Frameworks·Laravel·Libraries·Patterns & Practices·PHP·Security·Standards·February 17, 2016
