

The Laravel API Boilerplate (JWT Edition) was made on the shoulders of giants like:
In this article, we will learn how to use it to quickly create a fully functional API for an imaginary book wishlist application. As an aside, we will also see how to build a client application with AngularJS that will use our APIs.

Key Takeaways
- The Laravel API Boilerplate (JWT Edition) enables the creation of a fully functional API for an application, with this tutorial focusing on a book wishlist app.
- The tutorial assumes a working PHP environment, with the API Boilerplate installed by cloning the Github repository and running ‘composer install’ to install dependencies and generate Laravel and JWT keys.
- A User entity with features such as sign up, log in, and log out, and a Book entity with features such as title, author name, and pages count, are created.
- The User part is already completed in the app/Api/V1/Controllers/AuthController.php file, with signup and login methods re-implemented for a token-based procedure.
- The Book part is implemented with a migration to define the schema structure, a model, and a controller to handle operations. The User model is edited to define the relationship to retrieve related books. The resource controller for the Book entity is created with methods for index, show, store, update, and destroy.
Creating the Project
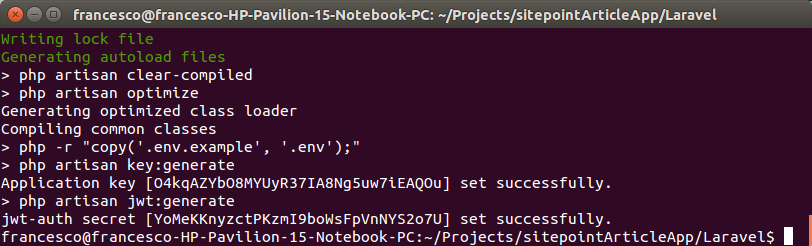
This tutorial assumes a working PHP environment has been set up, something like Homestead Improved. Let’s install our API Boilerplate. All we have to do is to clone the Github repository, with
git clone https://github.com/francescomalatesta/laravel-api-boilerplate-jwt Laravel
then run
composer install
to install dependencies and make all the basic configuration operations. Both Laravel and JWT keys will be automatically generated.
Nothing more to do! Let’s build the server part of our app!
Creating the API
Before doing anything, we have to plan our application’s details and features. We are going to build a basic book wishlist, so we will be using two main entities: User and Book.
A User will be able to:
- sign up, in order to create a new account;
- log in, if they already have an account;
- log out, to leave the application;
- get a list of their books;
- add a new book to the wishlist;
- edit an existing book;
- delete an existing book from the list;
Note that for every User we will ask for:
- name;
- email address;
- password;
A Book will have a:
- title;
- author name;
- pages count;
Finally, every list will show books starting from the most recent one.
First step: the User part.
Building the User Part
The good news is that the User part is already completed.
If we open the app/Api/V1/Controllers/AuthController.php file, we can see that it already has a signup and a login method! They are not the the ones we can see in the standard AuthController in a standard new Laravel project: here they were re-implemented to have a token-based sign up and log in procedure.
Now, let’s take a look at the signup method, in particular.
public function signup(Request $request)
{
    $signupFields = Config::get('boilerplate.signup_fields');
    $hasToReleaseToken = Config::get('boilerplate.signup_token_release');

    $userData = $request->only($signupFields);

    $validator = Validator::make($userData, Config::get('boilerplate.signup_fields_rules'));

    if($validator->fails()) {
        throw new ValidationHttpException($validator->errors()->all());
    }

    User::unguard();
    $user = User::create($userData);
    User::reguard();

    if(!$user->id) {
        return $this->response->error('could_not_create_user', 500);
    }

    if($hasToReleaseToken) {
        return $this->login($request);
    }

    return $this->response->created();
}
As we can see from the code, we are using some options in a config file. Specifically, we are getting two values from this file:
boilerplate.signup_fields: the fields list we want to use for the signup operation;boilerplate.signup_fields_rules: the validation rules we want our data checked against during the signup operation;
We can find all the boilerplate options in config/boilerplate.php.
There’s also another option used here: boilerplate.signup_token_release. When set to true, a token is automatically released after signup. This means that the user can start using your app immediately.
Note: for this project we are going to use 24-hour tokens. The default value for the token’s life-span is 60 minutes. This can be changed in config/jwt.php at the ttl value.
Back to our API. The actual setting for boilerplate.signup_fields is
'signup_fields' => [
    'name', 'email', 'password'
],
… and it’s fine, considering our needs. Some basic rules are there, too:
'signup_fields_rules' => [
	'name' => 'required',
	'email' => 'required|email|unique:users',
	'password' => 'required|min:6'
],
So far, we haven’t had to do anything. Also, we already have our routes in the app/Http/api_routes.php file.
// app/Http/api_routes.php

$api = app('Dingo\Api\Routing\Router');

$api->version('v1', function ($api) {

	$api->post('auth/login', 'App\Api\V1\Controllers\AuthController@login');
	$api->post('auth/signup', 'App\Api\V1\Controllers\AuthController@signup');

	...

});
The router we’re using here is a little bit different from the normal one we see in Laravel. We are, in fact, using the custom Dingo API Router.
The user part is now complete without typing a single line of code.
The only one remaining part is the logout procedure. However, a RESTful API is stateless by definition and this is something we are going to implement in the client.
Now, we should at least test our two procedures, to be sure. The first thing to do is to migrate our database. In our terminal, let’s type
php artisan migrate
Let’s test a basic signup procedure. We’ll open an HTTP Client and make a call to the signup route. For this article’s purposes, we will use Postman. Let’s fill our request body…
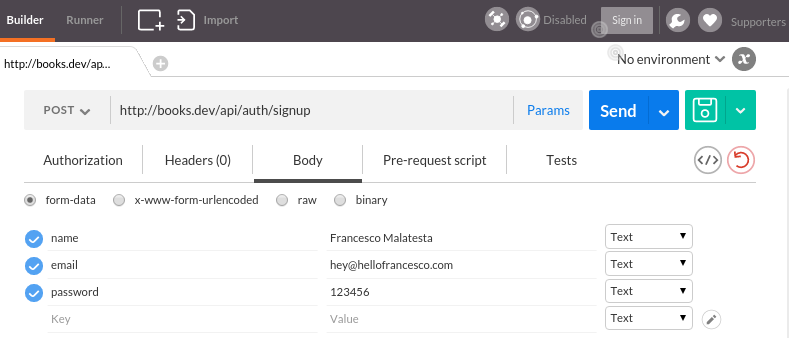
… send it and wait for the result …
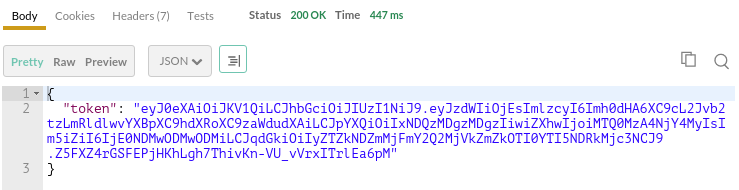
Done! Our user is now added to the application. To be sure, let’s make another test. This time for the login.
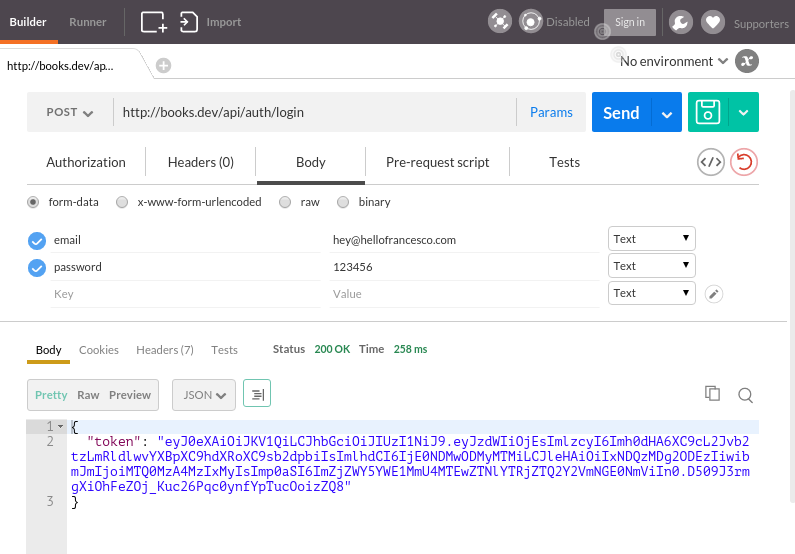
Great! The login procedure also works fine! We don’t need anything else for the User part. Time to finish our API by implementing the Book part.
Building the Book Part
In order to implement the Book side, we will need a migration to define our schema structure, a model and, finally, a controller to handle all the operations. Let’s start with migrations. Let’s open the terminal and type
php artisan make:migration create_books_table --create=books
and a new file will be created in database/migrations. We then add the following fields in the up() method.
public function up()
{
    Schema::create('books', function (Blueprint $table) {
        $table->increments('id');

		// adding specific fields here...
        $table->string('title');
        $table->string('author_name');
        $table->integer('pages_count');

        $table->integer('user_id')->index();

        $table->timestamps();
    });
}
Time to “migrate” again, by typing
php artisan migrate
to add the new table to the schema. Now, let’s create the model, with
php artisan make:model Book
and we are done. Due to the conventions in Laravel, the Book model already “knows” that it has to work with the books table we have created. Here’s the model:
namespace App;

use Illuminate\Database\Eloquent\Model;

class Book extends Model
{
    protected $fillable = ['title', 'author_name', 'pages_count'];
}
We are going to put these fields (title, author_name and pages_count) into the fillable array in order to use the fill method on the update procedure (more on that soon).
Now, we have to edit our User model in order to define the relationship we will need to retrieve their related books. In app\User.php we add the following method:
public function books()
{
    return $this->hasMany('App\Book');
}
The last step is the resource controller for the Book entity. Let’s type
php artisan make:controller BookController
to create a new resource controller. Laravel will create it in the app/Http/Controllers folder. We will move it to app/Api/V1/Controllers.
We also change the namespace:
namespace App\Api\V1\Controllers;
where App is the basic namespace we have chosen for our application. By default, we can leave it as it is.
Before proceeding, we have to remember to add some use directives at the beginning of the file:
use JWTAuth;
use App\Book;
use Dingo\Api\Routing\Helpers;
The first one is the JWTAuth Facade, which we will use to retrieve our user data from the token. The second one is our model. The third is a helper we will use to quickly create every response for outputting to the client in a RESTful manner.
We must also remember to include this Helpers trait in the controller:
...

class BookController extends Controller
{
    use Helpers;

...
Now we can implement our methods:
index, to get the books list of a certain user;show, to get a single book given its id;store, to store a newly created book in the database;update, to store updates on a certain book, given its id;destroy, to delete an existing book from the database, given its id;
Let’s start from the first: index().
public function index()
{
    $currentUser = JWTAuth::parseToken()->authenticate();
    return $currentUser
        ->books()
        ->orderBy('created_at', 'DESC')
        ->get()
        ->toArray();
}
This is really easy to understand. We are getting our user starting from the token, and then we are returning all the related books as output. Nothing more.
We can make a step forward, to store()
public function store(Request $request)
{
    $currentUser = JWTAuth::parseToken()->authenticate();

    $book = new Book;

    $book->title = $request->get('title');
    $book->author_name = $request->get('author_name');
    $book->pages_count = $request->get('pages_count');

    if($currentUser->books()->save($book))
        return $this->response->created();
    else
        return $this->response->error('could_not_create_book', 500);
}
Like before, we are getting the current user with the JWTAuth method, parseToken()->authenticate(). Then, we are creating our instance and saving the relationship with the save method.
If everything goes right, a Created 201 response will be returned. Otherwise, the client will get a custom 500 error. As we can see, it’s not just about the body: headers also will be tweaked accordingly to follow RESTful standards.
Let’s do some tests before finishing our controller. Add the following code into api_routes.php:
$api->group(['middleware' => 'api.auth'], function ($api) {
	$api->post('book/store', 'App\Api\V1\Controllers\BookController@store');
	$api->get('book', 'App\Api\V1\Controllers\BookController@index');
});
We have both routes now! Let’s get back to our HTTP Client and log in again. With our new token, let’s make some requests to store a new book and, right after, get a list of them.
We can pass the token in two ways: passing it as a simple request parameter, or in the header with this specific item: Authorization: Bearer {token_goes_here}.
That said, here’s an example of a store request and the subsequent index one.
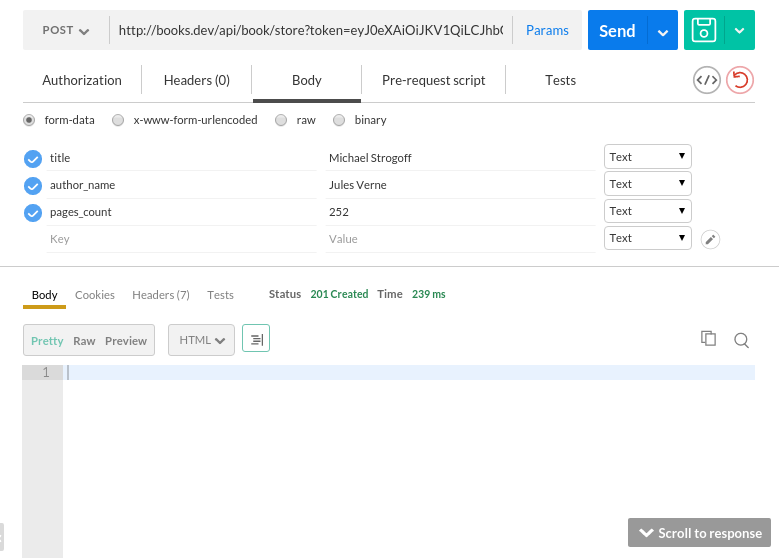
… and then …
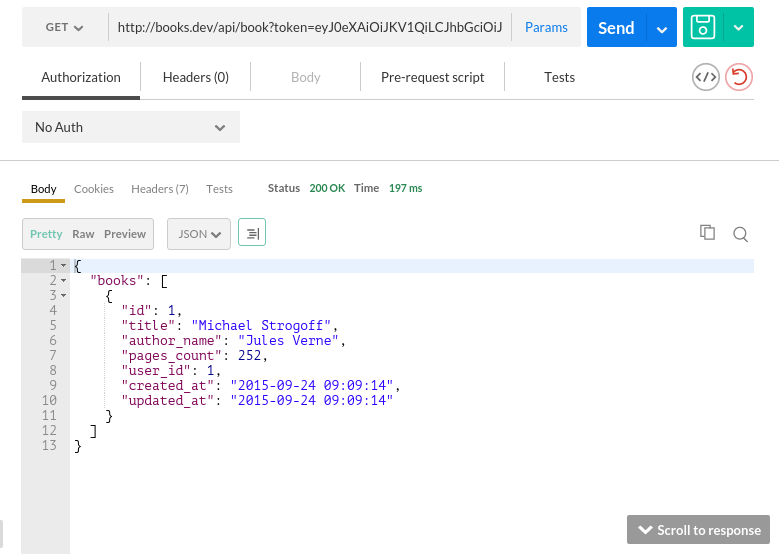
It works!
We can finish the job by implementing the three remaining methods: show, update and destroy.
Here they are!
...

public function show($id)
{
    $currentUser = JWTAuth::parseToken()->authenticate();

    $book = $currentUser->books()->find($id);

    if(!$book)
        throw new NotFoundHttpException;

    return $book;
}

public function update(Request $request, $id)
{
    $currentUser = JWTAuth::parseToken()->authenticate();

    $book = $currentUser->books()->find($id);
    if(!$book)
        throw new NotFoundHttpException;

    $book->fill($request->all());

    if($book->save())
        return $this->response->noContent();
    else
        return $this->response->error('could_not_update_book', 500);
}

public function destroy($id)
{
    $currentUser = JWTAuth::parseToken()->authenticate();

    $book = $currentUser->books()->find($id);

    if(!$book)
        throw new NotFoundHttpException;

    if($book->delete())
        return $this->response->noContent();
    else
        return $this->response->error('could_not_delete_book', 500);
}

...
We continued to use the $currentUser as an implicit “safety check”. In real world cases you should build something more robust.
It’s also possible to throw some Symfony exceptions. The API will automatically recognize them and encode in the right output format. You can find the complete supported exceptions list here.
In show, update and destroy, we used the NotFoundHttpException to tell the client that we have not found a certain resource.
Now, all we have to do is to add the last three new routes to the api_routes.php file.
$api->group(['middleware' => 'api.auth'], function ($api) {
	$api->get('books', 'App\Api\V1\Controllers\BookController@index');
	$api->get('books/{id}', 'App\Api\V1\Controllers\BookController@show');
	$api->post('books', 'App\Api\V1\Controllers\BookController@store');
	$api->put('books/{id}', 'App\Api\V1\Controllers\BookController@update');
	$api->delete('books/{id}', 'App\Api\V1\Controllers\BookController@destroy');
});
Laravel (and Dingo) has the shortcut method resource() that we can use to bind all the routes we just saw with a single instruction.
$api->resource('books', 'App\Api\V1\Controllers\BookController');
Choose the approach you like the most.
The controller is now complete. Here it is in full!
Note: we could stumble upon some issues using PUT and DELETE verbs with some body data. If the body is always empty, try to use x-www-form-urlencoded instead of form-data. It should fix the problem.
The server part is done!
Conclusion
In this part, we focused on the back-end and used a fairly stable and easy to use boilerplate to build our API and authentication + registration flow. Just like that, our app is already client-friendly. Slap together an iOS or Android app or even one of the many JavaScript frameworks and you can consume the content of our application with ease. That’s exactly what we’ll be focusing on in part 2 – building an Angular app for this back end from scratch! Stay tuned!
Frequently Asked Questions (FAQs) about Building an API-only JWT-Powered Laravel App
How can I make my Laravel application API-only?
To make your Laravel application API-only, you need to modify your routes/api.php file. This file is where you should register all API routes for your application. These routes are stateless and are assigned the API middleware group. To make your Laravel application API-only, you should move all your web routes to the api.php file and remove the web.php file. This way, your application will only respond to API requests.
What is JWT and why is it important in building an API-only Laravel app?
JWT stands for JSON Web Token. It is a compact, URL-safe means of representing claims to be transferred between two parties. In the context of a Laravel application, JWT is used for authentication. When a user logs in, the server generates a JWT for the user, which is then stored on the client side. This token is sent with every request the client makes, and the server uses it to authenticate the request. This is particularly important in an API-only application, where stateless, token-based authentication is often the most practical solution.
How can I implement JWT authentication in my Laravel app?
To implement JWT authentication in your Laravel app, you can use the jwt-auth package. First, you need to install it via Composer. Then, you need to publish the configuration file and generate a secret key. After that, you need to configure your User model and set up the authentication routes. Finally, you need to protect your routes with the jwt.auth middleware.
How can I handle errors in my API-only Laravel app?
Error handling is an important aspect of building an API. Laravel provides several ways to handle errors. One of the most common ways is to use exception handling. You can create custom exception classes and use them to throw exceptions when something goes wrong. Then, you can define how these exceptions should be rendered or reported. Laravel’s exception handler class makes it easy to report and render exceptions in a user-friendly way.
How can I test my API-only Laravel app?
Testing is a crucial part of API development. Laravel provides several tools for testing, including PHPUnit for unit testing and Dusk for browser testing. For testing APIs, you can use the feature testing functionality provided by Laravel. This allows you to make requests to your application and examine the output. You can check the status code, content, structure, and more. You can also use tools like Postman or Insomnia for manual testing.
How can I secure my API-only Laravel app?
Security is a major concern when building an API. Laravel provides several security features out of the box, including CSRF protection, input validation, and more. For an API-only application, you should also consider using rate limiting to protect your API from abuse. You can use Laravel’s built-in rate limiting middleware for this. Additionally, always use HTTPS to ensure that the data transferred between the client and the server is encrypted.
How can I version my API in Laravel?
API versioning is important to ensure backward compatibility as your API evolves. There are several ways to version an API, but one of the most common ways is to include the version number in the URL. Laravel does not provide built-in support for API versioning, but you can easily implement it yourself by including the version number in your route definitions.
How can I paginate responses in my API-only Laravel app?
Pagination is important for APIs that can return a large amount of data. Laravel makes it easy to paginate responses using the paginate method on the query builder or an Eloquent model. This will automatically add the necessary pagination data to the response. You can customize the number of items per page and the structure of the pagination data.
How can I handle file uploads in my API-only Laravel app?
Handling file uploads in an API is a bit different than in a traditional web application. Laravel provides several ways to handle file uploads. You can use the request’s file method to retrieve an instance of the uploaded file, and then use the store method to store it. Remember to validate the file before storing it to ensure it is of the correct type and size.
How can I deploy my API-only Laravel app?
There are several ways to deploy a Laravel application. You can use shared hosting, a VPS, a PaaS like Heroku, or a containerization platform like Docker. The exact steps depend on the platform you choose. Generally, you need to upload your code, install dependencies, configure the environment, run migrations, and set up a web server. Remember to set your application key and configure your database connection.

