
Selling products online has become a trend for catching the attention of a global audience. Among those products, it’s easier to sell purely web based products and services compared to tangible products. Marketing products online is a decisive factor in making higher sales. So, it’s important to show the features of your products and services in an interactive way to catch the attention of potential customers. Product tours, also known as feature tours, are a perfect solution for promoting a product. This tutorial is going to explain the importance of creating product tours, and show how Intro.js can be used to build an effective product tour.
Key Takeaways
- Product tours, also known as feature tours, are an effective way of showcasing a product’s features interactively to potential customers, making it easier to sell web-based products and services.
- JavaScript libraries, such as Intro.js, are increasingly being used to build product tours due to their ability to provide interactive demonstrations of product features.
- A product tour typically includes a start button, a series of steps demonstrating the features, a skip button for users who wish to bypass the tour, and a complete button that typically leads to a call to action such as purchasing or trying the product.
- Intro.js is a lightweight open-source library for creating step-by-step tours of a website or product. It allows customization of the tour’s look and feel, works well with single-page applications, supports internationalization, and provides several options to control navigation within the tour.
What is a Product Tour?
A product tour is a series of steps that introduces the existing features of a product or features added in the latest version. There are various types of product tours, and until recently, the majority of product tours were created as presentations using Flash. Recently, JavaScript libraries have become much more popular in building product tours as they provide an interactive demonstration of product features, instead of static images and animations.
Why Do I Need a Product Tour?
Generally, web based products are associated with a website for marketing purposes. These websites contain user guides or documentation to illustrate the functionality and features of the product. But these user guides are not as effective as product tours for the following reasons.
- People don’t like to read long documentation.
- Documentation doesn’t provide interactive demo of each and every feature.
- People don’t regularly read the docs and hence it’s difficult to introduce new features.
As a solution, product tours are used to highlight features and catch the attention of new users to the product. The features of product tours may vary between different types of product tour creation libraries, but each library provides a common set of features required for building tours. Let’s take a look at the most basic features of a product tour creation library.
Features of Product Tour Creation Libraries
- Product tour start button – This button might come with the library, or the developer might be required to define a custom button to initialize the tour. This button should be designed such that it catches the attention of users and is normally larger than normal buttons.
- Product tour steps – Once started, the user should be able to navigate through a series of steps introducing its features until the product tour is completed. A product tour creation library should contain a simple and clear way of defining steps in the tour by assigning various HTML elements in the document. Even though it is not mandatory, it is valuable to have Previous and Next buttons to navigate through the steps of product tour.
- Product tour skip button – It is almost certain that not every user wants to go through the complete product tour. Sometimes the first few steps of the tour might be effective enough to make the decision of buying the product. In such situations, users should be allowed to skip the tour and move forward. So the library should contain a Skip button that lets the user skip the tour. This button should be available on every step of the tour.
- Product tour complete button – As the user reaches the final step, there should be a way to complete the tour. Generally, this will be a button available in the final step. We need to have an effective call to action for this button. Usually, the call to action will be to purchase or try the product. A Complete button will replace the Skip button on the final step.
These are the general features of a product tour. Next, let’s look at some of the popular libraries for creating JavaScript based product tours.
Product Tour Creation Libraries
There are several JavaScript based product tour creation libraries in existence. Each of them provides features unique to the library. Some of the more popular choices are shown below.
Among these libraries, Intro.js provides all the essential features for a product tour. So, for the purposes of this article, we are going to use Intro.js to create an example product tour.
Building a Product Tour Using Intro.js
Intro.js is a lightweight open source library for creating step by step tours of a website or product. You can grab a copy of this library from Github. We can start the implementation by downloading the latest version. Once downloaded, you can extract the zip file and try the sample tours inside the example folder.
Generally, all the features and necessary information is available on the web page, and the product tour is used to highlight the features with additional information. In this tutorial, we are looking at a slightly modified product tour, where none of the features is available initially on the web page. Each feature will be displayed as we move on with the tour. Let’s start by copying the necessary files to a new folder for this tutorial.
Step 1 – Add Intro.js files
First, we need to add the Intro.js related files into our project folder. Copy intro.js and introjs.css into the project folder.
Step 2 – Creating the HTML file
Create a new HTML file and include the JavaScript and CSS files as shown in the following code.
<!DOCTYPE html>

<html lang="en">

  <head>

    <link href="introjs.css" rel="stylesheet">

  </head>

  <body>

    <script src="https://code.jquery.com/jquery-1.10.1.min.js"></script>

    <script src="intro.js"></script>

  </body>

</html>
Step 3 – Designing the First Step
As I mentioned earlier, all the steps will be hidden except for the initial step. The product tour start button and the first step are the mandatory things we need here. These are implemented using the following code.
<div class="main_container">

  <div class="flexi_form_title">

    <h1 data-step="1" data-intro="This is flexible forms tour">Flexible Forms</h1>

    <a id="flexi_form_start" href="javascript:void(0);">Start Tour</a>

  </div>

</div>

<script src="https://code.jquery.com/jquery-1.10.1.min.js"></script>

<script src="intro.js"></script>

<script>

  $("#flexi_form_start").click(function() {

    introJs().start();

  });

</script>
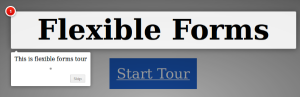
The preceding code needs to be inserted inside the <body> tag of the HTML document. Please note that CSS styles for this elements are not included here as it’s lengthy. You can find the CSS code in the source files. At this point, you should have a screen similar to the following.

Intro.js uses a custom data attribute named data-step for defining the steps of the product tour. This will be a numeric value used to define the ordering of steps. There is also a data-intro attribute for providing an explanation of each step.
Once the button is clicked, we have to initialize the product tour by calling introJs().start(). Now, you should have the first step of the tour as shown in the following image.
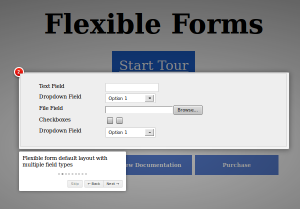
Step 4 – Designing Hidden Steps
Once the first step is completed, we need to show the next set of steps, which are hidden during the initial page load. So let’s take a look at the following code.
<div id="form_container">

  <form class="flexi_form" data-step="2" data-intro="Flexible form default layout with multiple field types" style="display:none"  data-position="bottom">

    <ul>

      <li data-step="3" data-position="left" data-intro="Inline form validation">

        <div class="left">Text Field</div><input type="text" />

      </li>

      <li data-step="4" data-intro="Customizable Form Layouts">

        <div class="left">Dropdown Field</div>

        <select>

          <option>Option 1</option>

          <option>Option 2</option>

        </select>

      </li>

      <li data-step="5" data-intro="Guidence for filling forms">

        <div class="left">File Field</div>

        <input type="file" />

        <div class="right">Please Upload PDF Files</div>

      </li>

      <li>

        <div class="left">Checkboxes</div>

        <input type="checkbox" /><input type="checkbox" />

      </li>

      <li>

        <div class="left">Dropdown Field</div>

        <select>

          <option>Option 1</option>

          <option>Option 2</option>

        </select>

      </li>

    </ul>

  </form>

</div>
This code block is inserted after the first block of code and within the main_container element, and will be hidden initially.This block contains multiple steps of the product tour. Here, we have also used data-position attributes, which enable us to define the direction of the explanation box. As we move through the steps, we have to show the features dynamically. So, we are using custom JavaScript code to filter each step in the tour. Consider the following code.
<script>

  $("#flexi_form_start").click(function() {

    introJs().start().onbeforechange(function(targetElement) {

      $(".steps").hide();

      $(".left").css("float", "left");

      $("input").removeClass("error");

      $(".right").hide();
      switch($(targetElement).attr("data-step")) {

        case "2":

          $(".flexi_form").hide();

          $(targetElement).show();

          break;

        case "3":

          $("input").addClass("error");

          $(targetElement).show();

          break;

        case "4":

          $(".left").css("float", "none");

          $(targetElement).show();

          break;

        case "5":

          $(".right").show();

          $(targetElement).show();

          break;

      }

    });

  });

</script>
Intro.js provide a function called onbeforechange(), which executes before each step transition. The next step element will be passed as an argument to this function. We can filter the step using a simple switch statement as shown in the previous code. Then we filter each step inside the switch statement and add necessary code to show the product features. This demo is used for illustrating the power of product tours and most of the features are not directly related to Intro.js. Your product tour will look similar to following screen.
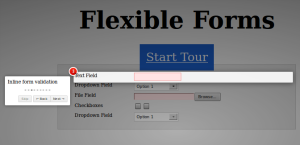
You can view the complete demo and source code for this product tour at the end of this tutorial.
Step 5 – Implementing Complete Functionality
As mentioned in the introduction, it’s important to provide a call to action on completion of the tour. Here, we will be redirecting the user to another page after clicking the complete button. This is done using the following code.
<script>

  introJs().start().oncomplete(function() {

    window.location.href = "complete.html";

  }).onbeforechange(function(targetElement) {

    // The rest of the code

  })

</script>
The Intro.js oncomplete() method is used for executing code after completing the product tour. This is invoked when the user clicks the Done button on the final step. Here, we are redirecting the user to another page. You should have a strong call to action for the users once they click this button.
Step 6 – Implementing Skip Functionality
Users should be able to skip the tour any time and hence we have a Skip button on each step, except from the final one. Intro.js uses its onexit() method for implementing skip functionality. The following code has been modified to include a call to onexit().
<script>

  introJs().start().oncomplete(function() {

    window.location.href = "complete.html";

  }).onexit(function() {

    window.location.href = "complete.html";

  }).onbeforechange(function(targetElement) {

    // The rest of the code

  })

</script>
Conclusion
This article has looked at all the basic functionality of a product tour creation library. Feel free to download the source code and check out the demo using the following links.
Download Source Code
View Demo
Now, it’s time for you to promote your product using an amazing product tour. Let us know about your product tours or any other unique product tours available online.
Frequently Asked Questions (FAQs) about Intro.js Product Tours
How can I customize the look and feel of my Intro.js tour?
Intro.js allows you to customize the look and feel of your tour to match your website or application’s aesthetic. You can modify the CSS file that comes with the Intro.js library. This file contains the styles for the tooltip, overlay, and navigation elements. You can change colors, fonts, sizes, and more. Remember to always test your changes to ensure they look as expected across different screen sizes and devices.
Can I use Intro.js with a single-page application (SPA)?
Yes, Intro.js works well with single-page applications (SPAs). You can initialize the tour when the SPA loads and then start it when needed. If your SPA changes the DOM based on user interaction, you may need to reinitialize the tour or update the steps to ensure they point to the correct elements.
How can I add more steps to my Intro.js tour?
Adding more steps to your Intro.js tour is straightforward. You can add steps by adding data-intro and data-step attributes to your HTML elements. The data-intro attribute contains the tooltip text, and the data-step attribute determines the order of the steps. Alternatively, you can define your steps in a JavaScript array and pass it to the introJs().setOptions() method.
How can I control the navigation in my Intro.js tour?
Intro.js provides several options to control navigation. You can allow users to navigate using keyboard shortcuts, disable interaction with elements behind the overlay, or force users to follow the tour in a specific order. These options can be set when initializing the tour using the introJs().setOptions() method.
Can I use Intro.js in a non-English application?
Yes, Intro.js supports internationalization. You can customize the text of the navigation buttons and tooltips to match your application’s language. This can be done by setting the nextLabel, prevLabel, skipLabel, and doneLabel options when initializing the tour.
How can I highlight a specific element in my Intro.js tour?
Intro.js automatically highlights the element associated with the current step. The rest of the page is covered with an overlay. You can customize the look of the highlighted element and the overlay using CSS.
Can I use Intro.js with a responsive design?
Yes, Intro.js is responsive and works well with mobile and desktop layouts. The tooltip position adjusts based on the screen size. However, for small screens, you may want to simplify your tour or use mobile-specific steps to ensure a good user experience.
How can I start the Intro.js tour automatically?
You can start the Intro.js tour automatically when the page loads by calling the start() method. For example, introJs().start(). However, consider your users’ experience before starting the tour automatically. It might be better to let users start the tour when they are ready.
Can I use Intro.js with a framework like React or Angular?
Yes, Intro.js can be used with JavaScript frameworks like React or Angular. You may need to adjust the way you initialize and start the tour to work with the framework’s lifecycle methods.
How can I troubleshoot issues with my Intro.js tour?
If your Intro.js tour is not working as expected, check the JavaScript console for errors. Make sure all your steps point to existing elements and that your custom CSS does not interfere with the Intro.js styles. If you’re still having trouble, the Intro.js GitHub page is a good resource for solutions to common issues.