

In this tutorial, I will teach you how to create an illustration of a fedora hat in Photoshop. If you’re a beginner to intermediate user, the hat is a fairly complicated illustration, and while we’re at it you will also learn the benefits of the liquify feature, to provide the hat with some shape.
This tutorial should take about an hour if you’re familiar with the Photoshop interface already.
Key Takeaways
- The tutorial guides through creating a fedora hat illustration using Photoshop and Illustrator, teaching the benefits of the liquify feature to shape the hat.
- The process includes creating the hat shape in Illustrator, transferring it to Photoshop, applying color changes, and adding patterns, shadows, and highlights.
- The use of the liquify feature in Photoshop is emphasized, which is used to alter patterns and give the hat a more realistic shape.
- The tutorial also explains how to add details like a feather, a bow, and a brim to the hat, and how to create a shadow for a 3D effect.
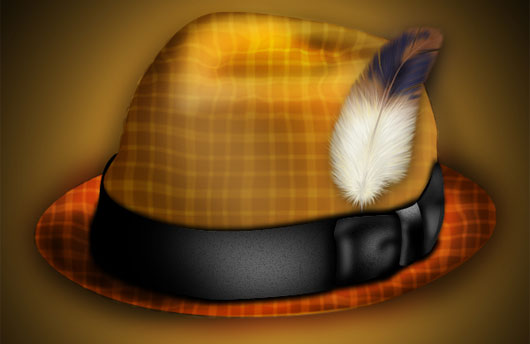
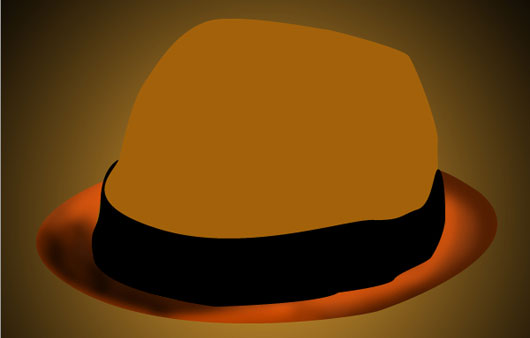
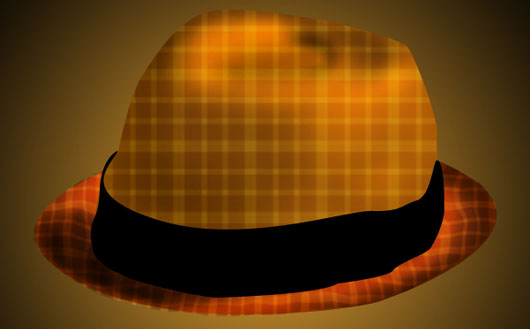
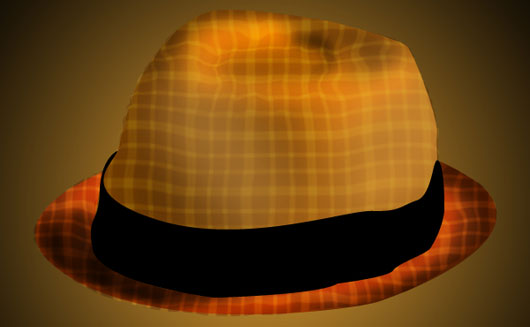
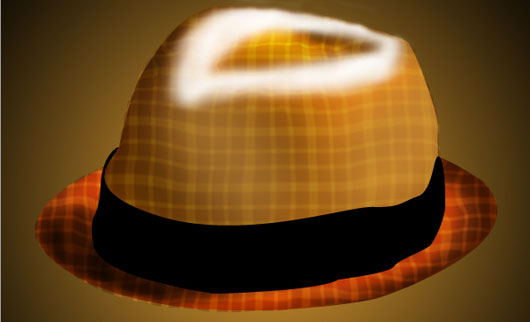
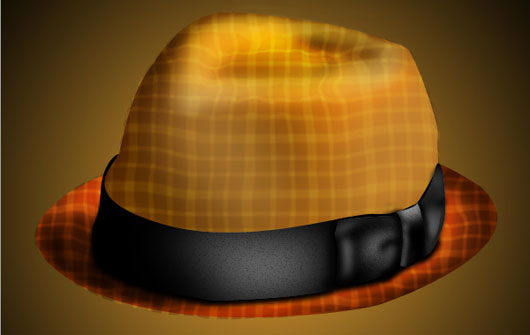
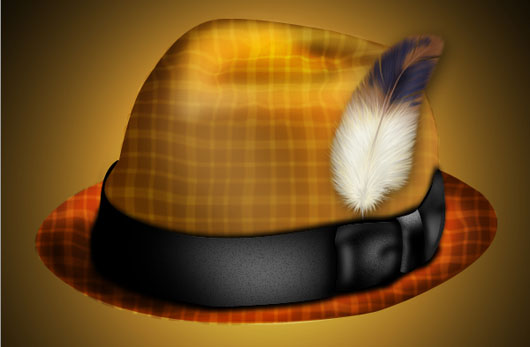
Preview
Here’s a look at the end result of what you’ll be putting together today:
Resources
You’ll need a couple of extra resources for this tutorial. You can grab them at these links:
- Feather – Official PSDs
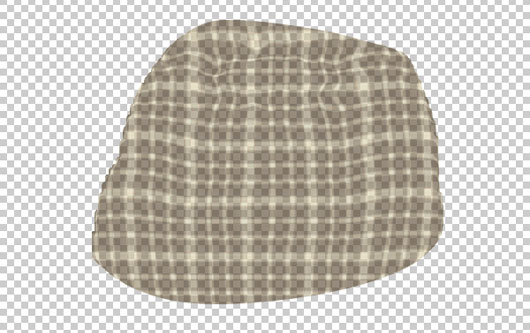
- Plaid Pattern – Graphics Software
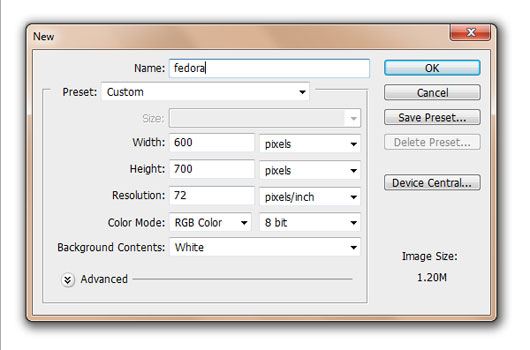
Step 1: New Document
Create a New Document in Photoshop. The size of my canvas is 600px by 700px, at 72 dpi.
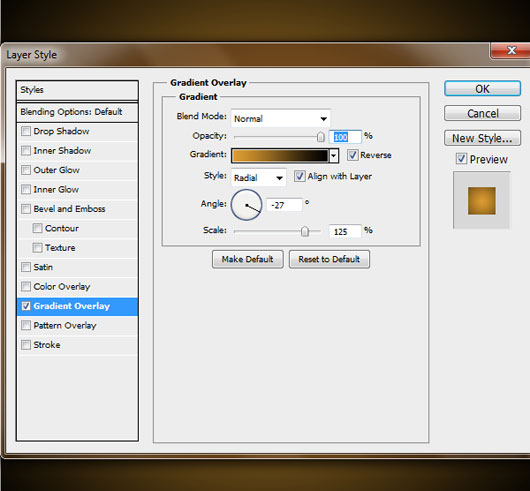
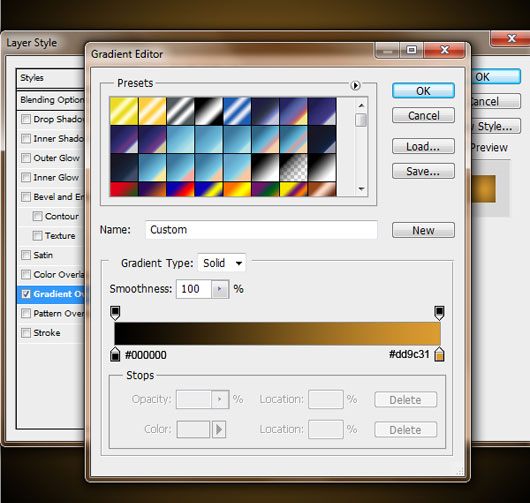
Step 2: Background
Apply this gradient to the background by using your layer styles. Double click the background layer to bring Layer Style up, and use the screenshots as a guide for the gradient settings.
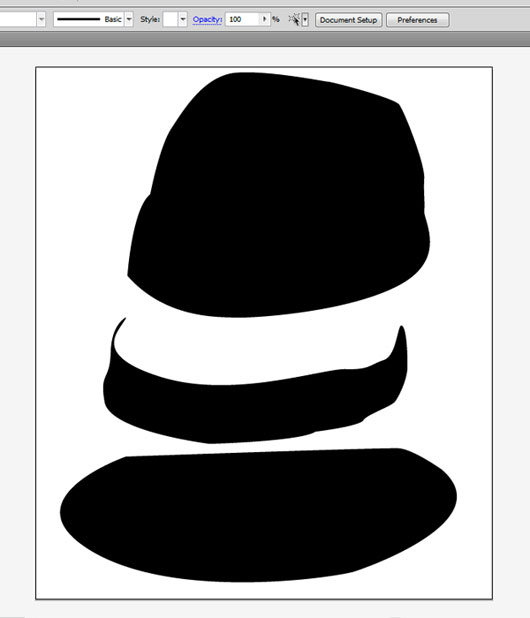
Step 3: Drawing the Hat in Illustrator
Now open up Adobe Illustrator. I will be using the pen tool in Illustrator to create the shape of my hat. I feel as though I’m able to control it more easily than in Photoshop. Create the same size canvas that you did in Photoshop. There are three different parts to my hat so I made three different shapes. Fill them with any color because we will change them once we bring them into Photoshop.
Step 4
Now transfer these shapes over to Photoshop — I just use the ‘drag and drop’ method. Make sure that you have ‘rasterized’ all three parts of the hat once you have transferred them over to Photoshop — this is a menu option you can access by right-clicking on each layer.
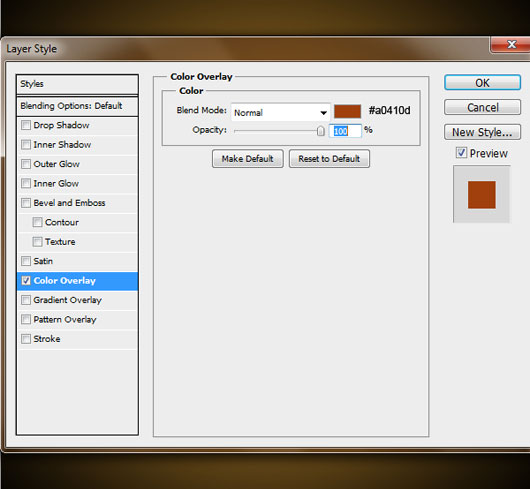
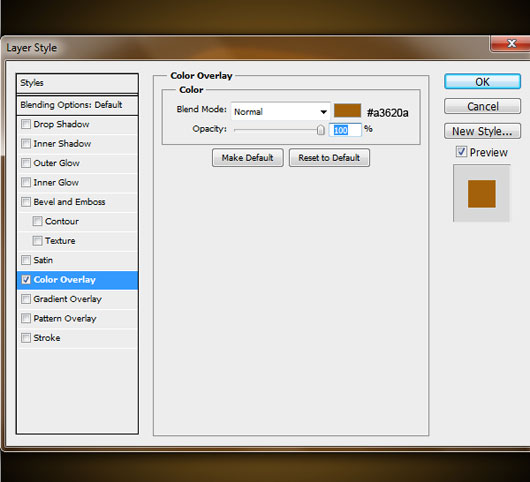
Change the name of the layer containing the rim of the hat to ‘Rim’ and change the color overlay using Layer Style. Now it is best you duplicate each layer so that we can add the pattern in a little bit.
Step 5
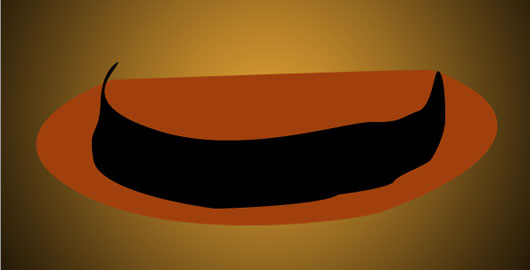
No need to change the color of the bow (leave it black #000000) that goes around the hat but you can change the name of this layer to ‘Bow’.
Step 6
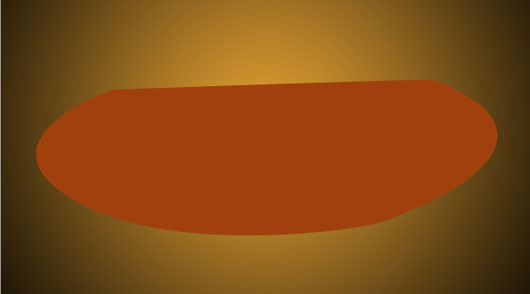
Now for the top of the hat (you can name this layer ‘Top’) change its color in Layer Style.
Step 7
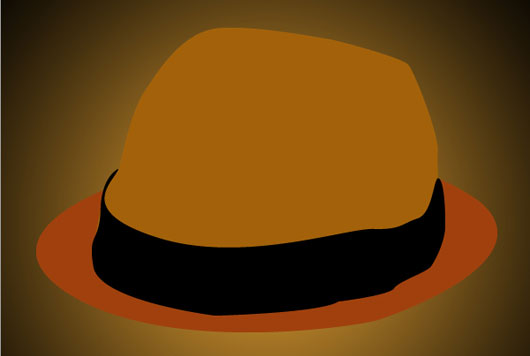
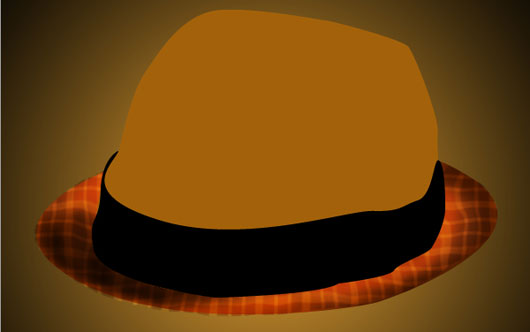
This is how your fedora should look so far now that you have applied the color changes. Make your backup layers invisible by clicking the eye icon next to that layer.
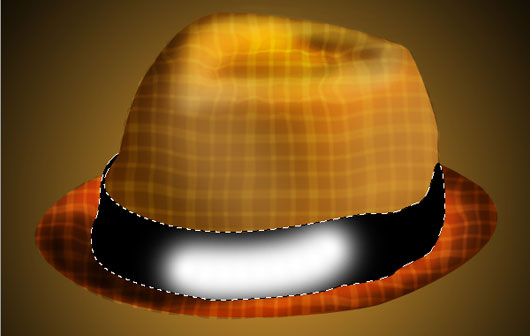
Step 8: The Rim
Select your ‘Rim’ layer then use the menu option Layer > Layer Style > Create Layer. Now make sure that Rim’s ‘Color Fill’ layer is selected. Let’s darken some areas on this rim. Grab your Burn Tool, start out with a 52px soft round brush, using the settings Range: Midtones and Exposure: 86% and go along the edges.
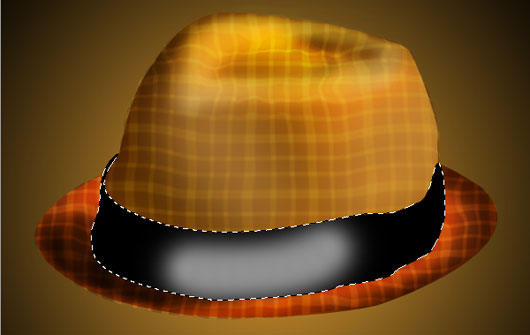
Step 9
Now change the Range to shadows and darken it a bit more with a 75px soft round brush.
Step 10
Now grab your Dodge brush and brush in some highlights. I used a 72px soft round brush, with the settings Range: Highlights and Exposure: 48%.
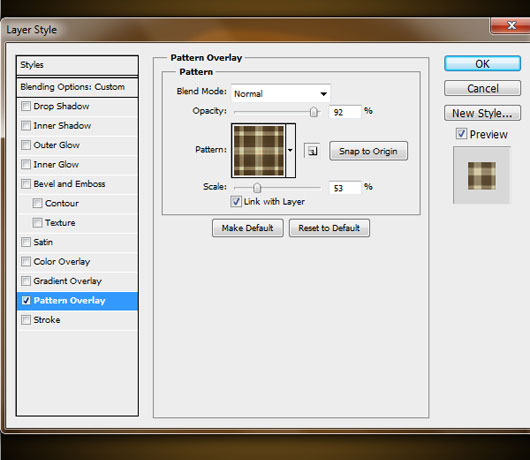
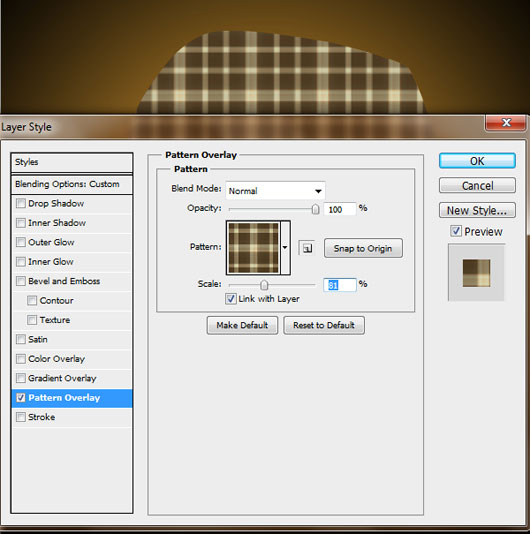
Step 11: Pattern
Make your duplicated ‘Rim’ layer visible. Make sure that this layer is above the rim’s ‘Color Fill’ layer and rename it ‘Rim Pattern’. Now right click the layer and click ‘Convert to smart object‘ and then rasterize it. Make sure that this layer’s Fill setting is at 0% and add this layer style:
Step 12
Now convert this layer to a smart object and rasterize it as well. Change this layer’s blending mode to ‘Soft Light’.
Step 13
Now the pattern looks a little ‘flat’ — let’s change that. Go to Filter > Liquify and try your best to alter the pattern and give it some shape.
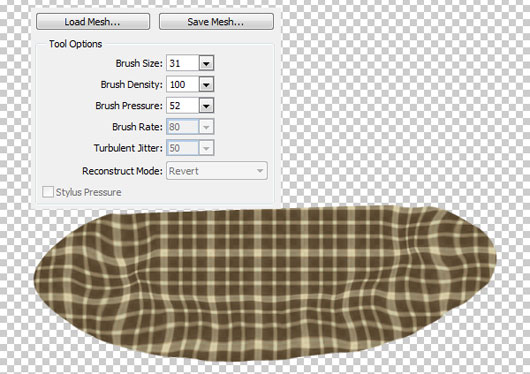
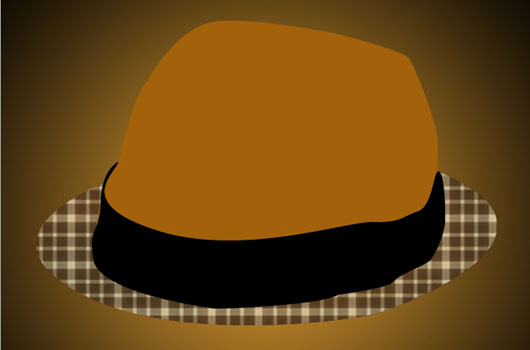
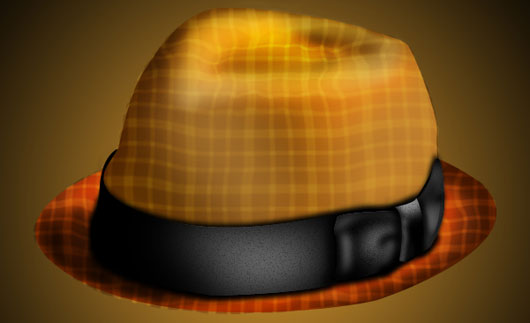
Step 14
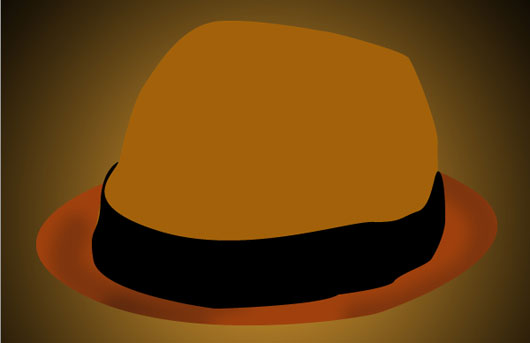
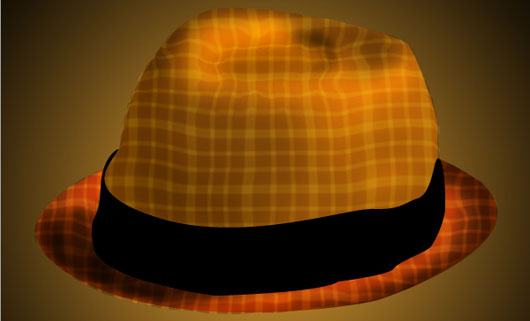
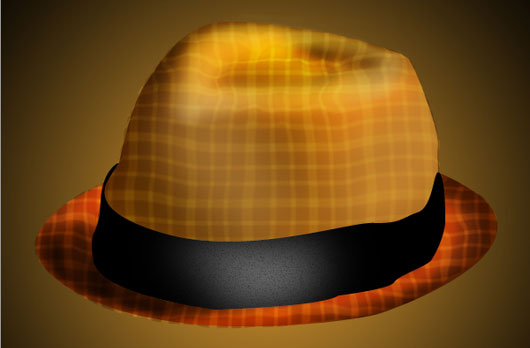
This is how it should look so far:
Step 15: Top
Now on your ‘Top’ layer go to Layer > Layer Style > Create Layer. Now make sure that you have selected ‘Top’s Color Fill’ and Burn and Dodge the top of the hat. It is best to use a mixture of Ranges and play with the Exposure also.
Step 16
Now grab that invisible ‘Top’ layer and make it visible. Make sure that it is above the ‘Top’s Color Fill’ layer and add the pattern. Make sure that this layer’s Fill is at 0%.
Step 17
Convert this ‘Top Pattern’ layer to a smart object and rasterize it. Change this layer to ‘Soft Light’ and change the Fill to 57%.
Step 18
Now alter the pattern to give the hat some shape. Go to Filter > Liquify, I used a 69 pixel brush for the outside edges of the hat and a smaller brush for the top.
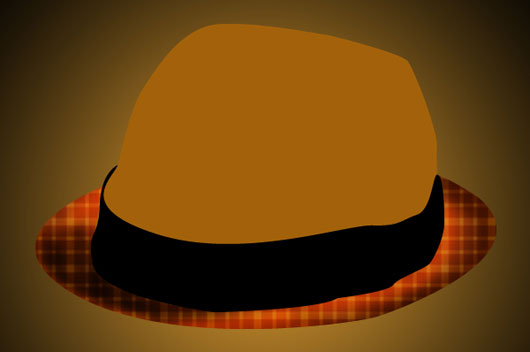
Step 19
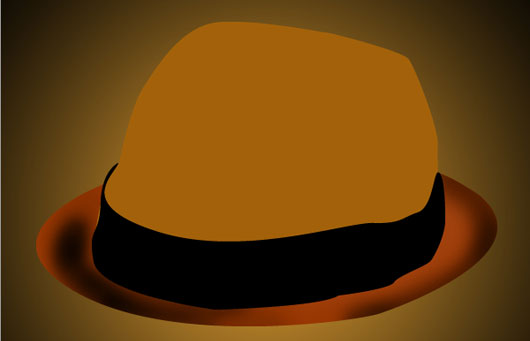
This is how it should look after liquifying:
Step 20
Now create a new layer above the pattern and grab your paint brush tool. With a 135px soft round brush (#d0a054) brush in the soft highlights. I made a ‘V’-like slash on my hat for the highlights.
Step 21
Change the Opacity of this layer to 60%:
Step 22
Create a new layer. Now we will darken the ‘Top’ in a bit more. With the same soft round paintbrush (#2e1b01) darken it up around the left side edge. Then change this layer to ‘Soft Light’:
Step 23
Create a new layer and with a soft brush (#ffffff) add in some more highlights to the top:
Step 24
Change this layer to ‘Overlay’ with an Opacity of 55%:
Step 25
Create a new layer and add some more shine. I also used the ‘Smudge tool’ to smooth it out
Step 26
Change this layer to ‘Soft Light’ with an Opacity of 87%:
Step 27
Now create a new layer above your ‘Bow’ layer and with a 83px soft round brush (#ffffff) brush in some shine. I usually like to make a selection of the ‘Bow’ so that I don’t have to worry about erasing. To make a selection just hover over the square next to the ‘Bow’ layer while pressing Control or Option and click that square.
Step 28
Change the Fill of this shine layer to 57%:
Step 29
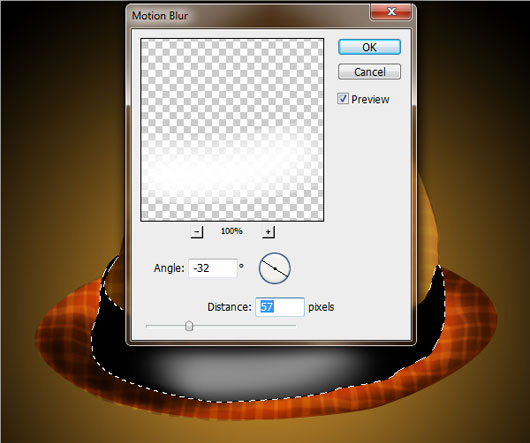
Now go to Filter > Blur > Motion Blur and blur this layer using these settings:
Step 30
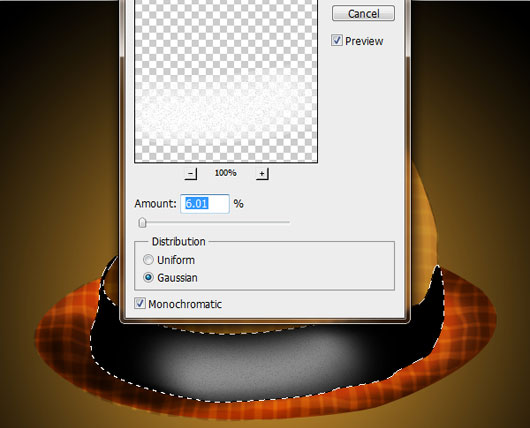
Add some noise by going to Filter > Noise > Add Noise and use the following settings:
Step 31
You may have to erase some areas to make this highlight look more natural.
Step 32
Add in shadows and highlights by using the black and white Paint Brush Tool (soft round brush). Also remember whenever you add white strokes to add some noise to it, as in Step 30. Add in highlights until it looks like a bow, such as in the image below.
Step 33
Now go to your ‘Bow’ layer that is invisible and make it visible and duplicate it. Make sure ‘Bow Copy’ and ‘Bow Copy 2’ are beneath the original bow layer. Take one of the duplicates and blur it using Filter > Blur > Gaussian Blur and these settings:
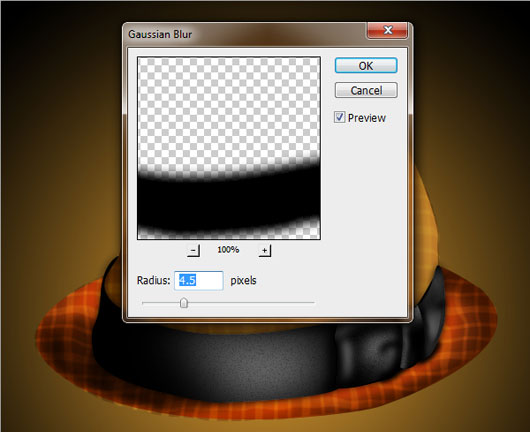
Step 34
Move this layer downward a few pixels:
Step 35
Repeat the Gaussian blur again but apply it to the other duplicated layer, and then move it upward.
Step 36
Download the PSD of the Feather and drag and drop it over to your canvas. Resize it if need be.
Step 37
Add in a drop shadow for the feather:
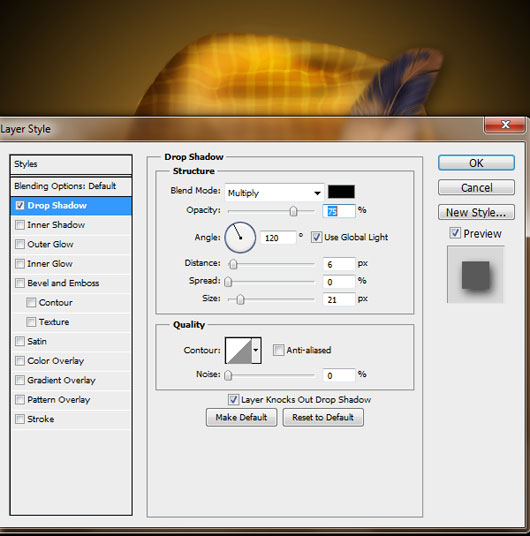
Step 38
Create a new layer and, with your Pen tool, create a line as shown below. Make sure that your Paint Brush tool is set to a 3px soft round brush #FFFFFF. Right click the Pen tool line and select Stroke Path. Also make sure the ‘Simulate Pressure’ box is checked.
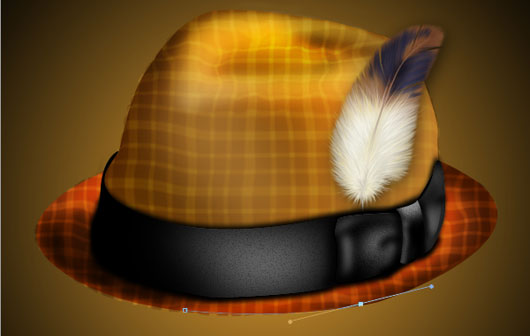
Step 39
Change this layer to ‘Soft Light’:
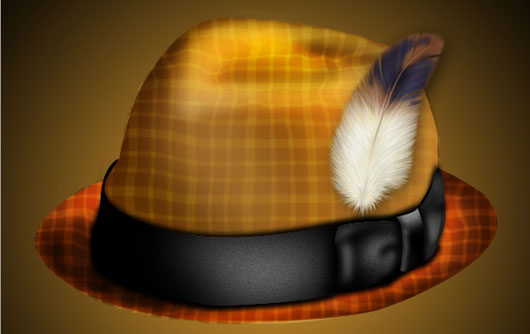
Step 40
Create a new layer above your ‘Background’ layer. Place a highlight behind the hat on this layer using a #FFFFFF 499px soft round brush.
Step 41
Change this layer to ‘Overlay’:
Step 42
Create a new layer above the ‘light’ layer and with a #FFFFFF soft round brush, brush along the top outer edges of the hat.

Step 43
Change the Opacity of this layer to 32%:
Step 44
Create a new layer and again add shadow to the bottom. Change this layer’s blending mode to Overlay with an Opacity of 71%:
Step 45
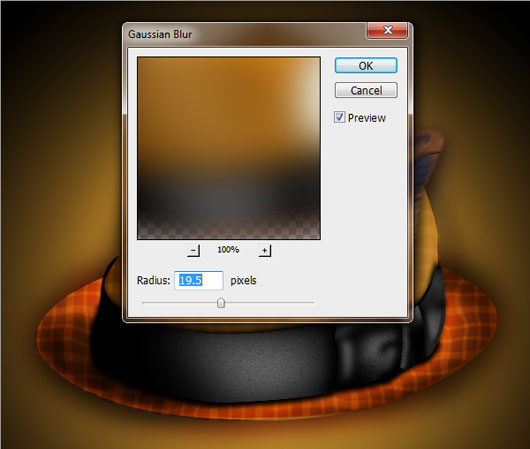
Now place everything pertaining to your fedora hat in a group (except for the shadow layer, Light layer and background layer). Place it in a group by selecting all of the layers and dragging them to the Folder icon. Duplicate this folder and convert it to a smart object and apply a Gaussian Blur.
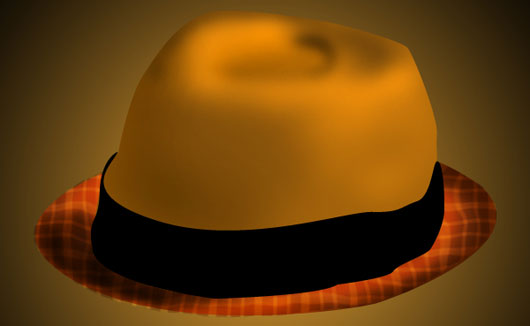
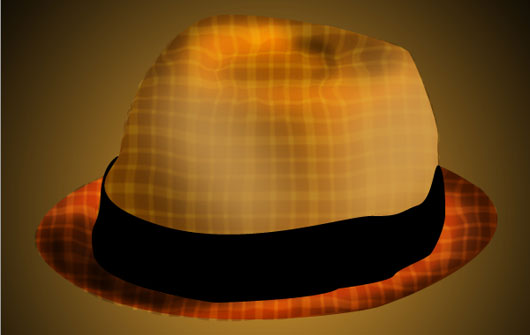
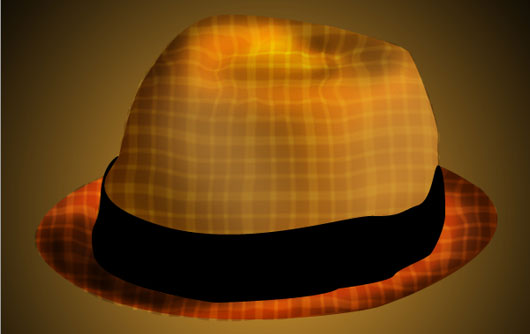
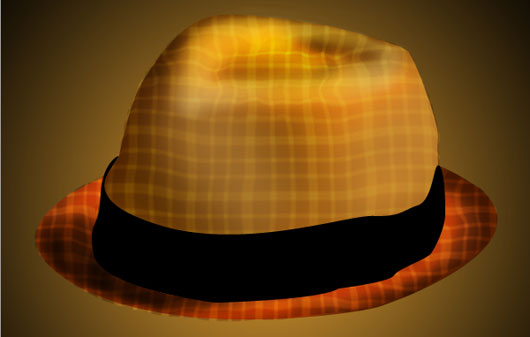
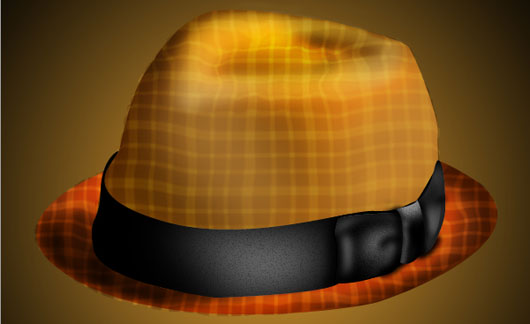
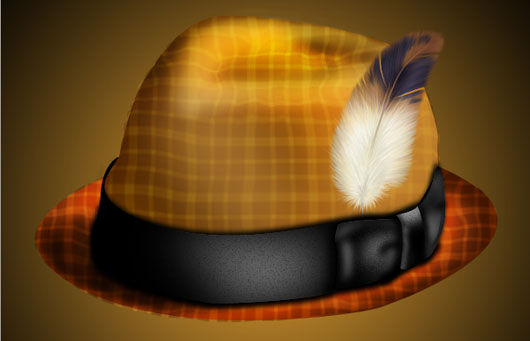
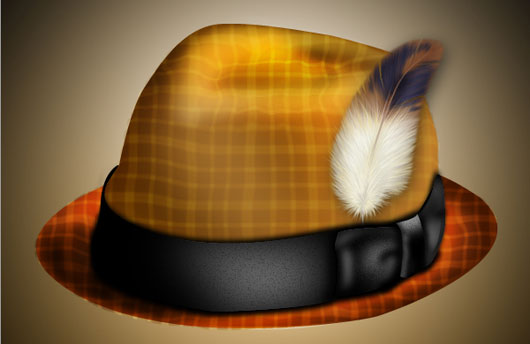
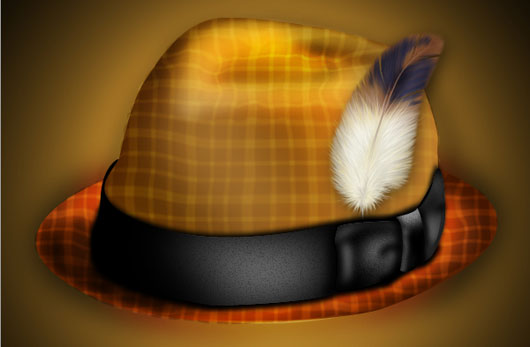
Final Results
Here’s what your hat should look more or less like. Congratulations!
Frequently Asked Questions (FAQs) about Creating a Fedora Hat in Photoshop and Illustrator
How can I use the liquify tool in Photoshop to create a Fedora hat?
The liquify tool in Photoshop is a powerful feature that allows you to push, pull, rotate, reflect, pucker, and bloat any area of an image. To create a Fedora hat, you can use the liquify tool to manipulate the shape of the hat. Start by drawing a basic shape of the hat, then select the liquify tool from the filter menu. Use the forward warp tool to push pixels around, the pucker tool to reduce the area of a brush, and the bloat tool to enlarge the area of a brush. Remember to use a large brush size for large adjustments and a small brush size for finer details.
How can I use Illustrator’s warp tools to create a Fedora hat?
Illustrator’s warp tools can be used to create a Fedora hat by distorting the shape of the hat. Start by drawing a basic shape of the hat, then select the warp tool from the toolbar. Click and drag on the shape to warp it. You can adjust the intensity of the warp effect by changing the pressure setting in the options bar. Use the twirl tool to create a swirling effect, the pucker tool to contract a shape, and the bloat tool to expand a shape.
Where can I find reference images for Fedora hats?
Reference images can be found on various stock photo websites such as iStock. Simply search for “Fedora hats” and you will find a wide variety of images that you can use as a reference. Remember to respect the copyright of the images and only use them for reference purposes.
Are there any video tutorials on how to create a Fedora hat in Photoshop and Illustrator?
Yes, there are many video tutorials available online. Websites like YouTube have a vast library of tutorials where you can learn how to create a Fedora hat in Photoshop and Illustrator. These tutorials provide step-by-step instructions and are a great resource for visual learners.
Where can I find inspiration for Fedora hat designs?
Websites like Pinterest are a great source of inspiration for Fedora hat designs. You can find a wide variety of Fedora hat designs from different artists around the world. You can also look at fashion magazines or websites to see the latest trends in Fedora hat designs.
How can I add texture to my Fedora hat in Photoshop?
Adding texture to your Fedora hat in Photoshop can make it look more realistic. You can add texture by using the texture brushes in Photoshop or by applying a texture image to the hat. To apply a texture image, open the image in Photoshop, then drag and drop it onto the hat. Change the blending mode of the texture layer to overlay or soft light to blend it with the hat.
How can I create a shadow for my Fedora hat in Illustrator?
Creating a shadow for your Fedora hat in Illustrator can give it a 3D effect. You can create a shadow by duplicating the shape of the hat, filling it with black, and then offsetting it slightly. Then, use the blur tool to blur the edges of the shadow.
How can I create a realistic brim for my Fedora hat in Photoshop?
Creating a realistic brim for your Fedora hat in Photoshop can be achieved by using the burn and dodge tools. The burn tool darkens areas of the image, while the dodge tool lightens areas. Use these tools to add highlights and shadows to the brim of the hat, giving it a more realistic appearance.
How can I add details to my Fedora hat in Illustrator?
Adding details to your Fedora hat in Illustrator can be done by using the pen tool or the brush tool. You can draw lines to represent the stitches on the hat, or use the brush tool to add texture. You can also use the gradient tool to add a gradient effect to the hat.
How can I save and export my Fedora hat design in Photoshop and Illustrator?
Once you’re satisfied with your Fedora hat design, you can save and export it in Photoshop and Illustrator. In Photoshop, go to File > Save As, choose the format you want, and click Save. In Illustrator, go to File > Export, choose the format you want, and click Export. Remember to save your work frequently to avoid losing any progress.

