

In this article, we will be looking at some of the common caching techniques in PHP: Opcache, Expires Headers and Query Caching in MySQL. We’ll look at additional approaches in part 2.

Key Takeaways
- Zend Opcache, Expires Headers, and Query Caching in MySQL are common caching techniques in PHP that can bypass certain steps in PHP’s request lifecycle, resulting in less time and resources wasted and faster page load times.
- Zend Opcache comes pre-installed with PHP 5.5 and newer. It can be enabled and configured to optimize PHP performance by storing precompiled script bytecode in shared memory, eliminating the need for PHP to load and parse scripts on each request.
- Expires Headers can be used with Apache to cache static files such as stylesheets, script files, images, and other media files. By specifying an expiration time, browsers can be instructed to hold on to the cached version of the file for a longer period, reducing bandwidth usage and improving web performance.
- MySQL Query Caching can speed up web applications by putting the parsed version of an SQL query and its corresponding result set into the cache. This makes subsequent requests for pages using the same set of queries retrieve the results faster as the application no longer has to go to the database to parse the query and fetch the results.
PHP’s Request Lifecycle
Before we move on, it’s important to understand PHP’s request lifecycle. What happens behind the scenes when you access a PHP file from the browser?
- A file is fetched from the file system – it doesn’t really matter if it has changed since the last request.
- Lexical analysis – the human-readable code is converted into something (tokens) that the parser can understand.
- Parsing – the machine-readable strings are analyzed for potential errors. This is like grammar-checking.
- Opcode Creation – the tokens that we got from step 2 are converted into machine executable code.
- Machine code execution – machine code is processed and then executed.
For a more in-depth explanation, check out this article on how PHP echos a Hello World.
All of those steps happen really quickly, and yet there is a lot of time and resources wasted on every request. That is because for every request for each PHP file on the server, the server has to go through all of them.
The caching techniques that we will be going through in these two articles help bypass steps 2, 3 and 4. That means less time and fewer resources wasted, leading to faster page load times for the user.
Zend Opcache
The first caching tool we’re going to look at is Zend Opcache.
It comes pre-installed with PHP 5.5 and newer. If running php --version from your terminal gives you something like the following, you’re good to go:
Zend Engine v2.5.0, Copyright (c) 1998-2014 Zend Technologies

    with Zend OPcache v7.0.3, Copyright (c) 1999-2014, by Zend Technologies
Alternatively, you can create a new PHP file, call phpinfo(), then access the file from your browser. Look for ‘Zend Opcache’. It should give you something similar to the following:
Activation
Once you have confirmed that Zend Opcache is installed, you can enable it by opening your php.ini file, then searching for the term ‘opcache’, uncommenting opcache.enable=0 and setting its value to 1:
[opcache]

; Determines if Zend OPCache is enabled

opcache.enable=1
Don’t forget to restart PHP to activate the changes.
If you are using a PHP version below 5.5, you can still take advantage of Zend Opcache by installing it via PECL. You can do so by executing the following command:
pecl install zendopcache-beta
Configuration
You can configure Zend Opcache by editing the opcache.ini file under /etc/php5/mods-available/ on Debian-based distributions. By default, the configuration file contains the following:
; configuration for php ZendOpcache module

; priority=05

zend_extension=opcache.so
Here are the most important configuration options you can tweak to your liking:
-
opcache.memory_consumption – the size of the shared memory storage used. This is expressed in megabytes and defaults to 64. You can go higher, depending on how much power your server packs and how much memory you think your application is going to need.
-
opcache.interned_strings_buffer – The amount of memory used to store interned strings, also in megabytes. An interned string is an approach in which only a single copy of each unique string is stored in memory.
-
opcache.max_accelerated_files – The maximum number of files that can be accelerated by opcache. Only numbers between 200 and 100000 are allowed.
-
opcache.revalidate_freq – The number of seconds after which to check PHP files for changes. Giving it a value of
1means checking for changes once per second, but only once per request.0means it will always check for changes. This is the optimal setting for development environments. -
opcache.max_file_size – Allows exclusion of large files from being cached. By default, it has a value of
0which means that all files are cached. The value for this option is expressed in bytes. -
opcache.fast_shutdown – When enabled, the deconstructors get a speed boost at the end of each request. This means that the subsequent request becomes faster. By default, it’s set to
0. Setting it to1will enable it.
More configuration options are available here: OPCache Runtime Configuration.
To check if opcache is working properly, you can install opcache-gui by executing the following command from the terminal
composer require amnuts/opcache-gui
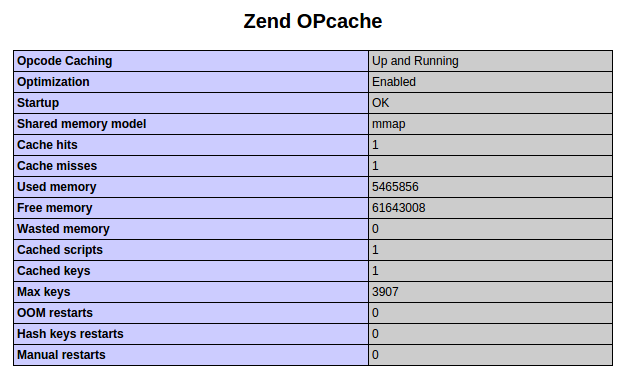
Once installed, you can copy the index.php file from the vendor/amnuts/opcache-gui directory to the root of the desired project directory and access it from your browser. It will then show you something similar to the following:

It will show you the memory usage, hit rate, and the configuration options that you have set. You can also reset the cache or invalidate files manually.
Expires Headers
We can also use Apache for caching (instructions for Nginx at the end of this section). With Apache, we can mainly cache static files such as stylesheets, script files, images and other media files.
By default, Apache uses etags. These are hashes of a file that are sent in the response header. The browser doesn’t make a request for that file again if the etag is the same, and uses the cached version instead until the default value for the expires header becomes greater than or equal to the time on the client’s computer. But when you make a change to a file, the etag changes and the browser will have to request the file again from Apache. This is all well and good, but we can take it further by specifying an expiration time. That way we can have the browser hold on to the cached version of the file for a longer period.
Specifying an expires header via Apache tells browsers to cache static resources for a specific period of time.
To enable the use of this functionality you must first enable the expires module. You can do that by executing the following commands from the terminal:
sudo a2enmod expires

sudo service apache2 restart
The first line enables the expires module and the second line restarts Apache in order for changes to take effect.
Once that’s done you can use the expires headers from your virtual server’s configuration file, usually residing in etc/apache/sites-available or something similar – check your installation’s documentation.
Open up the server config file and look for the Directory directive to find the directory corresponding to the project you’re setting etags up for. There, you can start using the expires module:
<IfModule mod_expires.c>

ExpiresActive On

ExpiresDefault "access plus 1 day"

ExpiresByType image/png "access plus 10 days"

ExpiresByType text/css "access plus 25 days"

</IfModule>
The first and last line are a wrapper where we check if the mod_expires module is already enabled. In the second line, we specify that we want to start using the module. The third to fifth line is where we set the rules. Here’s a description of what each option does:
-
ExpiresDefault– allows you to specify the default expire rule for all static files. This accepts the maximum timeframe during which you want the browser to hold on to the file. -
ExpiresByType– allows you to specify the expire time based on file type. This accepts the mime type as the first argument and the expire time as the second.
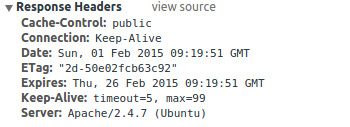
You can now check using the network tab in the Chrome Developer Tools that it has indeed changed the value for the Expires header based on the setting that you specified. The screenshot below is that of a stylesheet. The page is viewed on Feb 1, 2015 so we just add 25 days to that and get the expiration date:
To configure expiration headers for Nginx, see this excellent post.
MySQL Query Caching
For web applications which mostly read data from the database, you can take advantage of query caching. This puts the parsed version of an SQL query and its corresponding result set into the cache which in turn makes subsequent requests for pages using the same set of queries retrieve the results faster. This is because your application no longer has to go to the database to parse the query and fetch the results.
For MySQL versions below 5.6.8, query caching is enabled by default. You can check which version you have installed by executing the following command from your terminal:
mysql --version
mysql  Ver 14.14 Distrib 5.5.41, for debian-linux-gnu (x86_64) using readline 6.3
Configuring Query Cache
In this case the version is 5.5.41 so I know that query caching is enabled. If you have version 5.6.8 and above you need to enable it. You can do so by editing the configuration file. On Ubuntu, it’s in /etc/mysql/my.cnf.
Once you have the file open, try to find the string # * Query Cache Configuration. If it exists, put your configuration below it. If not, then navigate to the bottom of the file and add it:
# * Query Cache Configuration

query_cache_type             = ON

query_cache_min_res_unit     = 4096

query_cache_limit            = 1M

query_cache_size             = 16M

query_cache_wlock_invalidate = OFF
Note that the values in the sample above are the default configuration on MySQL version 5.5, so you’ll have to change them based on your needs and the capacity of your server. The general rule for tweaking the configuration is to not go with really high values if your database is updated frequently, as it’s going to take a longer time to invalidate the items in the cache once they are updated. To give you an idea of how much you can set for each item, here’s a brief description of each. Note that when an integer value is used without adding the unit such as M (for MB), then it is expressed in bytes:
query_cache_type– allows you to specify whether to enable query caching or not. You can set the value to eitherONorOFF.query_cache_limit– the maximum size of a result set that can be cached per query. Note that when a specific query has a result set exceeding the value specified in this option, it wouldn’t be included in the query cache at all.query_cache_min_res_unit– the minimum amount of memory that can be allocated to store a query.query_cache_size– the total size of the query cache.query_cache_wlock_invalidate– allows you to specify whether to invalidate the query cache when a specific table is locked for writing. You can set the value to eitherONorOFF.
Once you’re done tweaking your query cache configuration, you can now check if it is indeed functioning by executing the following query:
show variables like 'query%';
This will then return results similar to the following:
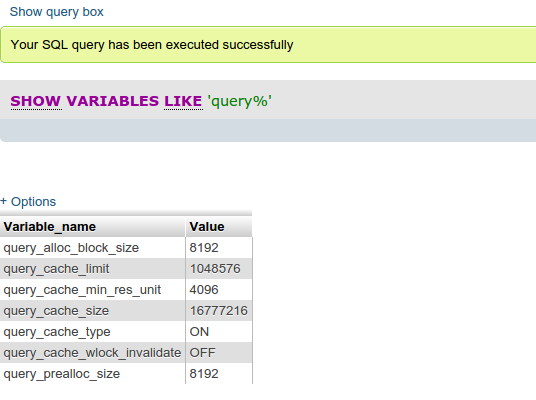
Note that the results returned for all integer values are expressed in bytes.
Testing Query Cache
Execute a SELECT query in one of the databases that you currently have in the machine you’re working on.
Next, execute the following query:
SHOW STATUS LIKE "qcache%";
This shows you something similar to the following:
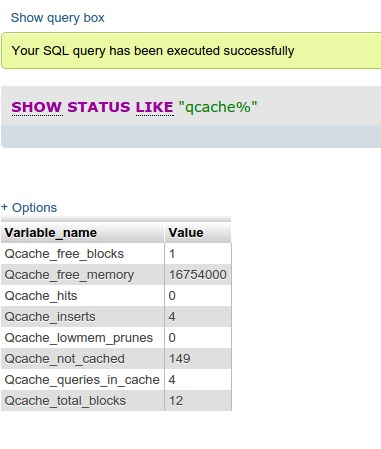
Take note of the values that you get and then execute the same SELECT query that you executed earlier. If you’re using phpmyadmin, you can just click on the refresh link under the query box.
You can also do the same for the SHOW STATUS query. It should now have incremented the values for the Qcache_free_memory, Qcache_hits, Qcache_inserts, Qcache_not_cached, Qcache_queries_in_cache, and Qcache_total_blocks. If those values have incremented then query caching is working.
Query Cache Gotchas
Here are some things to remember when using query cache:
-
It only works with
SELECTqueries.SHOWqueries aren’t cached since they are usually used for getting configuration values or general information about the server itself. -
Queries should be exactly the same in order for the cache to work. This means that if you update even a single character of the same query, it would be considered a different query, which means it won’t hit the cache.
-
Only deterministic queries can take advantage of the cache. This means that functions like
RAND()orCONNECTION_ID()or any other function which changes the results on each subsequent execution of the same query cannot take advantage of the query cache. -
Table updates such as when inserting new rows, updating the table schema, or updating a row automatically invalidate the query cache.
Conclusion
In this part, we looked at some common caching techniques to use with PHP and MySQL. In the followup, we’ll take a look at some other software which can further speed up our apps – Varnish, Memcached and some PHP caching libraries. Stay tuned!
Frequently Asked Questions (FAQs) about Zend OPcache, ETags, and Query Caching
What is Zend OPcache and how does it work?
Zend OPcache is a powerful PHP extension that improves PHP performance by storing precompiled script bytecode in shared memory. This eliminates the need for PHP to load and parse scripts on each request. The OPcache engine stores precompiled script bytecode in memory which leads to significant performance gains as the overhead of reading code from the disk and compiling it on every request is eliminated.
How can I enable Zend OPcache in my PHP configuration?
To enable Zend OPcache, you need to modify your php.ini file. Locate the file and open it in a text editor. Look for the line that reads ;opcache.enable=0 and change it to opcache.enable=1. Save the file and restart your web server for the changes to take effect.
What are ETags and how do they improve web performance?
ETags, or entity tags, are a mechanism that web servers and browsers use to validate cached components. They allow a browser to check if the cached version of the component has changed without having to download the entire component. This can significantly reduce bandwidth usage and improve web performance.
How does query caching work and how can it improve my website’s performance?
Query caching is a technique used to speed up dynamic web applications by caching the result set returned by a database query. When the same query is executed again, the database can return the result from the cache instead of executing the query again. This can significantly reduce the load on the database and improve the performance of your website.
How can I check if Zend OPcache is working on my website?
You can check if Zend OPcache is working by creating a phpinfo() file. This file will display all the information about your PHP configuration, including whether Zend OPcache is enabled or not. If it is enabled, you will see an OPcache section in the phpinfo() output.
How can I optimize the settings of Zend OPcache for my website?
Optimizing Zend OPcache settings depends on your specific website and server configuration. However, some general tips include increasing the memory consumption, adjusting the revalidate frequency, and enabling the fast shutdown.
What are the potential issues with using Zend OPcache?
While Zend OPcache can significantly improve PHP performance, it can also cause issues if not properly configured. These issues can include increased memory usage, stale cache, and issues with file-based sessions.
How can I clear the Zend OPcache?
You can clear the Zend OPcache by using the opcache_reset() function. This function will clear the entire opcode cache.
How does ETag caching compare to other caching methods?
ETag caching is a form of validation caching, which means it can provide more precise control over caching than some other methods. However, it can also be more complex to implement and manage.
Can I use Zend OPcache with other caching techniques?
Yes, Zend OPcache can be used in conjunction with other caching techniques such as ETag caching and query caching. Using multiple caching techniques can provide even greater performance improvements.

