

Key Takeaways
- CloudBees Jenkins Operation Center offers enhanced functionality for managing a growing Jenkins cluster, including consolidated navigation, shared build slave resources, and control of authentication and authorization schemes.
- The system allows for the creation of a client master and a shared slave across three separate servers, enhancing the scalability and performance of the Jenkins cluster.
- CloudBees Jenkins Operation Center provides centralized management of multiple Jenkins masters, simplifying the handling of large Jenkins environments, load balancing, and resource allocation.
- The platform supports integration with a wide range of tools in the DevOps pipeline, enhancing workflow efficiency and enabling seamless collaboration across different stages of the software development lifecycle.
This article was sponsored by CloudBees. Thank you for supporting the sponsors who make SitePoint possible!
Picture this: You start using Jenkins, probably with one machine. As both the number of projects and the size of the projects themselves start to grow, you start to add slaves. Slowly, your cluster of Jenkins servers grows, and you slowly start to lose your grip. What if your Jenkins master crashes? If you recognize this feeling or you want to avoid this, you definitely should read on.
In this article we’ll take a small peak at CloudBees Jenkins Operation Center. CloudBees Jenkins Operation Center, created by CloudBees, offers you a lot of additional functionality to take your Jenkins cluster to the next level. The key features for CloudBees Jenkins Operation Center are:
- Consolidated navigation experience across all the client masters.
- Shared build slave resources that can be used by any client masters.
- Control of authentication and authorization schemes used by client masters. This enables features such as: single sign-on and consolidated permission schemes.
- Management of update centers used by client masters.
- Consolidated management of Jenkins Enterprise licenses.
- Management and enforcement of certain key security settings on client masters.
Within this article we’ll just use a small amount of the available features. We’ll be creating a client master and a shared slave. For this we will be using three separate servers. The first one will run CloudBees Jenkins Operation Center, the second one will run Jenkins Enterprise and the third will be used as a shared slave. We will be explaining everything in the next couple of chapters.
Preparation
I’ll be using three virtual machines on my local computer. If you want to follow along, you might want to make sure your own computer is powerful enough. If you happen to have three spare servers somewhere, you can also try it directly on those servers.
The three servers will be managed through Vagrant. I created a multi-machine Vagrant file which will boot all three servers. If you’re not familiar with Vagrant yet, you might want to read this article.
Let’s start off with our Vagrant file. You can find the content here
Note: All three boxes are running CentOS 7. You can easily replace them with Ubuntu boxes if you prefer, but do note that all commands below are meant for CentOS.
Three servers will be created when you run vagrant up. They each have a different IP:
- 192.168.56.105: CloudBees Jenkins Operation Center
- 192.168.56.106: Jenkins Enterprise – Client Master (master)
- 192.168.56.107: Shared Slave (slave)
Installing CloudBees Jenkins Operation Center
We start by installing CloudBees Jenkins Operation Center on our first server. CloudBees Jenkins Operation Center is our main control hub to manage all Jenkins instances. We’ll be using it to create our client master and shared slave. After logging in to the first Vagrant machine by running vagrant ssh CloudBees Jenkins Operation Center in your terminal, you can perform the following commands to install CloudBees Jenkins Operation Center.
sudo rpm --import http://nectar-downloads.cloudbees.com/jenkins-operations-center/latest/rpm/jenkins-ci.org.key

sudo wget -O /etc/yum.repos.d/jenkins-oc.repo http://nectar-downloads.cloudbees.com/jenkins-operations-center/latest/rpm/jenkins-oc.repo

sudo yum update

sudo yum install java jenkins-oc

sudo chkconfig jenkins-oc on

sudo service jenkins-oc start
You will receive an ok message to indicate CloudBees Jenkins Operation Center has been successfully installed and started.
Before we can actually start using CloudBees Jenkins Operation Center, we’ll have to open the web service port to allow access as well as allow our other servers to access this server. We can do this by changing the firewall by running the following commands.
sudo firewall-cmd --zone=public --permanent --add-port=8888/tcp --permanent

sudo firewall-cmd --zone=public --permanent --add-rich-rule='rule family="ipv4" source address="192.168.56.105/32" accept'

sudo firewall-cmd --zone=public --permanent --add-rich-rule='rule family="ipv4" source address="192.168.56.106/31" accept'

sudo firewall-cmd --reload
By now, you should be able to reach CloudBees Jenkins Operation Center with the following URL: http://192.168.56.105:8888/. After entering the above URL, a registration form will show up. You can register for an evaluation license if you haven’t bought the product yet from CloudBees. Just fill in your details and press Next.
When you’ve registered yourself, I recommend you update all the plugins. CloudBees Jenkins Operation Center requires some specific versions of plugins so we want to make sure we have these. Generally, it’s not recommended to update plugins when it’s not needed, as indicated in this article, 7 ways to improve Jenkins.
Note: Problems installing CloudBees Jenkins Operation Center, or using a different server setup? Have a look at the official manual_ for troubleshooting._
Preparing a Client Master
On the client master server, we’ll install Jenkins Enterprise. Jenkins Enterprise is a commercial product like CloudBees Jenkins Operation Center by CloudBees. It’ll enhance your Jenkins experience by installing several plugins.
You can enter the client master server by running vagrant ssh master on the command line. Now you can run the following commands to install Jenkins.
sudo rpm –import http://nectar-downloads.cloudbees.com/jenkins-enterprise/1.580/rpm/jenkins-ci.org.key
sudo wget -O /etc/yum.repos.d/jenkins.repo http://nectar-downloads.cloudbees.com/nectar/rpm/jenkins.repo
sudo rpm --import  http://nectar-downloads.cloudbees.com/jenkins-enterprise/1.580/rpm/jenkins-ci.org.key

sudo wget -O /etc/yum.repos.d/jenkins.repo http://nectar-downloads.cloudbees.com/nectar/rpm/jenkins.repo

sudo yum update

sudo yum install java jenkins

sudo chkconfig jenkins on

sudo service jenkins start
Just as we did when installing CloudBees Jenkins Operation Center, we have to configure our firewall again.
sudo firewall-cmd --zone=public --permanent --add-port=8080/tcp --permanent

sudo firewall-cmd --zone=public --permanent --add-rich-rule='rule family="ipv4" source address="192.168.56.105/32" accept'

sudo firewall-cmd --zone=public --permanent --add-rich-rule='rule family="ipv4" source address="192.168.56.106/31" accept'

sudo firewall-cmd --reload
When you’ve performed these steps on the server, you can enter the Jenkins instance by entering http://192.168.56.106:8080/ in your favorite web browser. Once again, you’ll receive the option to register yourself. Fill in your details for an evaluation version of Jenkins Enterprise.
When completed, make sure you go to Manage Jenkins -> Configure System and set the number of executors to 0. By setting it to 0, we make sure that later on this client master uses any of the available shared slaves instead of building on the server itself.
Adding a Client Master to CloudBees Jenkins Operation Center
Install Jenkins Enterprise is one step. To create a client master out of it, we have to configure it in CloudBees Jenkins Operation Center. After entering CloudBees Jenkins Operation Center again, we click on new item in the menu and choose client master as our option on the CloudBees Jenkins Operation Center instance.
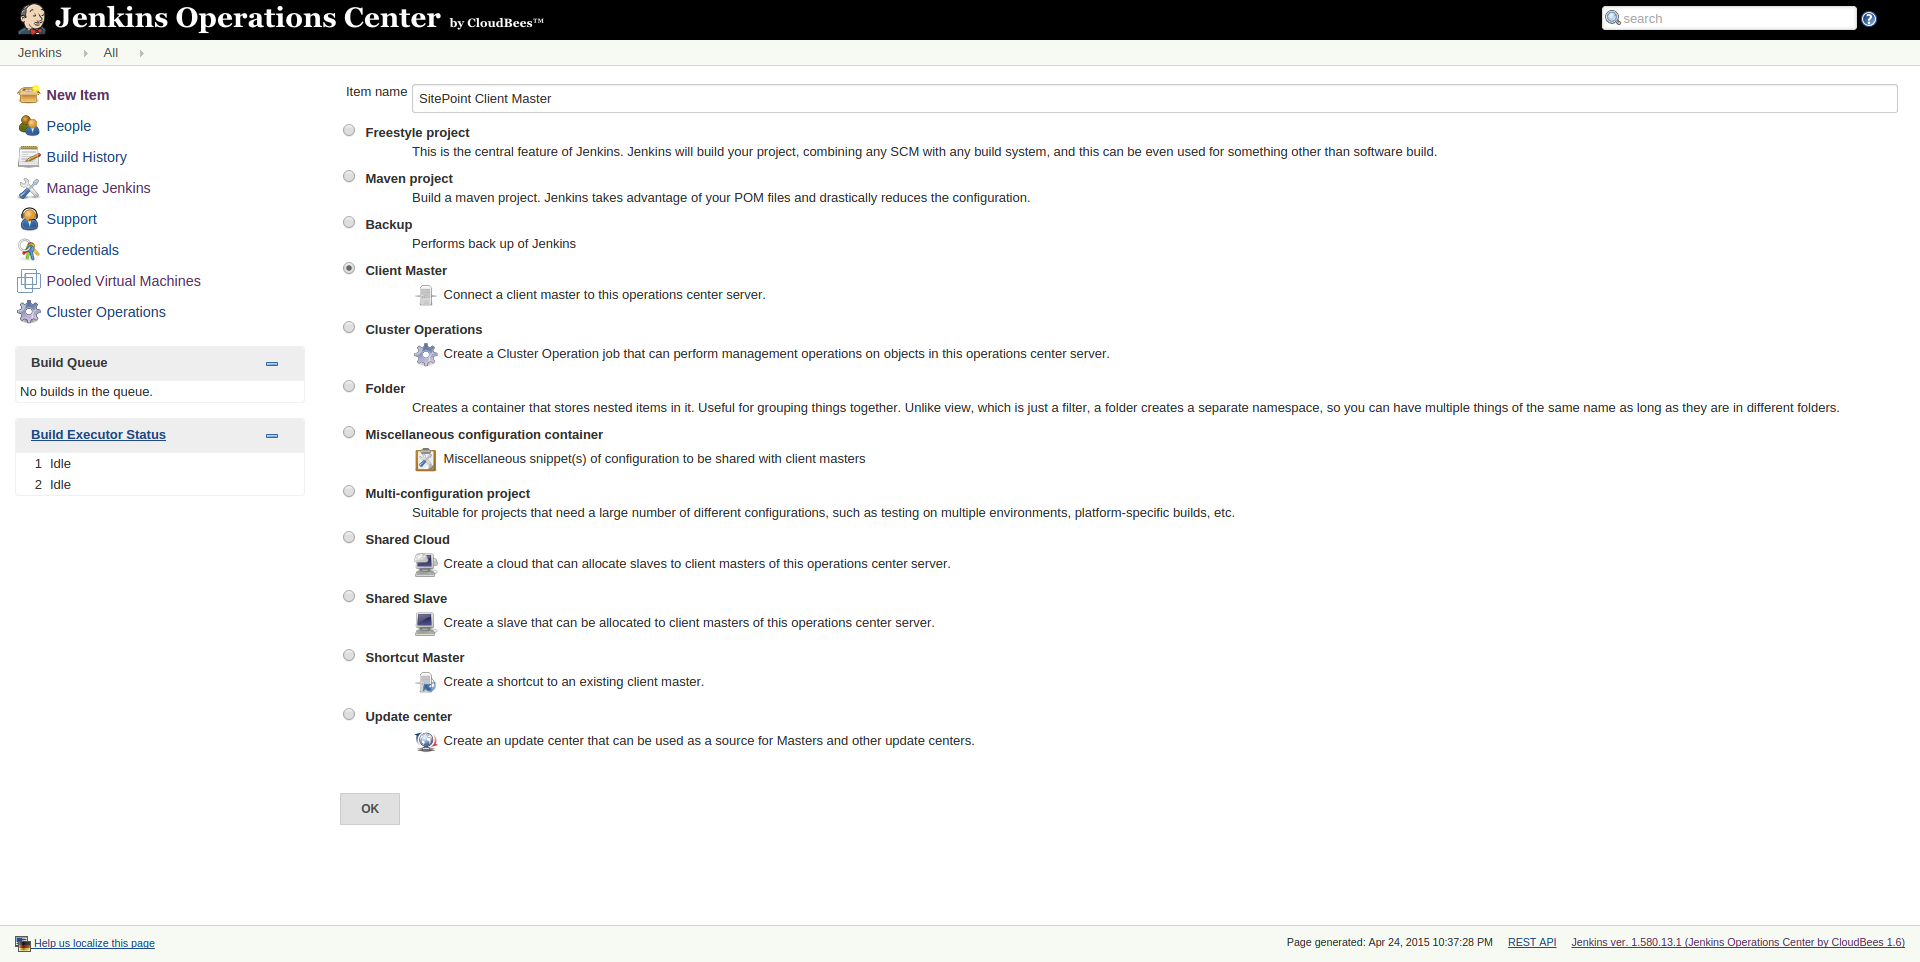
After creating the client master, you can define several settings like which license type to use and whether there’s a specific user who manages this master. The latter option can come in handy when different people manage certain Jenkins instances. You can find more information about the available settings in the official manual. The default license is License (no dedicated executors).
We can now connect this client master with the actual server. By filling in http://192.168.56.106:8080/ in Client Master URL and clicking Push Notification, we can connect our master instance with CloudBees Jenkins Operation Center.
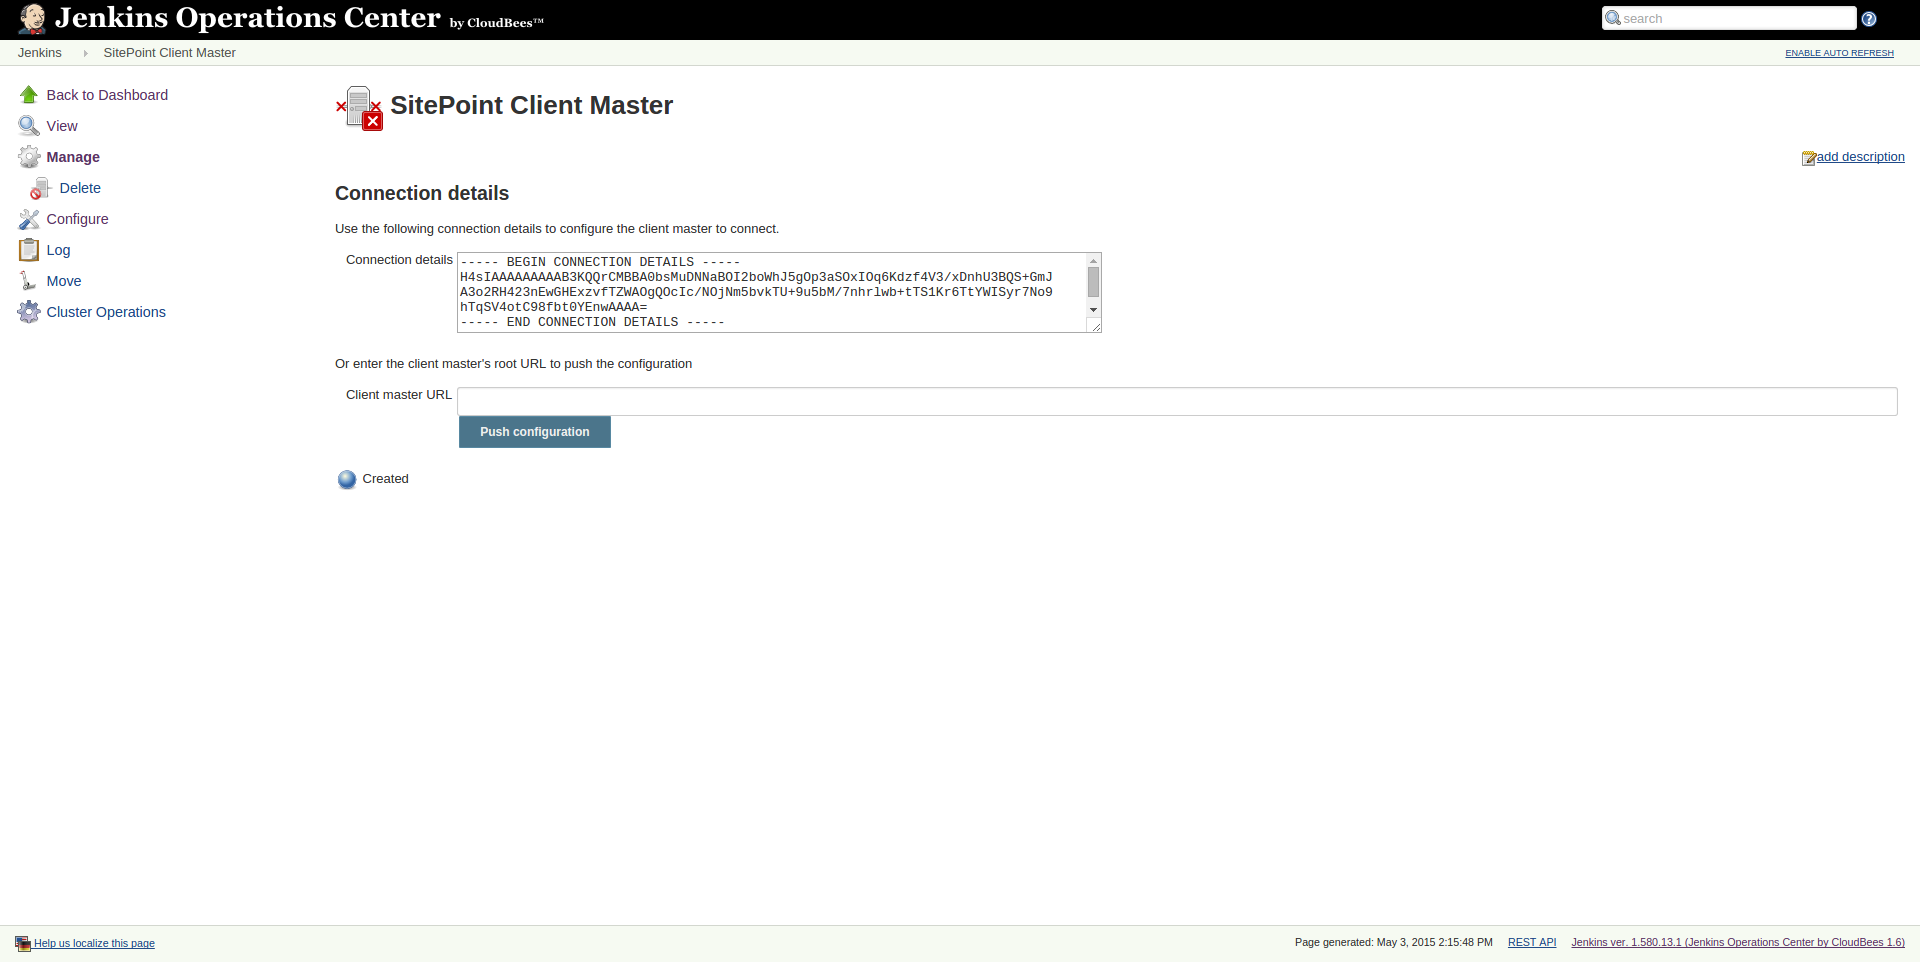
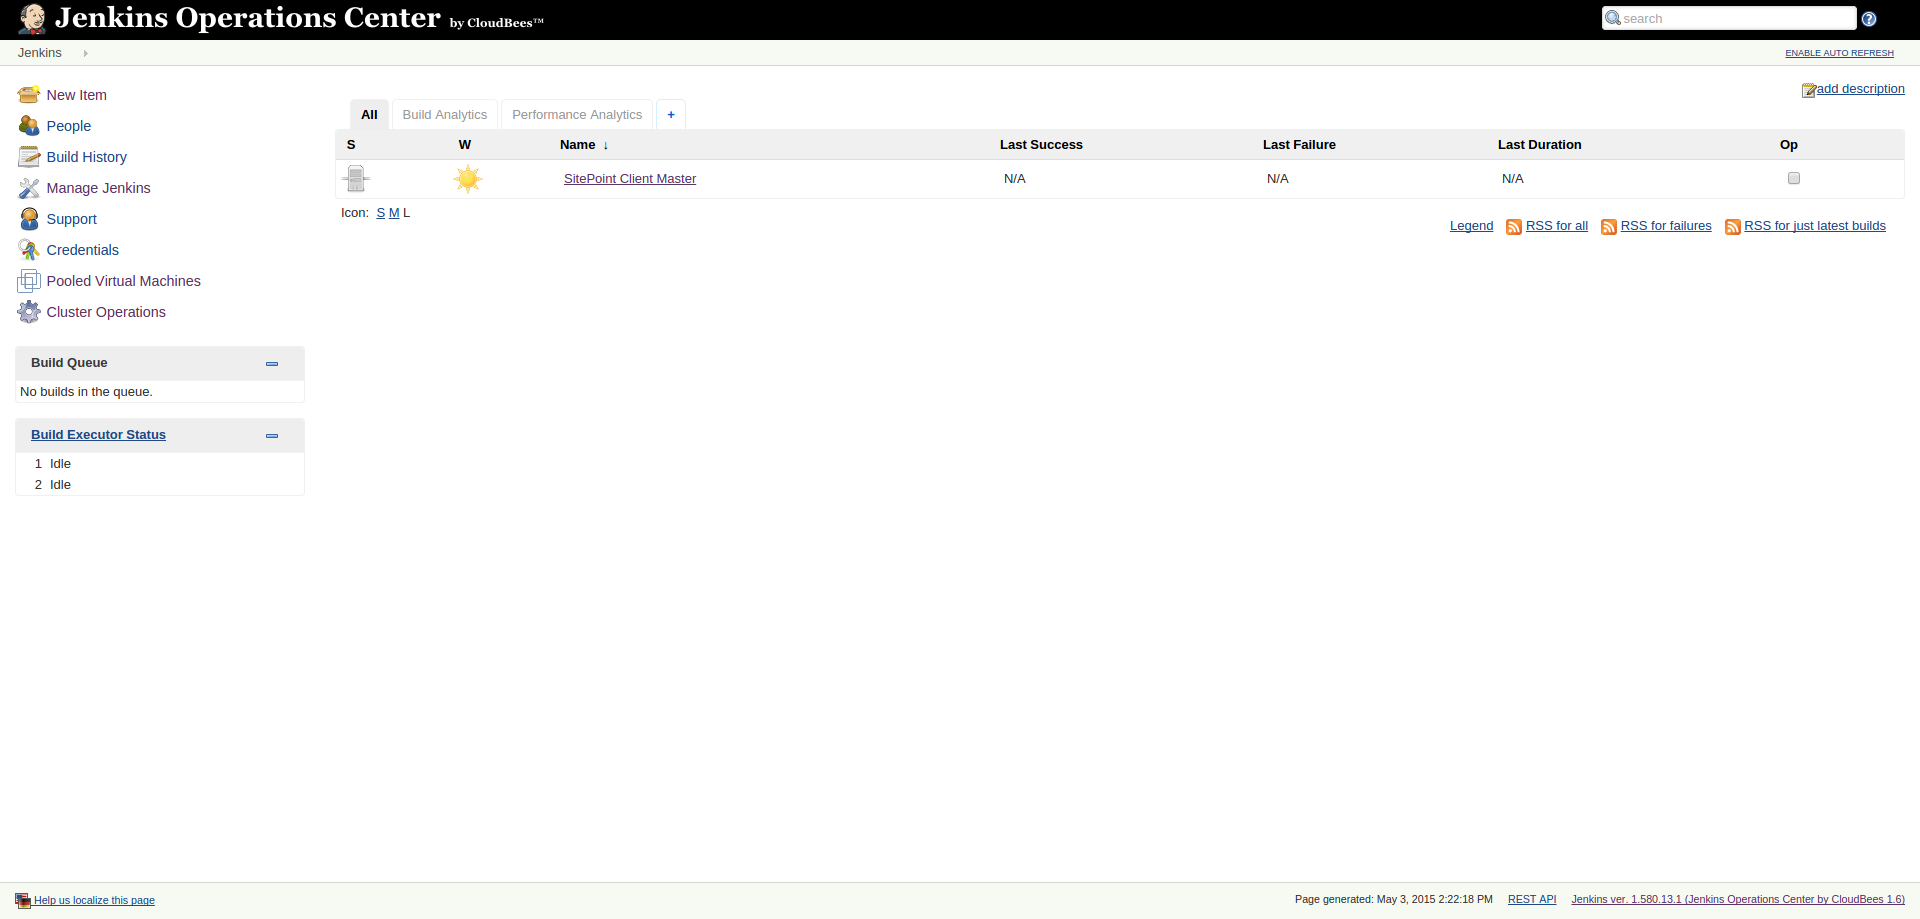
After confirming this connection, you’ll find a connected client master in the overview in CloudBees Jenkins Operation Center.
Adding a Shared Slave
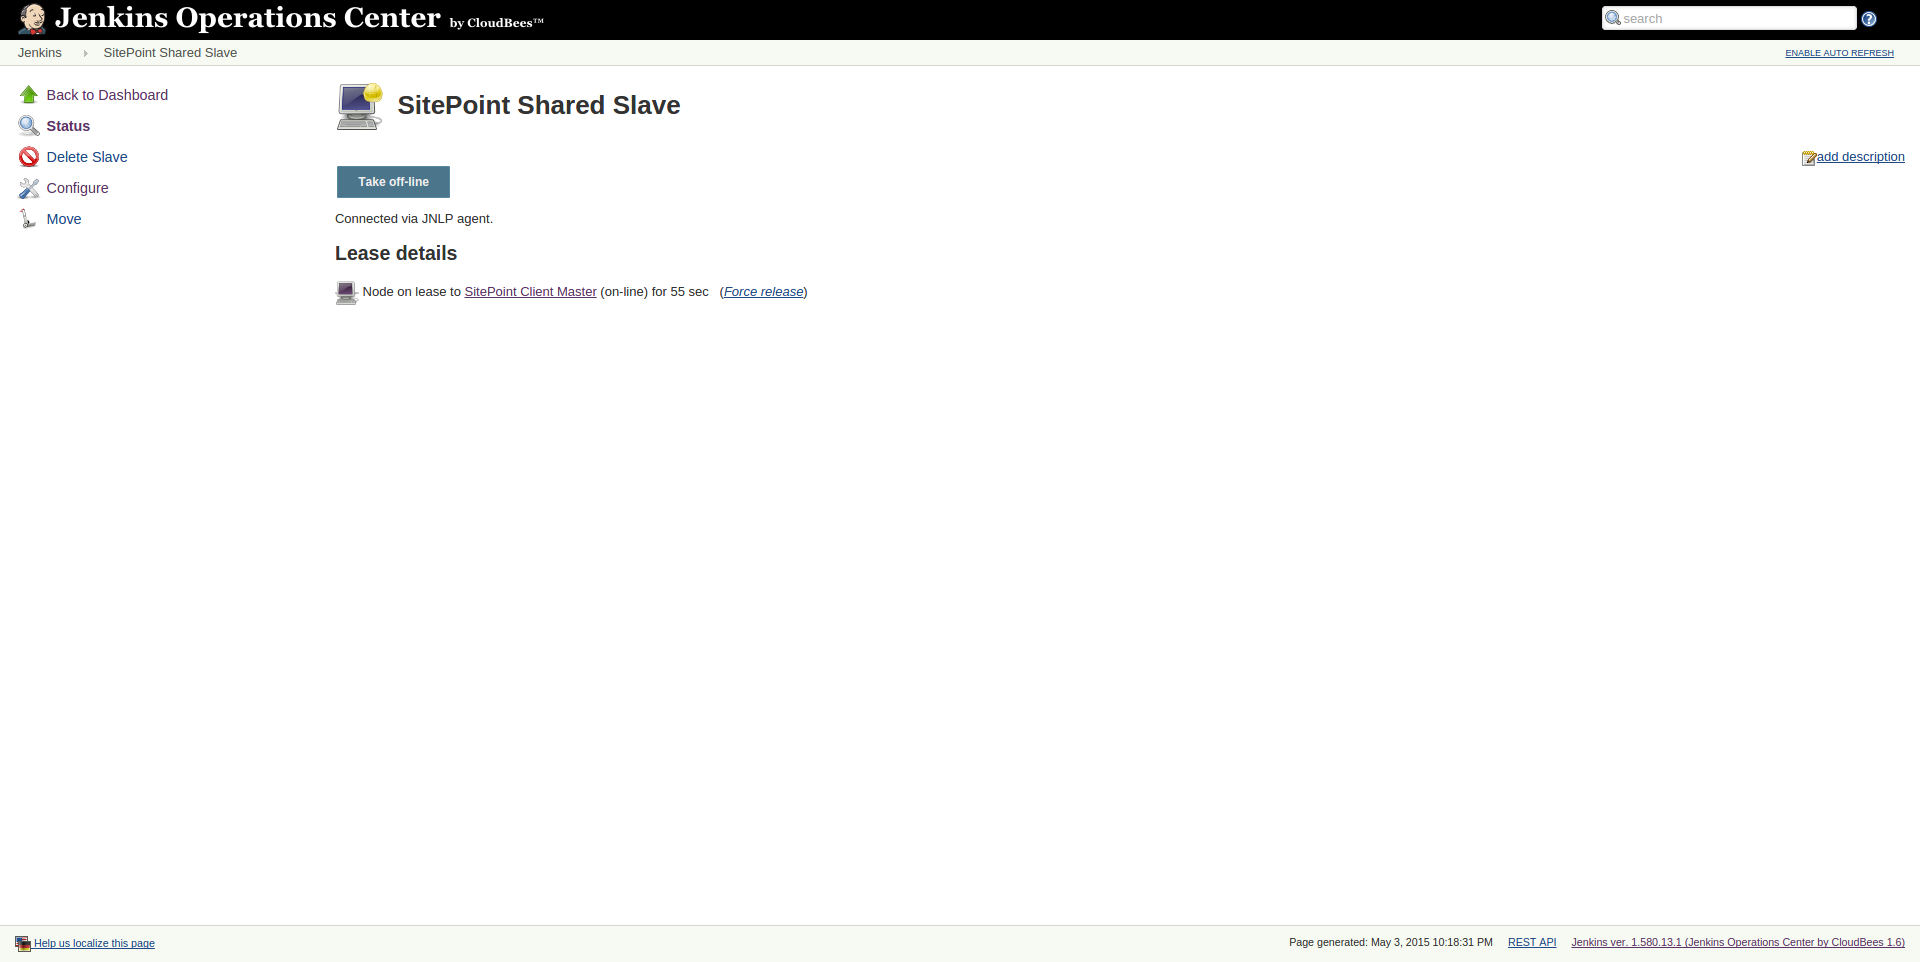
The third server is our shared slave. A shared slave is, as the name implies, a slave which can be shared across multiple client masters. Whenever a client master needs a slave, it will retrieve a slave from the pool in CloudBees Jenkins Operation Center. Whichever slave is available and connected to the client master will be attached to the client master.
A shared slave doesn’t necessarily need its own server. It can run on the same servers as our other instances (CloudBees Jenkins Operation Center & Client Master) or even multiple slaves can be run on one server. However, best practices mandate spreading the load by using a separate instance like we’re doing now.
You can enter the slave server by running vagrant ssh slave on the command line. Now you can run the following commands to install Java.
sudo yum update

sudo yum install java
Now we have to make sure that we have a writable directory for our slave. We do so by running the following commands on the slave.
sudo mkdir /var/jenkins

sudo chown vagrant:vagrant /var/jenkins
To add a shared slave to CloudBees Jenkins Operation Center click new item in the menu and chose shared slave as your option on CloudBees Jenkins Operation Center.
Change the following settings:
- Number of executors: 1
- Remote FS root: /var/jenkins
- Launch method: Launch slave agents on Unix machines via SSH
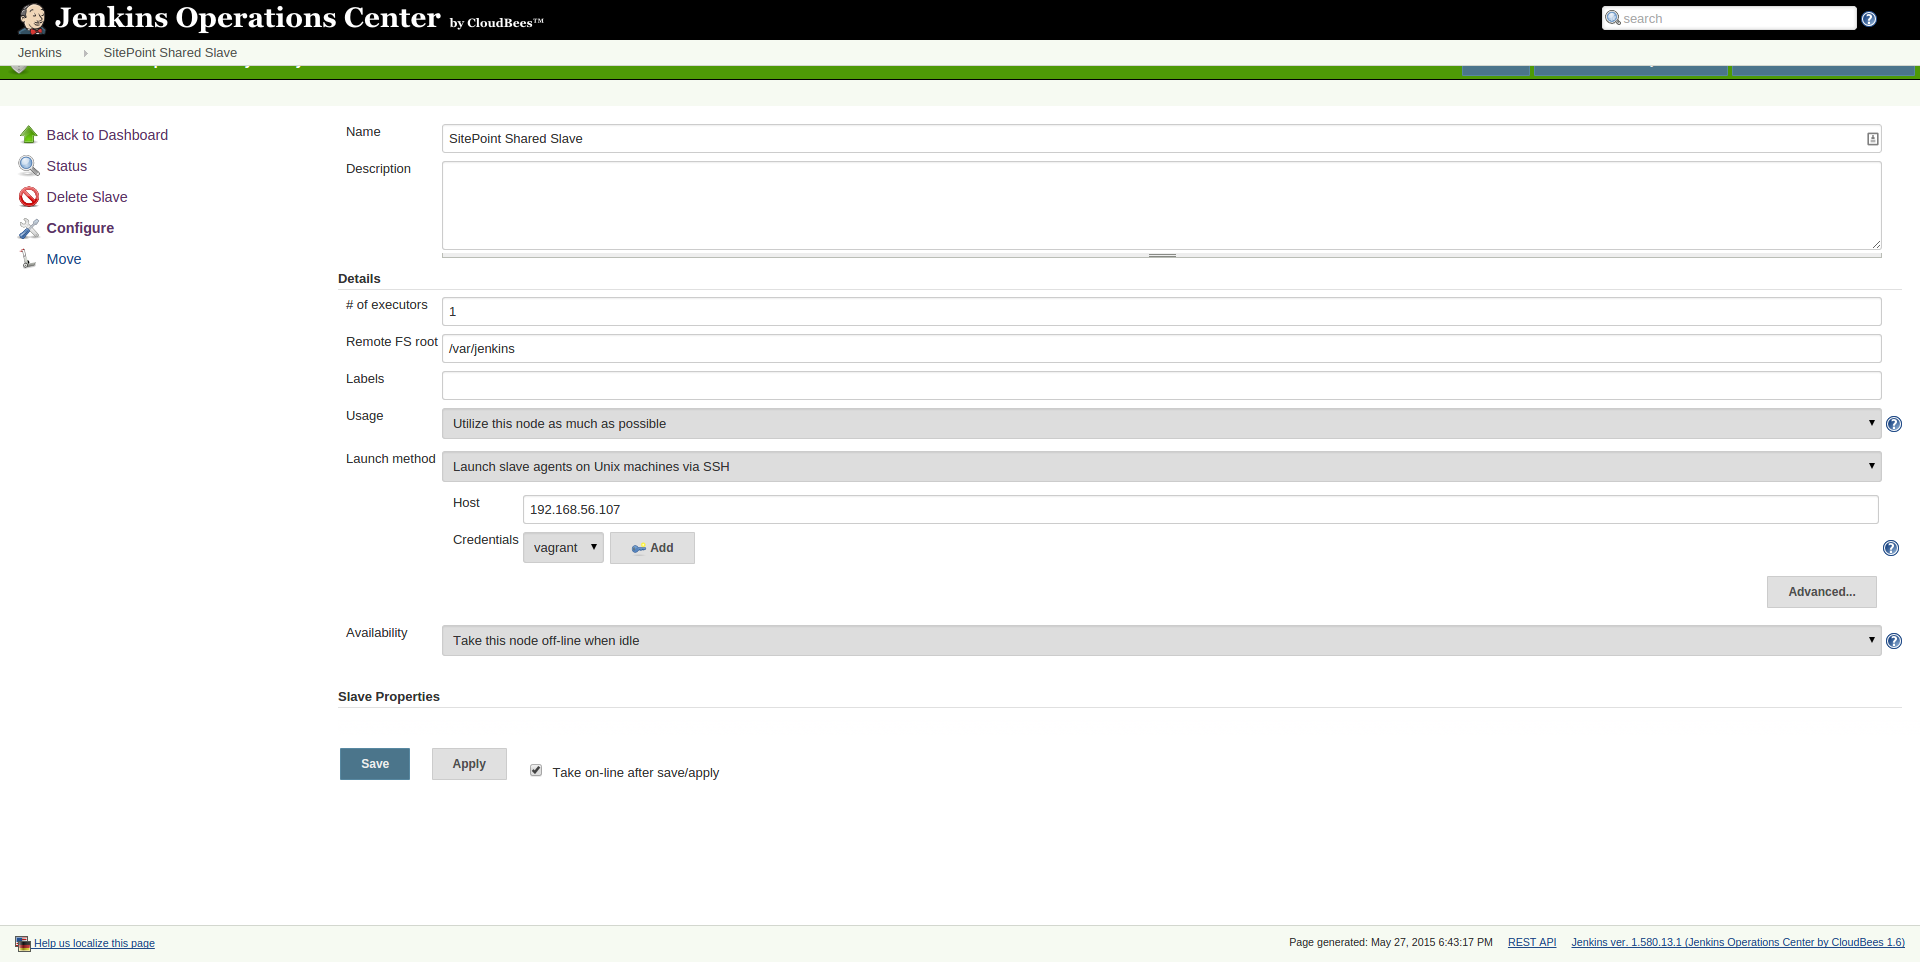
- Host: 192.168.56.107
We are going to set up an SSH connection between the servers. For security reasons, it’s advised to communicate through SSH with a separate user.
For now, we will be using the already existing vagrant user. If you would like to create your own user, check out this article. Here you can find out how to set up a public private key pair.
On our own machine, we first run the following command on the command line.
cat ~/.vagrant.d/insecure_private_key
Copy the output that you get back. Now head back into your browser. In the last step, you filled in the host. Now click the “add” button for adding a credential.
Choose ‘SSH username with private key’ in the drop down. Fill in ‘vagrant’ as username choose ‘enter directly’ for private key. Within the text box that appears, you can paste the content you copied earlier.
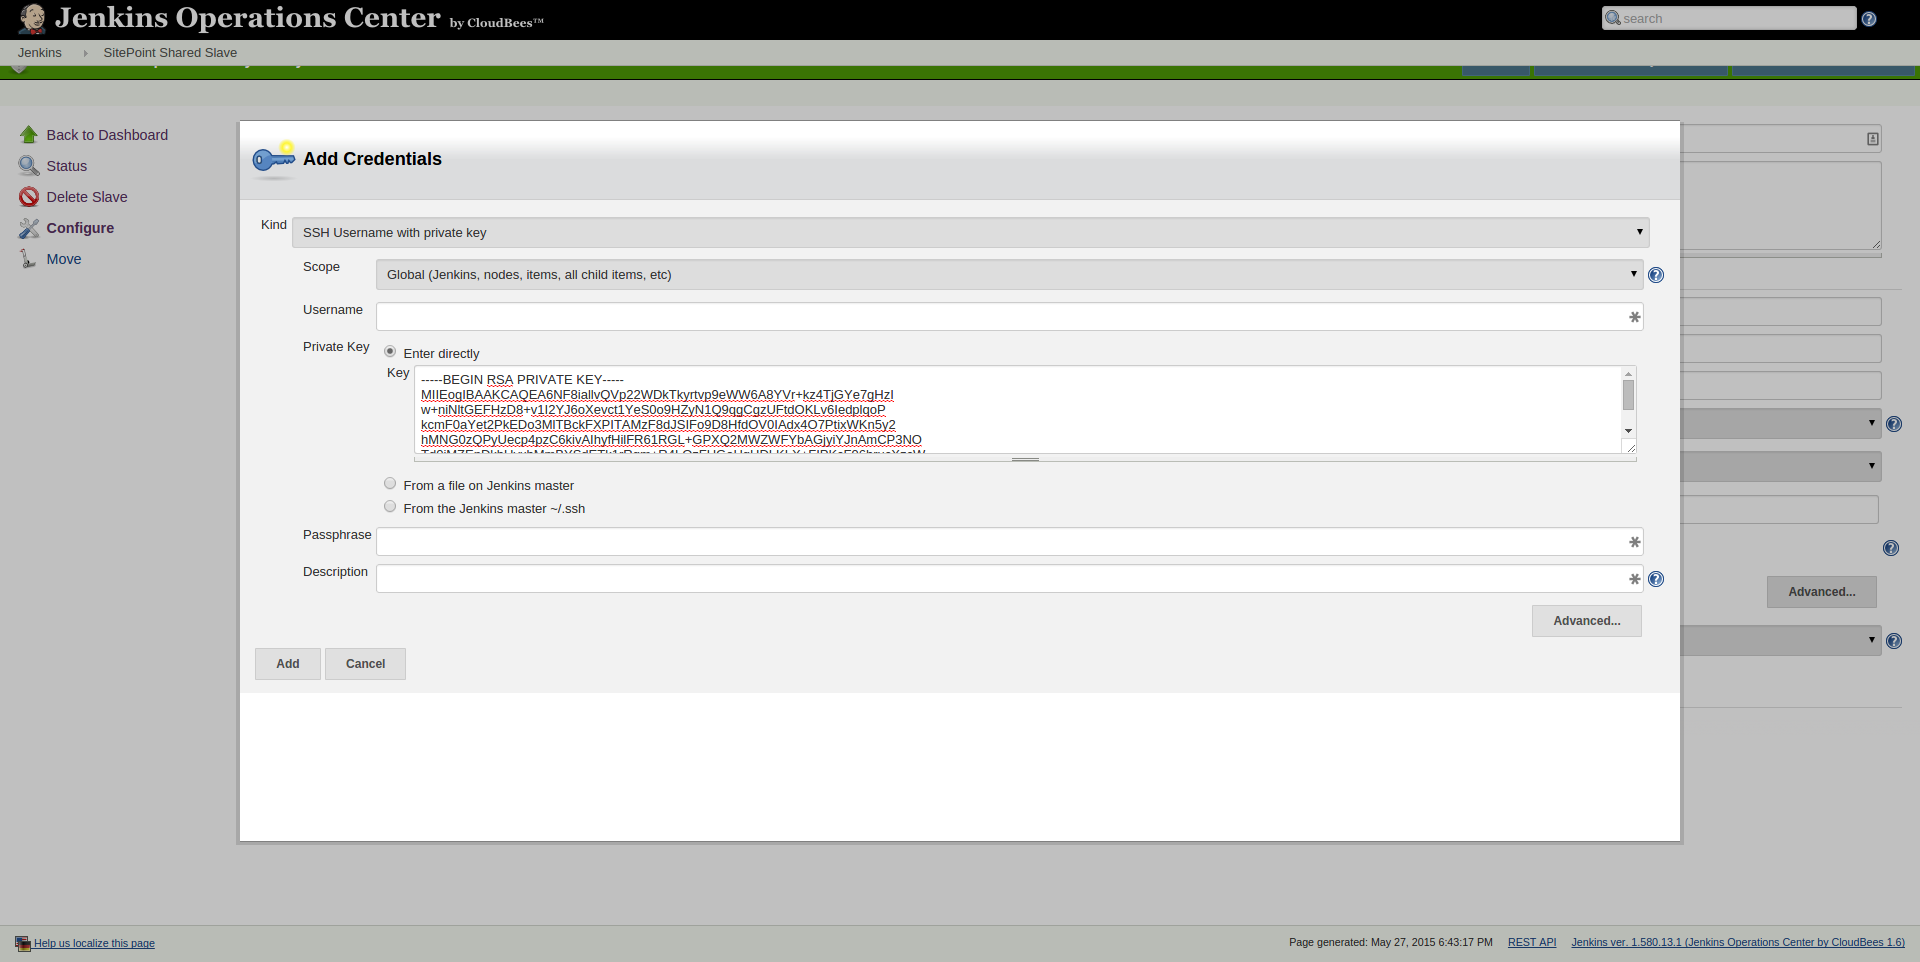
Click on add when done. Next you can click on save to save this slave. The slave should now state that it is ready for lease.
Creating a Project
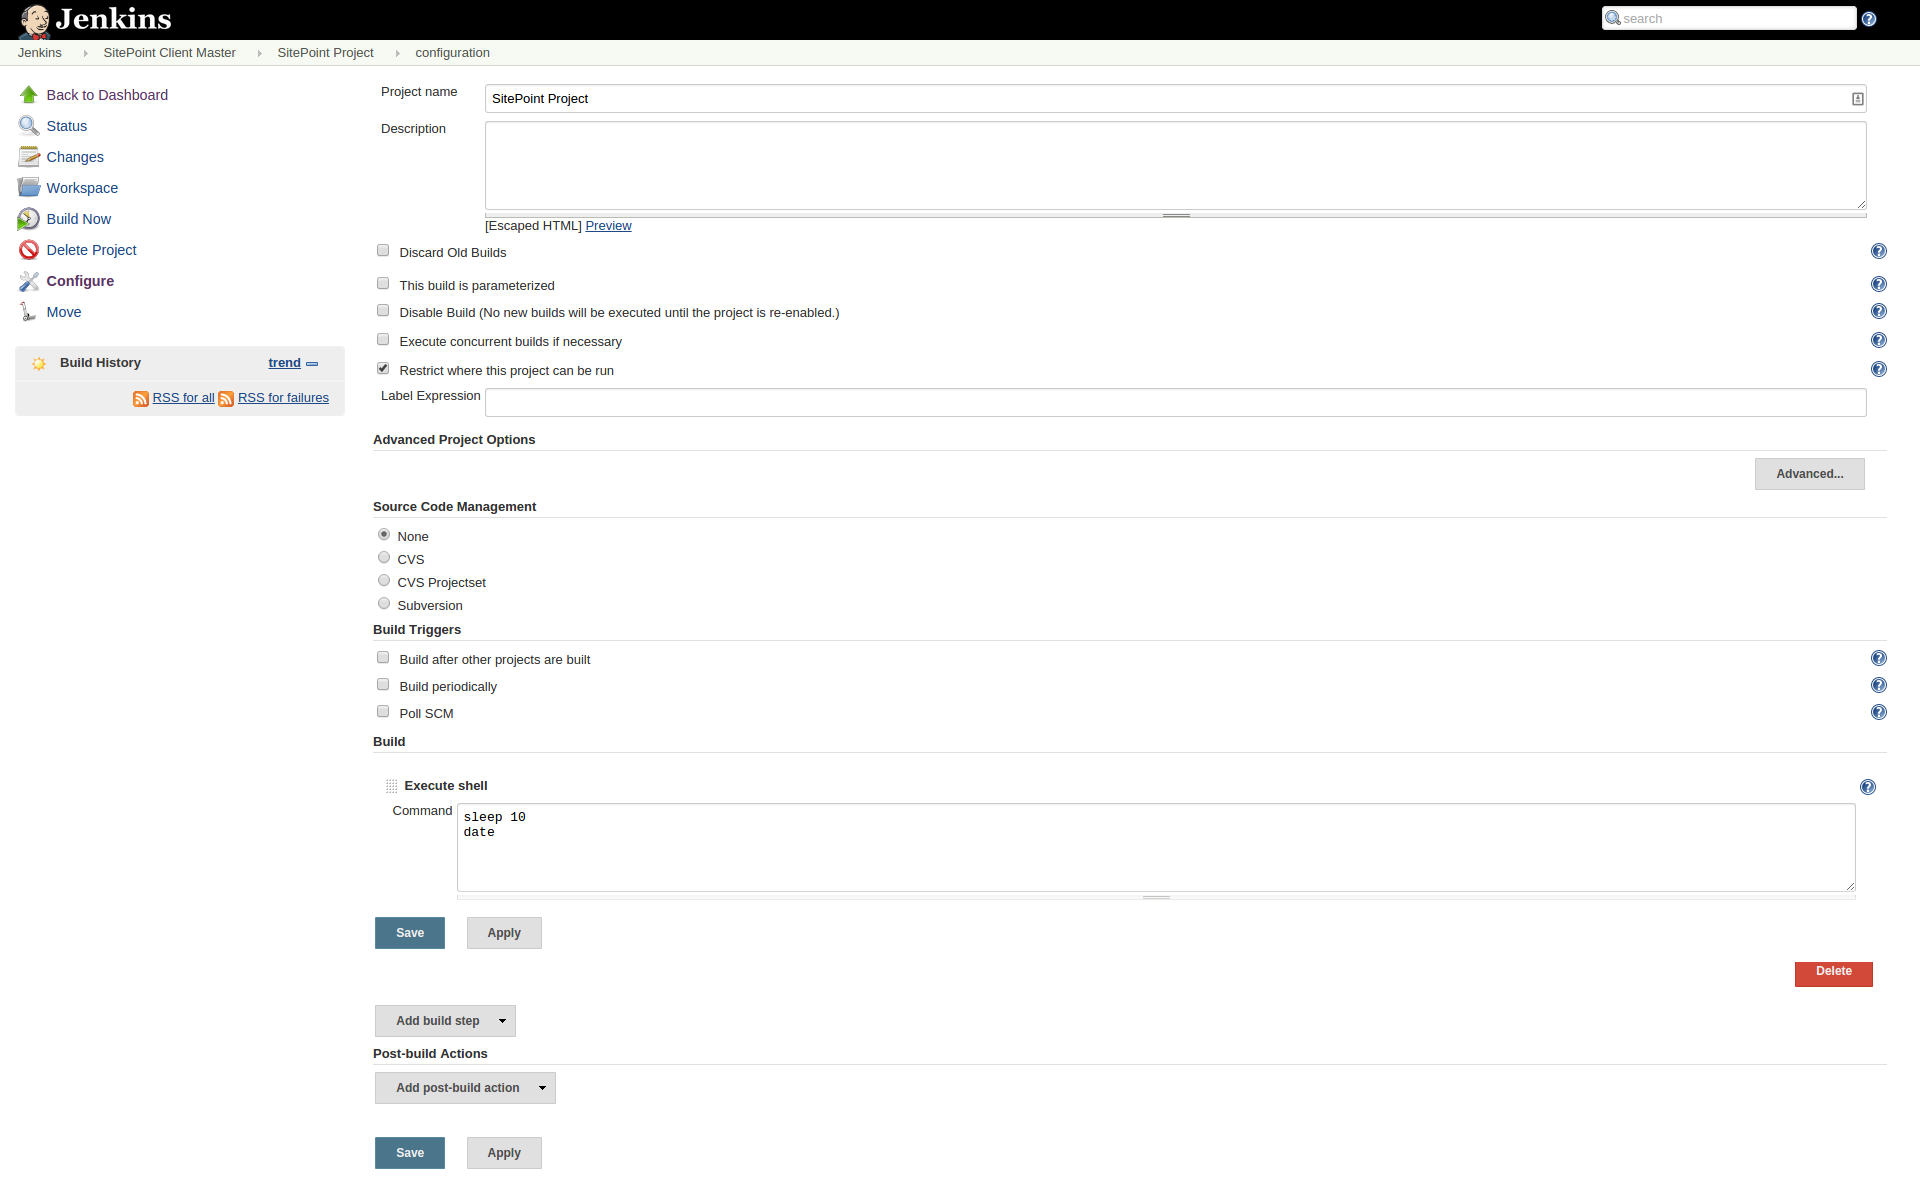
Until now, we’ve only been preparing our servers. We can now actually start to run a project and see the use of a shared slave. Log into our client master and create a new freestyle job by clicking on new item and then choosing freestyle project.
We add a new shell build step with the following content.
sleep 10

date
When you start building this project, you’ll notice two things. In the client master, you’ll notice that the project is being build on the shared slave. In CloudBees Jenkins Operation Center you will notice that the slave is being marked as ‘in use’.
Of course this project is not realistic, but you can imagine your own project is now being built. The next step you probably want to do is add more shared slaves, so your client master has more slaves to choose from. Also, you want to create more client masters and assign your colleagues to a client master to manage. This way you can keep control using CloudBees Jenkins Operation Center while having multiple Jenkins servers dealing with your projects.
Conclusion
Unfortunately, we’re at the end of the article. As you can imagine, we’re not quite production ready. To get to that stage, you’ll probably want to secure all your Jenkins instances with a single sign on and configure multiple shared slaves or perhaps a shared cloud. Also you could dive into generating analytics or configure the update centers.
As you can see, Jenkins Operations Center is a great tool to manage your Jenkins instances and this article just showed you a small part of horizontal scaling your Jenkins cluster.
Have you tried CloudBees Jenkins Operation Center yet? What did you think?
Frequently Asked Questions about Horizontal Scaling with CloudBees Jenkins Operation Center
What is the significance of horizontal scaling in Jenkins?
Horizontal scaling in Jenkins is a crucial aspect of managing large-scale projects. It involves adding more machines or nodes to the system to handle increased workload, rather than upgrading the capabilities of a single machine (vertical scaling). This approach is beneficial as it allows for better load distribution, improved system resilience, and the ability to handle larger workloads without performance degradation. It’s particularly useful in continuous integration and delivery environments where multiple builds and tests are run simultaneously.
How does CloudBees Jenkins Operation Center facilitate horizontal scaling?
CloudBees Jenkins Operation Center (CJOC) facilitates horizontal scaling by providing a centralized management system for multiple Jenkins masters. It allows for the easy addition of new Jenkins masters and agents, enabling the system to scale out as needed. CJOC also provides tools for load balancing and resource allocation, ensuring that workloads are evenly distributed across the system. This helps to maintain optimal performance even as the system scales.
What are the benefits of using CloudBees Jenkins Operation Center for horizontal scaling?
Using CloudBees Jenkins Operation Center for horizontal scaling offers several benefits. Firstly, it simplifies the management of large Jenkins environments by providing a centralized interface for managing multiple Jenkins masters. Secondly, it provides tools for load balancing and resource allocation, ensuring optimal system performance. Thirdly, it offers security and compliance features, including role-based access control and audit trail capabilities. Lastly, it supports the integration with other tools in the DevOps pipeline, enhancing overall workflow efficiency.
How does horizontal scaling compare to vertical scaling in Jenkins?
While vertical scaling involves upgrading the capabilities of a single machine, horizontal scaling involves adding more machines to the system. Horizontal scaling is generally more flexible and scalable, as it allows for the addition of resources as needed. It also provides better load distribution and system resilience. However, it requires more complex management and coordination, which is where tools like CloudBees Jenkins Operation Center come in.
Can I integrate other tools with CloudBees Jenkins Operation Center?
Yes, CloudBees Jenkins Operation Center supports integration with a wide range of tools in the DevOps pipeline. This includes source control systems, build tools, testing frameworks, and deployment tools. This integration capability enhances workflow efficiency and enables seamless collaboration across different stages of the software development lifecycle.
How does CloudBees Jenkins Operation Center ensure security and compliance?
CloudBees Jenkins Operation Center provides several features to ensure security and compliance. This includes role-based access control, which allows for the granular control of user permissions, and audit trail capabilities, which provide a record of all actions performed in the system. These features help to maintain system integrity and comply with regulatory requirements.
What is the role of Jenkins masters and agents in horizontal scaling?
In a Jenkins environment, the master is the central server that manages the build process, while agents are the machines that execute the builds. In horizontal scaling, multiple masters and agents are used to distribute the workload and increase the system’s capacity. This allows for the simultaneous execution of multiple builds and tests, improving overall system performance.
How does load balancing work in CloudBees Jenkins Operation Center?
CloudBees Jenkins Operation Center provides tools for load balancing, which ensure that workloads are evenly distributed across the system. This involves assigning tasks to the least busy or most suitable agents, based on factors like their capabilities and current workload. This helps to maintain optimal system performance and prevent any single machine from becoming a bottleneck.
Can I monitor system performance in CloudBees Jenkins Operation Center?
Yes, CloudBees Jenkins Operation Center provides monitoring tools that allow you to track system performance. This includes metrics like build times, queue lengths, and resource usage. These insights can help you identify any performance issues and make informed decisions about scaling and resource allocation.
How does horizontal scaling support continuous integration and delivery in Jenkins?
Horizontal scaling supports continuous integration and delivery in Jenkins by enabling the simultaneous execution of multiple builds and tests. This allows for faster feedback and quicker delivery of software updates. By using tools like CloudBees Jenkins Operation Center, you can easily manage and scale your Jenkins environment to support these practices.