
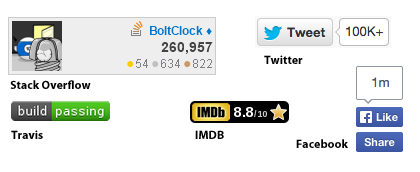
One great way of organically promoting your application is to provide “badges”; snippets of content that people can embed on their own websites.

This can contain up-to-the-minute information from your application about a user, piece of content or another object, dynamically generated and inserted into other websites. This is probably best illustrated with some examples:
In this article I’m going to take a look at some of the ways you can implement this.
Key Takeaways
- Embeddable custom badges can be implemented in three ways: using IFrames, dynamically created images, or JavaScript. Each method has its own benefits and drawbacks.
- IFrames are a common and practical approach for embedding content from one site into another. However, they may be blocked by certain CMS or blog software.
- Dynamically created images are simple to implement and can be easily embedded into third-party websites. However, they can’t be customized and a new image is generated on each request.
- JavaScript is a flexible approach that allows for the creation of dynamic and interactive content. It requires the host website to insert a script tag where the content should appear.
- When choosing an approach, consider factors such as the CMS used by the host website, the level of customization desired, and the need for interactivity.
- Custom badges can promote your site by providing live content on a third-party website, increase engagement, build a sense of community, and visually represent achievements or skills.
Setting up our Example Application
All the code from this tutorial is available on Github. There’s also an online demo.
First, we’ll define our application’s dependencies using Composer:
"silex/silex": "~2.0@dev",

"twig/twig": ">=1.8,<2.0-dev",

"smottt/wideimage": "dev-master"
Now, in index.php, let’s pull in the Composer-generated autoloader, add our use statement, initialize our Silex application and setup Twig templating:
require_once __DIR__.'/../vendor/autoload.php';
use Symfony\Component\HttpFoundation\Request,

		Symfony\Component\HttpFoundation\Response,

		WideImage\WideImage;
$app = new Silex\Application();
// Register the Twig service provider

$app->register(new Silex\Provider\TwigServiceProvider(), array(

	'twig.path' => __DIR__.'/../views',

));
Let’s create a data-store of users, with some information about them which will form the basis of our example “badges”. For simplicity, we’ll use a static array; in practice you’d use a database, but it ought to be pretty simple to swap this out for something more dynamic. We’ll inject it into the application container like so:
/**

 * For simplicity, our datastore is a really simple, static array

 */

$app['datastore'] = function(){

	return [

		'users'	=>	[

			'dave'	=>	[

				'avatar'			=>	'man1.png',

				'trophies'		=>	1,

				'rank'				=>	'Novice',

			],

			'jim'	=>	[

				'avatar'			=>	'man2.png',

				'trophies'		=>	2,

				'rank'				=>	'Intermediate',

			],

			'helen' => [

				'avatar'			=>	'woman1.png',

				'trophies'		=>	4,

				'rank'				=>	'Grand Master',

			],

		]

	];

};
Now that we’ve got a basic application set up along with some data, let’s go through three approaches to how you can provide an embeddable “badge” which displays this data for a given user.
IFrames
IFrames are arguably a dirty word in web circles, perhaps deservedly so. But they are a common and practical approach to embedding content from one site into another.
Let’s start with this approach; later we can reuse some of the code when we try out the JavaScript method.
Start with a simple Twig template, which creates some HTML – with inlined styles, to minimize HTTP requests – which contains our “badge” as a <div>:
<!-- /views/badge.twig -->

<html>

  <head>

    <title>{{ username }}</title>

    <style>

      .badge {

        width: 250px;

        height: 80px;

        border: solid 1px #ccc;

        clear: both;

      }

      .avatar {

        float: left;

        width: 80px;

      }

      .badge .avatar img {

        margin: 10px 0 0 10px

      }

      .badge .info {

        width: 170px;

        float: right;

      }

      .badge .info h3 {

        margin: 0.25em 0;

      }

      .badge .info h4 {

        margin: 0.25em 0;

        color: #666;

      }

    </style>

  </head>

  <body>

    <div class="badge">

      <div class="avatar">

        <img src="{{ imagepath }}/{{ user.avatar }}">

      </div>

      <div class="info">

        <h3>{{ username }}</h3>

        <h4>{{ user.rank }}</h4>

        <div class="trophies">

          {% for i in 1..user.trophies %}

          <img src="{{ imagepath }}/trophy.png">

          {% endfor %}

        </div>

      </div>

    </div>

  </body>

</html>
This is all pretty straightforward. Notice how we’re incorporating a variable named imagepath which we’ll set server-side, which is going to take care of one very important aspect – any images we incorporate must be referenced using absolute URLs.
Now the corresponding route:
/**

 * Dynamically-generated HTML for embedding in an iFrame

 */

$app->get('/iframe/{username}', function(Request $request, $username) use ($app) {
	// Check that the user in question exists

	if (!isset($app['datastore']['users'][$username])) {

		// No user with that username, throw a 404

		$app->abort(404, "User $username does not exist.");

	}
	// Get the user record

	$user = $app['datastore']['users'][$username];
	return $app['twig']->render('badge.twig',

		[

			'username'		=>	$username,

			'imagepath'		=>	( ($request->server->get('HTTP_PORT') == 443) ? 'https' : 'http' ) . '://' . $request->server->get('HTTP_HOST') . '/images',

			'user'  			=> 	$user,

		]

	);
});
All pretty straightforward. The bit which populates $imagepath is a bit quick-and-dirty, but it’ll do the job for now.
Embedding this into a third-party site is really simple:
<iframe src="/iframe/dave" width="300" height="100"></iframe>
Later we’ll look at some of the things you need to think about with the iframe approach; for now, let’s move onto method number two.
Dynamically Created Images
One of the simplest ways to implement this is to provide a URL to an image, which gets created server-side.
Here’s a screenshot of the sort of image we’re going to create:
![]()
Okay, it won’t win any awards for design, but you can use the same approach to create much more visually appealing images than this.
You’ll find the necessary resources – the background and trophy images, avatars and fonts – in the example application’s repository.
Here’s some example code to dynamically generate an embeddable image:
/**

 * Dynamically-generated image

 */

$app->get('/image/{username}', function($username) use ($app) {
	// Check that the user in question exists

	if (!isset($app['datastore']['users'][$username])) {

		// No user with that username, throw a 404

		$app->abort(404, "User $username does not exist.");

	}
	// Get the user record

	$user = $app['datastore']['users'][$username];
	// Load the background

	$background = WideImage::load(__DIR__.'/../resources/images/background.png');
	// Load the avatar

	$avatar = WideImage::load(__DIR__.'/images/' . $user['avatar']);
	// Load the trophy image

	$trophy = WideImage::load(__DIR__.'/images/trophy.png');
	// Paste the avatar onto the background

	$im = $background->merge($avatar, 10, 20);
	// Get the canvas

	$canvas = $im->getCanvas();
	// Set the font for the username

	$canvas->useFont(__DIR__.'/../resources/fonts/VeraBd.ttf', 12, $im->allocateColor(0, 0, 0));
	// Write the username onto the canvas

	$canvas->writeText(70, 15, $username);
	// Choose a slightly smaller, non-bold font

	$canvas->useFont(__DIR__.'/../resources/fonts/Vera.ttf', 9, $im->allocateColor(0, 0, 0));
	// Write the rank

	$canvas->writeText(70, 35, $user['rank']);
	// Now add the appropriate number of trophies

	$x = 70;
	for ($i = 0; $i < $user['trophies']; $i++) {

		$im = $im->merge($trophy, $x, 55);

		$x += 20;

	}
	// Finally, output the image to the screen

	return $im->output('png');
});
It’s pretty much self-documented, and should be pretty simple to adapt to your needs or with better images. Note that we’re taking the background image from a non-web accessible directory (resources), but the avatars and trophy icon are in the public directory.
Embedding this into a third-party website couldn’t be simpler:
<img src="http://example.com/image/helen">
You’ll note that there’s no file extension; this doesn’t matter, though, since WideImage’s
output()method will set the appropriate headers for you.
There are a couple of improvements we could make. For one thing, we’re generating a new image on each request. However you can use WideImage’s saveToFile() method to cache the results, like so:
$im->saveToFile('/path/to/badge.png');
It might also be better to provide a default image when the requested user cannot be found, rather than issuing a 404 error.
Now onto the third and final approach.
Javascript
Using JavaScript to dynamically create embedded content is amongst the most common, and perhaps the most flexible approach.
Again we’re going to generate some HTML, but this time we’ll return a simple snippet of JavaScript that will write it to the host page. All that requires is that the host website insert a simple <script> tag where they want our content to appear.
We’ll re-use the Twig template from earlier, but this time the route looks slightly different:
/**

 * Dynamically-generated JavaScript

 */

$app->get('/js/{username}', function(Request $request, $username) use ($app) {
	// Check that the user in question exists

	if (!isset($app['datastore']['users'][$username])) {

		// No user with that username, throw a 404

		$app->abort(404, "User $username does not exist.");

	}
	// Get the user record

	$user = $app['datastore']['users'][$username];
	// Build the HTML

	$html = $app['twig']->render('badge.twig',

		[

			'username'		=>	$username,

			'imagepath'		=>	( ($request->server->get('HTTP_PORT') == 443) ? 'https' : 'http' ) . '://' . $request->server->get('HTTP_HOST') . '/images',

			'user'  			=> 	$user,

		]

	);
	// Minify the HTML, ensuring we wind up with one long string

	$minified = preg_replace(

    array(

			'/ {2,}/',

			'/<!--.*?-->|\t|(?:\r?\n[ \t]*)+/s'

    ),

    array(

			' ',

			''

		),

    $html

  );
	// Return a document.write with the minified, populated HTML as its argument

	return new Response(

		sprintf('document.write(\'%s\');', $minified),

		200,

		[ 'Content-Type', 'text/javascript' ]

	);
});
The first part is identical to the iframe approach. This time, though, we’re generating a simple document.write. Before we can do that, we use a little preg_replace magic to minify the resulting HTML – which also ensures it will all be on one line – then insert it into some very simple dynamically created JavaScript.
Embedding this into a page is just as simple:
<div><script src="/js/jim"></script></div>
Strictly speaking, we don’t even need that container DIV, but it can be used to apply styling on the host site.
Now that we’ve examined three approaches, let’s look at some of the things you need to think about when deciding which of these approaches to take.
Considerations
When choosing an approach to this problem, there are a few things you need to weigh up.
CMS’s
If you’re intending people to be able to embed content into the body of CMS-driven content or within blog posts, it’s worth bearing in mind that any CMS or blog software worth its salt will block certain types of content. Inline scripts are almost certainly out. IFrames are probably going to be stripped out. That probably just leaves image tags.
Styling
There are a few ways to approach styling; perhaps you want to control everything, keeping your badges consistent across sites. Alternatively, you could provide default styles but allow site owners the flexibility to override them to better fit the design of their site.
Obviously images cannot be customized; aside, perhaps, their sizing. If you use iframes, it’s worth noting that any styling applied to the parent page will not be inherited by your content. On the other hand if you use the JavaScript approach, it may well be possible to override the styling, depending on specificity and how you incorporate your styles. The demo page that comes with the example application shows this in action.
Customization
Perhaps, like Stackoverflow and their “User Flair” badges, you want to provide a number of alternative styles – light and dark, for example. This is entirely possible with any of the approaches I’ve outlined, though it’s arguably slightly more difficult with the image tag approach.
Advanced
So far our embeddable content has been dynamically generated, but in no way interactive. A Facebook “like” button, for example, doesn’t just provide a count – it also allows people to perform the “like” action from within the page. That sort of interactivity will be covered in a later article.
Summary
Embeddable content is great way to promote your site. It can be used not only to link back to your site but to provide “live” content, right there on a third-party “host” website.
We’ve looked at three common approaches to this – images, iframes and JavaScript. We’ve looked at some of the things you need to think about when deciding which one to use, along with some pitfalls to be wary of.
Frequently Asked Questions (FAQs) about Implementing Embeddable Custom Badges
How can I create a custom badge from scratch?
Creating a custom badge from scratch involves a few steps. First, you need to decide on the design of your badge. This includes the shape, color, and any text or images you want to include. Once you have a design in mind, you can use a graphic design tool like Adobe Illustrator or Canva to create your badge. After your design is complete, you can use a badge-making software or service to turn your design into an embeddable custom badge.
What are the benefits of using custom badges?
Custom badges offer several benefits. They can help to increase engagement on your website or platform, as users are often motivated to earn badges. They can also help to build a sense of community, as users can display their badges to others. Additionally, badges can provide a visual representation of achievements or skills, making them a powerful tool for gamification.
Can I use custom badges for my e-commerce site?
Yes, custom badges can be a great addition to an e-commerce site. They can be used to highlight top-selling products, indicate sale items, or reward loyal customers. By using custom badges, you can create a more engaging and interactive shopping experience for your customers.
How can I implement custom badges on my website?
Implementing custom badges on your website can be done in a few different ways. One method is to use a badge management system, which allows you to create, manage, and distribute badges. Another method is to use a plugin or extension for your website platform. For example, if you’re using WordPress, there are several plugins available that allow you to easily add badges to your site.
What are some best practices for designing custom badges?
When designing custom badges, it’s important to keep a few best practices in mind. First, make sure your badges are visually appealing and align with your brand’s aesthetic. Second, ensure that the purpose of each badge is clear. Users should be able to understand what each badge represents just by looking at it. Finally, consider the size of your badges. They should be large enough to be easily seen, but not so large that they distract from other content on your site.
Can I create custom badges for different user levels?
Absolutely! Creating custom badges for different user levels is a great way to incentivize engagement and reward your most active users. You can create badges for various milestones or achievements, such as completing a certain number of tasks, reaching a certain level, or being a member for a certain amount of time.
How can I distribute custom badges to my users?
There are several ways to distribute custom badges to your users. One method is to automatically award badges when users reach certain milestones or achievements. Another method is to manually award badges to users. This can be done through a badge management system or directly through your website platform.
Can I track the performance of my custom badges?
Yes, tracking the performance of your custom badges is a key part of using them effectively. By tracking metrics like how many users have earned each badge and how badges affect user engagement, you can gain insights into how your badges are performing and make adjustments as needed.
Are there any limitations to using custom badges?
While custom badges offer many benefits, there are some limitations to be aware of. For example, if you’re using a badge management system or a plugin, you may be limited by the features and capabilities of that system or plugin. Additionally, it’s important to ensure that your badges are accessible to all users, including those with disabilities.
Can I use custom badges for my mobile app?
Yes, custom badges can be used for mobile apps as well. They can be used to reward users for completing tasks, reaching milestones, or achieving certain levels. Just like with websites, it’s important to ensure that your badges are visually appealing, clear in their purpose, and easy to earn.