Getting Started With Corona: Building Your First Corona App
Earlier, in Getting Started With Corona: Building Apps for Multiple Platforms and Markets Simultaneously, we covered the benefits of developing with Corona, as well as installing and configuring the SDK. If you haven’t read it yet, starting at the beginning will give you a much more thorough understanding of Corona. Now, let’s move on to exploring Corona and building our first app. All files pertaining to this article are located in code.zip.
Key Takeaways
- Begin by accepting the license agreement and logging in using your previously registered email and password to start using the Corona Simulator.
- Utilize the Corona Simulator’s menu options to access various resources such as sample apps, API references, and tutorials, which are crucial for learning and building your app.
- Explore the “HelloWorld” sample project to understand the basic structure and syntax of a Corona app, including how to display text and images.
- Modify existing sample projects like “HelloWorld” by creating a new project template, which allows for experimentation and learning without affecting the original source code.
- Take advantage of Corona’s basic functions such as `print()` for debugging and `newRect()` to experiment with adding graphical elements like rectangles to your app.
Exploring Corona
Corona’s installer adds a Corona Simulator icon to the desktop. Double-click this icon and you’ll see (on a Windows platform) Figure 9’s Corona Simulator window covered by a license agreement dialog box.
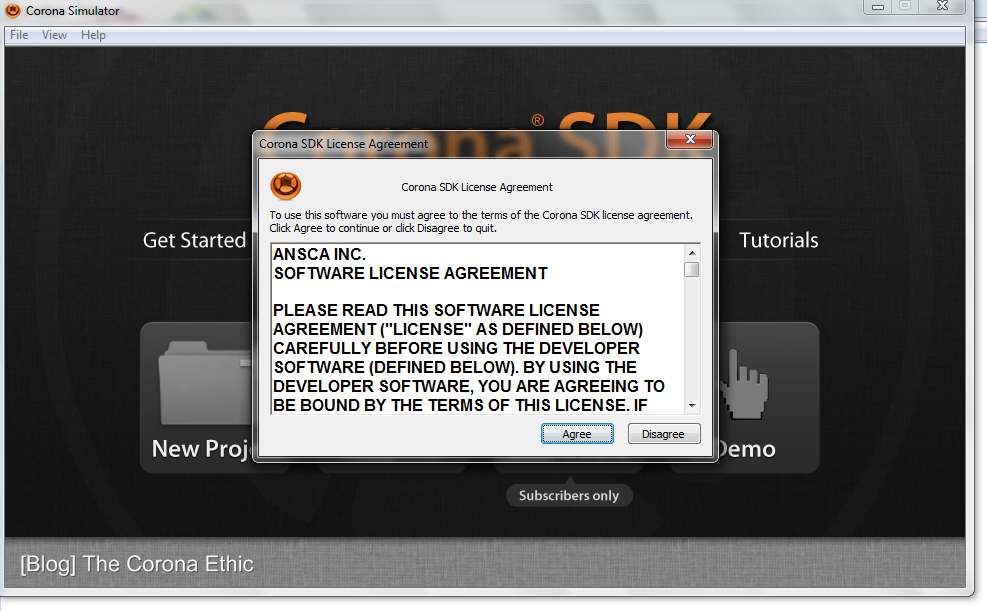
Accept the license agreement by clicking the Agree button. (You won’t see the license agreement when subsequently running Corona.) Figure 10 presents the resulting Login dialog box.
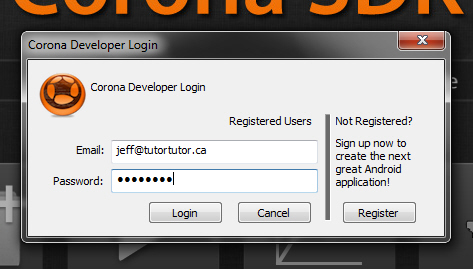
Enter the email address and password that you previously used to download the Corona SDK (see Figure 2) and click Login. Corona verifies this information and presents Figure 11’s dialog box with an acceptance message. (You won’t see Login or Figure 11’s dialog box when subsequently running Corona.)
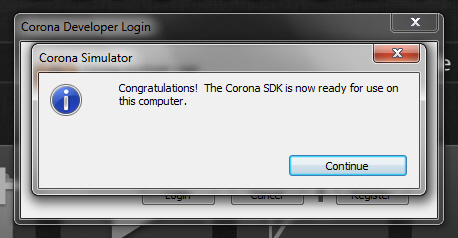
Click the Continue button. The dialog box shown in Figure 12 appears.
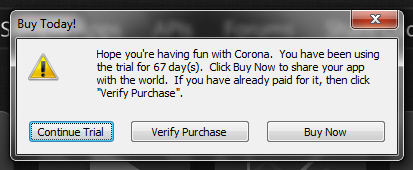
Click the Continue Trial button to view the Corona Simulator window in its entirety (see Figure 13) and choose a course of action.
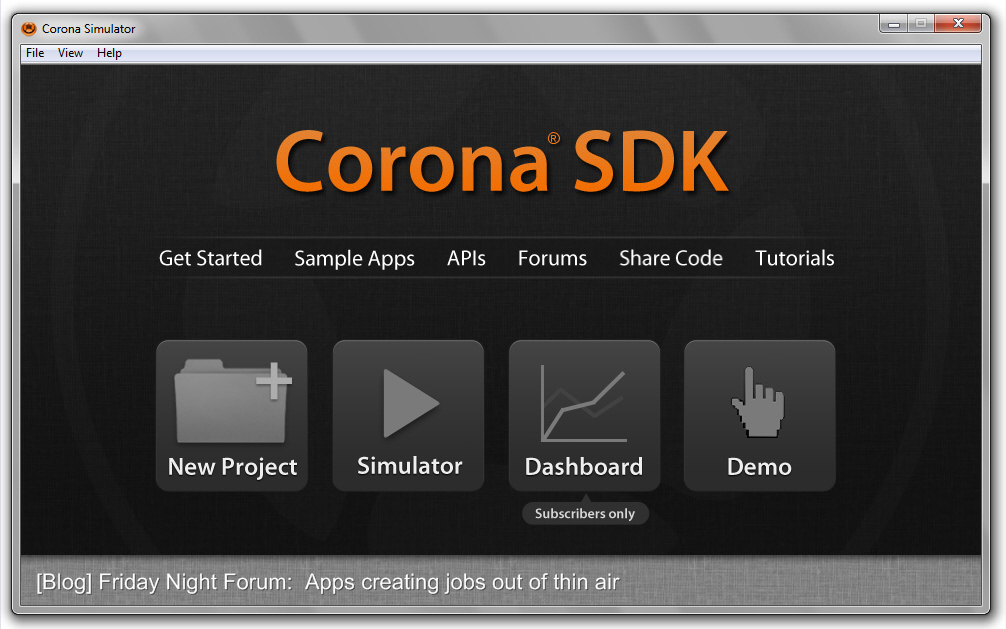
The Corona Simulator window presents a menu bar with File, View, and Help menus:
- File presents menu items for creating a new project, opening an existing project, modifying preferences, and exiting the simulator.
- View presents a menu item for accessing various demos.
- Help presents menu items for accessing online documentation, selecting a sample project, and more.
This window also presents the following links:
- Get Started takes you to Ansca Mobile’s “Getting Started with Corona” web page, where you’ll find introductory information on the SDK and links to various tutorials.
- Sample Apps presents a dialog box that lets you open a sample app and immediately view its output in a device simulator window.
- APIs takes you to Ansca Mobile’s “API Reference” page, where you can learn about the many APIs that Corona makes available.
- Forums takes you to Ansca Mobile’s “Community” page, where you can ask questions and obtain answers (or answer questions from others).
- Share Code takes you to Ansca Mobile’s “Share Your Code” page, where you can share your code with other developers and access their code for your apps.
- Tutorials takes you to Ansca Mobile’s “Tutorials” page, where you can explore tutorials that teach you how to accomplish various tasks.
- New Project presents a dialog box that lets you create a new Corona project.
- Simulator presents a dialog box that lets you choose and open a
main.luafile, and then runs this file on the current simulated device (e.g. an iPad). - Dashboard provides access to subscriber-only services for promoting your app and obtaining statistics on how well your app is doing, in terms of downloads and more.
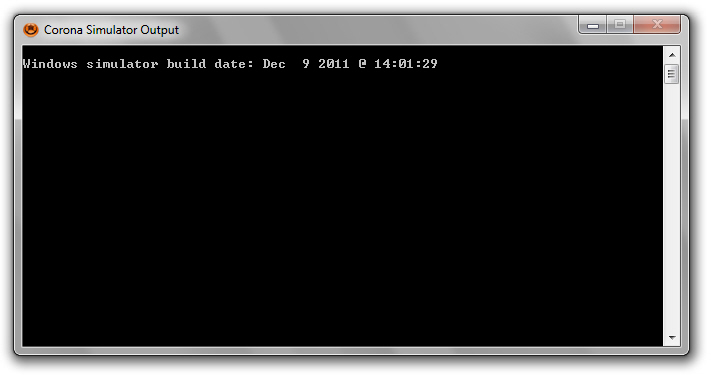
Besides the window shown in Figure 13, Corona also presents a Corona Simulator Output window upon startup. This window displays console output and is shown below in Figure 14.
HelloWorld
Corona includes several sample projects that you can play with to learn about writing apps in Lua and using Corona’s various APIs. For example, the GettingStarted directory contains a HelloWorldsubdirectory that describes the HelloWorld sample project.
You can open HelloWorld by selecting Open Project from the File menu, navigating to the HelloWorld directory, and selecting this directory’s main.lua source file (all Corona projects must have amain.lua source file). Alternatively, you can click the Sample Apps link on the Corona Simulator window. If you choose this latter option, you’ll observe the dialog box shown in Figure 15.
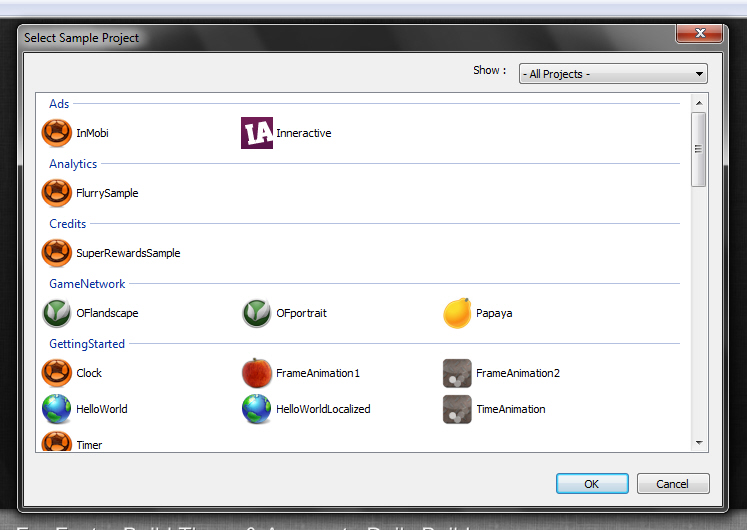
Scroll down until you see HelloWorld in the GettingStarted section. Select HelloWorld and click OK. You’ll immediately observe this app presented in the simulated device window shown in Figure 16.
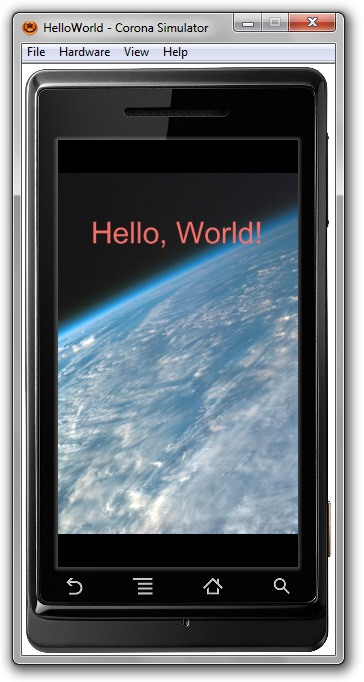
The window shown in Figure 16 replaces the window shown in Figure 13.
Figure 16 shows HelloWorld running on a Droid device. To see how it looks on another device, select the View menu, the View As menu item, and choose the desired device from the popup menu. See Figure 17.
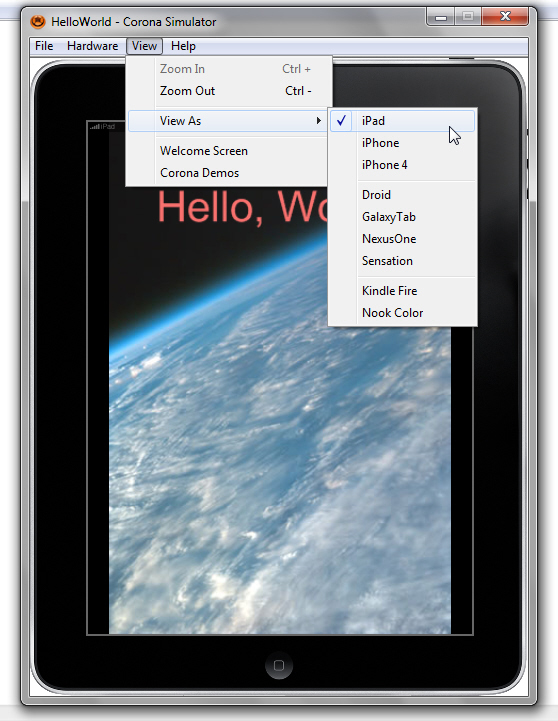
The File menu shown in Figures 16 and 17 presents an Open in Editor menu item that lets you examine the contents of the app’s main.lua source file. Listing 2 presents these contents for HelloWorld.
--
-- Abstract: Hello World sample app, using native iOS font
-- To build for Android, choose an available font, or use native.systemFont
--
-- Version: 1.2
--
-- Sample code is MIT licensed, see <a href="http://developer.anscamobile.com/code/license" target="_blank">http://developer.anscamobile.<wbr>com/code/license</wbr></a>
-- Copyright (C) 2010 ANSCA Inc. All Rights Reserved.
local background = display.newImage( "world.jpg" )
local myText = display.newText( "Hello, World!", 0, 0, native.systemFont, 40 )
myText.x = display.contentWidth / 2
myText.y = display.contentWidth / 4
myText:setTextColor( 255,110,110 )
Listing 2 (above): The contents of HelloWorld‘s main.lua source file resemble ActionScript or JavaScript.
Listing 2 first presents several lines that each start with “--” characters. Each hyphen character pair signifies the beginning of a comment; a non-executable textual documentation. You specify comments so that others can understand your code, to supply copyright information, and so on. Like most programming languages, Lua ignores comments.
Next, a local variable named background is declared. A local variable is a variable prefixed with reserved word local; has a scope (visibility) limited to the body of the control structure, function, or file where the variable is declared; and it ceases to exist once its scope is exited. In contrast, a global variable does not have the local prefix; its scope is the entire program, and it exists for as long as the program runs.
Tip: You should use local variables wherever possible because they provide faster access to their values than global variables. Also, they help you avoid cluttering the global environment with unnecessary names.
As part of its declaration, background is assigned a reference to a table object that describes a loaded image based on the contents of JPEG file world.jpg. This object is created and the image is loaded by newImage(), which happens to be a function field (property) of a special table named display. After newImage() returns, the loaded image is displayed in the simulated device window.
Note: A table is one of Lua’s basic types and serves as Lua’s only data structure. It can be used to represent an array, a dictionary (i.e., a hashtable), a tree, a record (with fields that serve as variables or functions), and other items. Consider the following example:
employee = { name = "Jeff" }
In this example, I’ve created a table named employee. This record-oriented table contains a single field variable named name. A string containing Jeff has been assigned to name. I can access this field’s value in one of two ways, as demonstrated below:
local mnName1 = employee("name")
local myName2 = employee.name
The second statement reveals syntactic sugar consisting of a period character followed by the field name, making field access look more object-like.
The display table contains several “new“-prefixed functions (known as factory functions or constructors) that let you create various kinds of displayable objects. You can learn more about these functions and find out what else display contains by pointing your browser to Ansca Mobile’s documentation page.
Continuing, Listing 2 declares a local variable named myText, and assigns a reference to the text table created and returned by newText(). This factory function identifies “Hello, World!” as text to display, initially positions this text with its top-left corner at (0, 0) – the upper-left corner of the display, and specifies that the text is to be drawn using the device’s native font at a size of 40 points.
Note: Because the call to newText() follows the call to newImage(), the text is drawn on top of the image. If the call to newImage() followed a call to newText(), the image would be drawn over the text, causing the text to be invisible.
Listing 2 lastly configures the text by altering the top-left corner to reflect the horizontal middle of the display and the top of the display’s second quadrant, and by assigning a shade of red as the text’s color.
Note: The colon character between myText and setTextColor in myText:setTextColor(255,110,110) is a syntactic sugar shorthand for specifying myText.setTextColor(myText, 255, 110, 110). Passing myText as the first argument identifies the table whose text color is to be set.
Instead of supporting objects in the object-oriented sense, Corona mimics objects by using tables and syntactic sugar. Although you can think of the colon syntax as describing a setTextColor() method call on the myText object, the reality is that you are only calling a function on a specific table.
The image and text objects are implicitly added to Corona’s stage, which is a special group (container) that represents the device screen and which contains displayable objects. Each displayable is appended to the group and displayed after previously added displayables. The resulting hierarchy creates a z-order in which displayables added later appear on top of displayables added earlier (e.g. the text appears over the image).
HelloWorld2
A good way for you to familiarize yourself with Lua and Corona APIs is to modify an existing sample, such as HelloWorld. Because you probably don’t want to mess up the source code in HelloWorld‘s main.lua file, let’s create a duplicate project whose main.lua content can be modified.
Begin by reverting to the Corona Simulator window shown earlier in Figure 13. Accomplish this task by selecting Welcome Screen from the simulated device window’s View menu (see Figure 17).
Now, click the New Project link and you should see the dialog box shown in Figure 18.
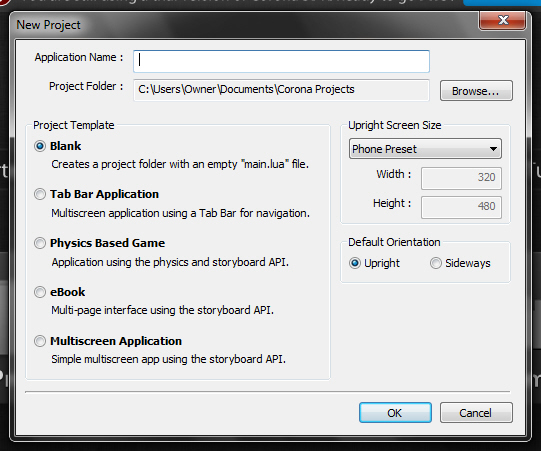
Corona requires a name for the project. It also lets you choose a template for the kind of project you want to create (e.g., an ebook) and provides other settings.
Enter HelloWorld2 into the Application Name textfield, keep the default settings shown in Figure 18, and press OK. On my Windows 7 platform, I observe the two windows shown in Figure 19.
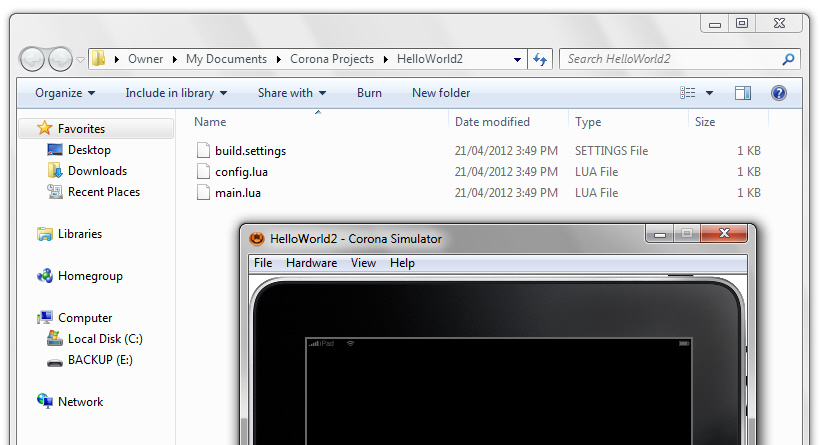
Corona creates a project directory for the HelloWorld2 project. On my platform, this directory is located at C:UsersOwnerDocumentsCorona ProjectsHelloWorld2. Corona also creates build.settings, config.lua, and skeletal main.lua files in HelloWorld2.
Note: build.settings contains instructions for building the project, and config.lua provides runtime configuration information for dynamic content scaling and more. Visit Ansca’s Configuration Options page to learn more about these files.
Open main.lua in Windows notepad or another text editor, and you’ll observe the skeletal content shown in Listing 3.
-----------------------------------------------------------------------------------------
--
-- main.lua
-- -----------------------------------------------------------------------------------------
-- Your code here
Listing 3 (above): A skeletal template to replace with your own code.
Replace Listing 3’s skeletal code with Listing 2’s main.lua content. You must also copy the PNG and JPEG files located in the HelloWorld project directory (C:Program Files (x86)AnscaCorona SDKSample CodeGettingStartedHelloWorld on my platform) to HelloWorld2‘s project directory. When you are finished, select Relaunch from the simulated device window’s File menu. You should see the same output as in Figure 16.
Exploring Basic Functions
Corona provides several basic functions that provide helpful capabilities. For example, print() lets you output a string to the Corona Simulator Output window, which is useful for debugging. Also, you can call type() to return a string identifying the type of a variable or other expression passed as argument. (Lua is a dynamically-typed language in which values — and not variables — have types. A variable takes on the type of whatever value is currently assigned to it.)
Let’s play with these functions. Add the following two lines to the end of main.lua (whose content should appear as shown earlier in Listing 2 before the addition) and save these changes:
print(type("ABC"))
print(type(myText))
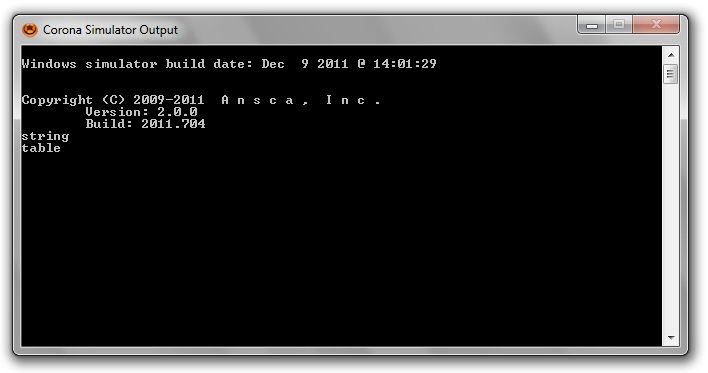
Select Relaunch from the simulated device window’s File menu. You should observe string and table appearing on successive lines in the Corona Simulator Output window. See Figure 20.
Two other basic functions that you’ll commonly use are tonumber() and tostring(). The former function tries to convert its argument to a number, whereas the latter function converts its argument to a string. For example, tostring(25) converts number 25 to a string consisting of letters 2 and 5. In contrast, tonumber("25") converts string 25 to number 25. Prove this to yourself by appending the following statements to main.lua:
print(type(tostring(25)))
print(type(tonumber("25")))
When you relaunch the simulator, you should observe string followed by number on separate lines.
Converting a table object to a string results in different output. You can see this for yourself by appending the following line to main.lua:
print("Display object: " .. tostring(myText))
This function call includes an expression that concatenates the string representation of the myText table object to the “Display object: ” string. (Lua expresses string concatenation via the “..” operator.)
When you relaunch the simulator, you should observe output similar to the following:
Display object: table: 00DDEAF0
The output includes a 32-bit value expressed in hexadecimal notation that uniquely identifies the display object (or any other kind of table).
Explore Additional Display Objects
The display.newImage() and display.newText() function calls return image and text display objects that are added to the stage container and made visible on the simulated device window. Corona also supports additional display objects, including rectangles and circles. (Rectangles and circles belong to a category of display object known as vector objects.)
Consider the rectangle. You can add a rectangle to the stage by specifying display.newRect(left, top, width, height), where you pass numbers (representing screen coordinates measured from the device’s upper-left corner origin at [0, 0]) to left and top, and pass numbers specifying the rectangle’s width and height to width and height.
Let’s experiment! Append the following code to main.lua and relaunch the simulator:
local myRect = display.newRect(50, 50, display.contentWidth/2, 50)
myRect.alpha = 0.5
myRect:setFillColor(0, 0, 255)
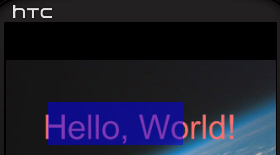
The first line creates a rectangle with a width half that of the screen. The width is obtained by reading the value of display‘s contentWidth property, which is a property that’s common to all display objects. I’ve specified values that position the rectangle over much of the “Hello, World!” message.
The second line accesses another common property: alpha. This property determines an object’s opacity (how much of the background does the object block), and ranges from 0 (transparent) to 1.0 (opaque). I’ve specified 0.5 (50%) so that you can still see part of the covered “Hello, World!” message.
The final line invokes the setFillColor() function (using the colon shorthand syntax) to specify the color for the rectangle’s interior. I’ve chosen solid blue for this color.
Figure 21 reveals that portion of the simulated device window affected by this code.
Exploring Event Handling
Corona lets you attach to display objects event listeners that can respond to events generated by various user actions, such as touching an item. The listener can be expressed as a function or a table. In either case, the listener is invoked with a table describing the event.
Attach a listener by invoking the display object’s addEventListener() function with two arguments, the first being a string that names the event and the second being the listener itself. When you no longer need the listener, you can remove it by calling removeEventListener() with the same arguments.
For example, Corona lets you respond to touch events, which occur when the user touches a display object in some fashion (you can trigger this event by moving the mouse cursor over the display object and pressing the left mouse button). The following code shows you how to create a function-based listener and register it with the previously created myRect object to respond to this kind of event:
local listener = function(event)
   print (event.name.." has occurred")
   myRect:setFillColor(math.random(0, 256), math.random(0, 256), math.random(0,256))
end

myRect:addEventListener("touch", listener)
This code first declares an anonymous (unnamed) function with a single parameter named event. This function obtains the event’s name by reading event’s name property, and then prints this name (touch) followed by “has occurred” to the Corona Simulator Output window.
Continuing, the function changes the rectangle’s current color to a randomly generated color, where each of the red, green, and blue color components is assigned a randomly selected value between 0 and 255 inclusive.
Finally, the touch listener is attached to the myRect rectangle display object via addEventListener().
Conclusion
Although there is much more to Corona than I could cover in these two brief introductory articles, I hope that what was presented is starting to get you excited about what this product can help you accomplish. Where do you go from here? I have five suggestions:
- Explore additional samples that are included with the SDK.
- Explore the Resources section on Ansca Mobile’s website. Pay particular attention to the API reference and the various documents that are present.
- Learn the Lua language. While writing this article, I discovered a wonderful resource on Lua and Corona APIs at http://www.gieson.com/corona/. You might also want to check out the Lua 5.0 reference manual.
- Although you can use the Corona Simulator to learn Lua, you might prefer to use a more convenient tool tailored specifically for this purpose (e.g., you might want to explore via an interactive command window). Visit http://www.lua.org/download.html to download Lua software for your platform.
- Write a simple game or another kind of app. If you’re interested in using Corona to develop games, you might want to check out Corona SDK Mobile Game Development: Beginner’s Guide
That’s pretty much it. Now it’s time to join the fun and cash in on your app ideas.
Frequently Asked Questions (FAQs) about Getting Started with Corona
What is Corona and why should I use it for app development?
Corona is a free, cross-platform framework ideal for creating games and apps for mobile devices and desktop systems. It uses Lua, a lightweight and easy-to-learn scripting language. Corona’s main advantage is its speed of development and simplicity. It allows developers to see changes instantly in the simulator and provides numerous plugins for extended functionality. It’s a great choice for both beginners and experienced developers looking to streamline their app development process.
How do I install Corona SDK?
To install Corona SDK, visit the official Corona Labs website and download the latest public release. Once downloaded, run the installer and follow the on-screen instructions. After installation, you can start building your apps using the Corona Simulator.
What is Lua and how can I learn it?
Lua is a powerful, efficient, lightweight, and embeddable scripting language. It supports procedural programming, object-oriented programming, functional programming, data-driven programming, and data description. Lua is widely used in game development and other industries, and there are numerous resources available online to learn Lua, including tutorials, forums, and documentation.
How can I test my Corona app?
Corona provides a simulator where you can test your app. The simulator updates in real-time as you make changes to your code. For more detailed testing, you can also build your app and install it on your device.
What platforms does Corona support?
Corona supports a wide range of platforms including iOS, Android, Kindle, Apple TV, Android TV, macOS, and Windows. This cross-platform support allows developers to write once and publish everywhere.
How can I monetize my Corona app?
Corona supports a variety of monetization options. You can integrate ads using one of the many supported ad networks, offer in-app purchases, or charge for your app directly.
What kind of apps can I build with Corona?
Corona is particularly strong for building 2D games, but it’s also capable of creating general purpose apps. Its simplicity and speed make it a great choice for prototyping and rapid development.
Can I use Corona for commercial projects?
Yes, Corona is free to use for both personal and commercial projects. There are no royalties or fees, regardless of how successful your app becomes.
What kind of support is available for Corona developers?
Corona has a strong and active community where developers can ask questions and share their experiences. There are also numerous tutorials, guides, and documentation available on the Corona Labs website.
How can I extend the functionality of Corona?
Corona supports a wide range of plugins that can be used to extend its functionality. These plugins provide additional features like analytics, in-app purchases, social media integration, and more. You can also create your own plugins using Corona’s native API.
Jeff Friesen is a freelance tutor and software developer with an emphasis on Java and mobile technologies. In addition to writing Java and Android books for Apress, Jeff has written numerous articles on Java and other technologies for SitePoint, InformIT, JavaWorld, java.net, and DevSource.

