
Key Takeaways
- Adobe Edge Animate CC 2014 is a natural tool for designing engaging infographics, allowing the creation of animations and interactive elements that tell a story.
- Infographics are a powerful way to convey a lot of information in a limited space in a way that can be easily retained. They are suitable for print, video, and web media.
- Adobe’s Creative Cloud offers a range of products for creating infographics, including Illustrator, Photoshop, InDesign, Premiere Pro, and After Effects.
- Adobe Edge Animate CC 2014 allows for the creation of responsive, data-driven widgets, separating the data model from the HTML view. This enables infographics to adapt to localization or selective data presentation based on location, time, date, etc.
- Adobe Edge Animate CC 2014 also allows for the addition of audio and video to infographics, the optimization of infographics for mobile devices, and the ability to share interactive infographics on social media.
This article was sponsored by Adobe. Thank you for supporting the sponsors that make SitePoint possible!
As I was working on a new project about infographics, I had an interesting revelation… Infographics are everywhere! I see infographics in television ads, on internet banners, printed in magazines, inside buses and trains, and all around me in everyday life. Combining information with visual design is often essential to communicate a message.
With that in mind, I started looking for ideas for my next Edge Animate project in my daily routine. While walking through Armstrong Woods in Northern California, I realized the entire park was essentially a giant three-dimensional infographic. The course of the path through the trees was lined with placards describing the forest ecosystem. It was an impressive exhibit, and a perfect place to find the theme for the Edge Animate project.
Adobe Edge Animate CC 2014 is a natural tool for designing engaging infographics. You can use it to easily build animations and interactive elements that tell a story. This article is a guide to using Edge Animate CC 2014 to create an infographic. If you’d like to follow along, step by step, read our companion tutorial.
See the Pen Adobe Edge – Of Time and Trees Demo by SitePoint (@SitePoint) on CodePen.
What is infographic design?
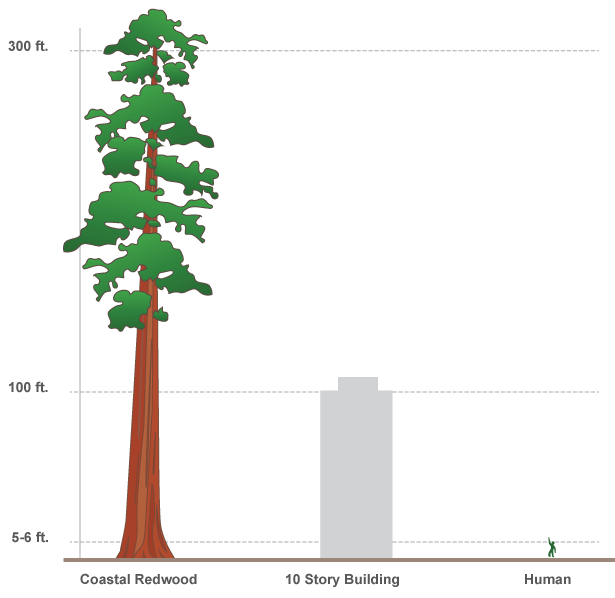
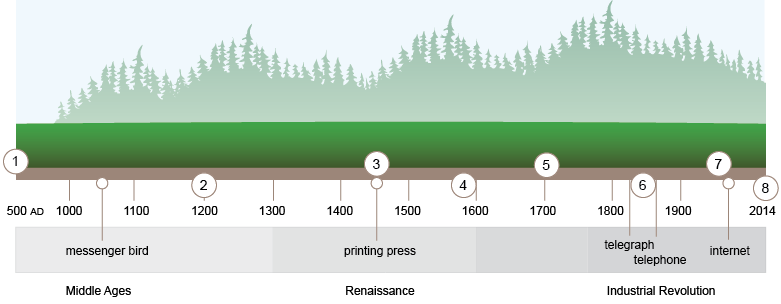
An infographic is the visualization of some type of data, message, or story. Infographics are as old as communication itself, and help to convey the scope of a message in a way that text and speech can’t do alone. For this project I chose to work with the theme of redwood trees, among the tallest and the oldest living creatures on the planet. My goal was to design an infographic that compares points in history and technological development with the lifespan of a 1400 year-old redwood tree. The visuals of a historical timeline combined with the timeline of the life of an old-growth tree, are very compelling.
Beyond helping to understand the scope of a message or set of data, infographics are also well suited to convey a lot of information in a limited space in a way that can be easily retained.
What are good infographic design practices?
Check out Sarah Hunt’s article The Onions of Modern Infographics. Sarah’s article was a great place to start, and I had to read it a few times to get my approach right. The project really came together when I shifted gears to focus on the content and the type of message and theme I wanted to convey. The topic of redwood trees is rich with interesting data, and close to my heart (see below).

When you start your infographic project, be sure to spend the time up front to gather your data, craft your story, and get inspired.
Types of infographics
Infographics appeared in cave art in early history, in printed art after the Renaissance, and in modern media in recent history. Today you have a lot of options in ways you can express your message, with static design, video, and the web being realistic options for just about anyone.
Ways to create infographics
Once you have the concept in place, start by designing mockups in Illustrator and Photoshop. Work with vector art and high resolution images so that you can produce any type of media from the design. For example, if you want to create an infographic for print, start in Illustrator and Photoshop, and then move to InDesign. If you want to combine the design with video, move to Premiere Pro and After Effects, and so on. All of these products are part of Adobe’s Creative Cloud. If you would like to learn how to use these apps, check out the hundreds of free tutorials that are available.
For this project, I designed the mockups in Illustrator (see below), and plan to implement them as an Edge Animate composition. Edge Animate has a great set of timeline-based tools that work well for producing animations and interactive content for the web. And, Edge Animate CC 2014 has a Responsive Scaling feature that makes delivering the infographic across screen sizes a lot easier.
Project Overview
Okay, now on to the sample project. The rest of this article is an overview of key concepts related to the tutorial steps.
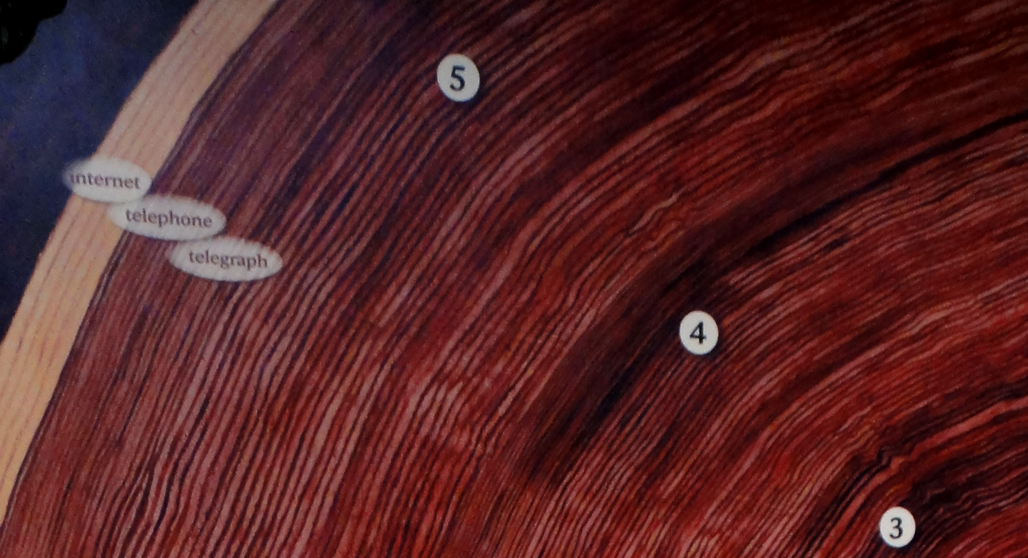
There is a great mural at the entrance to Armstrong Woods that shows the timeline of human history mapped to the rings of a redwood tree trunk (see below image). It inspired me to create my own version as an interactive web composition. I took the concept in my own direction by combining the life span of a 1400 year old tree (the Colonel Armstrong Tree), with the timeline of technological development over the past 1000 years.
In terms of what to expect from the project structure, the infographic is a single page composition. It includes background graphics in SVG format, a timeline composed of interactive triggers, and a detail panel that animates onto the screen and displays detail text related to each point along the timeline.
Setup the graphics and composition
The first two steps are simple, guiding you through the project setup and creating the static graphics for the infographic.
Check out this video for an overview of steps 1 and 2:
Video 1: Setup the composition using Adobe Illustrator CC 2014 and Adobe Edge Animate CC 2014
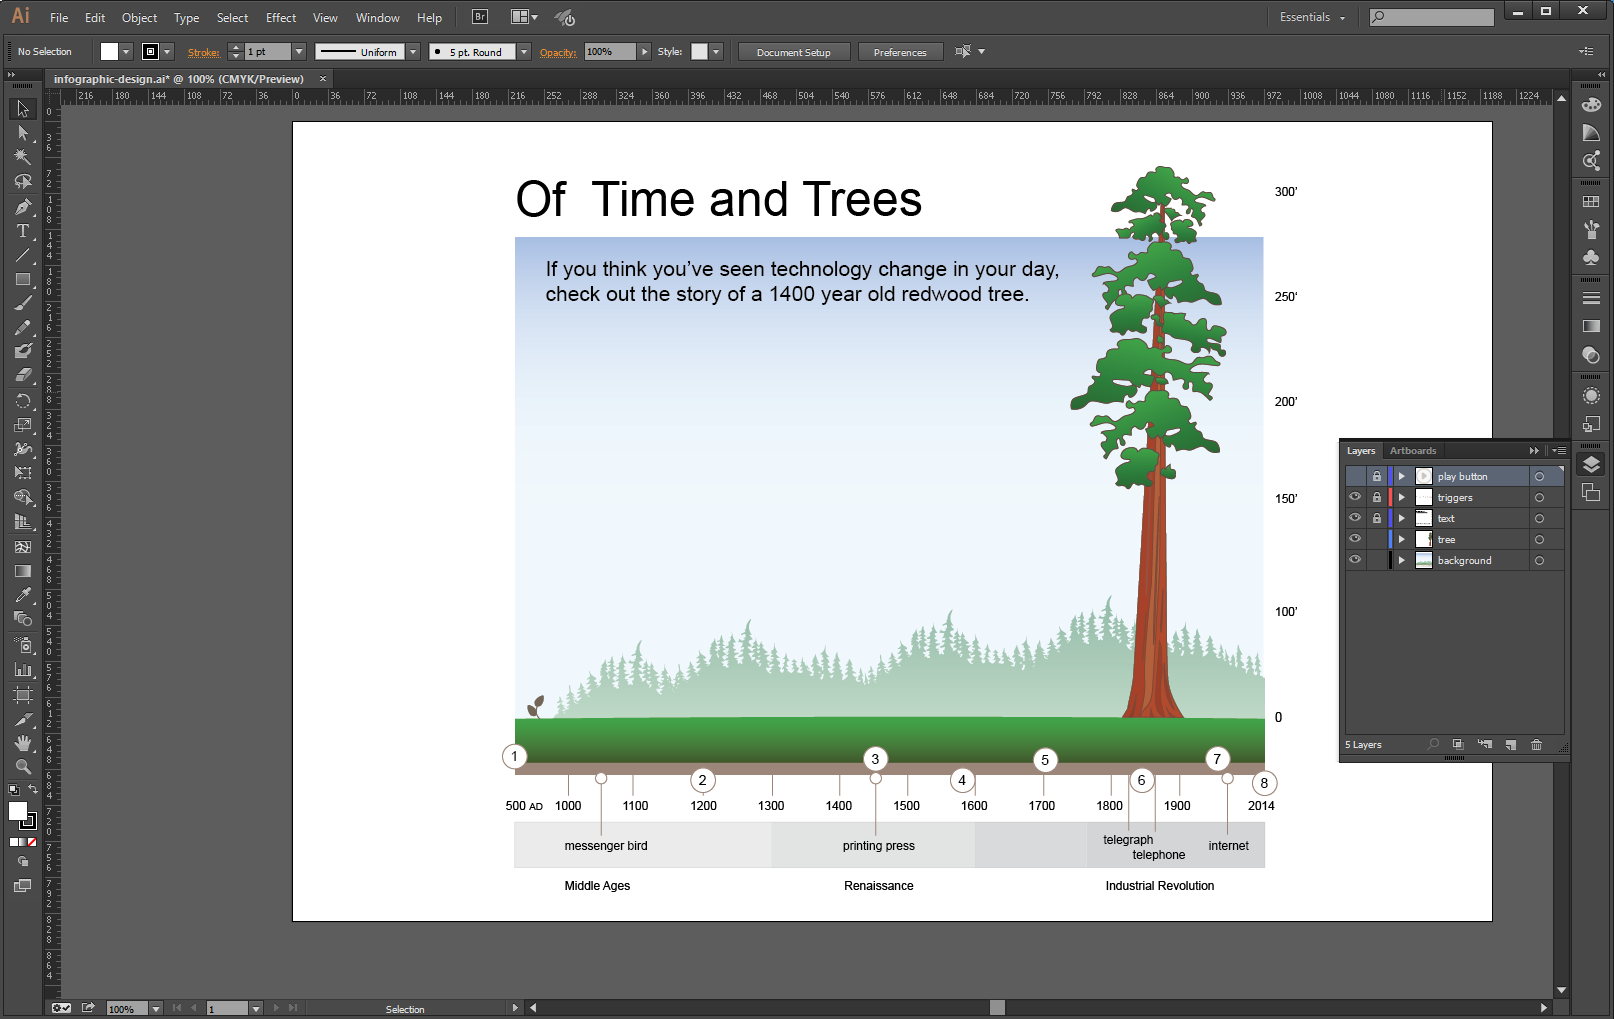
Step 1: Create the background graphic in Illustrator
I chose to create all my artwork as vector graphics using Adobe Illustrator CC 2014. Vector graphics scale well, and are well suited for the responsive scaling layout I want to create in Edge Animate.
The process used to bring artwork from Illustrator into Edge Animate is simple. You’ll start by creating your design in Illustrator (see below). From there, you’ll copy and paste graphics from Illustrator to Edge Animate. When you paste the graphics, Edge Animate will create SVG graphics for you and save them into the project’s images folder. The great thing about this workflow is that you can edit the SVG files in Illustrator and any changes you make will automatically appear in your Edge Animate composition.
Step 2: Build the static composition in Edge Animate CC 2014
This video walks you through creating the Edge Animate composition, pasting in SVG graphics from Illustrator, and adding text in HTML format.
Setting up a responsive composition in Edge Animate CC 2014 is as easy as selecting the Responsive Scaling options in the Properties panel, and defining minimum and maximum width settings. You’ll start by configuring the Responsive Scaling feature, followed by adding background graphics and text (see below image).
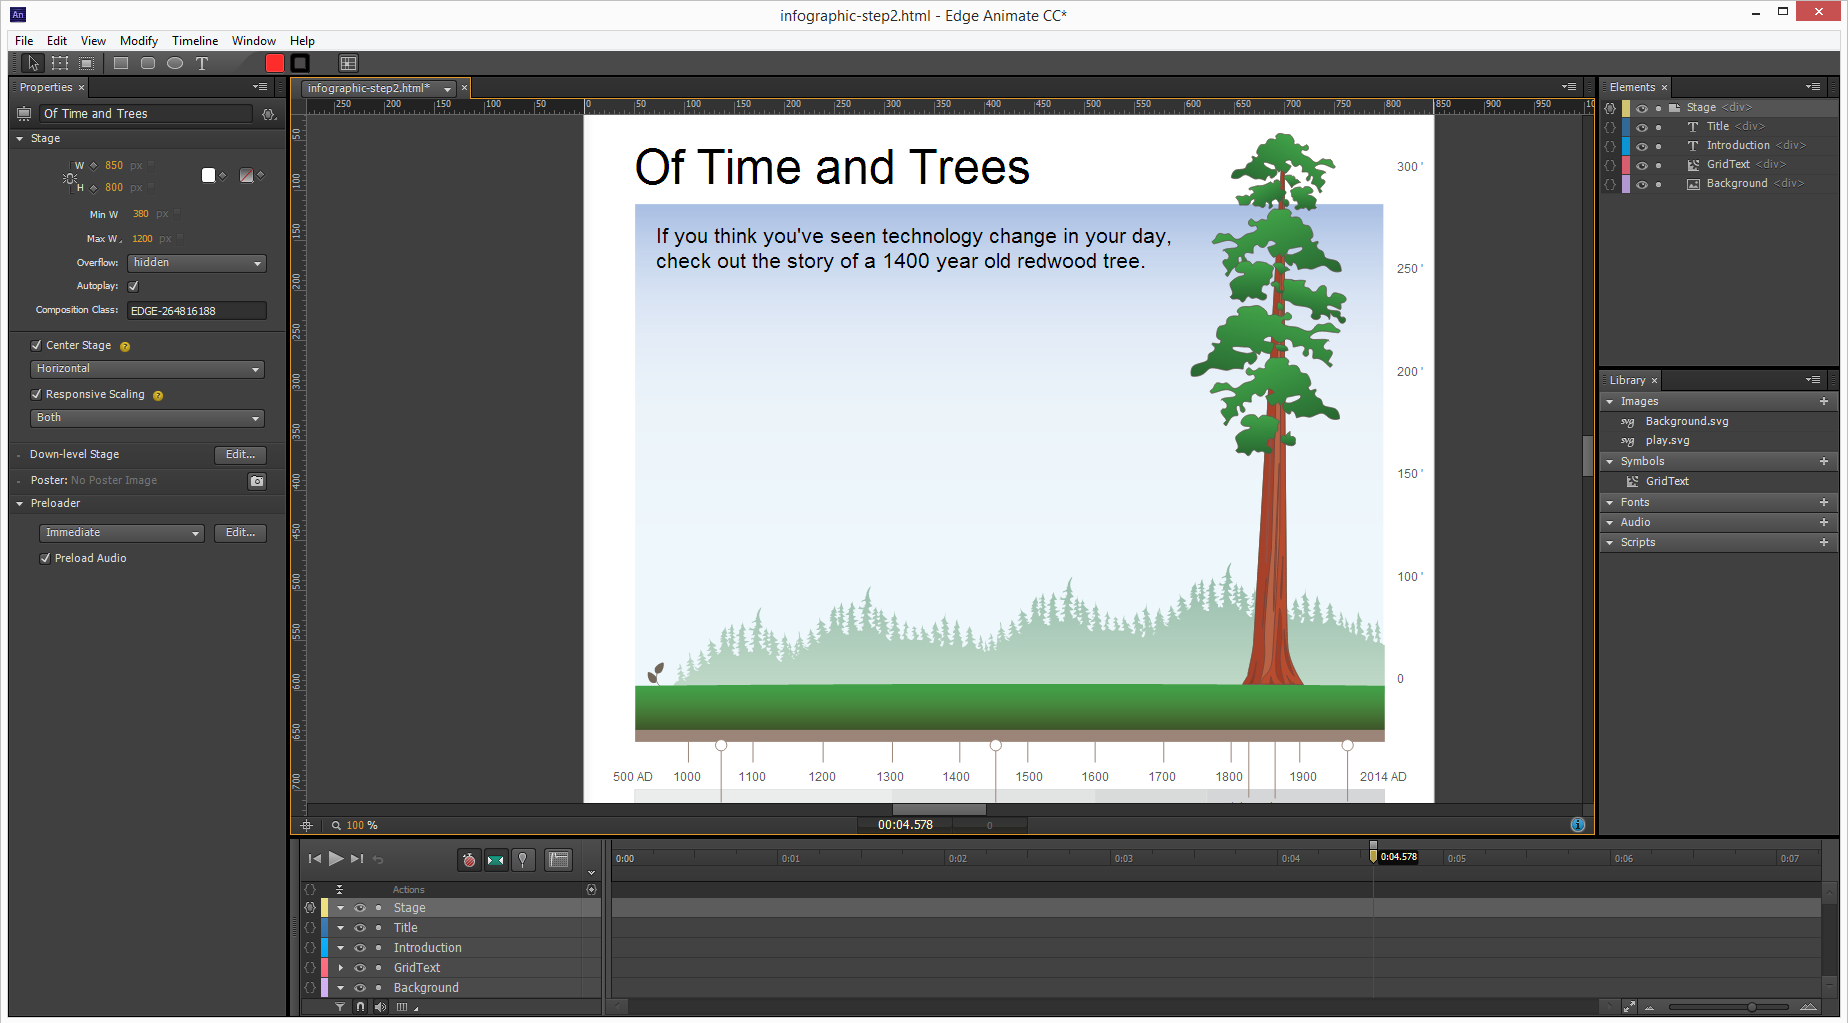
The key thing to note in this step is, while the background graphics are defined in an SVG file, the text is defined as HTML elements in Edge Animate. In my experiments, HTML text scaled better and remained more legible at smaller sizes.
Add widgets and animated states
At this point, the static infographic communicates some level of information, but the point of working with Edge Animate is to bring the infographic to life with interactivity and animation. To do that, I took the approach of building a couple of widgets.
A widget, as I’m defining it here, is simply an Edge Animate symbol that can be configured and reused in the composition. A symbol has its own timeline and area for code. It works well as a container for creating animated states within a graphic.
Check out this video for an overview of the steps 3 and 4, in the tutorial:
Video 2: Adding reusable widgets with animated states to an Edge Animate composition
Step 3: Build the TimelineTrigger widget
This step walks you through building a button symbol with animated states.
A TimelineTrigger is a button with a selected and deselected state (see below). Rather than create eight trigger graphics manually, it’s more efficient to create one widget that you can reuse eight times. The widget is built inside an Edge Animate symbol. It contains a default state, an animated rollover state, and an animated rollout state, in addition to a bit of code that handles state changes and selection.

The nice part about working with a widget in this way is that you can easily make changes to the symbol that update each instance of the symbol. For example, I built the rollover and rollout animations using elastic easing. If you decide you want a different effect, you can easily update the symbol to simultaneously update all eight instances.
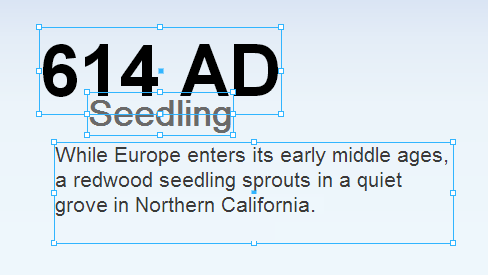
Step 4: Build the DetailPanel widget
This step walks you through building a presentation symbol with animated states.
The DetailPanel widget is built roughly in the same way as the TimelineTrigger widget, but it uses a symbol nested inside of another symbol to more easily control the animated states. The way it works is that you first create a symbol containing the text layout needed for the presentation (see below image), then you wrap that symbol in another symbol setup to control the animation states. Handling the text layout as a grouped object makes it easier to animate.
The DetailPanel follows the same kind of efficient design as the other widget, where you’ll reuse it each time you show detail text. So conceptually we’re setting up a page template where the data model is separate from the HTML view. We’ll take this concept further in the next steps.
Add data and bindings
Separating the data model from the HTML view is a powerful way to work. It enables you to build infographics using data-driven widgets. Loading the data as a separate resource opens the door for localization or selective data presentation based on location, time, date, etc.
In the tutorial, you’ll work with a supplied data file in JSON format, which is simply a text file describing an organized list of detail entries (each detail includes year, title, and text). Once you load this file, you can use it to populate the DetailPanel widget.
Check out this video for an overview of the steps 5 and 6:
Video 3: Adding a data source and bindings to the Edge Animate composition
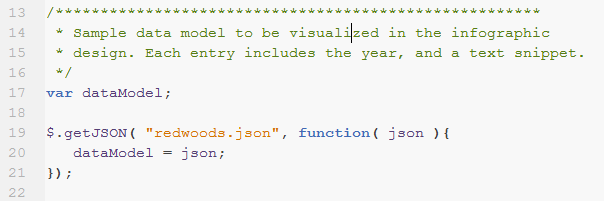
Step 5: Add a data source
This section walks you through the few short steps needed to load the supplied data file.
The cool part about this step is that it’s so easy. You can use Edge Animate’s built-in jQuery support to load the file, and make the detail list available to the code on the Stage timeline (see below).
Step 6: Bind the triggers to the detail panel
The last step in the tutorial walks you through adding the code snippets needed to bind the triggers to the detail panel.
The key concept in this step is that you’re stacking up code in the Stage timeline’s compositionReady event. The code acts as a controller bridging the data source with the HTML view. The controller code initializes the widgets, loads the data file, and binds the trigger instance clicks to the data, and detail panel presentation.
In the end, the working project cycles through the detail list, as you click on the timeline triggers.
Where to go from here
Infographics in any form are engaging and help to relay a message, and infographics containing interactivity and animation can be even more effective. Check out the resources below, and spend some time coming up with your own infographics in Illustrator, Photoshop, Edge Animate, and beyond.
Check out these links for more resources:
• Creating Static and Interactive Infographics with Illustrator and Muse (Jim Babbage)
• Infographic Design: Identifying the Good, the Bad, and the Ugly (Adobe TV)
• Make an engaging infographic (Adobe TV)
• Make a map of geographic data. (Adobe for Academics)
Frequently Asked Questions (FAQs) on Designing Interactive Infographics with Adobe Edge Animate CC 2014
How can I make my infographic interactive using Adobe Edge Animate CC 2014?
Adobe Edge Animate CC 2014 provides a variety of tools to make your infographic interactive. You can use the ‘Actions’ panel to add interactivity to your elements. This panel allows you to assign actions to specific events like mouse clicks or touch events. You can also use the ‘Timeline’ feature to animate your elements over time, making your infographic more dynamic and engaging. Remember to preview your infographic regularly to ensure that the interactivity works as expected.
What are some best practices for creating an interactive infographic?
When creating an interactive infographic, it’s important to keep the user experience in mind. Make sure your infographic is easy to navigate and understand. Use clear, concise language and visuals to convey your information. Also, consider the load time of your infographic. Too many animations or interactive elements can slow down the load time, which can frustrate users. Lastly, always test your infographic on multiple devices to ensure it works properly on all platforms.
Can I add audio or video to my interactive infographic in Adobe Edge Animate CC 2014?
Yes, Adobe Edge Animate CC 2014 allows you to add audio and video to your interactive infographic. You can use the ‘Media’ panel to import your audio or video files. Once imported, you can control when and how these media files play using the ‘Actions’ panel. This can add another layer of interactivity and engagement to your infographic.
How can I optimize my interactive infographic for mobile devices?
Adobe Edge Animate CC 2014 provides tools to help you optimize your interactive infographic for mobile devices. You can use the ‘Responsive Scaling’ feature to ensure your infographic scales properly on different screen sizes. You can also use the ‘Preview’ feature to see how your infographic will look on different devices. Remember to keep your file sizes small to ensure your infographic loads quickly on mobile devices.
Can I share my interactive infographic on social media?
Yes, you can share your interactive infographic on social media. Adobe Edge Animate CC 2014 allows you to export your infographic as an HTML file, which can be uploaded to your website or blog. From there, you can share the link to your infographic on your social media platforms. Remember to include relevant hashtags and a compelling caption to attract more viewers.
How can I track the performance of my interactive infographic?
You can track the performance of your interactive infographic by using analytics tools. These tools can provide insights into how users are interacting with your infographic, such as how long they spend on each section or what links they click on. This information can help you refine your infographic and make it more effective.
Can I collaborate with others when creating an interactive infographic in Adobe Edge Animate CC 2014?
While Adobe Edge Animate CC 2014 does not have built-in collaboration features, you can still collaborate with others by sharing your project files. You can also use project management tools to coordinate tasks and deadlines.
What are some common mistakes to avoid when creating an interactive infographic?
Some common mistakes to avoid when creating an interactive infographic include overloading it with too much information, using confusing visuals, and not testing it on different devices. It’s also important to avoid making your infographic too complex. While interactivity can enhance your infographic, too much interactivity can overwhelm users and detract from your message.
How can I update my interactive infographic after it’s been published?
You can update your interactive infographic by opening your project in Adobe Edge Animate CC 2014, making your changes, and then re-exporting the HTML file. You can then replace the old file on your website or blog with the updated file.
Can I use Adobe Edge Animate CC 2014 to create other types of interactive content?
Yes, Adobe Edge Animate CC 2014 is a versatile tool that can be used to create a variety of interactive content, including web animations, digital magazines, and e-learning materials. The process for creating these types of content is similar to creating an interactive infographic.