

Building a modern project requires splitting the logic into front-end and back-end code. The reason behind this move is to promote code re-usability. For example, we may need to build a native mobile application that accesses the back-end API. Or we may be developing a module that will be part of a large modular platform.

The popular way of building a server-side API is to use Node.js with a library like Express or Restify. These libraries make creating RESTful routes easy. The problem with these libraries is that we’ll find ourselves writing a ton of repetitive code. We’ll also need to write code for authorization and other middleware logic.
To escape this dilemma, we can use a framework like Feathers to help us generate an API in just a few commands.
What makes Feathers amazing is its simplicity. The entire framework is modular and we only need to install the features we need. Feathers itself is a thin wrapper built on top of Express, where they’ve added new features — services and hooks. Feathers also allows us to effortlessly send and receive data over WebSockets.
Key Takeaways
- Utilize FeathersJS with Node.js to simplify backend API creation, reducing the need for repetitive boilerplate code found in traditional Express setups.
- Scaffold your React application using Create React App, and structure your project for a CRUD application with components and pages for managing contacts.
- Implement state management in React using Hooks and the Context API to handle global state without Redux, streamlining the codebase.
- Build a dynamic user interface with Semantic UI React and React Router for seamless navigation and styling.
- Use FeathersJS to create RESTful services and integrate with MongoDB for data storage, utilizing Mongoose for schema definition and data validation.
- Enhance user experience by handling errors effectively in the UI using React Hook Forms for form validation and Axios for data fetching.
- Implement real-time capabilities in your app with FeathersJS, allowing for live updates to the UI when data changes on the server.
Prerequisites
To follow along with this tutorial, you’ll need the following things installed on your machine:
- Node.js v12+ and an up-to-date version of npm. Check this tutorial if you need help getting set up.
- MongoDB v4.2+. Check this tutorial if you need help getting set up.
- Yarn package manager — installed using
npm i -g yarn.
It will also help if you’re familiar with the following topics:
- How to write modern JavaScript
- Flow control in modern JavaScript (e.g.
async ... await) - The basics of React
- The basics of REST APIs
Also, please note that you can find the completed project code on GitHub.
Scaffold the App
We’re going to build a CRUD contact manager application using Node.js, React, Feathers and MongoDB.
In this tutorial, I’ll show you how to build the application from the bottom up. We’ll kick-start our project using the popular Create React App tool.
You can install it like so:
npm install -g create-react-app
Then create a new project:
# scaffold a new react project
create-react-app react-contact-manager
cd react-contact-manager

# delete unnecessary files
rm src/logo.svg src/App.css src/serviceWorker.js
Use your favorite code editor and remove all the content in src/index.css. Then open src/App.js and rewrite the code like this:
import React from 'react';

const App = () => {
  return (
    <div>
      <h1>Contact Manager</h1>
    </div>
  );
};

export default App;
And in src/index.js, change the code like so:
import React from 'react';
import ReactDOM from 'react-dom';
import './index.css';
import App from './App';

ReactDOM.render(
  <React.StrictMode>
    <App />
  </React.StrictMode>,
  document.getElementById('root')
);
Run yarn start from the react-contact-manager directory to start the project. Your browser should automatically open http://localhost:3000 and you should see the heading “Contact Manager”. Quickly check the console tab to ensure that the project is running cleanly with no warnings or errors, and if everything is running smoothly, use Ctrl + C to stop the server.
Build the API Server with Feathers
Let’s proceed with generating the back-end API for our CRUD project using the feathers-cli tool:
# Install Feathers command-line tool
npm install @feathersjs/cli -g

# Create directory for the back-end code
# Run this command in the `react-contact-manager` directory
mkdir backend
cd backend

# Generate a feathers back-end API server
feathers generate app

? Do you want to use JavaScript or TypeScript? JavaScript
? Project name backend
? Description Contacts API server
? What folder should the source files live in? src
? Which package manager are you using (has to be installed globally)? Yarn
? What type of API are you making? REST, Realtime via Socket.io
? Which testing framework do you prefer? Mocha + assert
? This app uses authentication No
? Which coding style do you want to use? ESLint

# Ensure Mongodb is running
sudo service mongod start
sudo service mongod status

● mongod.service - MongoDB Database Server
   Loaded: loaded (/lib/systemd/system/mongod.service; disabled; vendor preset: enabled)
   Active: active (running) since Fri 2020-09-18 14:42:12 CEST; 4s ago
     Docs: https://docs.mongodb.org/manual
 Main PID: 31043 (mongod)
   CGroup: /system.slice/mongod.service
           └─31043 /usr/bin/mongod --config /etc/mongod.conf

# Generate RESTful routes for Contact Model
feathers generate service

? What kind of service is it? Mongoose
? What is the name of the service? contacts
? Which path should the service be registered on? /contacts
? What is the database connection string? mongodb://localhost:27017/contactsdb

# Install email and unique field validation
yarn add mongoose-type-email
Let’s open backend/config/default.json. This is where we can configure our MongoDB connection parameters and other settings. Change the default paginate value to 50, since front-end pagination won’t be covered in this tutorial:
{
  "host": "localhost",
  "port": 3030,
  "public": "../public/",
  "paginate": {
    "default": 50,
    "max": 50
  },
  "mongodb": "mongodb://localhost:27017/contactsdb"
}
Open backend/src/models/contact.model.js and update the code as follows:
require('mongoose-type-email');

module.exports = function (app) {
  const modelName = 'contacts';
  const mongooseClient = app.get('mongooseClient');
  const { Schema } = mongooseClient;
  const schema = new Schema({
    name : {
      first: {
        type: String,
        required: [true, 'First Name is required']
      },
      last: {
        type: String,
        required: false
      }
    },
    email : {
      type: mongooseClient.SchemaTypes.Email,
      required: [true, 'Email is required']
    },
    phone : {
      type: String,
      required: [true, 'Phone is required'],
      validate: {
        validator: function(v) {
          return /^\+(?:[0-9] ?){6,14}[0-9]$/.test(v);
        },
        message: '{VALUE} is not a valid international phone number!'
      }
    }
  }, {
    timestamps: true
  });

  // This is necessary to avoid model compilation errors in watch mode
  // see https://mongoosejs.com/docs/api/connection.html#connection_Connection-deleteModel
  if (mongooseClient.modelNames().includes(modelName)) {
    mongooseClient.deleteModel(modelName);
  }

  return mongooseClient.model(modelName, schema);
};
Mongoose introduces a new feature called timestamps, which inserts two new fields for you — createdAt and updatedAt. These two fields will be populated automatically whenever we create or update a record. We’ve also installed the mongoose-type-email plugin to perform email validation on the server.
Now, open backend/src/mongoose.js and change this line:
{ useCreateIndex: true, useNewUrlParser: true }
to:
{
  useCreateIndex: true,
  useNewUrlParser: true,
  useUnifiedTopology: true,
  useFindAndModify: false,
}
This will squash a couple of annoying deprecation warnings.
Open a new terminal and execute yarn test inside the backend directory. You should have all the tests running successfully. Then, go ahead and execute yarn start to start the back-end server. Once the server has initialized, it should print 'Feathers application started on localhost:3030' to the console.
Launch your browser and access the URL http://localhost:3030/contacts. You should expect to receive the following JSON response:
{"total":0,"limit":50,"skip":0,"data":[]}
Test the API with Hoppscotch
Now let’s use Hoppscotch (formerly Postwoman) to confirm all of our endpoints are working properly.
First, let’s create a contact. This link will open Hoppscotch with everything set up to send a POST request to the /contacts endpoint. Make sure Raw input is set to on, then press the green Send button to create a new contact. The response should be something like this:
{
  "_id": "5f64832c20745f4f282b39f9",
  "name": {
    "first": "Tony",
    "last": "Stark"
  },
  "phone": "+18138683770",
  "email": "tony@starkenterprises.com",
  "createdAt": "2020-09-18T09:51:40.021Z",
  "updatedAt": "2020-09-18T09:51:40.021Z",
  "__v": 0
}
Now let’s retrieve our newly created contact. This link will open Hoppscotch ready to send a GET request to the /contacts endpoint. When you press the Send button, you should get a response like this:
{
  "total": 1,
  "limit": 50,
  "skip": 0,
  "data": [
    {
      "_id": "5f64832c20745f4f282b39f9",
      "name": {
        "first": "Tony",
        "last": "Stark"
      },
      "phone": "+18138683770",
      "email": "tony@starkenterprises.com",
      "createdAt": "2020-09-18T09:51:40.021Z",
      "updatedAt": "2020-09-18T09:51:40.021Z",
      "__v": 0
    }
  ]
}
We can show an individual contact in Hoppscotch by sending a GET request to http://localhost:3030/contacts/<_id>. The _id field will always be unique, so you’ll need to copy it out of the response you received in the previous step. This is the link for the above example. Pressing Send will show the contact.
We can update a contact by sending a PUT request to http://localhost:3030/contacts/<_id> and passing it the updated data as JSON. This is the link for the above example. Pressing Send will update the contact.
Finally we can remove our contact by sending a DELETE request to the same address — that is, http://localhost:3030/contacts/<_id>. This is the link for the above example. Pressing Send will delete the contact.
Hoppscotch is a very versatile tool and I encourage you to use it to satisfy yourself that your API is working as expected, before moving on to the next step.
Build the User Interface
Originally, I had wanted to use Semantic UI for the styling, but at the time of writing, it hasn’t been updated in over two years. Fortunately, the open-source community has managed to keep the project alive by creating a popular fork, Fomantic-UI, and this is what we’ll use. There are plans to merge one back into the other when active development of Semantic UI resumes.
We’ll also use Semantic UI React to quickly build our user interface without having to define lots of class names. Fortunately, this project has been kept up to date as well.
Finally, we’ll be using React Router to handle the routing.
With that out of the way, open a new terminal in the react-contact-manager directory and enter the following commands:
# Install Fomantic UI CSS and Semantic UI React
yarn add fomantic-ui-css semantic-ui-react

# Install React Router
yarn add react-router-dom
Update the project structure by adding the following directories and files to the src directory:
src
├── App.js
├── App.test.js
├── components #(new)
│   ├── contact-form.js #(new)
│   └── contact-list.js #(new)
├── index.css
├── index.js
├── pages #(new)
│   ├── contact-form-page.js #(new)
│   └── contact-list-page.js #(new)
├── serviceWorker.js
└── setupTests.js
From the terminal:
cd src
mkdir pages components
touch components/contact-form.js components/contact-list.js
touch pages/contact-form-page.js pages/contact-list-page.js
Let’s quickly populate the JavaScript files with some placeholder code.
The ContactList component will be a functional component (a plain JavaScript function which returns a React element):
// src/components/contact-list.js

import React from 'react';

const ContactList = () => {
  return (
    <div>
      <p>No contacts here</p>
    </div>
  );
}

export default ContactList;
For the top-level containers, I’m using pages. Let’s provide some code for the ContactListPage component:
// src/pages/contact-list-page.js

import React from 'react';
import ContactList from '../components/contact-list';

const ContactListPage = () => {
  return (
    <div>
      <h1>List of Contacts</h1>
      <ContactList />
    </div>
  );
};

export default ContactListPage;
The ContactForm component will need to be smart, since it’s required to manage its own state, specifically form fields. We’ll be doing this with React hooks:
// src/components/contact-form.js

import React from 'react';

const ContactForm = () => {
  return (
    <div>
      <p>Form under construction</p>
    </div>
  )
}

export default ContactForm;
Populate the ContactFormPage component with this code:
// src/pages/contact-form-page.js

import React from 'react';
import ContactForm from '../components/contact-form';

const ContactFormPage = () => {
  return (
    <div>
      <ContactForm />
    </div>
  );
};

export default ContactFormPage;
Now let’s create the navigation menu and define the routes for our App. App.js is often referred to as the “layout template” for a single-page application:
// src/App.js

import React from 'react';
import { NavLink, Route } from 'react-router-dom';
import { Container } from 'semantic-ui-react';
import ContactListPage from './pages/contact-list-page';
import ContactFormPage from './pages/contact-form-page';

const App = () => {
  return (
    <Container>
      <div className="ui two item menu">
        <NavLink className="item" activeClassName="active" exact to="/">
          Contacts List
        </NavLink>
        <NavLink
          className="item"
          activeClassName="active"
          exact
          to="/contacts/new"
        >
          Add Contact
        </NavLink>
      </div>
      <Route exact path="/" component={ContactListPage} />
      <Route path="/contacts/new" component={ContactFormPage} />
      <Route path="/contacts/edit/:_id" component={ContactFormPage} />
    </Container>
  );
};

export default App;
The above code uses React Router. If you’d like a refresher on this, please consult our tutorial.
Finally, update the src/index.js file with this code, where we import Formantic-UI for styling and the BrowserRouter component for using the HTML5 history API, which will keep our app in sync with the URL:
// src/index.js

import React from 'react';
import ReactDOM from 'react-dom';
import { BrowserRouter } from 'react-router-dom';
import App from './App';
import 'fomantic-ui-css/semantic.min.css';
import './index.css';

ReactDOM.render(
  <BrowserRouter>
    <App />
  </BrowserRouter>,
  document.getElementById('root')
);
Make sure that the create-react-app server is running (if not, start it using yarn start), then visit http://localhost:3000. You should have a similar view to the screenshot below:
Manage State with React Hooks and the Context API
Previously, one might have reached for Redux when tasked with managing state in a React app. However, as of React v16.8.0, it’s possible to manage global state in a React application using React Hooks and the Context API.
Using this new technique, you’ll write less code that’s easier to maintain. We’ll still use the Redux pattern, but just using React Hooks and the Context API.
Next, let’s look at hooking up the Context API.
Define a Context Store
This will be like our store for handling global state for contacts. Our state will consist of multiple variables, including a contacts array, a loading state, and a message object for storing error messages generated from the back-end API server.
In the src directory, create a context folder that contains a contact-context.js file:
cd src
mkdir context
touch context/contact-context.js
And insert the following code:
import React, { useReducer, createContext } from 'react';

export const ContactContext = createContext();

const initialState = {
  contacts: [],
  contact: {}, // selected or new
  message: {}, // { type: 'success|fail', title:'Info|Error' content:'lorem ipsum'}
};

function reducer(state, action) {
  switch (action.type) {
    case 'FETCH_CONTACTS': {
      return {
        ...state,
        contacts: action.payload,
      };
    }
    default:
      throw new Error();
  }
}

export const ContactContextProvider = props => {
  const [state, dispatch] = useReducer(reducer, initialState);
  const { children } = props;

  return (
    <ContactContext.Provider value={[state, dispatch]}>
      {children}
    </ContactContext.Provider>
  );
};
As you can see, we’re using the useReducer hook, which is an alternative to useState. useReducer is suitable for handling complex state logic involving multiple sub-values. We’re also using the Context API to allow sharing of data with other React components.
Inject the Context Provider into the Application Root
We need to encapsulate our root component with the Context Provider. Update src/index.js as follows:
...
import { ContactContextProvider } from './context/contact-context';

ReactDOM.render(
  <ContactContextProvider>
    <BrowserRouter>
      <App />
    </BrowserRouter>
  </ContactContextProvider>,
  document.getElementById('root')
);
Now all child components will be able to access the global state by using the useContext hook.
Display a List of Contacts
In this step, we’ll create some static data to test with. Our initial state has an empty array of contacts. We’ll use the dispatch method to temporarily populate the contacts array. Open pages/contact-list-page.js and update as follows:
import React, { useContext, useEffect } from 'react';
import ContactList from '../components/contact-list';
import { ContactContext } from '../context/contact-context';

const data = [
  {
    _id: '1',
    name: {
      first: 'John',
      last: 'Doe',
    },
    phone: '555',
    email: 'john@gmail.com',
  },
  {
    _id: '2',
    name: {
      first: 'Bruce',
      last: 'Wayne',
    },
    phone: '777',
    email: 'bruce.wayne@gmail.com',
  },
];

const ContactListPage = () => {
  const [state, dispatch] = useContext(ContactContext);

  useEffect(() => {
    dispatch({
      type: 'FETCH_CONTACTS',
      payload: data,
    });
  }, [dispatch]);

  return (
    <div>
      <h1>List of Contacts</h1>
      <ContactList contacts={state.contacts} />
    </div>
  );
};

export default ContactListPage;
Next, we’ll use a simple loop to display contacts in components/contact-list.js. Update as follows:
import React from 'react';

const ContactList = ({ contacts }) => {
  const list = () => {
    return contacts.map(contact => {
      return (
        <li key={contact._id}>
          {contact.name.first} {contact.name.last}
        </li>
      );
    });
  };

  return (
    <div>
      <ul>{list()}</ul>
    </div>
  );
}

export default ContactList;
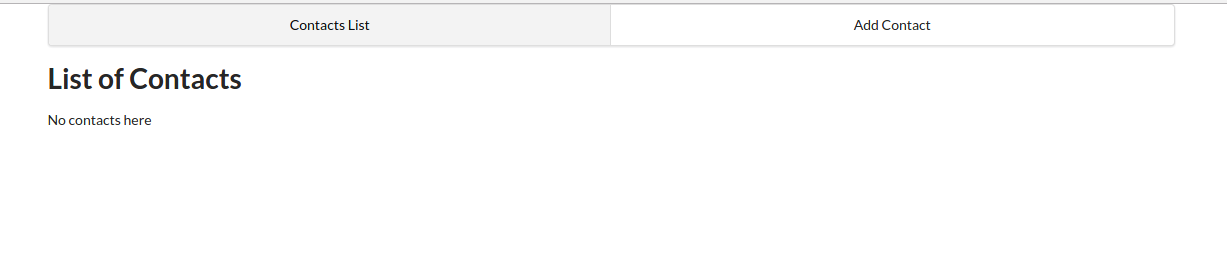
Now, if you go back to the browser, you should have something like this:

Let’s make the list UI look more attractive by using Semantic UI styling. In the src/components folder, create a new file contact-card.js:
touch src/components/contact-card.js
Then add the following code:
// src/components/contact-card.js

import React from 'react';
import { Card, Button, Icon } from 'semantic-ui-react';

const ContactCard = ({ contact }) => {
  return (
    <Card>
      <Card.Content>
        <Card.Header>
          <Icon name="user outline" /> {contact.name.first} {contact.name.last}
        </Card.Header>
        <Card.Description>
          <p>
            <Icon name="phone" /> {contact.phone}
          </p>
          <p>
            <Icon name="mail outline" /> {contact.email}
          </p>
        </Card.Description>
      </Card.Content>
      <Card.Content extra>
        <div className="ui two buttons">
          <Button basic color="green">
            Edit
          </Button>
          <Button basic color="red">
            Delete
          </Button>
        </div>
      </Card.Content>
    </Card>
  );
}

export default ContactCard;
Update the ContactList component to use the new ContactCard component:
// src/components/contact-list.js

import React from 'react';
import { Card } from 'semantic-ui-react';
import ContactCard from './contact-card';

const ContactList = ({ contacts }) => {
  const cards = () => {
    return contacts.map(contact => {
      return <ContactCard key={contact._id} contact={contact} />;
    });
  };

  return <Card.Group>{cards()}</Card.Group>;
}

export default ContactList;
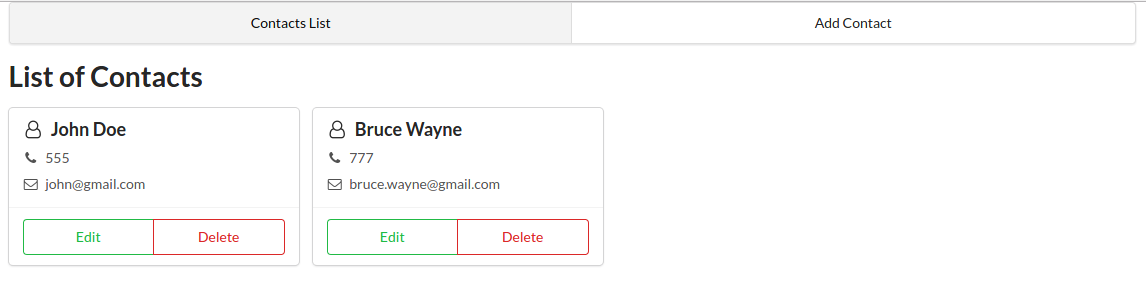
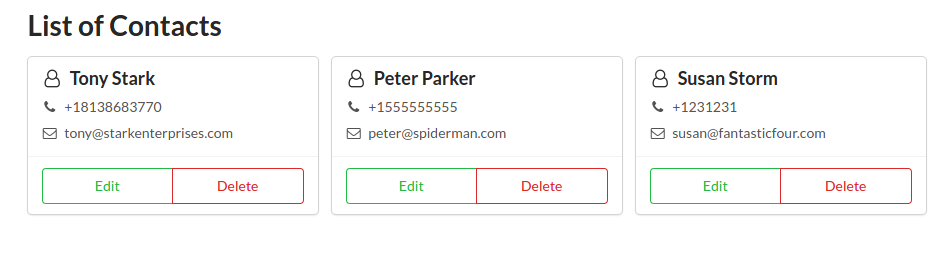
The list page should now look like this:
Fetch Data Asynchronously from the Feathers API Server
Now that we know the global state is properly being shared with other React components, we can make a real fetch request to the database and use the data to populate our contact list page. There are several ways to do this, but the way I’ll show you is surprisingly simple.
First, ensure both the Mongo database and the back-end server and are running in separate terminals. You can confirm this by opening the URL http://localhost:3030/contacts. If it doesn’t return any results, head back up the page and add a contact using Hoppscotch.
Next, install the axios library. We’ll be using this to make our requests:
yarn add axios
Then, update src/contact-list-page.js to perform the data fetch request and use that result to update the global state. You’ll need to remove the static data array list, as we won’t need that anymore. Update the code as follows:
// src/contact-list-page.js

import React, { useContext, useEffect } from 'react';
import axios from 'axios';
import ContactList from '../components/contact-list';
import { ContactContext } from '../context/contact-context';

const ContactListPage = () => {
  const [state, dispatch] = useContext(ContactContext);

  useEffect(() => {
    const fetchData = async () => {
      const response = await axios.get('http://localhost:3030/contacts');
      dispatch({
        type: 'FETCH_CONTACTS',
        payload: response.data.data || response.data, // in case pagination is disabled
      });
    };
    fetchData();
  }, [dispatch]);

  return (
    <div>
      <h1>List of Contacts</h1>
      <ContactList contacts={state.contacts} />
    </div>
  );
}

export default ContactListPage;
After saving, go back to your browser. The contact list page should now be displaying data from the database.
Error Handling
Let’s assume you forgot to start the back-end server and the Mongo database service. If you launch the create-react-app server, the home page will simply display no contacts. It won’t indicate an error has occurred unless you pop open the console tab.
Let’s implement some error handling by first creating a component that will display error messages. We’ll also implement a helper function for extracting information from caught errors. This helper function will be capable of differentiating between network errors and error messages sent by the back-end server — for example, validation or 404 error messages.
We’ll use Semantic UI React’s Message component to build our code. Create a flash-message.js file in the src/components folder:
touch src/components/flash-message.js
Then, insert the following code:
// src/components/flash-message.js

import React from 'react';
import { Message } from 'semantic-ui-react';

export const FlashMessage = ({ message }) => {
  return (
    <Message
      positive={message.type === 'success'}
      negative={message.type === 'fail'}
      header={message.title}
      content={message.content}
    />
  );
}

export const flashErrorMessage = (dispatch, error) => {
  const err = error.response ? error.response.data : error; // check if server or network error
  dispatch({
    type: 'FLASH_MESSAGE',
    payload: {
      type: 'fail',
      title: err.name,
      content: err.message,
    },
  });
}
Next, add this reducer to src/context/contact-context.js for handling flash messages:
function reducer(state, action) {
  switch  (action.type)  {
    ...
    case 'FLASH_MESSAGE': {
      return {
        ...state,
        message: action.payload,
      };
    }
    ...
  }
}
Finally, update pages/contact-list-page.js. We’ll implement a try … catch mechanism for catching and dispatching errors. We’ll also render the FlashMessage component that will only display if a FLASH_MESSAGE has been dispatched:
// src/pages/contact-list-page.js

...
import { FlashMessage, flashErrorMessage } from '../components/flash-message';

const ContactListPage = () => {
  const [state, dispatch] = useContext(ContactContext);

  useEffect(() => {
    const fetchData = async () => {
      try {
        const response = await axios.get('http://localhost:3030/contacts');
        dispatch({
          type: 'FETCH_CONTACTS',
          payload: response.data.data || response.data, // in case pagination is disabled
        });
      } catch (error) {
        flashErrorMessage(dispatch, error);
      }
    };
    fetchData();
  }, [dispatch]);

  return (
    <div>
      <h1>List of Contacts</h1>
      {state.message.content && <FlashMessage message={state.message} />}
      <ContactList contacts={state.contacts} />
    </div>
  );
}

export default ContactListPage;
Below is a screenshot of an error message that occurs when the back-end server is running but the Mongo database service has been stopped:
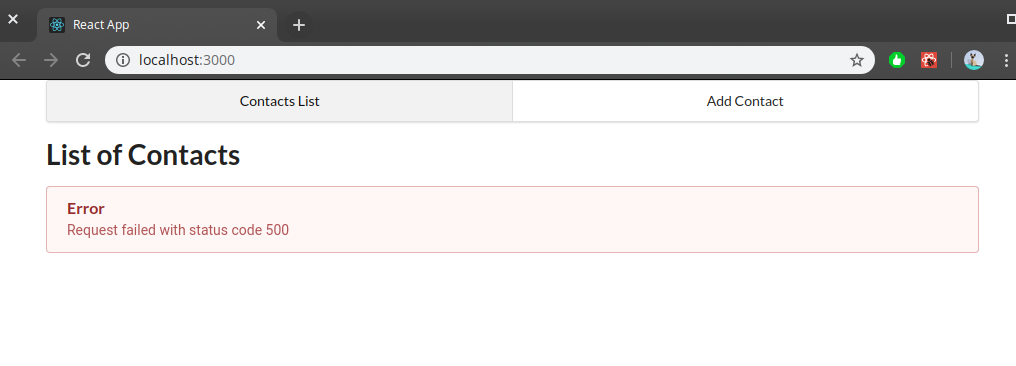
Please note, in order to recover from the above error, you must first start the Mongo service, then the Feathers back-end server, in that order.
Handle Create Requests Using React Hook Forms
Next, let’s look at how to add new contacts, and to do that we need forms. At first, building a form looks quite easy. But when we start thinking about client-side validation and controlling when errors should be displayed, it becomes tricky. In addition, the back-end server does its own validation, and we’ll also need to display these errors on the form.
Rather than implement all the form functionality ourselves, we’ll enlist the help of a form library — React Hook Form — which is in my opinion is the easiest library to work with when creating React forms. We’ll also use the classnames package to highlight form fields with validation errors.
First off, stop the create-react-app server with Ctrl + C and install the following packages:
yarn add react-hook-form classnames
Re-start the server after the packages have finished installing.
Add this CSS class to src/index.css file to style the form errors:
.error {
  color: #9f3a38;
}
Next, open src/components/contact-form.js to build the form user interface. Replace the existing code as follows:
// src/components/contact-form.js

import React, { useContext } from 'react';
import { Form, Grid, Button } from 'semantic-ui-react';
import { useForm } from 'react-hook-form';
import classnames from 'classnames';
import { ContactContext } from '../context/contact-context';

const ContactForm = () => {
  const [state] = useContext(ContactContext);
  const { register, errors, handleSubmit } = useForm();
  const onSubmit = data => console.log(data);

  return (
    <Grid centered columns={2}>
      <Grid.Column>
        <h1 style={{ marginTop: '1em' }}>Add New Contact</h1>
        <Form onSubmit={handleSubmit(onSubmit)} loading={state.loading}>
          <Form.Group widths="equal">
            <Form.Field className={classnames({ error: errors.name })}>
              <label htmlFor="name.first">
                First Name
                <input
                  id="name.first"
                  name="name.first"
                  type="text"
                  placeholder="First Name"
                  ref={register({ required: true, minLength: 2 })}
                />
              </label>
              <span className="error">
                {errors.name &&
                  errors.name.first.type === 'required' &&
                  'You need to provide First Name'}
              </span>
              <span className="error">
                {errors.name &&
                  errors.name.first.type === 'minLength' &&
                  'Must be 2 or more characters'}
              </span>
            </Form.Field>
            <Form.Field>
              <label htmlFor="name.last">
                Last Name
                <input
                  id="name.last"
                  name="name.last"
                  type="text"
                  placeholder="Last Name"
                  ref={register}
                />
              </label>
            </Form.Field>
          </Form.Group>
          <Form.Field className={classnames({ error: errors.phone })}>
            <label htmlFor="phone">
              Phone
              <input
                id="phone"
                name="phone"
                type="text"
                placeholder="Phone"
                ref={register({
                  required: true,
                  pattern: /^\+(?:[0-9] ?){6,14}[0-9]$/,
                })}
              />
            </label>
            <span className="error">
              {errors.phone &&
                errors.phone.type === 'required' &&
                'You need to provide a Phone number'}
            </span>
            <span className="error">
              {errors.phone &&
                errors.phone.type === 'pattern' &&
                'Phone number must be in International format'}
            </span>
          </Form.Field>
          <Form.Field className={classnames({ error: errors.email })}>
            <label htmlFor="email">
              Email
              <input
                id="email"
                name="email"
                type="text"
                placeholder="Email"
                ref={register({
                  required: true,
                  pattern: /^\w+([.-]?\w+)*@\w+([.-]?\w+)*(\.\w{2,3})+$/,
                })}
              />
            </label>
            <span className="error">
              {errors.email &&
                errors.email.type === 'required' &&
                'You need to provide an Email address'}
            </span>
            <span className="error">
              {errors.email &&
                errors.email.type === 'pattern' &&
                'Invalid email address'}
            </span>
          </Form.Field>
          <Button primary type="submit">
            Save
          </Button>
        </Form>
      </Grid.Column>
    </Grid>
  );
}

export default ContactForm;
Take the time to examine the code; there’s a lot going on in there. See the getting started guide to understand how React Hook Form works. Also, take a look at Semantic UI React’s Form documentation and see how we used it to build our form. Do note that in our onSubmit handler, we’re outputting form data to the console.
Let’s now go back to the browser and try to intentionally save an incomplete form. Using the navigation menu we set up earlier, click the Add Contact button, then hit the Save button without filling in the form. This should trigger the following validation error messages:
You can now start filling in the form. As you type, you’ll notice the various validation messages change or disappear. Once everything is valid, you can press Save again. If you check your console output, you should get a JSON object similar to this structure:
{
  "name":{
    "first": "Jason",
    "last": "Bourne"
  },
  "phone": "+1 555 555",
  "email": "jason@gmail.com"
}
Let’s now define the necessary actions to save a new contact to the database. First, let’s specify a reducer handler for CREATE_CONTACT. Update src/context/contact-context.js as follows:
function reducer(state, action) {
  switch  (action.type)  {
    ...
    case 'CREATE_CONTACT': {
      return {
        ...state,
        contacts: [...state.contacts, action.payload],
        message: {
          type: 'success',
          title: 'Success',
          content: 'New Contact created!',
        },
      };
    }
    ...
  }
}
Next, open src/components/contact-form.js and update the code as follows:
import React, { useContext, useState } from 'react';
import { Form, Grid, Button } from 'semantic-ui-react';
import { useForm } from 'react-hook-form';
import classnames from 'classnames';
import axios from 'axios';
import { Redirect } from 'react-router-dom';
import { ContactContext } from '../context/contact-context';
import { flashErrorMessage } from './flash-message';

const ContactForm = () => {
  const [state, dispatch] = useContext(ContactContext);
  const { register, errors, handleSubmit } = useForm();
  const [redirect, setRedirect] = useState(false);

  const createContact = async data => {
    try {
      const response = await axios.post('http://localhost:3030/contacts', data);
      dispatch({
        type: 'CREATE_CONTACT',
        payload: response.data,
      });
      setRedirect(true);
    } catch (error) {
      flashErrorMessage(dispatch, error);
    }
  };

  const onSubmit = async data => {
    await createContact(data);
  };

  if (redirect) {
    return <Redirect to="/" />;
  }

  return (
    //... form code
  )
}

export default ContactForm;
We’ve created a separate createContact function to handle the creation of new contacts. Later, we’ll implement another function for updating existing contacts. If an error occurs, whether it’s a network or a server error, a flash message will display indicating to the user what went wrong. Otherwise, if the POST request is successful, a redirect to / will be performed. A success message will then be displayed on the home page.
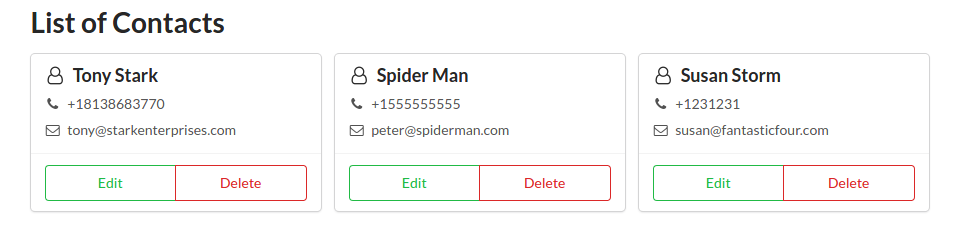
Now, finish filling in the form. After clicking Save, we should be directed to the list page. In the example below I’ve successfully added two more contacts.
Edit Existing Contacts
Now that we can add new contacts, let’s see how we can update existing contacts. Let’s start by defining a couple of reducers for fetching a single contact and updating a contact.
Update src/context/contact-context.js as follows:
function reducer(state, action) {
  switch  (action.type)  {
    ...
    case 'FETCH_CONTACT': {
      return {
        ...state,
        contact: action.payload,
      };
    }
    case 'UPDATE_CONTACT': {
      const contact = action.payload;
      return {
        ...state,
        contacts: state.contacts.map(item =>
          item._id === contact._id ? contact : item,
        ),
        message: {
          type: 'success',
          title: 'Update Successful',
          content: `Contact "${contact.email}" has been updated!`,
        },
      };
    }
    ...
  }
}
Next, let’s convert the Edit button in the ContactCard component to a link that will direct the user to the form:
// src/components/contact-card.js

...
import { Link } from 'react-router-dom';

const ContactCard = ({ contact }) => {
  return (
    <Card>
      ...
      <Card.Content extra>
        <div className="ui two buttons">
          <Button
            basic
            color="green"
            as={Link}
            to={`/contacts/edit/${contact._id}`}
          >
            Edit
          </Button>
          <Button basic color="red">
            Delete
          </Button>
        </div>
      </Card.Content>
    </Card>
  );
}

export default ContactCard;
Now, when users click the Edit button, the URL will change to http://localhost:3030/contacts/edit/{id}. Currently, the ContactFormPage component hasn’t been built to handle such URLs. Let’s replace the existing code in the src/pages/contact-form-page.js file with the following:
import React, { useContext, useEffect, useState } from 'react';
import axios from 'axios';
import ContactForm from '../components/contact-form';
import { flashErrorMessage } from '../components/flash-message';
import { ContactContext } from '../context/contact-context';

const ContactFormPage = ({ match }) => {
  const [state, dispatch] = useContext(ContactContext);
  const [loading, setLoading] = useState(true);

  useEffect(() => {
    const { _id } = match.params; // Grab URL _id

    if (_id) {
      const fetchData = async () => {
        try {
          const response = await axios.get(
            `http://localhost:3030/contacts/${_id}`,
          );
          dispatch({
            type: 'FETCH_CONTACT',
            payload: response.data,
          });
          setLoading(false);
        } catch (error) {
          flashErrorMessage(dispatch, error);
        }
      };
      fetchData();
    } else {
      setLoading(false);
    }
  }, [match.params, dispatch]);

  if (loading) {
    return <p>Please wait...</p>;
  }

  return (
    <div>
      <ContactForm contact={state.contact} />
    </div>
  );
}

export default ContactFormPage;
When the page loads, it checks if an _id exists in the URL. If there isn’t one, it will simply load a blank form which can be used to create a new contact. Otherwise, it will perform a fetch query and populate state.contact via the dispatch function.
We’ve also specified a local loading state that’s set to true by default. This is to delay rendering of the ContactForm component until state.contact has been populated. To understand why the delay is necessary, open src/components/contact-form.js and update the code as follows:
...
const ContactForm = ({contact}) => {
  ...
  const { register, errors, handleSubmit } = useForm({
    defaultValues: contact,
  });
  ...
  const updateContact = async data => {
    try {
      const response = await axios.patch(
        `http://localhost:3030/contacts/${contact._id}`,
        data,
      );
      dispatch({
        type: 'UPDATE_CONTACT',
        payload: response.data,
      });
      setRedirect(true);
    } catch (error) {
      flashErrorMessage(dispatch, error);
    }
  };

  const onSubmit = async data => {
    if (contact._id) {
      await updateContact(data);
    } else {
      await createContact(data);
    }
  };
  ...
  return (
    //... Display Form Mode
    <h1 style={{ marginTop: "1em" }}>
      {contact._id ? "Edit Contact" : "Add New Contact"}
    </h1>
    ....
  );
}

export default ContactForm;
As you can see above, we’ve introduced a new function for updating a contact. It’s almost identical to createContact, except that the URL is different and we’re using a PATCH HTTP request. We’re also checking for the existence of _id to determine if the form’s submit action should update or a create.
Back to the purpose of the loading state, as you’re probably aware, React usually re-renders if data linked to a component via props changes. Unfortunately, passing an existing contact to a React Hook Form can only be done during initialization. This means that, when the form first loads, it’s empty, as the fetch function is asynchronous. By the time it resolves and populates the state.contact field, the form will remain empty, as there’s no link between them.
One way to solve this problem is to write a function that will programmatically set the value of each field using the setValue function. The other method which we’ve implemented is simply to delay rendering of the ContactForm component until state.contact has been populated.
Once the list page has finished refreshing, choose any contact and hit the Edit button.
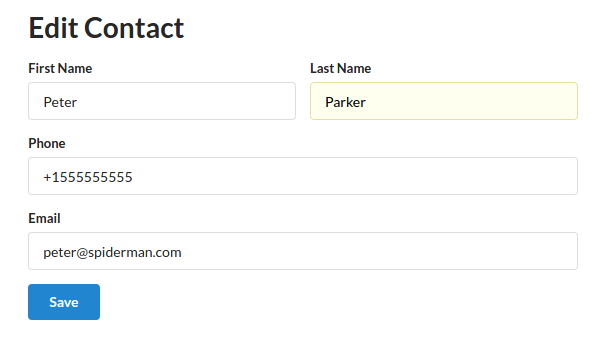
Finish making your changes and hit save.
By now, your application should allow users to add new contacts and update existing ones.
Implement a Delete Request
Let’s now look at the final CRUD operation: delete. This one is much simpler to code. We start by implementing the DELETE_CONTACT reducer in the src/context/contact-context.js file:
function reducer(state, action) {
  switch (action.type) {
    ...
    case 'DELETE_CONTACT': {
      const { _id, email } = action.payload;
      return {
        ...state,
        contacts: state.contacts.filter(item => item._id !== _id),
        message: {
          type: 'success',
          title: 'Delete Successful',
          content: `Contact "${email}" has been deleted!`,
        },
      };
    }
    ...
  }
}
Next, we implement the function that performs the actual deletion. We’ll do this in src/components/contact-card.js. Update as follows:
...
import  axios  from  'axios';
import  { ContactContext }  from  '../context/contact-context';
import  { flashErrorMessage }  from  './flash-message';

const  { useContext }  =  React;

const ContactCard = ({ contact }) => {
  // eslint-disable-next-line no-unused-vars
  const [state, dispatch] = useContext(ContactContext);

  const deleteContact = async id => {
    try {
      const response = await axios.delete(
        `http://localhost:3030/contacts/${id}`,
      );
      dispatch({
        type: 'DELETE_CONTACT',
        payload: response.data,
      });
    } catch (error) {
      flashErrorMessage(dispatch, error);
    }
  };

  return (
    ...
     <Button basic color="red" onClick={() => deleteContact(contact._id)}>
       Delete
     </Button>
    ...
  );
}

export default ContactCard;
Wait for the browser to refresh, then try to delete one or more contacts. The delete button should work as expected, with a confirmation message displayed at the top.
As a challenge, try to modify the delete button’s onClick handler so that it asks the user to confirm or cancel the delete action.
Conclusion
We now have a complete application built, using React and Feathers, that can perform CREATE, READ, UPDATE and DELETE actions. Now that you understand the CRUD logic in a React application, you’re free to substitute technologies. For example, you can use a different CSS framework such as Bulma, Materialize or Bootstrap. You can also use a different back-end server such as LoopBack or a headless CMS platform such as Strapi.
I would also like to point out that the code we’ve written can be improved in many ways. For example, we can:
- replace hard-coded URLs with environment variables
- refactor code in certain places to make it cleaner
- add documentation via comments
- implement the reducer code in a separate file
- create an
actionsfile and place all fetch related code there# - improve error handling by implementing user friendly messages
- write unit and end-to-end tests using modern testing frameworks
# You can decide not to do this and, instead, place action code next to where it’s being used. However, there are situations where action code could be called in more than one place. In that case, it’s recommended to move such code into a shareable action file.
If you’d like to learn more on how to build better information management applications, I recommend you learn the following:
GraphQL is a newer technology that replaces REST APIs. It allows front-end developers to query records that are joined. You can’t join records with REST API unless you write a custom route that executes a JOIN SQL/non-SQL query. Feathers does support GraphQL via a fgraphql hook, so you can easily start using GraphQL on your front-end interface.
Next.js is a server-rendering framework that provides better SEO and website performance than is possible with create-react-app. Combining these technologies, Next.js and Feathers with GraphQL support will allow you to build a robust data management application with less effort.
Frequently Asked Questions (FAQs) about Building a CRUD App with Node, React, and FeathersJS
What is FeathersJS and why is it used in building CRUD applications?
FeathersJS is a web-framework for building real-time applications and REST APIs. It provides tools and patterns to create modern web applications and speed up development. FeathersJS can interact with any backend technology, supports over a dozen databases and works with any frontend technology like React, VueJS, Angular, React Native, Android, or iOS. When building CRUD (Create, Read, Update, Delete) applications, FeathersJS provides a consistent and flexible layer for interacting with different kinds of data sources. This makes it easier to implement CRUD operations, which are fundamental to most web applications.
How does FeathersJS compare to other frameworks like Loopback?
Both FeathersJS and Loopback are popular choices for building APIs and web applications. However, they have different focuses. Loopback, backed by IBM, is a highly-extensible Node.js framework for building APIs and microservices. It provides a rich set of features for connecting to various data sources and services. On the other hand, FeathersJS is a minimalist web framework, focusing on flexibility, simplicity, and speed. It provides just enough features to build real-time applications and REST APIs, but leaves the rest to the developer. The choice between the two often depends on the specific needs of your project.
Can I use FeathersJS with other frontend technologies besides React?
Yes, FeathersJS is frontend agnostic, meaning it can work with any frontend technology. While the tutorial on SitePoint focuses on using FeathersJS with React, you can also use it with other frontend libraries and frameworks like VueJS, Angular, or even with native mobile platforms like Android and iOS.
How do I install and set up FeathersJS for my project?
To install FeathersJS, you need to have Node.js and npm installed on your machine. Once you have these prerequisites, you can install FeathersJS globally using the command npm install -g @feathersjs/cli. After installation, you can create a new FeathersJS application by running the command feathers generate app.
How do I integrate FeathersJS with a database?
FeathersJS supports over a dozen databases out of the box, including SQL databases like MySQL and PostgreSQL, and NoSQL databases like MongoDB and NeDB. To integrate a database with your FeathersJS application, you need to install the corresponding database adapter. For example, to use MongoDB, you would install the feathers-mongodb adapter.
How do I handle authentication in a FeathersJS application?
FeathersJS provides a built-in authentication mechanism that supports both local authentication (using a username and password) and OAuth authentication (using third-party providers like Google or Facebook). To set up authentication, you need to generate an authentication service using the command feathers generate authentication.
How do I create a CRUD service in FeathersJS?
In FeathersJS, a service is an object that implements certain methods to perform CRUD operations. To create a service, you can use the command feathers generate service. This will prompt you to choose the type of service (for example, a NeDB service or a Sequelize service), and the name of the service.
How do I connect my FeathersJS backend with my React frontend?
To connect a React frontend with a FeathersJS backend, you can use the feathers-client library. This library provides a set of tools to communicate with a FeathersJS server from a client application. You can install it using npm, and then import it into your React components to interact with your FeathersJS services.
How do I handle real-time updates in a FeathersJS application?
One of the key features of FeathersJS is its support for real-time updates. This is achieved through the use of websockets, a technology that allows for two-way communication between the client and the server. When a change occurs on the server (for example, a new record is created), FeathersJS can automatically push this change to all connected clients.
Where can I find more resources to learn about FeathersJS?
The official FeathersJS website is a great place to start. It provides a comprehensive guide to the framework, as well as API documentation. Additionally, there are many tutorials and blog posts available online that cover various aspects of FeathersJS. The FeathersJS community is also very active and helpful, and you can find support on platforms like Stack Overflow and GitHub.