


Key Takeaways
- Building a web application with React and GraphQL involves consuming an API, in this case from graphql-pokemon, and serving it from the provided link. GraphQL is a powerful tool created by Facebook that offers a comprehensive description of the data in your API, allowing clients to request exactly what they need.
- To connect Apollo Client to your React app, you need to wrap the root App component with the ApolloProvider component and pass the client instance via the client prop. This places the client in the context, making it accessible from anywhere in your app.
- Fetching data with queries involves using the useQuery hook from the @apollo/react-hooks package. This React Hook fetches a GraphQL query and exposes the result, allowing you to render your UI based on the data it returns. The useQuery hook utilizes React’s Hooks API to fetch and load data from GraphQL queries into the UI of your applications.
In this tutorial, we’ll learn to build a web application with React and GraphQL. We’ll consume an API available from graphql-pokemon and serve it from this link, which allows you to get information about Pokémon.
GraphQL is a query language for APIs and a runtime for fulfilling those queries created by Facebook. GraphQL provides a complete and understandable description of the data in your API, gives clients the power to ask for exactly what they need and nothing more, makes it easier to evolve APIs over time, and enables powerful developer tools.
In this tutorial, we’ll only learn the front end of a GraphQL application that makes use of Apollo for fetching data from a ready GraphQL API hosted on the web.
Let’s get started with the prerequisites!
Prerequisites
There are a few prerequisites for this tutorial:
- recent versions of Node.js and npm installed on your system
- knowledge of JavaScript/ES6
- familiarity with React
If you don’t have Node and npm installed on your development machine, you can simply download the binaries for your system from the official website. You can also use NVM, a POSIX-compliant bash script to manage multiple active Node.js versions.
Installing create-react-app
Let’s install the create-react-app tool that allows you to quickly initialize and work with React projects.
Open a new terminal and run the following command:
npm install -g create-react-app
Note: You may need to use sudo before your command in Linux and macOS or use a command prompt with administrator rights if you get EACCESS errors when installing the package globally on your machine. You can also simply fix your npm permissions.
At the time of writing, this installs create-react-app v3.1.1.
Creating a React Project
Now we’re ready to create our React project.
Go back to your terminal and run the following command:
create-react-app react-pokemon
Next, navigate into your project’s folder and start the local development server:
cd react-pokemon
npm start
Go to http://localhost:3000 in your web browser to see your app up and running.
This is a screenshot of the app at this point:
Installing Apollo Client
Apollo Client is a complete data management solution that’s commonly used with React, but can be used with any other library or framework.
Apollo provides intelligent caching that enables it to be a single source of truth for the local and remote data in your application.
You’ll need to install the following packages in your React project to work with Apollo:
- graphql: the JavaScript reference implementation for GraphQL
- apollo-client: a fully-featured caching GraphQL client with integrations for React, Angular, and more
- apollo-cache-inmemory: the recommended cache implementation for Apollo Client 2.0
- apollo-link-http: the most common Apollo Link, a system of modular components for GraphQL networking
- react-apollo: this package allows you to fetch data from your GraphQL server and use it in building complex and reactive UIs using the React framework
- graphql-tag: this package provides helpful utilities for parsing GraphQL queries such as
gqltag.
Open a new terminal and navigate to your project’s folder, then run the following commands:
npm install graphql --save
npm install apollo-client --save
npm install apollo-cache-inmemory --save
npm install apollo-link-http --save
npm install react-apollo --save
npm install graphql-tag --save
Now that we’ve installed the necessary packages, we need to create an instance of ApolloClient.
Open the src/index.js file and add the following code:
import { ApolloClient } from 'apollo-client';
import { InMemoryCache } from 'apollo-cache-inmemory';
import { HttpLink } from 'apollo-link-http';

const cache = new InMemoryCache();
const link = new HttpLink({
  uri: 'https://graphql-pokemon.now.sh/'
})

const client = new ApolloClient({
  cache,
  link
})
We first create an instance of InMemoryCache, then an instance of HttpLink and we pass in our GraphQL API URI. Next, we create an instance of ApolloClient and we provide the cache and link instances.
Connect the Apollo Client to React Components
After creating the instance of ApolloClient, we need to connect it to our React component(s).
We’ll use the new Apollo hooks, which allows us to easily bind GraphQL operations to our UI.
We can connect Apollo Client to our React app by simply wrapping the root App component with the ApolloProvider component — which is exported from the @apollo/react-hooks package — and passing the client instance via the client prop.
The ApolloProvider component is similar to React’s Context provider. It wraps your React app and places the client in the context, which enables you to access it from anywhere in your app.
Now let’s import the ApolloProvider component in our src/index.js file and wrap the App component as follows:
import React from 'react';
import ReactDOM from 'react-dom';
import './index.css';
import App from './App';
import * as serviceWorker from './serviceWorker';

import { ApolloClient } from 'apollo-client';
import { InMemoryCache } from 'apollo-cache-inmemory';
import { HttpLink } from 'apollo-link-http';
import { ApolloProvider } from '@apollo/react-hooks';

const cache = new InMemoryCache();
const link = new HttpLink({
  uri: 'https://graphql-pokemon.now.sh/'
})

const client = new ApolloClient({
  cache,
  link
})

ReactDOM.render(<ApolloProvider client={client}><App /></ApolloProvider>, document.getElementById('root'));

serviceWorker.unregister();
Fetching Data with Queries
After adding and configuring the Apollo client in our application, let’s fetch some Pokémon data and render it in our component.
Open the src/App.js file and start by adding the following imports:
import { useQuery } from '@apollo/react-hooks';
import gql from "graphql-tag";
We imported the useQuery hook from the @apollo/react-hooks package. It’s a React Hook that fetches a GraphQL query and exposes the result so you can render your UI based on the data it returns. We also imported the gql tag, which allows us to parse GraphQL queries.
The useQuery hook is built on top of React’s Hooks API to fetch and load data from GraphQL queries into the UI of our applications. It exposes error, loading and data properties through a result object, used to populate and render our component.
After the imports, define the following GraphQL query:
const GET_POKEMON_INFO = gql`
{
    pokemons(first: 150) {
      id
      number
      name,
      image,
      evolutions {
        id,
        number,
        name,
        image
      }
    }
  }
This query will allow us to fetch the first 150 Pokémon with their ID, number, name, image, and evolutions.
Next, let’s run the query against our GraphQL API by calling the useQuery hook with our GET_POKEMON_INFO query:
function App() {
  const { data, loading, error } = useQuery(GET_POKEMON_INFO);

  if (loading) return <p>Loading...</p>;
  if (error) return <p>Error</p>;
We use object destructuring to get the data, loading and error parts from the returned value of the useQuery hook.
If loading is true, this means data is still being fetched so we simply render the Loading… message code to indicate to users that data is still loading.
If an error occurs during the query, the error variable will have a value of true. In this case, we simply render an Error message.
Next, if data is done loading successfully, we render the list of Pokémon:
return (
<React.Fragment>
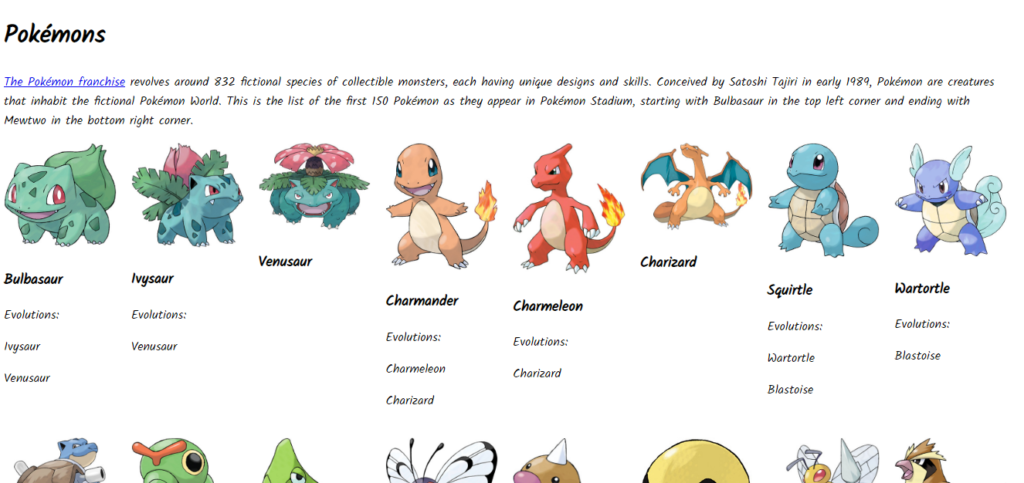
<h1>Pokémons</h1>
<p>
<a href="https://en.wikipedia.org/wiki/List_of_Pok%C3%A9mon">
The Pokémon franchise
</a>{" "}
revolves around 832 fictional species of collectible monsters, each having
unique designs and skills. Conceived by Satoshi Tajiri in early 1989,
Pokémon are creatures that inhabit the fictional Pokémon World. This is
the list of the first 150 Pokémon as they appear in Pokémon Stadium,
starting with Bulbasaur in the top left corner and ending with Mewtwo in
the bottom right corner.
</p>
<div className="container">
{data &&
data.pokemons &&
data.pokemons.map((pokemon, index) => (
<div key={index} className="card">
<img src={pokemon.image} />
<div class="card-body">
<h3>{pokemon.name}</h3>
<p>
{pokemon.evolutions && pokemon.evolutions.length !== 0 && (
<p>
{" "}
Evolutions:
{pokemon.evolutions.map((e, indx) => {
return <p key={indx}> {e.name} </p>;
})}
</p>
)}
</p>
</div>
</div>
))}
</div>
</React.Fragment>
);
Styling the App
After fetching and rendering data in our React application, let’s add a bit of styling to the interface.
Open the public/index.html file and add a <link> tag to the Kalam font:
<!DOCTYPE html>
<html lang="en">
  <head>
    <meta charset="utf-8" />
    <link rel="shortcut icon" href="%PUBLIC_URL%/favicon.ico" />
    <link href="https://fonts.googleapis.com/css?family=Kalam" rel="stylesheet">
Next, open the src/index.css file and add the following CSS styles:
body {
  margin: 5px;
  font-family: 'kalam';
  -webkit-font-smoothing: antialiased;
  -moz-osx-font-smoothing: grayscale;
}

.container {
    display: grid;
    grid-template-columns: repeat(auto-fill, minmax(140px, 1fr));
    grid-gap: 19px;
}

.container > .card img {
    max-width: 100%;
}
This is a screenshot of our application at this stage:
Building and Hosting the Application
Now that we’ve created our application, we can build the production bundles using the following command:
npm run build
The command will produce a minified and optimized production bundle in the build folder that you can upload to your server.
We’ll be using ZEIT Now for hosting the application.
ZEIT Now is a cloud platform for websites and serverless functions that you can use to deploy your projects to a .now.sh or personal domain.
Head back to your terminal and execute the following command to install Now CLI:
npm install -g now
Next, navigate to the build folder and run the now command:
cd build
now
That’s it! Your application will be uploaded to the hosting server. You can see the app live at https://build-cy9hwmjpe.now.sh.
You can also find the source code of this application in this GitHub repository.
Conclusion
In this tutorial, we built a React app that fetches the first 150 Pokémon, as they appear in Pokémon Stadium, and render them. We used the Apollo client with React hooks to fetch and manage data in our app.
Frequently Asked Questions (FAQs) on Building a Web App with GraphQL and React
What are the prerequisites for building a web app with GraphQL and React?
Before you start building a web app with GraphQL and React, you need to have a basic understanding of JavaScript, ES6 syntax, and React. Familiarity with Node.js and Express.js can also be beneficial as they are often used in conjunction with GraphQL and React. Additionally, understanding the basics of GraphQL such as queries, mutations, and resolvers will be helpful.
How do I set up my development environment for GraphQL and React?
To set up your development environment, you will need Node.js and npm installed on your computer. You can then use the Create React App command to set up a new React project. For GraphQL, you will need to install Apollo Client, which is a comprehensive state management library for JavaScript that enables you to manage both local and remote data with GraphQL.
How do I connect my React app to a GraphQL API?
To connect your React app to a GraphQL API, you will need to use Apollo Client. Apollo Client is a comprehensive state management library that enables you to manage both local and remote data with GraphQL. You can install it using npm and then use it to fetch data from your GraphQL API and use it in your React components.
How do I handle errors in GraphQL and React?
Error handling in GraphQL and React can be done using Apollo Client’s error handling capabilities. Apollo Client provides an onError function that you can use to handle errors. This function is called whenever an error occurs while fetching data from your GraphQL API.
How do I use mutations in GraphQL and React?
Mutations in GraphQL are used to modify data on the server. In a React app, you can use mutations to update the state of your components. Apollo Client provides a useMutation hook that you can use to execute a mutation and update your component’s state.
How do I use subscriptions in GraphQL and React?
Subscriptions in GraphQL are used for real-time updates. In a React app, you can use subscriptions to update your components in real-time whenever data on the server changes. Apollo Client provides a useSubscription hook that you can use to subscribe to updates from your GraphQL API.
How do I test my GraphQL and React app?
Testing a GraphQL and React app can be done using various testing libraries such as Jest and React Testing Library. You can write unit tests for your components and integration tests for your GraphQL API. Apollo Client also provides a MockedProvider component that you can use to mock your GraphQL API for testing.
How do I optimize performance in a GraphQL and React app?
Performance in a GraphQL and React app can be optimized in various ways. One way is by using Apollo Client’s caching capabilities. Apollo Client caches your queries and mutations, which can significantly improve the performance of your app. You can also use React’s useMemo and useCallback hooks to prevent unnecessary re-renders.
How do I secure my GraphQL and React app?
Securing a GraphQL and React app can be done in various ways. One way is by using authentication and authorization. You can use libraries such as Passport.js for authentication and use GraphQL directives for authorization. You should also validate user input to prevent SQL injection attacks.
How do I deploy my GraphQL and React app?
Deploying a GraphQL and React app can be done using various platforms such as Heroku, Netlify, and Vercel. You will need to build your app for production using the npm run build command and then deploy the built files to your chosen platform.