

Why should we PHP warriors care at all about Apple’s Passbook? Well first because Apple made this technology open (well, sort of…), second because it can be used outside iOS devices, and third because it involves a lot of well-known and loved technologies like JSON and RESTful APIs. I’d also add that it’s a very interesting piece of technology, but that’s my personal opinion.
In this article I’ll show you how I built a sample web application that creates and distributes passes in the form of a “PHPMaster Membership Card”. It is not a full-featured product, but it’s a nice base to build on for more serious real world uses. You can download the demo code for the article from GitHub.
Please note: In order to run this article’s code, you (or your client) must be registered to one of the paid Apple iOS Developer Programs which allows you to create the necessary certificates to sign your passes. For this reason I’ve also made a dummy application available online for you to play with.
Key Takeaways
- Utilize PHP and Apple’s Passbook to create and distribute digital tickets like the “PHPMaster Membership Card.”
- Understand that a pass is a digitally signed document that can be used as a ticket, membership card, or coupon, and is compatible across both iOS and Android devices.
- Implement the sample application using the Slim Framework for RESTful API development and manage data with Idiorm and Paris ORM libraries.
- Learn to define and manage passes using JSON templates and ensure each pass has a unique serial number and is signed with a certificate obtained from Apple.
- Explore the backend functionality where PHP scripts handle pass creation, registration, and distribution through email or web downloads.
- Implement RESTful endpoints for registering and unregistering devices that store passes, using HTTP methods like POST and DELETE.
What’s a Pass and How do I Use One?
A pass is a digitally signed document such as a ticket, membership card, or coupon that can be distributed by email or a web download. It can be opened with the Passbook app on iOS or with an app like PassWallet on Android. On iOS, a pass can also be linked to a companion app, for example the Eventbrite app which allows you to buy tickets and add them to your device’s Passbook, but that’s not mandatory.
Apple’s specs outline four main pass types:
- Boarding passes
- Event tickets
- Retail coupons
- Store cards
There’s also a Generic pass type that covers other purposes, and this the type of pass I’m using here.
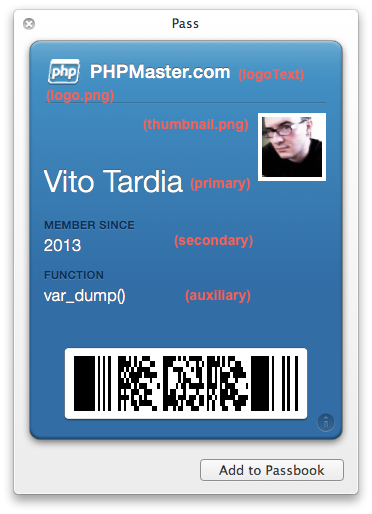
Each pass contains various bits of data. Some, such as a member name and bar code are displayed visually on the “front side” of the pass. Other data is located on the “back” of the pass and triggered by the “i” icon. Passes can also contain some hidden information such as a time and location which can be used to display relevant notifications.
On Apple’s Passbook Developers page you can find official guides and some sample code.
App Concept: PHPMaster Membership Card
The sample application has two main features:
- Create and store passes
- Implement the register/unregister web service API
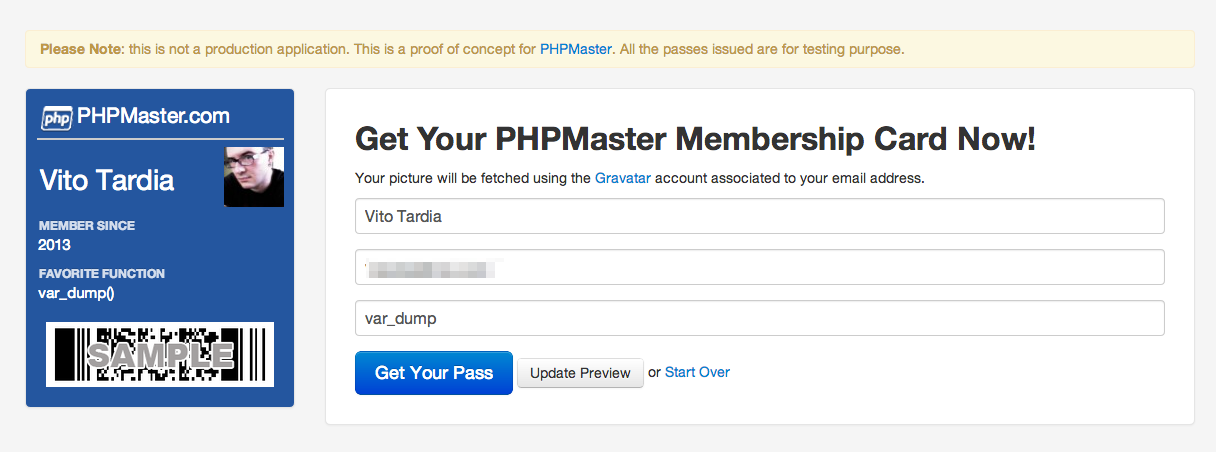
The main form prompts the user for a full name, an email address, and an optional favorite function. The member picture is fetched using the Gravatar API. The backend code then saves the provided data to a database, generates the pass, and sends a copy to the subscriber’s email.
The pass contains the URL and access codes for a web service, so when the subscriber adds the pass to his collection the Passbook app will call a predefined registration URL that must be implemented to check and store the provided data for later use.
App Structure
Since the core of this writeup is to understand pass-related code, I’ll start from a base of well known open source components available on GitHub and using Composer.
The application is built using Slim Framework since it’s lightweight and well suited for both RESTful development and web-GUI applications. Slim’s default PHP template engine is used as well the DateTimeLogWriter from the Slim Extras package.
The data and model layer is covered by Idiorm and Paris. Idiorm takes care of database work, while Paris provides a simple and clean model interface. This allows us to work with a Pass and a Subscriber object and call, for example, $pass->pack() to generate the pass package.
Pass Definition
The first step is to define the pass; how will it look and what data will contain?
With this information at hand, we can create a pass template directory containing the basic assets:
templates/passes/PHPMaster.raw/
    logo.png
    icon.png
    pass.json
Each of the images can have a corresponding ImageName@2x.png version that can be used on retina devices if present. The logo is displayed in the top left of the pass, while the icon is displayed in the push notification box and iOS mail app. pass.json contains the data for the pass.
Inside pass.json, teamIdentifier is assigned to us by Apple when we subscribe to the Developer Program. passTypeIdentifier is a unique reverse-domain ID for our pass type, for example pass.com.phpmaster.membership-test (the “.pass” prefix is required). The serialNumber field must be unique to each pass, so a good value to use is the primary key from the database table that stores passes.
The generic key indicates the pass type we are using and contains the specific fields for the pass. Each pass type has a set of primaryFields, secondaryFields, and auxiliaryFields displayed in different places on the front side; it can also have a number of backFields displayed on the reverse side. Each field has a label (displayed publicly), a key (for internal reference), and a value.
The webServiceURL and authenticationToken fields are defined later in the application and are filled with the base URL of and the access credentials used by the device to register itself on our server.
Certificates
The next step is to obtain the certificate used for pass generation. The Apple Developer’s provisioning panel is used to request certificates and there is a nice video tutorial on the PassKit wiki. You need a specific certificate for each pass type; the certificate’s common name must match the passTypeIdentifier of the pass.
Each pass’s signature must also include the public Apple WWDR Intermediate Certificate.
Directory and File Layout
Here’s what the layout of the application looks like:
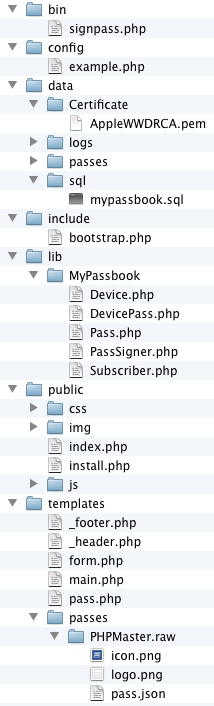
The bin directory contains the command line utility signpass.php. This program is a PHP port of Apple’s console utilities written in Objective-C and Ruby. It can be used to validate a pass or to create one from a given directory. It uses the PassSigner library which I detail later.
The config directory holds the configuration files. Make a copy of the sample and name it after your environment (stage, dev, prod, etc). To define a custom environment, create a text file named .mode inside the root directory containing the desired name of your environment. The $config['db'] array in the configuration file is used by Idiorm, and the $config['app'] array is passed directly to the Slim application’s constructor.
The data directory holds log files, generated passes, the SQL dump file, and the Certificate directory that must contain Apple’s public certificate and the certificate for your pass, both in PEM format. Certificates are distributed in CER or P12 format and can be converted with the openssl utility like so:
openssl pkcs12 -in data/Certificate/PHPMaster.p12 -out data/Certificate/PHPMaster.pem
The templates directory holds the front-end template files. There’s two pages, the home (main.php) and the result page (pass.php), which share the header and footer elements. The subscription form has its own file (form.php).
The passes subdirectory holds templates for each pass type. Each pass’ templates are organized into directories named PassTypeOrName.raw containing the necessary files.
The custom library code resides in lib/MyPassbook. Inside this directory there is:
- the PassSigner library, responsible for pass signing and validation
- the model classes built upon the core objects
Subscriber,Pass, andDevice
DevicePass is an intermediate class needed by Paris and manages the many-to-many relationship between devices and passes; as defined in the Passbook specs, each device can contain many passes and a copy of each pass can be stored in many devices.
The application’s public directory contains the controller files. index.php is the main controller. The controller includes include/bootstrap.php which is responsible for the application’s startup, loading the configuration file, setting up some defaults, connecting ORM to the database, and starting the log writer. In particular, the script also sets some code to the slim.before event hook used to capture the special Authentication HTTP header.
The install.php file is just a quick-and-dirty script that resets the application; there’s probably no need to say that it must be removed after you’ve set everything up!
There should also be a .htaccess file that redirects all non-file URIs to index.php and adds a custom mime type for our passes:
AddType application/vnd.apple.pkpass pkpass
This allows Safari to open the pass with the PassViewer utility.
Writing the Application
The most important components of the application are the PassSigner class and the index.php front controller. Paris gives us the ability to use model classes so that the underlying database logic is transparent and managed by Idiorm. Creating a model class is as simple as:
<?php

class Subscriber extends Model { }
There’s three classes that need to be created: Pass, Device, and Subscriber.
The basic methods such as create(), find_many(), delete(), and so on are inherited from the base class. We can modify the basic properties (for example the linked database table or column ID), enhance the default methods, and add custom methods as needed.
I added three methods to the Subscriber class:
pass()– implement a one-to-one relationship with aPassobject and return this object.create()– override the defaultcreate()method allowing an array of data to be passed.createPass()– create aPassobject linked to the current subscriber.
And these are the six methods I added to the Pass class:
subscriber()– implement a one-to-one relationship with aSubscriberobject and return this object.devices()– define the many-to-many relationship with theDeviceobject. It has a correspondingpasses()method on theDeviceclass.create()– same as thecreate()method of theSubscriberclass.delete()– override the default method; delete the linkedDevicesandSubscriberobjects.filename()– calculate and return the file name for the pass on disk.pack()– save the pass to disk using the PassSigner library.
The PassSigner library
PassSigner provides two main public methods for pass management:
signPass()– take a directory containing data for a single pass and the certificate data and produce a zipped PKPASS file.verifyPassSignature()take a PKPASS file and validate its structure and signature.
There are also two utility methods rcopy() and rrmdir() for recursive copy and deletion of directories, and some internal protected methods. The library makes extensive use of exceptions validation functions, and the two important methods check for the Apple certificate which must be defined by the constant APPLE_CERTIFICATE with the certificate path.
To sign a pass, a file named manifest.json must be produced using the pass directory’s contents. This file must be signed with your certificate and include Apple’s public certificate. The signature data is saved in a file named signature.
Let’s say that we have a directory that contain the pass data:
data/passes/PassForUser001.raw
    info.png
    logo.png
    thumbnail.png
    pass.json
The first step is to recursively copy all of the contents to a temporary directory (/tmp/PassForUser001 for example). Make sure there’s no “junk” files that shouldn’t be included, like the annoying .DS_Store files if you’re on OSX. If any of these files in included in the zipped pass but not in the manifest, the pass is invalid.
Then create the associative array to store the manifest data. There is an item for each file in the pass directory, the relative path is the item’s key while the value is the SHA1 hash of the file. The array is encoded and saved as manifest.json in the pass directory.
<?php

$manifestData = array();

$files = new DirectoryIterator($passPath);

foreach ($files as $file) {

    if ($file->isDot() || $file->getFilename() == ".DS_Store") {

        continue;

    }

    $key = trim(str_replace($passPath, "", $file->getPathName()), "/");

    $manifestData[$key] = sha1_file($file->getPathName());

}
Now for the signature… basically, we sign the manifest.json file using our certificate and password, including Apple’s WWDR certificate. The binary output is written to signature. However, there’s a problem here: the the binary option for PHP’s openssl_* functions seems buggy and still generates a text-encoded signature. I’ve worked around this by calling the shell command from PHP instead:
<?php

$signCommand = sprintf(

    "openssl smime -binary -sign -certfile %s -signer %s -inkey %s -in %s -out %s -outform DER -passin pass:%s",

    APPLE_CERTIFICATE,

    $certPath,

    $certPath,

    $manifestPath,

    $signaturePath,

    $certPassword

);
$signResult = false;

$signOut = array(); // needed but unused

exec($signCommand, $signOut, $signResult);

unset($signOut);
If the $zip option is enabled (with by default it is) the pass is packed using the ZipArchive class.
To verify the pass, verifyPassSignature() extracts the given pass to a temporary directory and then calls the internal validateManifest() and validateSignature() methods. Both methods must return true.
<?php

foreach ($files as $file) {

    ...
    // Check that each file is present in the manifest

    if (!array_key_exists((string)$file, $manifestData)) {

        throw new Exception("No entry in manifest for file '{$file}'"), 506);

    }
    // Check SHA1 hash for each file

    $hash = sha1_file($file->getPathname());

    if ($hash == false || $hash != $manifestData[(string)$file]) {

        throw new Exception(

            sprintf(

                "For file %s, manifest's listed SHA1 hash %s doesn't match computed hash, %s",

                $file,

                $manifestData[(string)$file],

                $hash

            ),

            507

        );

    }

}
A manifest is valid if the pass directory contains only the files declared inside the manifest, the manifest itself, and the signature file. If a file is missing or there are files not listed then the pass is invalid. Also, the SHA1 hash for each file must match with the one stored in the manifest.
The signature is also validated using openssl in three steps. First we verify the manifest’s contents with its signature. The option -noverify tells OpenSSL to skip the signer’s certificate verification.
$verifyCommand = sprintf(

    'openssl smime -verify -binary -inform DER -in %s -content %s -noverify 2> /dev/null',

    $signaturePath,

    $manifestPath

);
Then the certificates are extracted from the signature:
<?php

$exportCommand = sprintf(

    'openssl smime -pk7out -in %s -content %s -inform DER -outform PEM',

    $signaturePath,

    $manifestPath

);
The command’s output is passed to the internal parseCertificates() method which I won’t discuss here. It uses a mix of OpenSSL and regex to extract certificates from the given data to an array of associative arrays which is used for a certificate-checking loop:
<?php

$certs = self::parseCertificates($pemData);

$foundWWDRCert = false;

for ($i = 0; $i < count($certs); $i++) {

    $commonName = $certs[$i]['subject']['CN'];
    if ($commonName == APPLE_CERTIFICATE_CN) {

        $foundWWDRCert = true;

    }

}
The controller index.php is responsible for providing both the web-GUI app and the RESTful API. It consists of two URIs: the homepage via GET and the same page via POST. The first page displays only the empty form, but the second is more interesting.
To ensure each email address is unique, it asks Paris which in turn checks the database:
<?php

$subscriber = Model::factory('MyPassbookSubscriber')

    ->where_equal('email', $memberMail)

    ->find_one();
if ($subscriber !== false) {

    $errors['membermail'] = sprintf("The email address '%s' is not available", $memberMail);

}
The subscriber thumbnail URL is picked from Gravatar:
<?php

if (empty($errors['membermail'])) {

    $memberThumbnail = "https://www.gravatar.com/avatar/" . md5(strtolower(trim($memberMail))) . "?s=60";

}
And now it can create a new subscriber:
<?php

try {

    $subscriber = Model::factory('MyPassbookSubscriber')->create(

        array(

            'name' => $memberName,

            'email' => $memberMail,

            'created' => date('Y-m-d H:i:s', $memberSubscription),

            'function' => $memberFavFunction,

            'picture' => $memberThumbnail

            )

    );

    $subscriber->save();

}

catch (Exception $e) {

    $errors['subscriber'] = "Error creating subscriber profile";

}
The pass’s JSON template file is loaded into $data and all of the placeholders are filled with real user and app data:
<?php

$data['serialNumber'] = $subscriber->id;

$data['webServiceURL'] = sprintf('https://%s/%s/', $env['SERVER_NAME'], $app->request()->getRootUri());

$data['authenticationToken'] = md5($subscriber->id);

$data['barcode']['message'] = $subscriber->id;

$data['generic']['primaryFields'][0]['value'] = $subscriber->name;

$data['generic']['secondaryFields'][0]['value'] = date('Y', $memberSubscription);

$data['generic']['auxiliaryFields'][0]['value'] = $subscriber->function . '()';

$data['generic']['backFields'][0]['value'] = $subscriber->id;

$data['generic']['backFields'][1]['value'] = $subscriber->created;

$data['generic']['backFields'][2]['value'] = $subscriber->email;
Using the custom model methods, the new $pass is created with $subscriber->createPass() and, if everything is right, the $pass can pack itself.
<?php

if ($pass = $subscriber->createPass($app->config('passes.passType'), $data)) {

    $pass->pack(

        $app->config('passes.path'),

        $app->config('passes.store'),

        $app->config('passes.certfile'),

        $app->config('passes.certpass')

    );
...
}

else {

    $errors['pass'] = 'Unable to create pass';

}
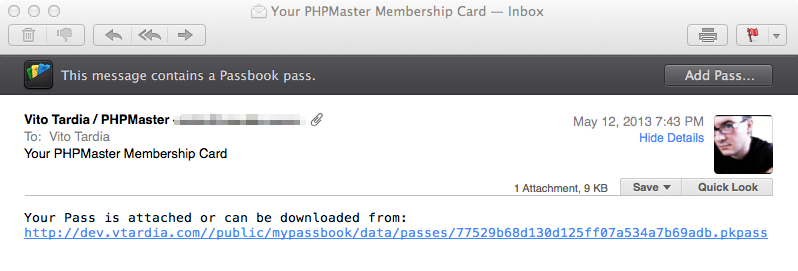
The pack() method is simple: it makes a temporary copy of the template directory, adds the pass-specific files, and calls PassSigner::signPass() on the working directory. The newly created pass is then sent by email and the pass.php template file is rendered to the user with the download link.
Going RESTful
Since a web service URL is embedded inside the pass, Apple’s specs say that we must implement at least two endpoints for registering and unregistering devices. The URI is always /v1/devices/:deviceId/registrations/:passTypeId/:serialNo and is called via POST for registration and DELETE for unregistration.
The Device ID, Pass Type ID, and Pass Serial Number are received from the URI while the auth token is found in the Authorization header. The auth token must be present in the header and linked to a pass in order to succeed, and a 401 response must be returned in the event of unauthorized access.
During the registration process, a Push Token is sent as the body of the request in JSON format: {"pushToken": <pushToken>}. The registration process creates a new Device object in the database and fills the Device ID and Push Token fields provided. Then a DevicePass object is created to store the relationship between the device and the pass.
If we need to update a pass, we use the Device ID and Push Token to send a push notification request to Apple Push Server (and obviously the update mechanisms need to be implemented as well).
The unregistration URI receives all of the same data except for the Push Token. All references for the given pass are deleted, including devices and relationships.
Conclusion
We’ve covered a lot in this article, and there’s still more to explore about Pass management. Feel free to start with the PassSigner library and build on top of it. You can easily create all sorts of Pass applications for you or your clients. Happy coding!
Image via Fotolia
Frequently Asked Questions on Creating Digital Tickets with PHP and Apple Passbook
How Can I Generate a PKPass File Automatically?
To automatically generate a PKPass file, you need to use the PHP-PKPass library. This library allows you to create passes for Wallet on iOS by dynamically generating .pkpass files. You can use it to create event tickets, coupons, store cards, and more. To use this library, you need to have PHP 5.3 or later and the OpenSSL extension installed on your server. Once you have these prerequisites, you can download the library from GitHub and include it in your project. Then, you can use the PKPass class to create a new pass and set its properties.
How Can I Send a PKPass File to the Wallet on an iPhone?
To send a PKPass file to the Wallet on an iPhone, you need to set the correct MIME type when you send the file. The MIME type for .pkpass files is application/vnd.apple.pkpass. You can set this in the headers of your response when you send the file. For example, in PHP, you would use the header function like this: header(‘Content-type: application/vnd.apple.pkpass’). After setting the MIME type, you can then send the file using the readfile function.
What is the DL Signer Card and How Can I Use It?
The DL Signer Card is a digital signature tool that you can use to sign .pkpass files. It is a hardware device that generates a digital signature for a file, ensuring its authenticity and integrity. To use the DL Signer Card, you need to have the device and the corresponding software installed on your computer. Once you have these, you can use the software to select the file you want to sign and generate the signature.
How Can I Create Digital Signatures with PHP?
To create digital signatures with PHP, you can use the OpenSSL extension. This extension provides functions for generating and verifying digital signatures. To generate a signature, you can use the openssl_sign function. This function takes the data you want to sign, a variable to hold the generated signature, and your private key. It then generates the signature and stores it in the provided variable.
How Can I Verify a Digital Signature with PHP?
To verify a digital signature with PHP, you can use the openssl_verify function. This function takes the original data, the signature, and the public key of the signer. It then verifies whether the signature is valid for the given data and key. If the signature is valid, the function returns 1. If it is not valid, it returns 0. If there is an error, it returns -1.
How Can I Create a Pass for Wallet on iOS?
To create a pass for Wallet on iOS, you need to create a .pkpass file. This file is a compressed file that contains the pass data and resources. The pass data is a JSON file that specifies the pass details, such as the pass type, serial number, and fields. The resources are images that are displayed on the pass. Once you have created the .pkpass file, you can send it to the Wallet app on an iPhone.
How Can I Customize the Appearance of a Pass?
To customize the appearance of a pass, you can modify the pass.json file in the .pkpass file. This file contains fields for the pass header, primary field, secondary field, auxiliary field, and back field. You can set the value and label of each field to customize the information displayed on the pass. You can also include images for the logo, icon, and background of the pass to customize its appearance.
How Can I Update a Pass?
To update a pass, you need to generate a new .pkpass file with the updated pass data and send it to the Wallet app. The Wallet app checks the pass type and serial number to determine which pass to update. If the pass type and serial number match an existing pass, the app updates that pass with the new data. If they do not match any existing pass, the app adds a new pass.
How Can I Distribute Passes?
You can distribute passes by sending the .pkpass files to users. You can send the files via email, SMS, or a web link. When a user receives the file, they can open it on their iPhone to add the pass to the Wallet app. You can also distribute passes through your own app by using the PassKit framework.
How Can I Secure a Pass?
To secure a pass, you can sign it with a digital signature. This ensures that the pass is authentic and has not been tampered with. You can generate a digital signature with a private key and include it in the .pkpass file. When the Wallet app receives the pass, it verifies the signature with the corresponding public key. If the signature is valid, the app accepts the pass. If the signature is not valid, the app rejects the pass.