
Designers are often asked to incorporate everyday objects into their designs, as such objects grasp viewers’ attention easily. It holds true, especially when it comes to colorful, delicious food items that elicit visceral responses and trigger strong nostalgic memories.
In this tutorial, I’ll show you how to create an appealing strawberry jam jar in Illustrator. We’ll use different shape tools, the pen tool, the gradient tool, the mesh tool, and the symbol sprayer tool to achieve the final result. Hopefully, you will learn few handy tips along the way. Let’s get started!
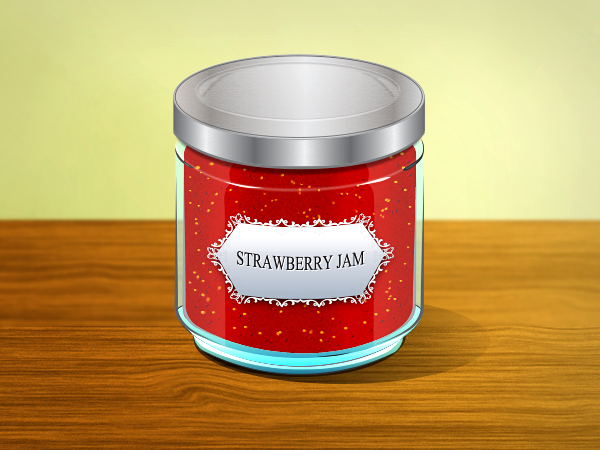
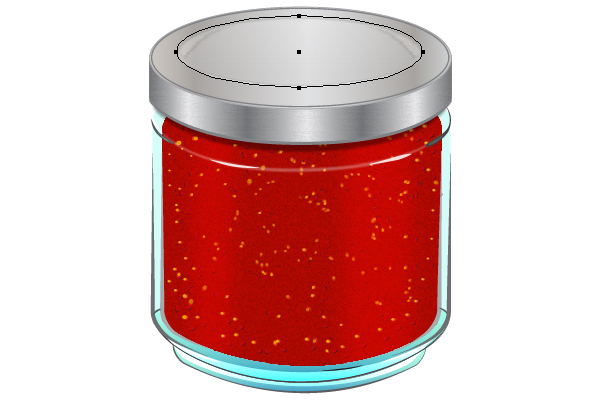
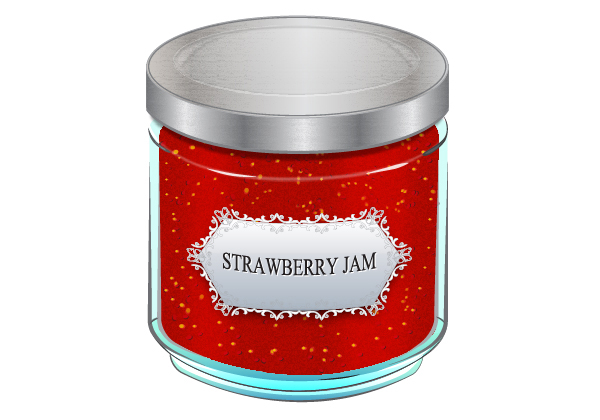
Final result: (Download the finished Illustrator file.)
Key Takeaways
- This tutorial provides a step-by-step guide on creating a vectorized jam jar using Adobe Illustrator, utilizing tools such as the pen tool, the gradient tool, the mesh tool, and the symbol sprayer tool.
- The reader is guided through creating different parts of the jar, including the bottom, body, sides, lid and label, as well as the jam and strawberry seeds inside the jar, each with detailed instructions on the tools and settings to use.
- The tutorial also includes tips on adding realistic details, such as using the Gradient and Mesh tools to mimic the way light interacts with the glass and jam, using the Pen tool to draw reflections or highlights, and adding a label to the jar.
- The tutorial concludes with a Frequently Asked Questions section that provides additional tips and advice on using Illustrator to create vectorized illustrations, using the Pen tool, making the jam jar look like a specific type of jar, and saving the finished illustration as a separate file.
Step 1
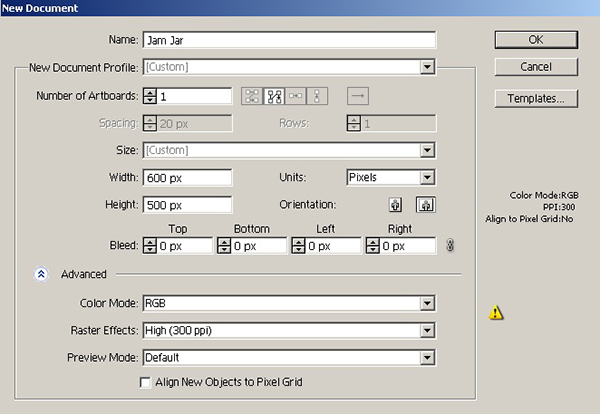
Create a new document in Illustrator with a 600px width and a 500px height.
Step 2
We’ll create the bottom of the jar first. So, select the pen tool and draw the shape shown below with any fill color.

Now, select this shape layer by clicking the ring-shaped target on the right side of respective layer and pick the gradient tool. Apply following gradient to it. Select a dark gray stroke color, with a 2pt stroke weight and width profile2 in the stroke panel at the top.

Step 3
Draw another shape shown below using the pen tool with the same gradient and stroke panel settings used in step 2.

Step 4
Draw the following shape using the pen tool with a white fill color. Set your stroke to “none.” After that, change the blending mode of this layer to “Overlay” within the transparency panel (Shift + Ctrl + F10).

Step 5
To make the body, select the rounded rectangle tool and draw a rectangle shown below with #aafaf1 as your fill color. Adjust the width of the rectangle according to the bottom of the jar. You can adjust the height as you like. Reduce the opacity of this layer to 50%.

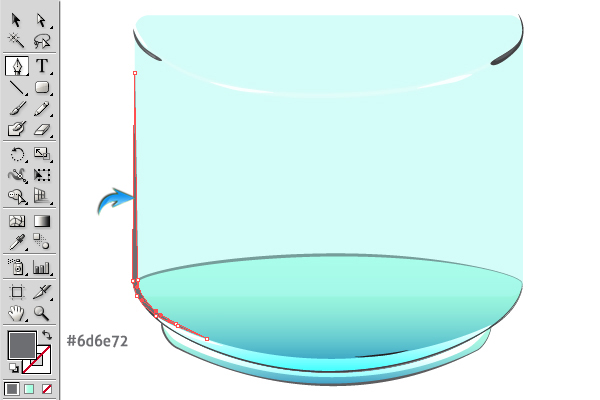
Step 6
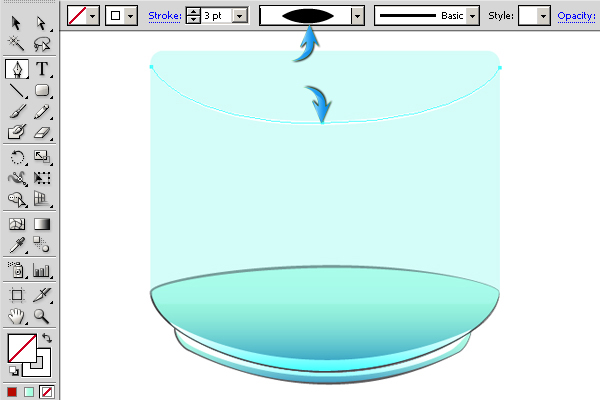
Now, draw the curve show below using the pen tool on a new layer above the rest of the layers. Set this new shape’s fill color to “none” and create a white stroke with 3pt stroke weight and width profile1.
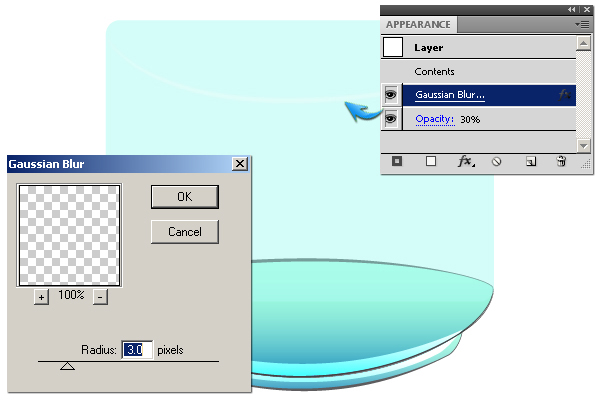
Select the curve and go to “Effect” > “Blur” > “Gaussian Blur.” Apply a 3px Gaussian blur effect to it and reduce its opacity to 30%.
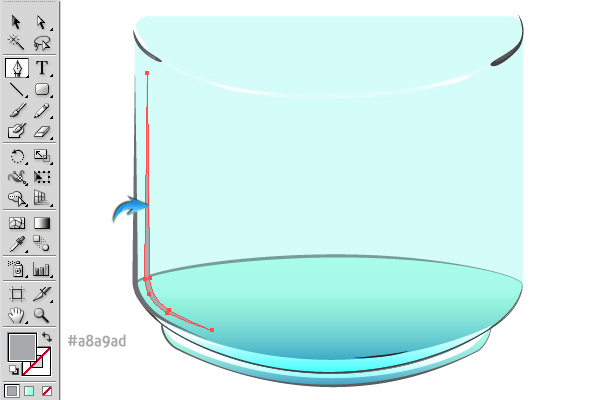
Step 7
Make a few highlights over the jar using the pen tool. Look below for clarity.

Step 8
To define the jar sides, draw the following shape on one edge.
Duplicate the shape, drag it inward, and position it as shown below. Change its fill color to a lighter gray.
Collect both shapes in a single new layer, and label it as “side1”. Duplicate this newly-created layer. Finally, select the copy and go to “Object” > “Transform” > “Reflect.” Reflect it vertically and position it over the right side of jar.

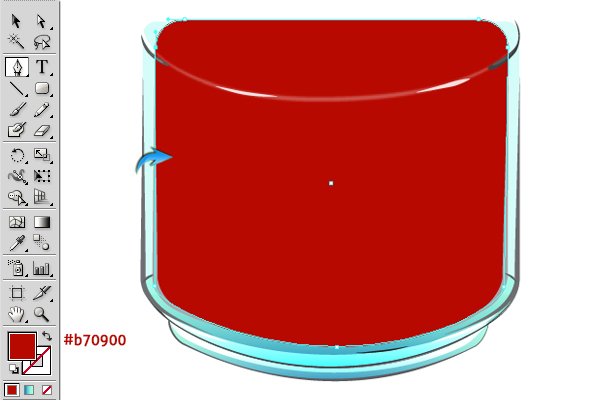
Step 9
Next, we’ll create the jam. Pick #b70900 as your fill color and draw the shape shown below using the pen tool. Label it as “jam”. Make sure to create this shape on a new layer below the highlight layers.
Step 10
Select the jam layer and go to “Effect” > “Effect Gallery” > “Artistic” > “Sponge”. Apply the following sponge settings.

Step 11
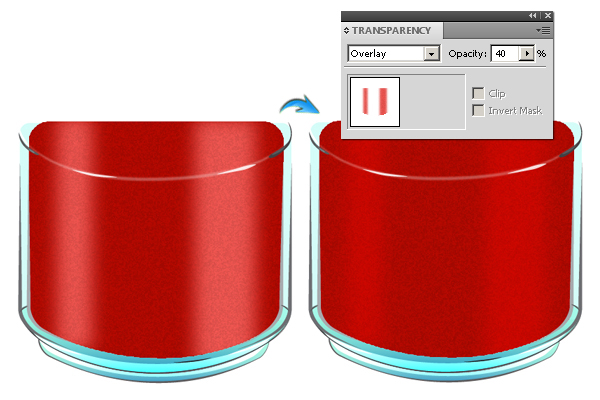
Draw two rectangles using #ff5c57 as your fill color.
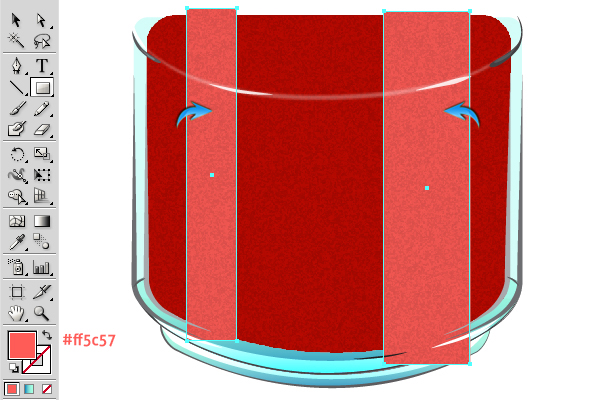
To confine the rectangles to the jam, duplicate the jam layer, set its fill color to “none,” and place it above the two rectangles. Now, select the duplicated jam layer and the two rectangles and go to “Object” > “Clipping Mask” > “Make.” After that, select the rectangle one by one and apply a 35px Gaussian blur effect to it. Change their blending mode to “Overlay” and their opacity to 40%.
Step 12
To make the strawberry seeds within the jam, draw few elongated ellipses and arrange them as shown below. Once you are done, select the group of seeds and drag them to the “Symbols” window. Now, select the “symbol sprayer tool” (Shift+ “S”) and apply it roughly over the jam on separate new layers.

To adjust the seeds size, select them and decrease their size using the selection tool (“V”). After that, apply the symbol scruncher tool, symbol sizer tool, and symbol spinner tool randomly over the seeds to give them a variated look. Experiment with these tools to get the desired seed density. You can reduce the opacity of seeds layers to 60-70% to make them appear deeper within the jam.

Step 13
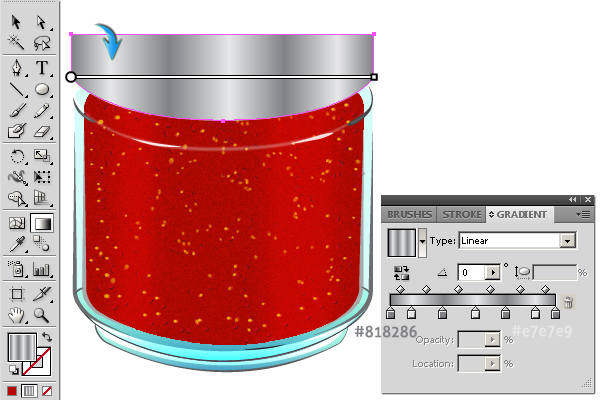
Next, we’ll create the jar’s lid. Draw the following shape using the pen tool and apply the following gradient to it.
Duplicate it and change its fill color to lighter gray. Now place this copy below the original layer and drag it slightly downwards to make the border.

To make the lid shadow, duplicate the lid layer again, change its fill color to black, and place it below the original. Drag it 3-5steps downwards and apply a 5px Gaussian blur effect on it. After that, change its blending mode to “Multiply” and reduce its opacity to 40%. Decrease its width a bit using the selection tool (“V”) to confine it to the jar.

Step 14
To add texture to the lid front, duplicate the lid layer, select it, and go to “Effect” > “Effect Gallery” > “Sketch” > “Cont˄ e Crayon”. Apply the following settings here.
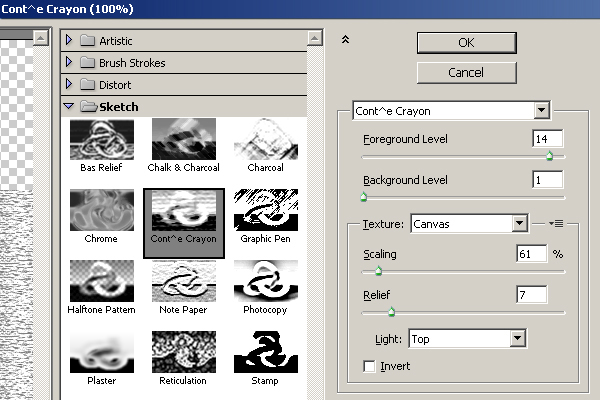
Reduce the texture opacity to 15%.

Step 15
To make the lid top, draw an ellipse and apply the following gradient to it with a 1pt gray stroke.
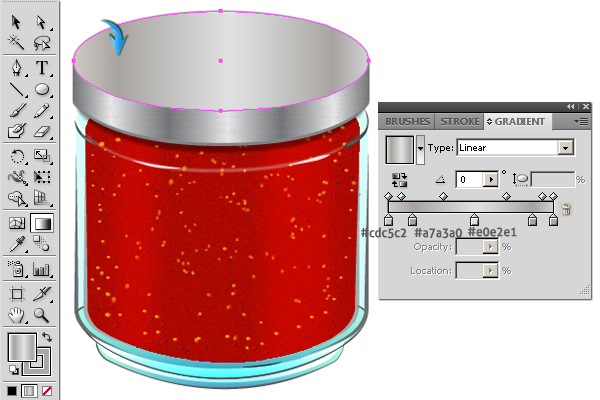
Draw another ellipse at the top that’s a bit smaller than the lid top. Set its fill color to “none” and give it a 1pt gray stroke.

Step 16
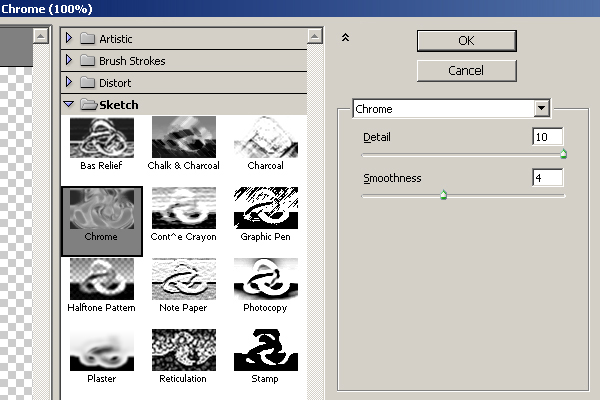
Draw another smaller ellipse at the top. Give it the following gradient and a lighter gray 3pt stroke.

Now, select it and apply the following settings for a chrome effect. Reduce its opacity to 30%.
Step 17
Next, we’ll make the lid top texture. Draw an ellipse covering the top and apply a stainless steel gradient on it. You can find this gradient by going to “Window” > “Swatch Libraries” > “Gradients” > “Metals” > “Stainless Steel.”

Select it and apply the following settings for Cont˄ e Crayon to it.

Change its blending mode to “Multiply” and reduce its opacity to 50%.

Step 18
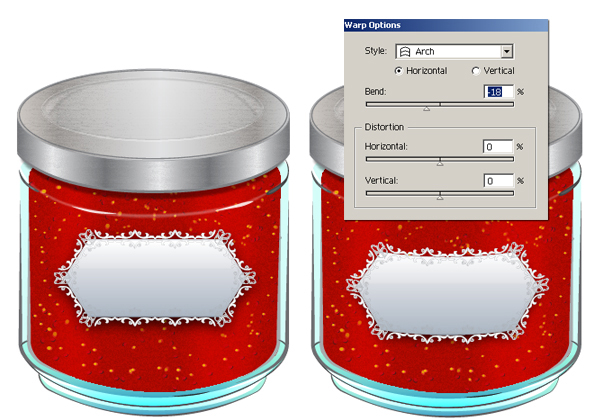
Now, we’ll make the label for the jam jar. I am going to use a label from the resources present in Adobe Illustrator. You can find it by going to “Window” > “Symbol Libraries” > “Heirloom.” Pick “Heirloom Geo” from the options and it should appear in your symbol window. Simply drag and drop it onto a new layer. Next, you need to give it a proper perspective to fit properly on the jar. Select the label and go to “Effect” > “Warp” > “Arch.” Apply the following settings:
Step 19
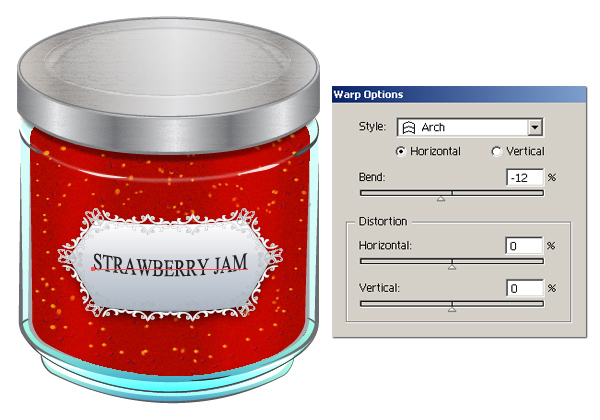
Type your text over the label using the type tool. I have used “Aparajita” font here.

Step 20
Select the text and apply the following warp settings to it.
Duplicate the text layer, change its color to white, and place it below the original layer. Drag it towards right and down to get the effect shown below.
Step 21
Draw the following shape in white using the pen tool to make the reflection over the jar. Reduce its opacity to 20%, duplicate it, and flip it vertically to make a reflection on the right side. 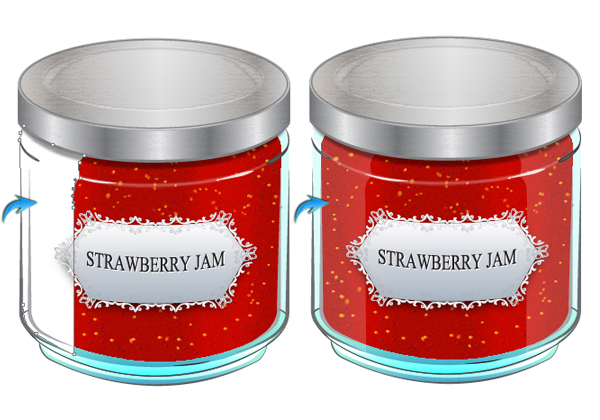
Step 22
Make the shadow by drawing the shape shown below using the pen tool and applying a “black to transparent” gradient to it.


That’s it! I hope you enjoyed the tutorial and learned something useful. Do share your thoughts!
Frequently Asked Questions about Creating a Vectorized Jam Jar in Illustrator
How can I add more realistic details to my vectorized jam jar in Illustrator?
To add more realistic details to your vectorized jam jar, you can use the Gradient tool and the Mesh tool in Illustrator. The Gradient tool allows you to create a smooth transition between different colors, which can give your jam jar a more three-dimensional look. The Mesh tool, on the other hand, allows you to create complex, detailed gradients that can mimic the way light interacts with the glass and the jam inside the jar. You can also use the Pen tool to draw additional details, such as reflections or highlights.
Can I use Illustrator to create other types of vectorized food illustrations?
Absolutely! Illustrator is a versatile tool that can be used to create a wide range of vectorized illustrations, including food items. You can use the same techniques you learned in creating the jam jar to create other food illustrations. For example, you can use the Pen tool to draw the basic shapes, the Gradient tool to add depth and dimension, and the Mesh tool to add detailed color variations.
I’m having trouble using the Pen tool in Illustrator. Do you have any tips?
The Pen tool in Illustrator can be a bit tricky to master, but with practice, it can become one of your most valuable tools. Start by clicking on the canvas to create anchor points, and then drag these points to create curves. Remember that less is more when it comes to using the Pen tool – try to use as few anchor points as possible to create a smoother, cleaner line. You can also adjust the position and angle of the anchor points after you’ve placed them by using the Direct Selection tool.
How can I make my vectorized jam jar look more like a specific type of jar?
If you want to make your vectorized jam jar look like a specific type of jar, you can start by finding a reference image of that jar. Then, use the Pen tool to trace the basic shape of the jar. Pay attention to the details that make that jar unique, such as its shape, size, and any distinctive features. You can also use the Gradient tool and the Mesh tool to mimic the way light interacts with the jar, which can help make it look more realistic.
Can I use these techniques in other vector graphics software?
While this tutorial specifically covers how to create a vectorized jam jar in Illustrator, many of the techniques can be applied in other vector graphics software. Most vector graphics software have similar tools, such as a pen tool for drawing shapes, and gradient tools for adding depth and dimension. However, the specific steps and settings may vary depending on the software you’re using.
How can I add a label to my vectorized jam jar?
Adding a label to your vectorized jam jar can be done by using the Rectangle tool to create the basic shape of the label. Then, you can use the Type tool to add text to the label. You can also use the Gradient tool to add some depth to the label, and the Pen tool to add any additional details.
How can I change the color of the jam in my vectorized jam jar?
Changing the color of the jam in your vectorized jam jar can be done by selecting the jam shape and then changing the fill color in the Color panel. You can also use the Gradient tool to add a gradient to the jam, which can make it look more realistic.
Can I use Illustrator to create a vectorized jam jar with a different perspective?
Yes, you can use Illustrator to create a vectorized jam jar from any perspective. The key is to start with a reference image that matches the perspective you want to achieve. Then, use the Pen tool to trace the basic shape of the jar, paying attention to how the perspective affects the shape and proportions of the jar.
How can I make my vectorized jam jar look more shiny or glossy?
To make your vectorized jam jar look more shiny or glossy, you can add highlights to the jar. This can be done by using the Pen tool to draw shapes where the light would hit the jar, and then filling these shapes with a lighter color or a gradient. You can also use the Mesh tool to create detailed gradients that mimic the way light interacts with a shiny surface.
How can I save my vectorized jam jar as a separate file in Illustrator?
To save your vectorized jam jar as a separate file in Illustrator, go to the File menu and select Save As. Then, choose the format you want to save the file in, and choose a location on your computer to save the file. Make sure to check the “Include Linked Files” box if you want to include any linked images or files in the saved file.