
Key Takeaways
- IFTTT’s Maker Channel allows developers to define triggers that are set off when they receive a HTTP request, expanding its usability for virtually any purpose, limited only by the creativity of the developer community.
- The Maker Channel can be used to set up a simple Arduino to communicate with IFTTT via Node.js, allowing for actions such as toggling a LIFX lightbulb on and off via an Arduino powered light switch, or changing an RGB LED color whenever a Twitter mention is received.
- The setup process for Maker Channel involves creating a new recipe on IFTTT, selecting “Maker” as the Trigger Channel, defining the trigger type, event name and action type, and then using Node.js code to define the button connected to the Arduino that will trigger the HTTP request to IFTTT.
- To make the Arduino respond to IFTTT triggers, a similar process is followed but in reverse, with the Trigger Channel being the service that will cause the action (e.g., Twitter), and the Action Channel being “Maker”, which will then make a web request to the Node.js server and Arduino whenever the trigger event occurs.
IFTTT has huge potential in its ability to connect devices quickly and easily. There was one thing it had been missing for a while – the ability to send and receive generic HTTP GET and POST requests. If you wanted to use IFTTT for something, the specific use for it had to be defined by IFTTT and published on their site within a channel. That is, until now!
IFTTT recently released the Maker Channel. It is exactly what developers have been waiting for! It allows you to define triggers that are set off when they receive a HTTP request, along with actions that can make a HTTP request to a defined location. This opens up IFTTT to be used for virtually anything. It is now completely up to the imagination of the developer community.
To show what the Maker channel is capable of, we are going to set up a simple Arduino to communicate back and forth with IFTTT via Node.js. To experiment with sending triggers to IFTTT, we will toggle a LIFX lightbulb on and off via an Arduino powered light switch. To try out an IFTTT Maker action, we will connect an RGB LED to our Arduino which will change color any time we are mentioned on Twitter. Don’t like Twitter or don’t have a LIFX bulb? Not a problem at all, switch out the action/trigger with something else on IFTTT. Work with the Facebook channel instead of Twitter or trigger actions on your phone instead of a lightbulb. This is a lot of fun to tinker with.
If you are new to IFTTT, I previously covered the basics in my article on Connecting LIFX Light Bulbs to the IoT Using IFTTT. This article assumes you know all about triggers and actions, and now are ready to take it to the next level!
The code
If you’re keen to get straight into the code and try it out, you can find it here on GitHub.
How This Will Work
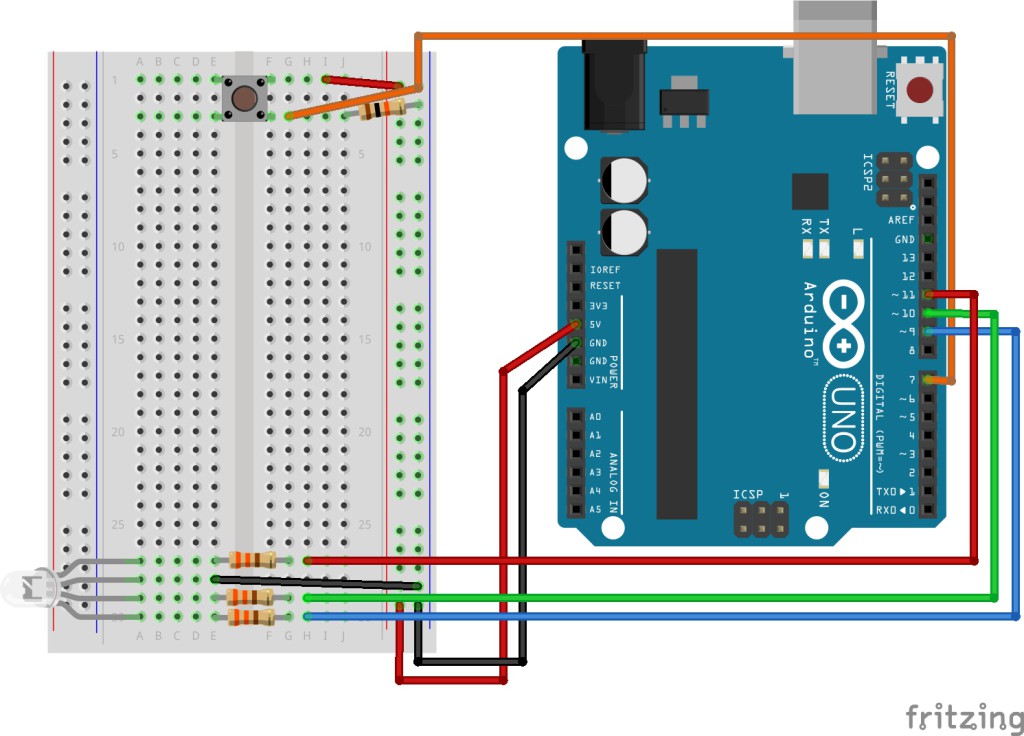
We are going to have a local Node.js server running with an Arduino connected via USB. Pressing a button on the Arduino set up will trigger a HTTP request to IFTTT to tell it to toggle our LIFX light. Our Node.js server will also have Express running to handle any incoming HTTP requests. Whenever IFTTT sees a new mention of us on Twitter, it’ll make a POST request to our server to trigger our Arduino’s LED.
Our Arduino Sketch
We’ll be connecting up a simple button and an RGB LED to an Arduino.
Setting Up The Maker Channel
To get started, we will need to go to the Maker Channel on IFTTT and click “Connect”. Once it is set up, you’ll reach a screen that looks like so:
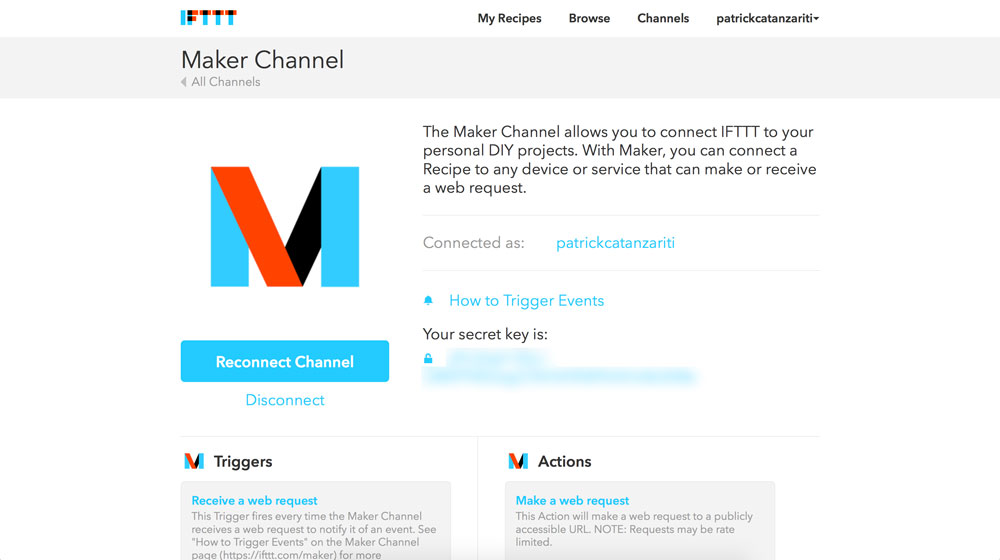
On this screen, it provides your secret key you’ll need to trigger IFTTT actions via HTTP commands. Of course, you’ll need a bit more info than just the key, we need a URL to POST to that’ll trigger the action. To find this, click the link that says “How to Trigger Events”. It’ll open up a page that contains the URL you’ll want to use, conveniently with your key attached to it.
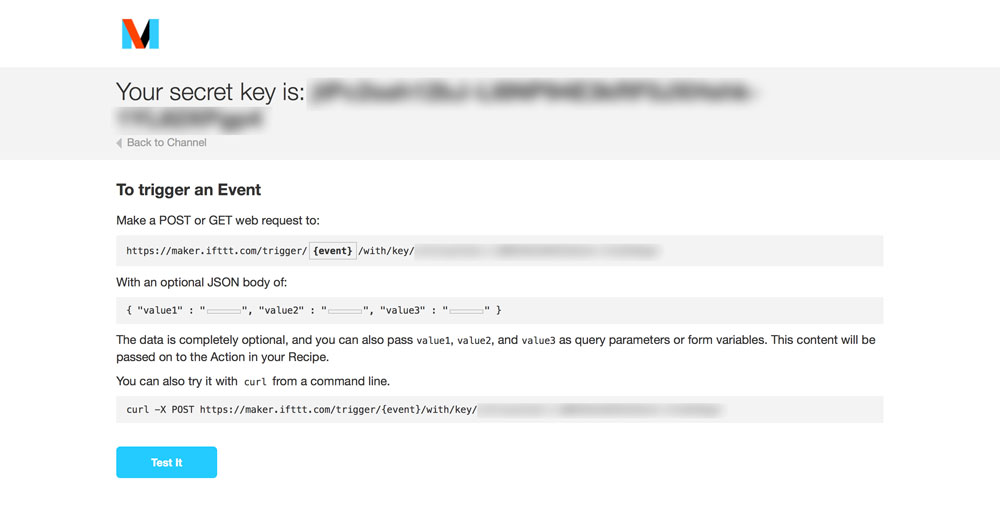
The URL we’ll be using for our LIFX bulb looks like this: http://maker.ifttt.com/trigger/light_switch/with/key/{{yourkeyhere}}. The URL part which says light_switch is our event name. We use this when putting together our IFTTT recipe. If you’re not triggering a LIFX bulb, choose a name that matches your event more accurately.
Toggling IFTTT Using Maker Triggers
Our Maker channel is active and ready to be used. We will begin by looking at how to toggle our IFTTT action – toggling a LIFX lightbulb on and off using a button from an Arduino.
Making the recipe itself is quite simple:
- We go to the Create New Recipe page on IFTTT.
- Select “Maker” as our Trigger Channel.
- Click on “Receive a web request” as our trigger type.
- Enter our event name of
light_switch. - Choose “LIFX” as our Action Channel.
- Click on “Toggle lights on/off” as our action type.
- Choose the LIFX lights we’d like this to affect.
- Give the recipe a title and click “Create Recipe”!
In our Node.js code, we use johnny-five to access our Arduino. When the board is ready, we define our button connected to pin 7 in the btn variable:
  board.on('ready', function() {

    console.log('Board ready');
    btn = new five.Button(7);
Within the board’s ready event, we set up a watch for the button’s down event. If we detect the button has been pressed, we log that click to the console for debugging purposes (in the situation where a wire on the breadboard comes loose or something along those lines, having these console logs can save a lot of time!). Then, we use the npm module request to make a HTTP POST request to the URL we found above. We’ve got console logs upon its success for debugging purposes also.
  btn.on('down', function(value) {

    console.log('Light toggle pressed.');
    request.post({

      url: 'http://maker.ifttt.com/trigger/light_switch/with/key/{{yourkeyhere}}'

    }, function(error, response, body) {

      console.log('Body response was ', body);

      console.log('Error was ', error);

    });

  });
Upon running the code, when we click the button and the request is successful, it should switch our LIFX lightbulb on and off! IFTTT will return a nice message that will look like so in our console.log:
Body response was Congratulations! You've fired the light_switch event
It is really simple to put together but has a lot of potential.
One thing to note – if you want to make a call to the IFTTT service via HTTPS, you’ll need a properly secured HTTPS server too. I had errors when using a local test server, so it may need to have a certificate that isn’t self signed.
Responding To IFTTT Triggers
We now can trigger IFTTT actions via Node.js and our Arduino. Let’s look at how to do things the opposite way – making our Arduino respond to IFTTT triggers. We’ll set up IFTTT to tell our Node.js server and Arduino whenever we are mentioned on Twitter.
We put together the recipe the other way around:
- We go to the Create New Recipe page on IFTTT.
- Select “Twitter” as our Trigger Channel.
- Click on “New mention of you” as our trigger type.
- Click “Create Trigger”.
- Choose “Maker” as our Action Channel.
- Click on “Make a web request” as our action type.
- Put in your POST request settings (we’ll cover these below) and click “Create Action”!
The screen with our HTTP request settings will look like so:
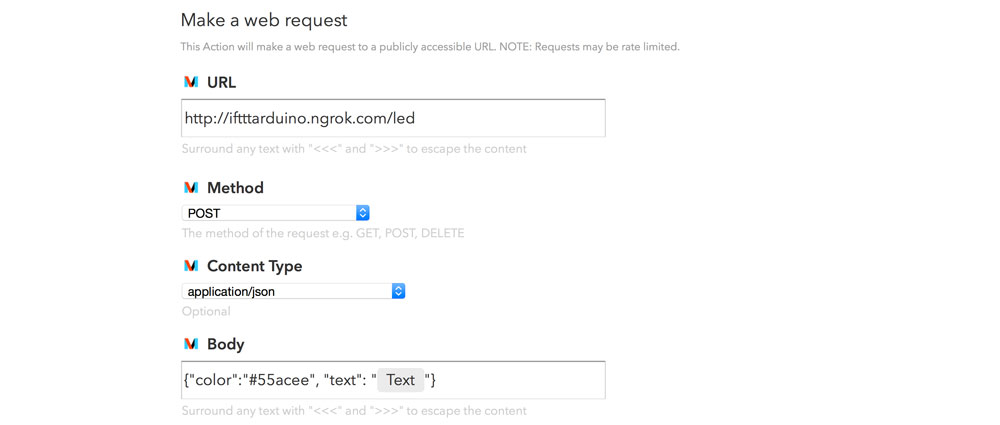
- Put in a publically accessible URL for your Node server. I personally use ngrok for testing all of this out. I cover how to use ngrok and similar services in my article on Accessing Localhost From Anywhere. Choose POST for the method (a GET request should work too if you’d prefer it).
- Choose “application/json” for the content type as our Node server will be expecting to receive JSON.
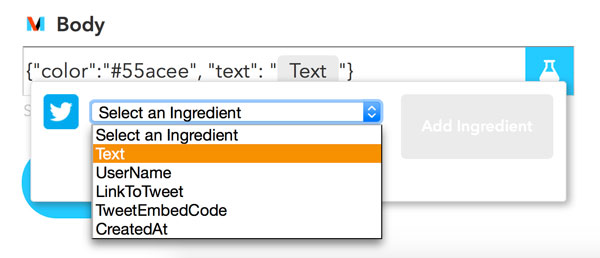
- Finally, include the JSON message we’d like to send. I put down
{"color":"#55acee", "text":Text}.#55aceeis the color I found from Twitter’s bird mascot, so I thought it the most appropriate choice! Textis a field dynamically filled in by IFTTT with the text from the tweet it found mentioning you. These fields are called IFTTT ingredients. We don’t really use it to change our LED color but I wanted to include an IFTTT ingredient in there to show how it’s done.- To add an ingredient into your JSON, click on the body field to enter in your JSON string and you’ll find a test tube icon on the right hand side. If you click it, you’ll open a menu which will let you choose a field to include:
Within our Node code, we set up our LED so that our johnny-five module knows about it and set up the server to listen for that POST request. It will respond to it by changing our LED.
Within the board’s ready event, we define our LED attached to pins 9, 10 and 11 within the variable of led like so:
led = new five.Led.RGB([11,10,9]);
The code might look odd as the pins count down from 11 rather than up. The reason for this is I prefer my wiring to have red, green and then blue from top to bottom on the Arduino board (e.g. 11, then 10 and 9).
We set its initial color to green:
led.color('#00ff00');
Outside of the board’s ready event, we create our routing for the /led POST request using express. Within the callback function for this route, we get the JSON data sent from IFTTT inside req.body and find the color key within it. We give that color to johnny-five‘s led.color() function to change the color of our LED to what we’ve been given. We log the JSON data in our console too.
  app.post('/led', function (req, res) {

    var response = req.body;

    console.log('Response was ', response);
    led.color(response.color);

    res.send('LED request successful!');

  });
Something to keep in mind – If you’re putting this on a publically accessible server that will be available for more than just test purposes, I’d recommend checking that the JSON data being provided is actually a color and is a legitimate request.
If you run the Node server and then recieve a tweet at your account, after a little while (it won’t be instant as it seems to take time for IFTTT to refresh that info from Twitter at times), your LED should go Twitter blue! In your console.log, you should see something like the following:
Response was { color: '#55acee', text: '@thatpatrickguy WOO HOO' }
Then, if you set up various other services along the same lines but with different colors, you can have a wide variety of LED color changes!
Conclusion
Having the ecosystem of IFTTT and all of its channels available to makers of any internet enabled technology that can send and receive HTTP requests is huge. Whilst we’ve been able to do things like include the Twitter API into Node.js applications for a long time now, this provides a whole range of possibilities in an API that is much easier to use and is incredibly modular. Switch out Twitter for something else and everything should still work with only a few adjustments!
If you make some really neat IFTTT Maker Channel creation from this guide, leave a note in the comments or get in touch with me on Twitter (@thatpatrickguy), I’d like to take a look!
Frequently Asked Questions (FAQs) about Connecting IoT and Node.js to IFTTT
What is the role of Node.js in connecting IoT to IFTTT?
Node.js plays a crucial role in connecting IoT devices to IFTTT. It is a JavaScript runtime built on Chrome’s V8 JavaScript engine, which is used to develop server-side and networking applications. Node.js applications are written in JavaScript and can be run within the Node.js runtime on various platforms. In the context of IoT, Node.js can be used to write the server-side code that interacts with IoT devices and sends commands to IFTTT via the Maker Webhooks service.
How does the Maker Webhooks service work in IFTTT?
The Maker Webhooks service in IFTTT allows you to create custom Webhooks, which can trigger an action on an IFTTT service. This service is particularly useful when you want to connect your own hardware or software with IFTTT. You can send a Web request to a specific URL generated by the Maker Webhooks service, and this request will trigger an action on an IFTTT service.
Can I use other programming languages instead of Node.js to connect IoT to IFTTT?
Yes, you can use other programming languages to connect IoT devices to IFTTT. However, Node.js is a popular choice due to its efficiency and scalability, which are particularly useful when dealing with IoT devices that generate a large amount of data. Other languages like Python, Java, or C++ can also be used, but the implementation might differ.
How secure is the connection between IoT, Node.js, and IFTTT?
The security of the connection between IoT, Node.js, and IFTTT largely depends on how you implement it. It’s important to use secure methods when sending data from your IoT devices to Node.js and from Node.js to IFTTT. This can include using HTTPS for all connections, validating all incoming data, and keeping your IFTTT key secret.
What types of IoT devices can I connect to IFTTT using Node.js?
You can connect a wide range of IoT devices to IFTTT using Node.js. This includes but is not limited to smart home devices like lights, thermostats, and security cameras, wearable devices like smartwatches and fitness trackers, and even custom-built IoT devices. The key requirement is that the device must be able to send data over the internet.
How can I debug issues when connecting IoT to IFTTT using Node.js?
Debugging issues when connecting IoT to IFTTT using Node.js can be done using various methods. You can use console.log statements in your Node.js code to print out information about the state of your application. You can also use tools like the Node.js debugger or Node Inspector.
Can I connect multiple IoT devices to IFTTT using Node.js?
Yes, you can connect multiple IoT devices to IFTTT using Node.js. Each device would send data to your Node.js application, which would then trigger actions on IFTTT using the Maker Webhooks service. You can even set up different actions for different devices.
What are the limitations of using IFTTT with IoT and Node.js?
While IFTTT is a powerful tool for connecting IoT devices with various services, it does have some limitations. For example, the free version of IFTTT limits the number of applets you can create. Also, not all services are available on IFTTT, so you might not be able to connect your IoT device with every service you want to use.
How can I optimize the performance of my Node.js application when connecting IoT to IFTTT?
Optimizing the performance of your Node.js application can be done in several ways. This includes using efficient algorithms and data structures, minimizing the use of blocking operations, and properly managing memory. You can also use tools like the Node.js profiler to identify performance bottlenecks.
Can I use Node.js and IFTTT to connect IoT devices to services other than IFTTT?
Yes, you can use Node.js and IFTTT to connect IoT devices to a wide range of services. IFTTT supports hundreds of services, including popular ones like Gmail, Twitter, and Dropbox. You can trigger actions on these services based on data from your IoT devices.