- Understanding Atom
- Activating Full ES2015 Support with Babel
- The package.json
- The Package Source Code
- Event Subscription
- Serialize All the Things!
- Panes and Views
- Making a Package Configurable
- Fine-Tuning with Menus and Keymaps
- Debugging with Chrome Developer Tools
- Unit Tests with Jasmine
- Package Flow
- Conclusion
- Frequently Asked Questions (FAQs) on Writing Atom Packages Using Vanilla JavaScript
This article was peer reviewed by Vildan Softic. Thanks to all of SitePoint’s peer reviewers for making SitePoint content the best it can be!
Atom is a modern, to the core hackable editor. This is great, but for developers who aren’t fluent in CoffeeScript, it is hard to follow the documentation. Understanding the ecosystem of Atom can become confusing. Let’s go through all aspects of how writing an Atom package in JavaScript works.
Understanding Atom
Atom is a Node.js and Chromium based application, written with GitHub’s Electron framework. That means it is technically a web application, running on the desktop. Atom’s internal functionality is split up into tiny core packages; they’re developed the same way as any other package from the community. Although they are all written in CoffeeScript, it is possible to either write them in plain JavaScript, or transpile them via Babel.
Activating Full ES2015 Support with Babel
Babel is a source-to-source compiler; turning ECMAScript 2015 (formerly known as ES6) code into ECMAScript 5 code. Since the environment is Chromium, there are already a lot of supported ES2015 features available. But instead of always looking up which ones are implemented, I recommend using Babel to transpile your code. In a later release — when ES2015 is better supported in Chromium — you can deactivate Babel again and keep your code base (almost) untouched.
To activate transpiling with Babel, each file needs a 'use babel'; statement at the beginning, similar to strict mode in ECMAScript 5. This gives you also the ability to decide which files should be transpiled and which not, by omitting the statement.
The package.json
It helps to view an Atom package as npm module. You have the same access to the API as any tool running on Node.js. Therefore it’s possible to add any npm dependency needed. A package.json is also required, containing all meta data for your project. The basic file should be as follows:
{
  "name": "your-package",
  "main": "./lib/main",
  "version": "0.1.0",
  "description": "A short description of your package",
  "keywords": [
    "awesome"
  ],
  "repository": "https://github.com/<your-name>/<package>",
  "license": "MIT",
  "engines": {
    "atom": ">=1.0.0 <2.0.0"
  },
  "dependencies": {
  }
}
The important keys are main — defining the main entry point of your package (defaults to index.js/index.coffee) — and engines — telling Atom on which version your package runs. There is also a set of optional keys available, documented in the “wordcount” package documentation (section package.json).
The Package Source Code
All your package code belongs in the top-level directory lib/. I recommend having your entry point in this folder as well, as it keeps the structure clean and makes it easier to scan the project.
Your main file must be a singleton object that maintains the entire lifecycle of your package. Even if your package consists only of a single view, it will all be managed from this object. Your entry-point requires one activate() method, but should also have the optional deactivate() and serialize().
// lib/main.js
'use babel';

// This is your main singleton.
// The whole state of your package will be stored and managed here.
const YourPackage = {
  activate (state) {
    // Activates and restores the previous session of your package.
  },
  deactivate () {
    // When the user or Atom itself kills a window, this method is called.
  },
  serialize () {
    // To save the current package's state, this method should return
    // an object containing all required data.
  }
};

export default YourPackage;
Activate Your Package
The activate() function is the only required method. Initialise all your modules, views or helpers here. It is passed an object, containing the previous serialized state of your package. If you don’t serialize anything in your package, it will be an empty object. That means, it is entirely up to you and your package architecture on what to serialize.
Deactivating
The deactivate() method is optional, but important. It will be called by Atom when the window is shutting down, or the user deactivates it in the settings. When your package gets deactivated by the user, and you don’t dispose of added events/commands, they are still available. This isn’t a problem when Atom is shutting down the window. It will tear down events and commands. But if your package is watching files or doing any other work, you should release them in deactivate().
Event Subscription
A package usually subscribes to multiple events like adding custom commands, listening to changes, or modified files. It is possible to bundle these into an instance of CompositeDisposable(), and this way they can all be disposed of at once.
// lib/main.js
import { CompositeDisposable } from 'atom';

const YourPackage = {
  subscriptions: null,

  activate (state) {
    // Assign a new instance of CompositeDisposable...
    this.subscriptions = new CompositeDisposable();

    // ...and adding commands.
    this.subscriptions.add(
      atom.commands.add('atom-workspace', {
        'your-package:toggle': this.togglePackage
      })
    );
  },

  // When your package get's deactivated, all added
  // subscriptions will be disposed of at once.
  deactivate () {
    this.subscriptions.dispose();
  },

  togglePackage () {
    // Code to toggle the package state.
  }
};
Serialize All the Things!
Serialization is a powerful, but again optional, feature of Atom packages. Serialization/deserialization happens when a window is shutting down, refreshed or restored from a previous session. It is up to you to define which and how many of your components should serialize their data. What’s important is that it returns JSON. If you have a view, and want that to be able to be refreshed, you need to make it compatible with serialization and deserialization.
This very basic component takes an object, which will be used as the component’s internal data. Your component then might do some work with the data and can allow its state to be serialized via the serialize() method.
// lib/fancy-component.js
class FancyComponent {
  constructor (configData) {
    this.data = configData;
  }

  // This method will be called when the class
  // is restored by Atom.
  static deserialize (config) {
    return new FancyComponent(config);
  }

  // The returned object will be used to restore
  // or save your data by Atom.
  // The "deserializer" key must be the name of your class.
  serialize () {
    return {
      deserializer: 'FancyComponent',
      data: this.data
    };
  }

  doSomethingWithData () {}
}

// Add class to Atom's deserialization system
atom.deserializers.add(FancyComponent);

export default FancyComponent;
To make all this useful, this component must be called and serialized in your packages main singleton.
// lib/main.js
import FancyComponent from './fancy-component';
import SomeView from './some-view';

const YourPackage = {
  fancyComponent: null,
  someView: null,

  activate (state) {
    // If the component has been saved at a previous session of Atom,
    // it will be restored from the deserialization system. It calls your
    // your components static 'deserialize()' method.
    if (state.fancy) {
      this.fancyComponent = atom.deserializers.deserialize(state.fancy);
    }
    else {
      this.fancyComponent = new FancyComponent({ otherData: 'will be used instead' });
    }

    // More activation logic.
  },

  // As well as your component, your package has a serialize method
  // to save the current state.
  serialize () {
    return {
      fancy: this.fancyComponent.serialize(),
      view: this.someView.serialize()
    };
  }
};
All objects you want to serialize need the serialize() method. It must return a “serializable object”, and a deserializer key with the name of a registered deserializer. According to Atom, “it usually is the name of the class itself”. Additional to that, a class also needs the static deserialize() method. This method converts an object from a previous state to a genuine object.
In order to make all this possible, you have to add your class to the deserialization system with atom.deserializers.add().
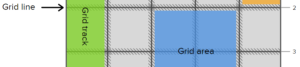
Panes and Views
A pane is the individual window in Atom. It contains all open tabs, called “items”. These panes are stored in the atom.workspace object. With atom.workspace.getActivePane() you are requesting the current active pane. A pane object doesn’t contain any DOM elements, but all the instances of Atom’s internal components (e.g. TextEditor, GutterContainer, NotificationManager). Understanding these panes is essential to create custom views for your package.
Views or any other custom UI element you want to add must be created with JavaScript. Atom is entirely build with Web Components, but you don’t have to do that. A very basic example of a custom modal could be as follows.
// lib/custom-view-element.js
export default class YourPackageView {
  constructor (state) {
    this.data = state;
    this.element = document.createElement('div');
    this.message = document.createElement('span');
    this.textNode = document.createTextNode(this.data.content);

    this.element.classList.add('your-package');
    this.message.classList.add('your-package-message');

    this.message.appendChild(this.textNode);
    this.element.appendChild(this.message);
  }

  serialize () {
    return {
      data: this.data
    };
  }

  destroy () {
    this.element.remove();
  }

  getElement () {
    return this.element;
  }

  doSomethingWithData () {}
}
// lib/main.js
import YourPackageView from './custom-view-element';
import { CompositeDisposable } from 'atom';

const YourPackage = {
  subscriptions: null,
  packageView: null,
  modal: null,

  activate (state) {
    this.subscriptions = new CompositeDisposable();
    // We don't use the serialization system here because we assume
    // that our view won't work with any data.
    this.packageView = new YourPackageView(state.viewState);
    // Here we add the custom view to the modal panel of Atom.
    this.modal = atom.workspace.addModalPanel({
      item: this.packageView.getElement(),
      visible: false
    });

    this.subscriptions.add(
      atom.commands.add('atom-workspace', {
        'your-package:toggle-modal': this.toggleModal()
      })
    );
  },

  // We destroy both the custom view and Atom's modal.
  deactivate () {
    this.subscriptions.dispose();
    this.packageView.destroy();
    this.modal.destroy();
  },

  serialize () {
    return {
      viewState: this.packageView.serialize()
    };
  },

  toggleView () {
    if (this.modal.isVisible()) {
      this.modal.hide();
    }
    else {
      this.modal.show();
    }
  },

  doSomethingElseWithView () {}
};

export default YourPackage;
The atom.workspace.addModalPanel() method adds a modal element to Atom’s workspace. If you want to add a custom view to a pane (e.g. for a settings page) there is a bit more work required though.
Making a Package Configurable
Package configuration should be described in JSON Schema. To add settings, your package object needs a config key with the data. Alternatively you can move the configuration to a config-schema.json file and import it. This keeps your configuration separated and your architecture organised.
// lib/config-schema.json
{
  "activateHyperMode": {
    "description": "Turns the package into hyper mode.",
    "type": "boolean",
    "default": false
  },
  "setRange": {
    "type": "integer",
    "default": 42,
    "minium": 1,
    "maximum": 9000
  }
}
// lib/main.js
import packageConfig from './config-schema.json';

const YourPackage = {
  config: packageConfig,
  subscriptions: null,

  activate (state) {
    // ...
  }
};
This creates the configuration on your package’s settings page automatically. A list of all supported types can be found on the configuration page of Atom’s API documentation. Your settings object, along with all other package configuration, are stored in the atom.config object.
Getting and Setting
You can get and set any key of your configuration with the get() and set() methods. It is also possible to get either Atom’s general settings or other packages’ settings. If you want to interact with other packages, you need to provide and consume services.
atom.config.get('yourPackage'); // Returns the entire configuration object
atom.config.get('yourPackage.activateHyperMode'); // Returns false
atom.config.get('core.fileEncoding'); // Returns 'utf8'
atom.config.get('differentPackage');

atom.config.set('yourPackage.activateHyperMode', true);
atom.config.set('yourPackage.myNewValue', 'value');
Listening to Changes
To listen for changes, you can either observe the config for changes, or have a listener — called onDidChange() — to a key path. Both of them return a Disposable which you can .dispose() to unsubscribe.
Again, adding them to an instance of CompositeDisposable allows you to dispose of multiple events at once:
this.subscriptions = new CompositeDisposable();

this.subscriptions.add(
  atom.config.observe('core.themes', value => {
    // do something
  })
);

this.subscriptions.add(
  atom.config.onDidChange('yourPackage', ({oldValue, newValue}) => {
    // do something
  })
);
Or, dispose them individually:
const observeConfig = atom.config.observe('core.themes', doSomethingCool);
const onChangeConfig = atom.config.onDidChange('yourPackage', doSomethingOnChange);

// later in your code
observeConfig.dispose();
onChangeConfig.dispose();
Fine-Tuning with Menus and Keymaps
Menus and keymaps make your package’s functionality accessible to the user in the Atom environment. They are linked to specific commands of your interface. If your package can be toggled, open a view, do some custom action or anything else, it should be available to the user.
Adding Menus
The menu definition can be either stored as a JSON file in the menus/ top-level directory or in the menus key of your package.json. The following example adds commands to the Packages menu bar and to the context menu of the editor. The context menu appears when right-clicking inside of the editor.
// menus/your-package.json
"menu": [
  {
    "label": "Packages",
    "submenu": [
      {
        "label": "Your Package",
        "submenu": [
          {
            "label": "Toggle",
            "command": "your-package:toggle"
          }, {
            "label": "Settings",
            "command": "your-package:show-settings"
          }
        ]
      }
    ]
  }
],
"context-menu": {
  "atom-text-editor": [
    {
      "label": "Toggle Your Package",
      "command": "your-package:toggle"
    }
  ]
}
Keymaps
With keymaps you define shortcuts for your package commands. They are tied to a specific scope, where the scope is a CSS selector like atom-text-editor, atom-text-editor:not([mini]) or atom-workspace. When an element matching the selector is in focus, and the keystroke pattern is used, your custom action is emitted.
// keymaps/your-package.json
{
  "atom-text-editor": {
    "alt-shift-e": "your-package:toggle",
    "cmd-ctrl-alt-shift-enter-backspace": "your-package:do-something-crazy"
  },
  "atom-text-editor[mini]": {
    "tab-escape": "your-package:transform"
  }
}
Keep in mind that these commands must have been registered (atom.commands.add()) in your entry-point.
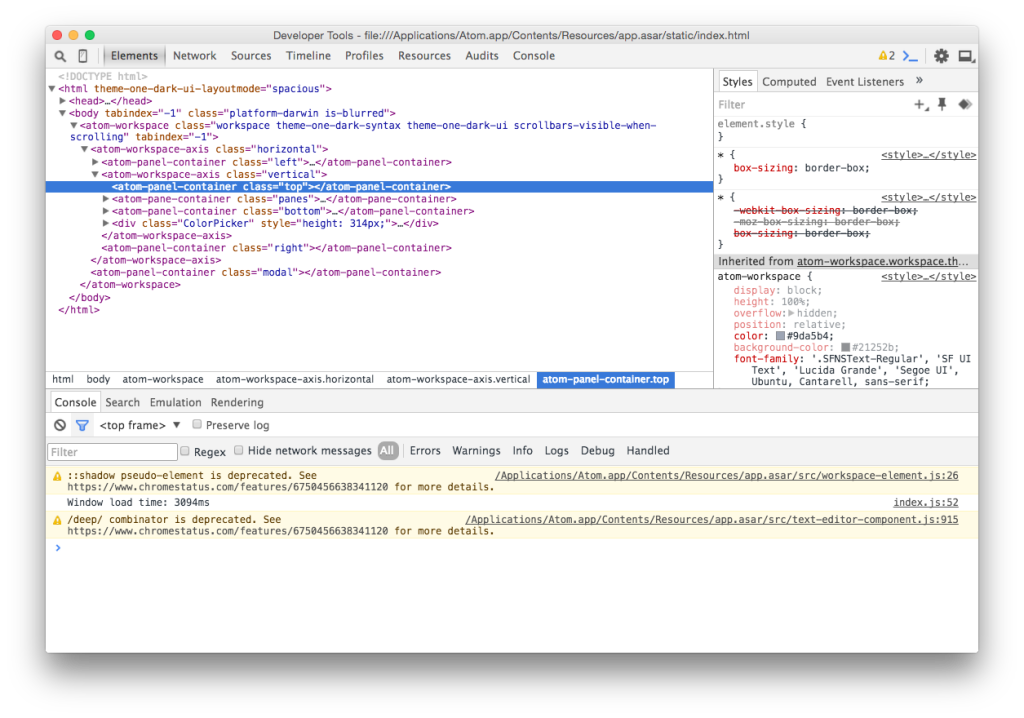
Debugging with Chrome Developer Tools
Debugging in Atom isn’t much different to debugging on the web. You can activate the Chrome Developer Tools under View > Developer > Toggle Developer Tools to view thrown errors, logs from your code or get an understanding of Atom’s markup.
Unit Tests with Jasmine
Atom uses the Jasmine framework for its tests. Tests are placed in the spec/ top-level directory and files within must end with -spec (e.g. fancy-component-spec.js). Tests aren’t required to run your package or publish it, but they are a good way to back up the quality of your code and make sure nothing breaks when adding new features.
To run your tests, you can either use the window:run-package-specs command or go to View > Developer > Run Package Specs.
If you want to run your package specs on Travis CI, there is a brief post on Atom’s blog on how to set it up.
Package Flow
That was a lot of input. The actual flow or execution order of Atom is roughly as follows (note: tests aren’t part of the package flow).
- Atom boots up and reads your
package.json- Menus, keymaps, stylesheets and all other configuration is applied
- If
activationCommandsare defined, they will be run
- The main entry-point (i.e.
activate()) is executed- Your package magic (e.g. reacting to user input, creating views, modifying a file) comes into action
- You deactivate your package or shut down Atom
- Atom serializes the package state
Conclusion
I hope my article has helped you to get a basic understanding of Atom package development. There is still a lot more functionality, and many topics, which unfortunately can’t be covered in just one article. Take a look into the Atom Flight Manual to see what else is possible.
What package will you develop?
Frequently Asked Questions (FAQs) on Writing Atom Packages Using Vanilla JavaScript
What is Vanilla JavaScript and why is it important in writing Atom packages?
Vanilla JavaScript refers to plain, pure JavaScript without any additional libraries or frameworks. It’s important in writing Atom packages because it allows for a lightweight, efficient, and highly customizable code. Using Vanilla JavaScript, developers can create packages that are faster, more secure, and easier to debug and maintain. It also ensures that the packages are not dependent on any third-party libraries, making them more reliable and robust.
How do I start writing an Atom package using Vanilla JavaScript?
To start writing an Atom package using Vanilla JavaScript, you first need to set up your development environment. This includes installing Node.js and Atom. Once you have these installed, you can use the Atom package generator to create a new package. After that, you can start writing your package using Vanilla JavaScript. Remember to follow the Atom package guidelines to ensure your package is compatible with the Atom editor.
How do I import and export modules in Vanilla JavaScript?
In Vanilla JavaScript, you can use the import and export statements to include modules in your code. The import statement allows you to bring in functions, objects, or values from another module, while the export statement allows you to make certain parts of your module available to other modules. Here’s a basic example:// exporting a function in module.jsexport function myFunction() {
// function code here}// importing the function in another moduleimport { myFunction } from './module.js';
What are the benefits of modularizing code in Vanilla JavaScript?
Modularizing code in Vanilla JavaScript has several benefits. It makes your code more organized, easier to understand, and maintain. It also promotes code reuse, as you can import and use the same module in different parts of your application. Moreover, it helps in managing dependencies, as each module can specify its own dependencies.
How do I debug my Atom package written in Vanilla JavaScript?
Atom provides a built-in developer tools panel that you can use to debug your package. You can open this panel by going to View > Developer > Toggle Developer Tools. Here, you can inspect your code, set breakpoints, and monitor variables and network activity. Additionally, you can use console.log() statements in your code to output values to the console for debugging purposes.
How can I make my Atom package compatible with different versions of Atom?
To ensure your Atom package is compatible with different versions of Atom, you should follow the Atom API guidelines and avoid using deprecated APIs. You should also test your package on different versions of Atom to identify and fix any compatibility issues. Additionally, you can specify the minimum required Atom version in your package’s package.json file.
How do I publish my Atom package?
Once you’ve written and tested your Atom package, you can publish it to the Atom package repository using the apm publish command. Before you can publish, you’ll need to create a new version of your package using the apm version command. You’ll also need to create a GitHub repository for your package and push your code to it.
How can I improve the performance of my Atom package written in Vanilla JavaScript?
There are several ways to improve the performance of your Atom package. One way is to minimize the use of global variables and keep your functions small and focused. You can also use performance profiling tools to identify bottlenecks in your code. Additionally, you should avoid unnecessary DOM manipulations, as these can be expensive in terms of performance.
Can I use ES6 features in my Atom package written in Vanilla JavaScript?
Yes, you can use ES6 features in your Atom package. Atom’s underlying Node.js runtime supports most ES6 features, including let and const declarations, arrow functions, template literals, and more. However, you should ensure that your use of ES6 features does not cause compatibility issues with older versions of Atom.
How do I handle errors in my Atom package written in Vanilla JavaScript?
You can handle errors in your Atom package using try-catch blocks. This allows you to catch and handle exceptions that may occur during the execution of your code. You can also use the atom.notifications API to display error messages to the user. This API provides methods for displaying different types of notifications, including error notifications.
 Moritz Kröger
Moritz is a German front-end developer living in Berlin. Although Germans typically have a thing for extra long compound words, he's a friend of short functions.