

Key Takeaways
- The default forms provided by WordPress often do not match the design and branding of the site, leading to an increasing demand for custom login, registration and password reset forms.
- The tutorial explains how to build a WordPress multi-step registration form using a plugin called ProfilePress, which handles server-side PHP validation, authentication and authorization of custom forms.
- The process involves adding contact information fields to a WordPress user profile, building the multi-step form with HTML, CSS, and JavaScript, and converting the form into a functioning WordPress registration form using the plugin’s melange feature.
- The multi-step form can be customized through CSS, and it can be integrated with other tools or services. It’s crucial to ensure the form is mobile-friendly and to validate user input. If the form is long, it’s possible to save the user’s progress using cookies or local storage.
The default login, registration and password reset forms included in WordPress (outside the website developed with it) often do not conform to the design and branding of the site.
In the past when WordPress was a blogging engine, this was fine. WordPress has since evolved into a content management system, leading to an ever increasing demand for custom login, registration and password reset forms.
In this tutorial, we’ll learn how to build a WordPress multi-step registration form using a plugin that I’ve developed called ProfilePress.
It is worth noting that we’ve previously covered how to build custom login, registration and password reset forms with ProfilePress and a tabbed login and signup widget.
Below is the design of the multi-step registration form which we will have built by the end of this tutorial.
See the Pen Multi Step Registration Form with Progress Bar using jQuery and CSS3 by Agbonghama Collins (@collizo4sky) on CodePen.
If you want to jump ahead of this tutorial, here is a live demo of the form in a WordPress powered site.
Without further ado, let’s jump straight into building the multi-step registration form.
Diving into Coding
In the demo above, the SOCIAL PROFILES section contains a Facebook, Twitter and Google+ field, which aren’t present in the default WordPress user profile. As a result, we need to create contact methods for the above social profile fields in order for WordPress to save the data entered into the fields against the profile of registered users.
Adding Contact Fields Using the ‘functions.php’ File
There are a number of online tutorials that describe how to add contact information fields to a WordPress user profile, including:
- Customise WordPress User Profile’s Contact Info
- Add Extra Contact Methods to User Profiles
- Extend the User Contact Info in WordPress
These tutorials explain that if the following code is pasted into your theme’s functions.php file, it will add a Facebook, Twitter and Google+ field to the contact information section in a WordPress user profile.
function add_contact_methods( $user_contact ){
/* Add user contact methods */
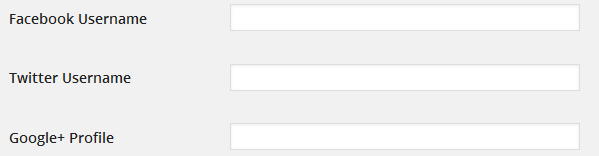
$user_contact['facebook'] = __('Facebook Username');
$user_contact['twitter'] = __('Twitter Username');
$user_contact['google'] = __('Google+ Profile');
return $user_contact;
}
add_filter('user_contactmethods', 'add_contact_methods');
Adding Contact Fields Using the ProfilePress Plugin
Using the plugin, contact information fields can be added by filling a key/label form (see image below). This is located in the Contact information settings page, where key is a unique name used internally by WordPress to recognize the field and label the field description displayed to users.
For more information, take a look at Adding contact info to WordPress profile with ProfilePress plugin.
Navigate to your WordPress profile to see the Facebook, Twitter and Google+ field displayed.
Having added the Facebook, Twitter and Google+ contact info fields to your WordPress profile, you then need to build the multi-step form via the melange feature.
Building the Multi-Step Form
I’m not going to walk us through the process of how the multi-step form is built with HTML, CSS and JavaScript. Feel free to poke around the source code to learn about that. Rather, we’ll learn how to convert the form into an actual, functioning WordPress registration form.
The melange feature of the plugin is capable of converting just about any login, registration password reset and can even edit the profile form template so that a working WordPress equivalent is available (although, this is only available in the premium version of the plugin).
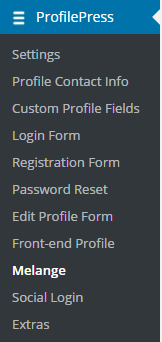
With the plugin installed, click the Melange menu as shown in the image below and then the Add New button to initiate the building process.
A form will be presented to you. Fill the fields as follows.
Enter a name for the form in the Name field. Let’s call it Stride Multistep Signup Form.
Copy the HTML code of the multi-step form to the Melange Design TinyMCE editor and then replace the input fields with their respective shortcode equivalents like so:
<form method="post" novalidate>

    <div id="msform">

        <!-- progressbar -->

        <ul id="progressbar">

            <li class="active">Account Setup</li>

            <li>Social Profiles</li>

            <li>Personal Details</li>

        </ul>

        <!-- fieldsets -->

        <fieldset>

            <h2 class="fs-title">Create your account</h2>
            <h3 class="fs-subtitle">This is step 1</h3>

            [reg-username placeholder="Username"]

            [reg-email placeholder="Email"]

            [reg-password placeholder="Password"]

            <input type="button" name="next" class="next action-button" value="Next"/>

        </fieldset>

        <fieldset>

            <h2 class="fs-title">Social Profiles</h2>
            <h3 class="fs-subtitle">Your presence on social networks</h3>

            [reg-cpf key="twitter" type="text" placeholder="Twitter"]

            [reg-cpf key="facebook" type="text" placeholder="Facebook"]

            [reg-cpf key="google" type="text" placeholder="Google Plus"]

            <input type="button" name="previous" class="previous action-button" value="Previous"/>

            <input type="button" name="next" class="next action-button" value="Next"/>

        </fieldset>

        <fieldset>

            <h2 class="fs-title">Personal Details</h2>
            <h3 class="fs-subtitle">We will never sell it</h3>

            [reg-first-name placeholder="First Name"]

            [reg-last-name placeholder="Last Name"]

            [reg-nickname placeholder="Nickname"]

            [reg-bio placeholder="Biography"]

            <input type="button" name="previous" class="previous action-button" value="Previous"/>

            [reg-submit class="submit action-button" value="Submit"]

        </fieldset>

    </div>

</form>
We could have left the fields in the form the way they were without replacing them with their ProfilePress shortcode equivalent. However, using the shortcodes takes care of adding the correct name attribute for the input fields.
If you can determine the name attribute for the fields (for example, for the username field, the name attribute is reg_username), you might as well do away with using their shortcodes.
Since ProfilePress doesn’t include a text area for inserting JavaScript, the JavaScript code will go into the Melange Design field immediately after the HTML code of the form.
Note: the novalidate attribute was added to the <form> tag to circumvent the annoying “An invalid form control with name=” is not focusable” error in blink-based) browsers (such as Chrome and Opera) that prevents the form from being submitted.
	//jQuery time

	(function ($) {

		var current_fs, next_fs, previous_fs; //fieldsets

		var left, opacity, scale; //fieldset properties which we will animate

		var animating; //flag to prevent quick multi-click glitches
		$(".next").click(function () {

			if (animating) return false;

			animating = true;
			current_fs = $(this).parent();

			next_fs = $(this).parent().next();
			//activate next step on progressbar using the index of next_fs

			$("#progressbar li").eq($("fieldset").index(next_fs)).addClass("active");
			//show the next fieldset

			next_fs.show();

			//hide the current fieldset with style

			current_fs.animate({

				opacity: 0

			}, {

				step: function (now, mx) {

					//as the opacity of current_fs reduces to 0 - stored in "now"

					//1. scale current_fs down to 80%

					scale = 1 - (1 - now) * 0.2;

					//2. bring next_fs from the right(50%)

					left = (now * 50) + "%";

					//3. increase opacity of next_fs to 1 as it moves in

					opacity = 1 - now;

					current_fs.css({

						'transform': 'scale(' + scale + ')'

					});

					next_fs.css({

						'left': left,

						'opacity': opacity

					});

				},

				duration: 800,

				complete: function () {

					current_fs.hide();

					animating = false;

				},

				//this comes from the custom easing plugin

				easing: 'easeInOutBack'

			});

		});
		$(".previous").click(function () {

			if (animating) return false;

			animating = true;
			current_fs = $(this).parent();

			previous_fs = $(this).parent().prev();
			//de-activate current step on progressbar

			$("#progressbar li").eq($("fieldset").index(current_fs)).removeClass("active");
			//show the previous fieldset

			previous_fs.show();

			//hide the current fieldset with style

			current_fs.animate({

				opacity: 0

			}, {

				step: function (now, mx) {

					//as the opacity of current_fs reduces to 0 - stored in "now"

					//1. scale previous_fs from 80% to 100%

					scale = 0.8 + (1 - now) * 0.2;

					//2. take current_fs to the right(50%) - from 0%

					left = ((1 - now) * 50) + "%";

					//3. increase opacity of previous_fs to 1 as it moves in

					opacity = 1 - now;

					current_fs.css({

						'left': left

					});

					previous_fs.css({

						'transform': 'scale(' + scale + ')',

						'opacity': opacity

					});

				},

				duration: 800,

				complete: function () {

					current_fs.hide();

					animating = false;

				},

				//this comes from the custom easing plugin

				easing: 'easeInOutBack'

			});

		});
	})(jQuery);
Code explanation: firstly, we included a deferred call to the jQuery Easing library. This was done to add an easing effect to the form followed by the JavaScript codes that actually handle the multi-stepping.
Paste the CSS of the multi-step form into the CSS Stylesheet code area.

Note: Errors generated by registration forms powered by ProfilePress are wrapped in a div with class name profilepress-reg-status, hence the class in the style sheet.
Enter the code below in Registration Success field to display a customized notice on successful user registration.

Save the form and navigate back to the melange catalog.
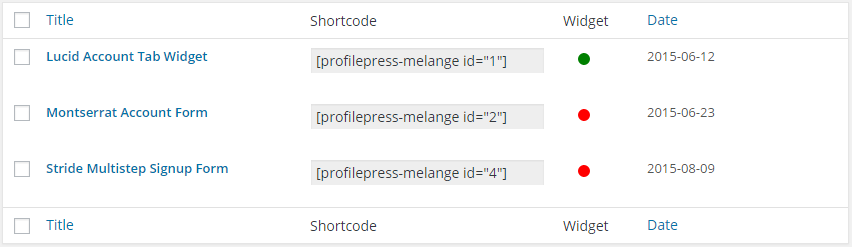
Copy the generated shortcode and paste it to a WordPress page of your choosing.
Save the page, then preview to see the multi-step registration in action.
A live demo of the multi-step registration form is available here.
Summary
In this tutorial, we learned how to build a WordPress multi-step registration form using a plugin I developed called ProfilePress. This plugin handles server-side PHP validation, authentication and authorization of custom login, registration, password reset and front-end edit profile forms.
If you have any questions, suggestions or contributions, please let me know in the comments.
Frequently Asked Questions (FAQs) about Building a Multi-Step Registration Form for WordPress
How can I create a multi-step form without using a plugin?
Creating a multi-step form without using a plugin involves coding. You need to have a basic understanding of HTML, CSS, and JavaScript. The process involves creating an HTML form, styling it with CSS, and then using JavaScript to control the form’s steps. You can also use AJAX to submit the form without refreshing the page. However, this method requires a good understanding of these languages and WordPress development. If you’re not comfortable with coding, using a plugin might be a better option.
Can I use a multi-step form for other purposes besides registration?
Absolutely! Multi-step forms can be used for a variety of purposes. They are particularly useful when you need to collect a lot of information from users. For example, you can use them for surveys, job applications, or complex contact forms. The key is to break down the information into manageable chunks to make it easier for users to complete the form.
How can I customize the look of my multi-step form?
Customizing the look of your multi-step form can be done through CSS. You can change the colors, fonts, button styles, and more. If you’re using a plugin, it might come with customization options. For example, some plugins allow you to choose from different layout templates or add custom CSS.
Is it possible to add conditional logic to my multi-step form?
Yes, it’s possible to add conditional logic to your multi-step form. This means that the form’s steps or fields can change based on the user’s input. For example, you might want to show different questions based on the user’s previous answers. This can be done through JavaScript or with the help of a plugin that supports conditional logic.
How can I ensure my multi-step form is mobile-friendly?
Ensuring your multi-step form is mobile-friendly is crucial for user experience. You can do this by using responsive design techniques. This means that the form’s layout and elements will automatically adjust to fit different screen sizes. If you’re using a plugin, make sure it supports responsive design.
Can I save the user’s progress in the multi-step form?
Yes, it’s possible to save the user’s progress in the multi-step form. This can be useful if the form is long and users might not complete it in one session. You can do this by using cookies or local storage in the user’s browser. Some plugins also offer this feature.
How can I validate the user’s input in the multi-step form?
Validating the user’s input is important to ensure you’re collecting the correct information. You can do this by using JavaScript to check the input before the form is submitted. Some plugins also offer built-in validation features.
Can I integrate my multi-step form with other tools or services?
Yes, you can integrate your multi-step form with other tools or services. For example, you might want to send the form data to an email marketing service or a CRM. This can be done through APIs or with the help of a plugin that supports integrations.
How can I test my multi-step form to ensure it’s working correctly?
Testing your multi-step form is crucial to ensure it’s working correctly. You can do this by filling out the form yourself and checking if the data is correctly saved or sent. You should also test the form on different devices and browsers to ensure it’s responsive and compatible.
What should I do if I encounter problems while creating my multi-step form?
If you encounter problems while creating your multi-step form, you can try troubleshooting the issue yourself by checking your code or plugin settings. If you’re still having trouble, you can seek help from online communities, forums, or the plugin’s support team. Remember, it’s okay to ask for help when you need it.

