

Key Takeaways
- The article provides a detailed guide on how to build a custom tabbed WordPress login and registration widget, which can better reflect the design and branding of a client or web developer compared to the default WordPress pages.
- The widget is built using the QuickFlip jQuery library to create a flipping effect between the login and registration tabs. The registration form includes a username, password, and email field, while the login form does not have a CAPTCHA.
- The author walks through the process of creating the widget, including turning on output buffering, extending the standard WP_Widget class, creating a child-class, and registering the widget. The article also explains how to create HTML code for the login and registration forms, handle new user registration, sign in users, and create the back-end widget settings form.
- The article also answers several frequently asked questions about building a tabbed WordPress login and registration widget, including how to customize the widget, add it without coding, resolve issues with accessing the WordPress admin, add a login form to the WordPress sidebar, change the default WordPress login URL, ensure the widget’s security, add a registration form to the sidebar, resolve issues with the widget not working properly, and add social login options.
In the last few years, there has been an increasing demand for a customised registration widget for WordPress. There exists a healthy disrespect for the WordPress default login and registration pages, solely because they are not intuitive as they may not reflect the design and branding of a client or a web developer.
To solve this problem, a couple of developers have released several kinds of login and registration pages, but the good ones come with a price and they don’t come cheap.
However, if you have been on the fence or overall disappointed with what’s available for free on the WordPress plugin repository, you can have your spirit lifted because you can learn how to create a tabbed WordPress login and registration widget for free! You only need to sacrifice a short period of your time to get a grasp of the entire process. Once you acquire the knowledge which is pretty simple; you should have a feature rich registration page on your WordPress powered sites.
In this article, we will build a simple tabbed login and registration form widget with a flipping effect made possible by the QuickFlip jQuery library.
If you want to jump ahead of the tutorial, you can view a demo of the login and registration widget and download the widget plugin.
To keep things simple, the registration form will consist of a username, password and email field. The login form will contain no CAPTCHA.
Without further fussing, let’s get started with the widget development.
Widget Development
First off, include the plugin header.
<?php

/*

Plugin Name: Tabbed Login Registration Widget

Plugin URI: https://www.sitepoint.com

Description: A tabbed login and registration widget for WordPress

Version: 1.0

Author: Agbonghama Collins

Author URI: http://w3guy.com

License: GPL2

*/
Before we enter into the widget development properly, we need to turn on output buffering to prevent any Warning: Cannot modify header information – headers already sent error.
// Turn on output buffering

ob_start();
To create a WordPress widget, extend the standard WP_Widget class, include the necessary methods and finally, register the widget.
Create a child-class extending the WP_Widget class.
class Tab_Login_Registration extends WP_Widget {
The static property $login_registration_status will save the registration and login form generated error messages.
static private $login_registration_status;
Give the widget a name and description using the __construct() magic method.
/**

	 * Register widget with WordPress.

	 */

	function __construct() {

		parent::__construct(

			'tab_login_registration', // Base ID

			__( 'Tabbed Login Registration Widget', 'text_domain' ), // Name

			array( 'description' => __( 'A tabbed login and registration widget for WordPress', 'text_domain' ), ) // Args

		);

	}
Two methods – login_form() and registration_form() – that returns the HTML code for the login and registration form will be created for reuse later.
/**

	 * Returns the HTML for the login form

	 * @return string

	 */

	static function login_form() {

		$html = '<form method="post" action="' . esc_url( $_SERVER['REQUEST_URI'] ) . '">';

		$html .= '<input type="text" name="login_username" placeholder="Username" /><br/>';

		$html .= '<input type="password" name="login_password" placeholder="Password" /><br/>';

		$html .= '<input type="checkbox" name="remember_login" value="true" checked="checked"/> Remember Me<br/>';

		$html .= '<input type="submit" name="login_submit" value="Login" /><br/>';

		$html .= '</form>';
		return $html;
	}
/**

	 * Returns the HTML code for the registration form

	 * @return string

	 */

	static function registration_form() {

		$html = '<form method="post" action="' . esc_url( $_SERVER['REQUEST_URI'] ) . '">';

		$html .= '<input type="text" name="registration_username" placeholder="Username" /><br/>';

		$html .= '<input type="password" name="registration_password" placeholder="Password" /><br/>';

		$html .= '<input type="email" name="registration_email" placeholder="Email" /><br/>';

		$html .= '<input type="submit" name="reg_submit" value="Sign Up" /><br/>';

		$html .= '</form>';
		return $html;

	}
The register_user() below handles the registration of a new user.
/**

	 * Register new users

	 */

	function register_user() {
		if ( isset( $_POST['reg_submit'] ) ) {
			$username = esc_attr( $_POST['registration_username'] );

			$password = esc_attr( $_POST['registration_password'] );

			$email    = esc_attr( $_POST['registration_email'] );
			$register_user = wp_create_user( $username, $password, $email );
			if ( $register_user && ! is_wp_error( $register_user ) ) {
				self::$login_registration_status = 'Registration completed.';

			} elseif ( is_wp_error( $register_user ) ) {

				self::$login_registration_status = $register_user->get_error_message();

			}
		}

	}
Here’s how the method registers a new user.
First, we make sure the user is actually registering an account. This is done by detecting that the ‘Sign Up’ button was clicked i.e. $_POST['reg_submit'] has been set.
The form data are then escaped for HTML attributes using the esc_attr function.
The username, password and email entered by the user are then passed to wp_create_user() function to insert the new user into the WordPress database.
If all goes well, the property $login_registration_status will be set to the text Registration completed otherwise the error returned by wp_create_user() will be it value.
When the login form is submitted, the login_user() function below sign in the user.
/**

	 * Login registered users

	 */

	function login_user() {

		if ( isset( $_POST['login_submit'] ) ) {
			$creds                  = array();

			$creds['user_login']    = esc_attr( $_POST['login_username'] );

			$creds['user_password'] = esc_attr( $_POST['login_password'] );

			$creds['remember']      = esc_attr( $_POST['remember_login'] );
			$login_user = wp_signon( $creds, false );
			if ( ! is_wp_error( $login_user ) ) {

				wp_redirect( home_url( 'wp-admin' ) );

			} elseif ( is_wp_error( $login_user ) ) {

				self::$login_registration_status = $login_user->get_error_message();

			}

		}

	}
Allow me to explain how login_user() sign in users to WordPress.
Similar to the aforementioned register_user(), first we ensure the user is trying to log in by checking if $_POST['login_submit'] has been set.
An associated array $creds of the login credentials entered by the user is created.
The associative array is then passed to wp_signon for authentication.
If the credential is deemed valid and by wp_signon, the user will be redirected to the WordPress dashboard by wp_redirect otherwise property $login_registration_status is set to the login generated error.
The back-end widget settings form is created by the form() method that will consist of a field that will contain the title of the widget.
public function form( $instance ) {

		if ( isset( $instance['title'] ) ) {

			$title = $instance['title'];

		} else {

			$title = __( 'Login / Registration', 'text_domain' );

		}

		?>

		<p>

			<label for="<?php echo $this->get_field_id( 'title' ); ?>"><?php _e( 'Title:' ); ?></label>

			<input class="widefat" id="<?php echo $this->get_field_id( 'title' ); ?>"

			       name="<?php echo $this->get_field_name( 'title' ); ?>" type="text"

			       value="<?php echo esc_attr( $title ); ?>">

		</p>

	<?php

	}

When the widget title is entered into the form field, the update() method sanitizes and saves the data to the database for reuse.
public function update( $new_instance, $old_instance ) {

		$instance          = array();

		$instance['title'] = ( ! empty( $new_instance['title'] ) ) ? strip_tags( $new_instance['title'] ) : '';
		return $instance;

	}
The widget() method displays the tabbed login and registration form at the front-end of WordPress.
public function widget( $args, $instance ) { ?>

		<script type="text/javascript">

			$('document').ready(function () {

				$('#flip-container').quickFlip();
				$('#flip-navigation li a').each(function () {

					$(this).click(function () {

						$('#flip-navigation li').each(function () {

							$(this).removeClass('selected');

						});

						$(this).parent().addClass('selected');

						var flipid = $(this).attr('id').substr(4);

						$('#flip-container').quickFlipper({}, flipid, 1);
						return false;

					});

				});

			});

		</script>
		<?php

		$title = apply_filters( 'widget_title', $instance['title'] );
		echo $args['before_widget'];

		if ( ! empty( $title ) ) {

			echo $args['before_title'] . $title . $args['after_title'];

		} ?>
		<?php $this->login_user(); ?>
		<?php $this->register_user(); ?>
		<div class="login-reg-error"><?php echo self::$login_registration_status; ?></div>

		<div id="flip-tabs">

			<ul id="flip-navigation">

				<li class="selected"><a href="#" id="tab-0">Login</a></li>

				<li><a href="#" id="tab-1">Register</a></li>

			</ul>

			<div id="flip-container">

				<div>

					<ul class="orange">

						<?php echo self::login_form(); ?>

					</ul>

				</div>

				<div>

					<ul class="green">

						<?php echo self::registration_form(); ?>

					</ul>

				</div>

			</div>

		</div>
		<?php

		echo $args['after_widget'];

	}
Code explanation: The JavaScript code add the tabbing and flipping effect to the widget.
The login_user() and register_user() are included to respectively sign in a registered user or register a new user.
The login_form() and registration_form() static methods are called to display the login and registration form.
Finally, we close the widget class.
} // class Tab_Login_Registration
The widget class Tab_Login_Registration needs to be registered using the widgets_init hook so it is recognized by WordPress internals.
// register Foo_Widget widget

function register_tab_login_registration() {

	register_widget( 'Tab_Login_Registration' );

}
add_action( 'widgets_init', 'register_tab_login_registration' );
We still need to include jQuery, the widget CSS and QuickFlip library to get the tab and flipping effect in the widget working.
The jQuery, and Quickflip javascript as well as the CSS are included/enqueue to the header of WordPress by wp_enqueue_style and wp_enqueue_script.
function plugin_assets() {

	wp_enqueue_style( 'tlrw-styles', plugins_url( 'css/styles.css', __FILE__ ) );

	wp_enqueue_script( 'tlrw-jquery', plugins_url( 'js/jquery.js', __FILE__ ) );

	wp_enqueue_script( 'tlrw-quickflip', plugins_url( 'js/jquery.quickflip.js', __FILE__ ) );

}
add_action( 'wp_enqueue_scripts', 'plugin_assets' );
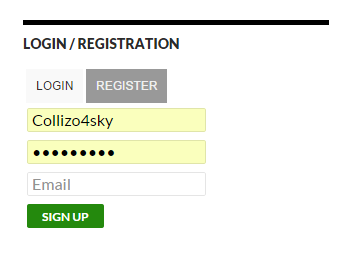
We are done coding the login and registration widget.
Below is a screenshot of the widget.
Wrap Up
To further understand how the widget was built and how to implement it on your WordPress site, download the widget plugin, which includes the jQuery, Quickflip, and the widget stylesheet files.
If you have any questions or suggestions for code improvement, let me know in the comments.
Frequently Asked Questions about Building a Tabbed WordPress Login and Registration Widget
How can I customize the look of my WordPress login and registration widget?
Customizing the look of your WordPress login and registration widget can be done through CSS. You can add your own CSS in the WordPress Customizer or in your theme’s style.css file. You can change the colors, fonts, sizes, and more to match your website’s design. Remember to always backup your site before making any changes to the code.
Can I add a login and registration widget to my WordPress site without coding?
Yes, you can add a login and registration widget to your WordPress site without coding. There are several plugins available that allow you to do this. Some popular options include Login Sidebar Widget and User Registration & User Profile. These plugins offer easy-to-use interfaces and customization options.
What should I do if I can’t access my WordPress admin after adding a login and registration widget?
If you can’t access your WordPress admin after adding a login and registration widget, you may need to disable the plugin causing the issue. You can do this by accessing your site’s files via FTP and renaming the plugin’s folder. Once you’ve done this, try logging in again. If you’re still having trouble, you may need to contact your hosting provider or seek help from a WordPress expert.
How can I add a login form to my WordPress sidebar?
Adding a login form to your WordPress sidebar can be done using a widget. Go to Appearance > Widgets in your WordPress dashboard, and drag the Meta widget to your sidebar. The Meta widget includes a login link that will display a login form when clicked.
Can I change my default WordPress login URL?
Yes, you can change your default WordPress login URL for security reasons. This can be done using a plugin like WPS Hide Login or manually by editing your site’s .htaccess file. Remember to note down your new login URL and keep it safe.
Are there any other plugins I can use to add a login widget to my WordPress site?
Yes, there are many plugins available that allow you to add a login widget to your WordPress site. Some popular options include Custom Login Page Customizer, Login Designer, and Theme My Login. These plugins offer a variety of features and customization options.
How can I ensure the security of my WordPress login and registration widget?
To ensure the security of your WordPress login and registration widget, make sure to use a strong, unique password and keep your WordPress site and plugins up-to-date. You can also use security plugins like Wordfence or Sucuri to add an extra layer of protection.
Can I add a registration form to my WordPress sidebar?
Yes, you can add a registration form to your WordPress sidebar using a widget. There are several plugins available that allow you to do this, such as User Registration & User Profile. These plugins offer easy-to-use interfaces and customization options.
What should I do if my login and registration widget is not working properly?
If your login and registration widget is not working properly, try deactivating and reactivating the plugin. If this doesn’t solve the issue, it may be a conflict with another plugin or your theme. Try deactivating other plugins one by one to see if the issue is resolved. If not, you may need to contact the plugin’s support or seek help from a WordPress expert.
Can I add social login options to my WordPress login and registration widget?
Yes, you can add social login options to your WordPress login and registration widget. There are several plugins available that allow you to do this, such as Nextend Social Login and WP Social Login. These plugins allow users to register and login using their social media accounts, making the process quicker and easier.

