

One of the side effects of building your site with PHP, as opposed to plain HTML, is that you’ll be building dynamic Web applications rather than static Web pages. Your site will let you “do” things that weren’t possible with plain HTML. But how can you ensure that only you, or those to whom you give permission, are able to “do things,” and prevent the Internet’s raging hordes from running riot on your site?
In this chapter, we’ll be looking at the mechanisms you can employ with PHP to build authentication systems and control access to the parts of your site you regard as private.
One word of warning before I go any further: any system you build, which involves the transfer of data from a Web page over the Internet, will send that information in clear text by default (Web servers that require Secure Socket Layer (SSL) connections will safely encrypt the data during transit. This is the best way to protect sensitive data in today’s Web applications). What this means is that if someone is “listening in” on the network between the client’s Web browser and the Web server, which is possible using a tool known as a packet sniffer, they will be able to read the user name and password sent via your form. The chances of this happening are fairly small, as typically only trusted organizations like ISPs have the access require to intercept packets. However, there is still a risk, and it’s one you should take seriously.
In addition to strategies for building access control systems for your site, in this chapter you’ll find plenty of references to useful information (there are more in Appendix C, Security Checklist). I can’t stress enough the importance of a little healthy paranoia in building Web-based applications. The SitePoint Forums frequently receive visits from would-be Website developers who got their fingers burned when it came to site security.
This chapter requires the following MySQL tables, in addition to the user table from Chapter 9, Web Page Elements. Note that you’ll find the SQL code to create all of these, along with sample data, in the code archive in the sql/ directory.
First, you’ll need a table for storing temporary sign up information:
CREATE TABLE signup (

  signup_id    INT(11)     NOT NULL AUTO_INCREMENT,

  login        VARCHAR(50) NOT NULL DEFAULT '',

  password     VARCHAR(50) NOT NULL DEFAULT '',

  email        VARCHAR(50) DEFAULT NULL,

  firstName    VARCHAR(50) DEFAULT NULL,

  lastName     VARCHAR(50) DEFAULT NULL,

  signature    TEXT        NOT NULL,

  confirm_code VARCHAR(40) NOT NULL DEFAULT '',

  created      INT(11)     NOT NULL DEFAULT '0',

  PRIMARY KEY (signup_id),

  UNIQUE KEY confirm_code (confirm_code),

  UNIQUE KEY user_login (login),

  UNIQUE KEY email (email)

)
You’ll need a table for storing groups (Note that I’ve called this table collection. The name “group” would cause problems, as GROUP is a keyword in SELECT query syntax):
CREATE TABLE collection (

  collection_id INT(11)     NOT NULL auto_increment,

  name          VARCHAR(50) NOT NULL default '',

  description   TEXT        NOT NULL,

  PRIMARY KEY (collection_id)

)
Next, there’s a lookup table between users and groups:
CREATE TABLE user2collection (

  user_id       INT(11)     NOT NULL default '0',

  collection_id INT(11)     NOT NULL default '0',

  PRIMARY KEY (user_id, collection_id)

)
Don’t forget this table for storing permissions:
CREATE TABLE permission (

  permission_id INT(11)     NOT NULL AUTO_INCREMENT,

  name          VARCHAR(50) NOT NULL DEFAULT '',

  description   TEXT        NOT NULL,

  PRIMARY KEY (permission_id)

)
And finally, you’ll need this lookup table between groups and permissions:
CREATE TABLE collection2permission (

  collection_id INT(11)     NOT NULL DEFAULT '0',

  permission_id INT(11)     NOT NULL DEFAULT '0',

  PRIMARY KEY (collection_id, permission_id)

)
How do I use HTTP authentication with PHP?
Hypertext Transfer Protocol (HTTP) defines its own authentication mechanisms, namely “Basic” and “Digest” authentication, which are defined in PHP Manual.
Heads Up
The first thing to understand is what actually happens when your browser sends a request to a Web server to give it a Web page. HTTP is the protocol for communication between a browser and a Web server. When your Web browser sends a request to a Web server, it uses an HTTP request to tell the server which page it wants. The server then replies with an HTTP response that describes the type and characteristics of the document being sent, then delivers the document itself.
For example, a client might send the following request to a server:
GET /subcat/98 HTTP/1.1

Host: www.sitepoint.com
Here’s what it might get back from the server:
HTTP/1.1 200 OK

Date: Tue, 25 Feb 2003 15:18:24 GMT

Server: Apache/1.3.27 (Unix) PHP/4.3.1

X-Powered-By: PHP/4.3.1

Connection: close

Content-Type: text/html


<!DOCTYPE html PUBLIC "-//W3C//DTD XHTML 1.0 Strict//EN"

"https://www.w3.org/TR/xhtml1/DTD/xhtml1-strict.dtd">

<html xmlns="https://www.w3.org/1999/xhtml">

<head>

<title>SitePoint : Empowering Web Developers Since 1997</title>

...
Don’t believe me? Try it for yourself:
Example 1.1. 1.php


<?php

// Connect to sitepoint.com

$fp = fsockopen('www.sitepoint.com', '80');


// Send the request

fputs($fp,

  "GET /subcat/98 HTTP/1.1rnHost: www.sitepoint.comrnrn");


// Fetch the response

$response = '';

while (!feof($fp)) {

  $response .= fgets($fp, 128);

}

fclose($fp);


// Convert HTML to entities

$response = htmlspecialchars($response);


// Display the response

echo nl2br($response);

?>
Authentication headers are additional headers used by a server to instruct the browser that it must send a valid user name and password in order to view the page.
In response to a normal request for a page secured with basic HTTP authentication, a server might respond with headers like these:
HTTP/1.1 401 Authorization Required

Date: Tue, 25 Feb 2003 15:41:54 GMT

Server: Apache/1.3.27 (Unix) PHP/4.3.1

X-Powered-By: PHP/4.3.1

WWW-Authenticate: Basic realm="PHP Secured"

Connection: close

Content-Type: text/html
No further information is sent, but notice the status code HTTP/1.1 401 Authorization Required and the WWW-Authenticate header. Together, these indicate that the page is protected by HTTP authentication, and is not available to an unauthorized user. How a visitor’s browser goes about dealing with this information may vary, but, usually, the user will see a small pop-up dialog box like that shown in Figure 1.1.
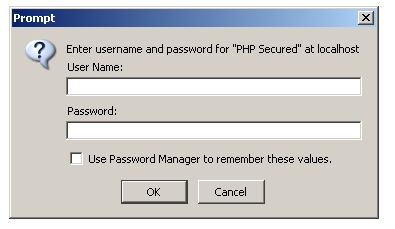
Figure 1.1. Let Me In!
The dialog prompts site visitors to enter their user names and passwords. If visitors using Internet Explorer enter these login details incorrectly three times, the browser will display the “Unauthorized” message instead of displaying the prompt again. In other browsers, such as Opera, users may be able to continue trying indefinitely.
Notice that the realm value specified in the WWW-Authenticate header is displayed in the dialog box. A realm is a “security space” or “zone” within which a particular set of login details are valid. Upon successful authentication, the browser will remember the correct user name and password combination and automatically re-send it in any future request to that realm. When the user navigates to another realm, however, the browser displays a fresh prompt once again.
In any case, the user must provide a user name and password to get the page. The browser then sends those credentials with a second page request like this:
GET /admin/ HTTP/1.1

Host: www.sitepoint.com

Authorization: Basic jTSAbT766yN0hGjUi
The Authorization header contains the user name and password encoded with base64 encoding which, it is worth noting, is not secure – but at least makes it unreadable for humans.
The server will check to ensure that the credentials are valid. If they are not, the server will send the Authorization Required response again, as shown previously. If the credentials are valid, the server will send the requested page as normal.
Not by the Hairs of my Chin…
Now that you have a rough idea of how HTTP authentication works, how might you secure a PHP page with it? When PHP receives an Authorization header from a Web browser, it automatically decodes the user name and password combination and stores the values in the variables $_SERVER['PHP_AUTH_USER'] and $_SERVER['PHP_AUTH_PW'] for the user name and password, respectively. Here’s how you could secure a simple page:
Example 1.2. 2.php


<?php

// An array of allowed users and their passwords

$users = array(

  'harryf' => 'secret',

  'littlepig' => 'chinny'

);


// If there's no Authentication header, exit

if (!isset($_SERVER['PHP_AUTH_USER'])) {

  header('HTTP/1.1 401 Unauthorized');

  header('WWW-Authenticate: Basic realm="PHP Secured"');

  exit('This page requires authentication');

}


// If the user name doesn't exist, exit

if (!isset($users[$_SERVER['PHP_AUTH_USER']])) {

  header('HTTP/1.1 401 Unauthorized');

  header('WWW-Authenticate: Basic realm="PHP Secured"');

  exit('Unauthorized!');

}


// Is the password doesn't match the username, exit

if ($users[$_SERVER['PHP_AUTH_USER']] != $_SERVER['PHP_AUTH_PW'])

{

  header('HTTP/1.1 401 Unauthorized');

  header('WWW-Authenticate: Basic realm="PHP Secured"');

  exit('Unauthorized!');

}


echo 'You're in';

?>
First, the script checks to see if an authentication has been sent by the browser; if it hasn’t, the script sends the Authorization Required headers and terminates. If login details were submitted, it checks that the submitted user name actually exists. If we hadn’t checked this, we’d get a PHP notice stating that the array key didn’t exist when performing the third check on particular PHP configurations (see Chapter 10, Error Handling). The third check ensures that the user name and password combination in the $users array matches the details sent by the Web browser.
Note that we could also have checked the user name and password against a table in a database – something we’ll look at in the section called “How do I authenticate users with sessions?”.
When to Send Headers
In PHP, the moment your script outputs anything that’s meant for display, the Web server finishes sending the headers and begins to send the content itself. You cannot send further HTTP headers once the body of the HTTP message – the Web page itself – has begun to be sent. This means that if you use the header function or session_start after the body has begun, you’ll get an error message like this:
Warning: Cannot add header information - headers already

sent by (output started at...
Remember, any text or whitespace outside the <?php ... ?> tags causes output to be sent to the browser. If you have whitespace before a <?php tag or after a ?> tag, you won’t be able to send headers to the browser past that point.
This type of authentication is handy in that it’s easy to implement, but it’s none too pretty in terms of the user experience. It does present a useful authentication mechanism for use with Web services, however – something we’ll see in Chapter 2, XML.
Note that PEAR provides the Auth_HTTP package, which you should consider if you’re planning to use HTTP authentication in earnest, as it will help you avoid making critical errors. For a detailed discussion of PEAR, consult Appendix D, Working with PEAR.
How do I authenticate users with sessions?
Sessions are a mechanism that allows PHP to preserve state between executions. In simple terms, sessions allow you to store variables from one page and use them on another. So if a visitor tells you his name is “Bob” (via a form) on one page, sessions will help you remember his name and allow you to, for instance, place on all the other pages of your site personal messages such as, “Where would you like to go today, Bob?” (don’t be surprised if Bob leaves pretty quickly, though).
The basic mechanism of sessions works like this: first, PHP generates a unique, thirty-two character string to identify the session. It then passes the value to the browser; simultaneously, it creates a file on the server and includes the session ID in the filename. There are two methods by which PHP can inform a browser of its session ID: by adding the ID to the query string of all relative links on the page, or by sending it as a cookie. Within the file that’s stored on the server, PHP saves the names and values of the variables it has been told to store for the session.
When the browser makes a request for another page, it tells PHP which session it was assigned via the URL query string, or by returning the cookie. PHP then looks up the file it created when the session was started, and so has access to the data stored within the session.
Once the session has been established, it will continue until it is specifically destroyed by PHP (in response to a user clicking “Log out,” for example), or the session has been inactive for longer than a given period of time (24 minutes by default), at which point it becomes flagged for garbage collection and will be deleted the next time PHP checks for outdated sessions.
The following HTTP response headers show a server passing a session cookie to a browser, as a result of the session_start function in a PHP script:
HTTP/1.1 200 OK

Date: Wed, 26 Feb 2003 02:23:08 GMT

Server: Apache/1.3.27 (Unix) PHP/4.3.1

X-Powered-By: PHP/4.3.1

Set-Cookie: PHPSESSID=ce558537fb4aefe349bb8d48c5dcc6d3; path=/

Connection: close

Content-Type: text/html


<!DOCTYPE html PUBLIC "-//W3C//DTD XHTML 1.0 Strict//EN"

"https://www.w3.org/TR/xhtml1/DTD/xhtml1-strict.dtd">

<html xmlns="https://www.w3.org/1999/xhtml">

...
Note that I’ve said sessions are stored on the server as files. It’s also possible to store sessions using other means, such as a database or even shared memory. This can be useful for displaying “Who is Online” type information as well as load balancing multiple Web servers using a single session repository, allowing visitors to (unknowingly) swap servers while maintaining their session.
Session Security
Sessions are very useful, but there are some important security considerations you should take into account when using them in your applications:
- By default, all a browser has to do to gain control of a session is pass a valid session ID to PHP. In an ideal world, you could store the IP address that registered the session, and double check it on every new request that used the associated session ID. Unfortunately, some ISPs, such as AOL, assign their users a new IP on almost every page request, so this type of security mechanism would soon start throwing valid users out of the system. As such, it’s important to design your application in a manner that assumes that one of your users will eventually have his or her session “hijacked.” The user’s account is only exposed as long as the session hasn’t expired, so your focus should be on preventing the hijackers from doing serious damage while they’re in the system. This means, for example, that for logged-in users to change their accounts’ passwords, they should be asked to provide their old passwords – obviously, hijackers won’t know these. Also, be careful with the personal information you make available to users (such as credit card details), and if you give users the opportunity to make significant changes to their accounts, for instance, changing a shipping address, be sure to send a summary notification to their email address (this will alert users whose sessions have been hijacked).
To keep the session ID completely hidden, you’ll need to use SSL to encrypt the conversation. What’s more, you should only use the cookie method of passing the session ID. If you pass it in the URL, you may give away the session ID upon referring the visitor to another site, thanks to the
referrerheader in the HTTP request. - The files PHP creates for the purpose of storing session information are, by default, stored in the temporary directory of the operating system under which PHP is running. On Unix based systems such as Linux, this will be
/tmp. And, if you’re on a shared server, this will mean that other users on the server can read the files’ contents. They may not be able to identify which virtual host and PHP script are the owners of the session but, depending on the information you place there, they may be able to guess.This is a serious cause for concern on shared PHP systems; the most effective solution is to store your sessions in a database, rather than the server’s temporary directory. We’ll look more closely at custom session handlers later in this chapter, but a partial solution is to set the
session.save_pathoption to a directory that’s not available to the public. You’ll need to contact your hosting company in order to have set the correct permissions for that directory, so that the ‘nobody’ or ‘wwwuser’ user with which PHP runs has access to read, write, and delete files in that directory.Session IDs and Cross-Site Scripting
One final warning: using a common Web security exploit, cross-site scripting (XSS), it’s possible for an attacker to place JavaScript on your site that will cause visitors to give away their session ID to a remote Website, thereby allowing their sessions to be hijacked. If you allow your visitors to post any HTML, make sure you check and validate it very carefully (see Appendix C, Security Checklist for more on XSS and Chapter 5, Text Manipulation for an HTML filtering mechanism).
Remember the golden rules: never rely on client side technologies (such as JavaScript) to handle security and never trust anything you get from a browser.
Getting Started
I hope that introduction hasn’t made you so paranoid about using sessions that you’ll never touch them. In general, sessions offer a mechanism that is both simple to use and powerful – it’s an essential tool for building online applications.
The first development trick you need to know is that you should always access session variables using their predefined global variable $_SESSION, not the functions session_register and session_unregister. These functions fail to work correctly when PHP’s register_globals setting has been disabled, which is the way you should be programming with PHP (see Appendix A, PHP Configuration for details).
To start off slowly, here’s a simple example of how sessions can be used:
Example 1.3. 3.php


<?php

session_start();


// If session variable doesn't exist, register it

if (!isset($_SESSION['test'])) {

  $_SESSION['test'] = 'Hello World!';

  echo '$_SESSION['test'] is registered.<br />' .

       'Please refresh page';

} else {

  // It's registered so display it

  echo '$_SESSION['test'] = ' . $_SESSION['test'];

}

?>
The first order of business in a script that uses sessions is to call session_start to load any existing session variables.
This script registers the session variable the first time the page is displayed. The next time (and all times thereafter, until the session times out through inactivity), the script will display the value of the session variable.
That’s a simple example of how sessions can be used. We’ll use them to store the value of a user name and password shortly, but first, we need to put together some classes that will collaborate to deal with both sessions and authentication. Don’t panic! The classes themselves may get fairly complex, but using them from an external script will be easy.
First, let’s develop a class for sessions. All code will use this class to access sessions, rather than using the $_SESSION variable directly. This has the advantage that if we ever want to switch to an alternative session handling mechanism, such as one we’ve built ourselves, we simply need to modify the class, rather than rewriting a lot of code. We can provide an interface to the $_SESSION variable with a few simple methods:
Example 1.4. Session/Session.php (in SPLIB)


<?php

/**

 * A wrapper around PHP's session functions

 * <code>

 * $session = new Session();

 * $session->set('message','Hello World!');

 * echo ( $session->get('message'); // Displays 'Hello World!'

 * </code>

 * @package SPLIB

 * @access public

 */

class Session {

  /**

   * Session constructor<br />

   * Starts the session with session_start()

   * <b>Note:</b> that if the session has already started,

   * session_start() does nothing

   * @access public

   */

  function Session()

  {

    session_start();

  }


  /**

   * Sets a session variable

   * @param string name of variable

   * @param mixed value of variable

   * @return void

   * @access public

   */

  function set($name, $value)

  {

    $_SESSION[$name] = $value;

  }


  /**

   * Fetches a session variable

   * @param string name of variable

   * @return mixed value of session varaible

   * @access public

   */

  function get($name)

  {

    if (isset($_SESSION[$name])) {

      return $_SESSION[$name];

    } else {

      return false;

    }

  }


  /**

   * Deletes a session variable

   * @param string name of variable

   * @return void

   * @access public

   */

  function del($name)

  {

    unset($_SESSION[$name]);

  }


  /**

   * Destroys the whole session

   * @return void

   * @access public

   */

  function destroy()

  {

    $_SESSION = array();

    session_destroy();

  }

}

?>
Next, we build an authentication class, called Auth, which will use the MySQL class we saw in earlier chapters, as well as the above Session class.
We begin by defining a few constants that will make it easy to customize this class for different environments:
Example 1.5. AccessControl/Auth.php (in SPLIB) (excerpt)


// Name to use for login variable e.g. $_POST['login']

@define('USER_LOGIN_VAR', 'login');

// Name to use for password variable e.g. $_POST['password']

@define('USER_PASSW_VAR', 'password');


# Modify these constants to match your user login table

// Name of users table

@define('USER_TABLE', 'user');

// Name of login column in table

@define('USER_TABLE_LOGIN', 'login');

// Name of password column in table

@define('USER_TABLE_PASSW', 'password');
The first two constants are for the names of the user name and password fields of the login form we’ll build in a moment. The next three provide details of the table in which user information is stored.
Next come the properties and constructor for the class:
Example 1.6. AccessControl/Auth.php (in SPLIB) (excerpt)


/**

 * Authentication class<br />

 * Automatically authenticates users on construction<br />

 * <b>Note:</b> requires the Session/Session class be available

 * @access public

 * @package SPLIB

 */

class Auth {

  /**

   * Instance of database connection class

   * @access private

   * @var object

   */

  var $db;


  /**

   * Instance of Session class

   * @access private

   * @var Session

   */

  var $session;


  /**

   * Url to re-direct to in not authenticated

   * @access private

   * @var string

   */

  var $redirect;


  /**

   * String to use when making hash of username and password

   * @access private

   * @var string

   */

  var $hashKey;


  /**

   * Are passwords being encrypted

   * @access private

   * @var boolean

   */

  var $md5;


  /**

   * Auth constructor

   * Checks for valid user automatically

   * @param object database connection

   * @param string URL to redirect to on failed login

   * @param string key to use when making hash of user name and

   *               password

   * @param boolean if passwords are md5 encrypted in database

   *               (optional)

   * @access public

   */

  function Auth(&$db, $redirect, $hashKey, $md5 = true)

  {

    $this->db       = &$db;

    $this->redirect = $redirect;

    $this->hashKey  = $hashKey;

    $this->md5      = $md5;

    $this->session  = &new Session();

    $this->login();

  }
The $db parameter accepts an instance of the MySQL class, which we created in Chapter 3, PHP and MySQL.
The $redirect parameter specifies a URL to which visitors will be redirected if they aren’t logged in, or if their user name or password is incorrect. This might be a login form, for example.
The $hashKey parameter is a seed we provide to double check the user names and passwords of users who are already logged in. I’ll explain this in more detail later.
The $md5 parameter tells the class whether we’ve used MD5 encryption to store the passwords in the database.
MD5 Digests
MD5 is a simple message digest algorithm (often referred to as one-way encryption) that translates any string (such as a password) into a short series of ASCII characters, called an MD5 digest. A particular string will always produce the same digest, but it is practically impossible to guess a string that will produce a given digest. By storing only the MD5 digest of your users’ passwords in the database, you can verify their login credentials without actually storing the passwords on your server! The built-in PHP function md5 lets you calculate the MD5 digest of any string in PHP.
The constructor goes on to create a new instance of the Session class, which it stores in an instance variable, and finally calls the login method to validate the user against the database.
Here’s the login method:
Example 1.7. AccessControl/Auth.php (in SPLIB) (excerpt)


  /**

   * Checks username and password against database

   * @return void

   * @access private

   */

  function login()

  {

    // See if we have values already stored in the session

    if ($this->session->get('login_hash')) {

      $this->confirmAuth();

      return;

    }


    // If this is a fresh login, check $_POST variables

    if (!isset($_POST[USER_LOGIN_VAR]) ||

        !isset($_POST[USER_PASSW_VAR])) {

      $this->redirect();

    }


    if ($this->md5) {

      $password = md5($_POST[USER_PASSW_VAR]);

    } else {

      $password = $_POST[USER_PASSW_VAR];

    }


    // Escape the variables for the query

    $login = mysql_escape_string($_POST[USER_LOGIN_VAR]);

    $password = mysql_escape_string($password);


    // Query to count number of users with this combination

    $sql = "SELECT COUNT(*) AS num_users

            FROM " . USER_TABLE . "

            WHERE

              " . USER_TABLE_LOGIN . "='$login' AND

              " . USER_TABLE_PASSW . "='$password'";


    $result = $this->db->query($sql);

    $row = $result->fetch();


    // If there isn't is exactly one entry, redirect

    if ($row['num_users'] != 1) {

      $this->redirect();

    // Else is a valid user; set the session variables

    } else {

      $this->storeAuth($login, $password);

    }

  }
The login method first checks to see whether values for the user name and password are currently stored in the session; if they are, it calls the confirmAuth method (see below). If user name and password values are not stored in the session, the method checks to see if they’re available in the $_POST array and, if they’re not, it calls the redirect method (see below).
Assuming it has found the $_POST values, the script performs a query against the database to see if it can find a record to match the submitted user name and password. There must be exactly one matching record, otherwise the visitor will be redirected. Finally, assuming the script has got this far, it registers the user name and password as session variables using the storeAuth method (see below), which makes them available for future page requests.
One thing to note about the login method is that it assumes magic_quotes_gpc is switched off, as it uses mysql_escape_string to prepare submitted values for incorporation into database queries. In the scripts that utilize this class, we’ll include the script that nullifies the effect of magic quotes (see the section called “How do I write portable PHP code?”).
Let’s now look at the methods that login uses.
Example 1.8. AccessControl/Auth.php (in SPLIB) (excerpt)


  /**

   * Sets the session variables after a successful login

   * @return void

   * @access protected

   */

  function storeAuth($login, $password)

  {

    $this->session->set(USER_LOGIN_VAR, $login);

    $this->session->set(USER_PASSW_VAR, $password);


    // Create a session variable to use to confirm sessions

    $hashKey = md5($this->hashKey . $login . $password);

    $this->session->set('login_hash', $hashKey);

  }
The storeAuth method is used to add the user name and password to the session, along with a hash value. This is comprised of a seed value defined using the Auth class (remember the $hashKey parameter required by the constructor?), as well as the user name and password values. As we’ll see in the confirmAuth method below, instead of laboriously checking the database to verify the login credentials whenever a user requests a page, the class simply checks that the current user name and password produce a hash value that’s the same as that stored in the session. This prevents potential attackers from attempting to change the stored user name after login if your PHP configuration has register_globals enabled.
As I’ve just described, the confirmAuth method is used to double check credentials stored in the session once a user is logged in. Notice how we reproduce the hash built by the storeAuth method. If this fails to match the original hash value, the user is immediately logged out.
Example 1.9. AccessControl/Auth.php (in SPLIB) (excerpt)


  /**

   * Confirms that an existing login is still valid

   * @return void

   * @access private

   */

  function confirmAuth()

  {

    $login = $this->session->get(USER_LOGIN_VAR);

    $password = $this->session->get(USER_PASSW_VAR);

    $hashKey = $this->session->get('login_hash');

    if (md5($this->hashKey . $login . $password) != $hashKey)

    {

      $this->logout(true);

    }

  }
The logout method is the only public method in the Auth class. It’s used to remove the login credentials from the session and return the user to the login form:
Example 1.10. AccessControl/Auth.php (in SPLIB) (excerpt)


  /**

   * Logs the user out

   * @param boolean Parameter to pass on to Auth::redirect()

   *               (optional)

   * @return void

   * @access public

   */

  function logout($from = false)

  {

    $this->session->del(USER_LOGIN_VAR);

    $this->session->del(USER_PASSW_VAR);

    $this->session->del('login_hash');

    $this->redirect($from);

  }
The redirect method is used to return the visitor to the login form (or whatever URL we specified upon instantiating the Auth class):
Example 1.11. AccessControl/Auth.php (in SPLIB) (excerpt)


  /**

   * Redirects browser and terminates script execution

   * @param boolean adverstise URL where this user came from

   *               (optional)

   * @return void

   * @access private

   */

  function redirect($from = true)

  {

    if ($from) {

      header('Location: ' . $this->redirect . '?from=' .

             $_SERVER['REQUEST_URI']);

    } else {

      header('Location: ' . $this->redirect);

    }

    exit();

  }
Unless you tell it not to, this method will send the from variable via the query string to the script to which the browser is redirected. This allows the login form to return the users to the location from which they came; it saves the users from having to navigate back to that point, which might be useful if, for example, a session times out. Note that in the logout method we specified that redirect should not provide the from variable. If it did, the script might return users to the URL they used to log out, putting them in a loop from which they couldn’t log in.
One important note to make here is that the redirection URL (which is set by the constructor) should be absolute, not relative. According to the HTTP specification, an absolute URL must be provided when a Location header is used. Later on, when we put this class into action, I’m going to break that rule and use a relative URL, because I can’t guess the script’s location on your server. This works because most recent browsers understand it (even though they shouldn’t). On a live site, make sure you provide a full, absolute URL.
Finally, and most importantly, we use exit to terminate all further processing. This prevents the calling script sending the protected content that follows the authentication code. Although we’ve sent a header that should redirect the browser, we can’t rely on the browser to do what it’s told. If the request were sent by, for instance, a Perl script pretending to be a Web browser, whoever was using the script would, no doubt, have total control over its behavior and could quite easily ignore the instruction to redirect elsewhere. Hence, the exit statement is critical.
Overall, this approach helps save us from our own mistakes; if a given user is not valid, script execution halts and the user is redirected to another “safe” page. The alternative approach might be to build conditional statements into a page, like this:
if ($auth->login()) {

  echo 'You are logged in';

} else {

  echo 'Invalid login';

}
However, this isn’t really a good idea. In a more complex scenario, which involves multiple file inclusions, and has classes take responsibility for different parts of the application, it’s possible that you may unwittingly allow unauthorized visitors access. The approach of redirection is simple, reliable, and less likely to lead to such nasty surprises.
Authentication in Action
Now that you’ve seen the internals of the Session and Auth classes, let’s take a look at some code that makes use of them. First, here’s the script that will act as the login form:
Example 1.12. 4.php


<?php

// If $_GET['from'] comes from the Auth class

if (isset($_GET['from'])) {

  $target = $_GET['from'];

} else {

  // Default URL: usually index.php

  $target = '5.php';

}

?>

<!DOCTYPE html PUBLIC "-//W3C//DTD XHTML 1.0 Transitional//EN"

  "https://www.w3.org/TR/xhtml1/DTD/xhtml1-transitional.dtd">

<html xmlns="https://www.w3.org/1999/xhtml">

<head>

<title> Login Form </title>

<meta http-equiv="Content-type"

  content="text/html; charset=iso-8859-1" />

<style type="text/css">

body, a, td, input

{

    font-family: verdana;

    font-size: 11px;

}

h1

{

    font-family: verdana;

    font-size: 15px;

    color: navy

}

</style>

</head>

<body>

<h1>Please log in</h1>

<form action="<?php echo $target; ?>" method="post">

<table>

<tr valign="top">

<td>Login Name:</td>

<td><input type="text" name="login" /></td>

</tr>

<tr valign="top">

<td>Password:</td>

<td><input type="password" name="password" /></td>

</tr>

<tr valign="top">

<td></td>

<td><input type="submit" value=" Login " /></td>

</tr>

</table>

</form>

</body>

</html>
At the beginning of the script, we check for the $_GET['from'] query string variable. If it exists, we use it as the action of the form (i.e. the page to which the form is submitted), so that a successful login will send the user to the requested page. Otherwise, a default target page is used (5.php in this example).
Later in this chapter, we’ll reproduce this form using QuickForm, which may make an interesting comparison.
Next, let’s look at the secure page:
Example 1.13. 5.php


<?php

// Include Magic Quotes stripping script

require_once 'MagicQuotes/strip_quotes.php';


// Include MySQL class

require_once 'Database/MySQL.php';


// Include Session class

require_once 'Session/Session.php';


// Include Auth class

require_once 'AccessControl/Auth.php';


$host   = 'localhost'; // Hostname of MySQL server

$dbUser = 'harryf';    // Username for MySQL

$dbPass = 'secret';    // Password for user

$dbName = 'sitepoint'; // Database name


// Instantiate MySQL connection

$db = &new MySQL($host, $dbUser, $dbPass, $dbName);


// Instantiate the Auth class

$auth = &new Auth($db, '4.php', 'secret');


// For logging out

if (isset($_GET['action']) && $_GET['action'] == 'logout') {

  $auth->logout();

}

?>

<!DOCTYPE html public "-//W3C//DTD XHTML 1.0 Transitional//EN"

  "https://www.w3.org/TR/xhtml1/DTD/xhtml1-transitional.dtd">

<html xmlns="https://www.w3.org/1999/xhtml">

<head>

<title> Welcome </title>

<meta http-equiv="Content-type"

  content="text/html; charset=iso-8859-1" />

<style type="text/css">

body, a, td, input

{

    font-family: verdana;

    font-size: 11px;

}

h1

{

    font-family: verdana;

    font-size: 15px;

    color: navy

}

</style>

</head>

<body>

<h1>Welcome</h1>

<p>You are now logged in</p>

<?php

if (isset($_GET['action']) && $_GET['action'] == 'test') {

  echo '<p>This is a test page. You are still logged in';

}

?>

<p><a href="<?php echo $_SERVER['PHP_SELF'];

  ?>?action=test">Test page</a></p>

<p><a href="<?php echo $_SERVER['PHP_SELF'];

  ?>?action=logout">Logout</a></p>

</body>

</html>
The only way the user can view this page is to have provided a correct user name and password. The moment that the Auth class is instantiated, it performs the security check. If valid user name and password values have been submitted via a form, they are stored by Auth in a session variable, allowing the visitor to continue surfing without having to log in again.
As promised, using the Auth class is very easy. To secure a page with it, all you need to do is place this at the start (Of course, you must also include the Auth.php file that contains the class definition with require_once):
// Instantiate the Auth class

$auth = &new Auth(&$db, $loginUrl);
As previously mentioned, $loginUrl is the URL to which the Auth class should redirect people who aren’t already logged in.
Room for Improvement
The basic mechanics of the Auth class are solid, but it’s missing the more involved elements that will be necessary to halt the efforts of any serious intruders.
It’s a good idea to implement a mechanism to keep an eye on the number of failed login attempts made from a single client. If your application always responds immediately to any login attempt, it will be possible for a potential intruder to make large numbers of requests in a very short time, trying different user name and password combinations. The solution is to build a mechanism that counts the number of failed attempts using a session variable. Every time the number of failures is divisible by three (i.e. three incorrect passwords are entered), use PHP’s sleep function to delay the next attempt by, for example, ten seconds. You may also decide that, after a certain threshold value (for example, fifteen failed attempts), you block all further access from that IP address for a given period (such as an hour). Of course, changing an IP address is much easier than changing a phone number, but you will at least stall would-be intruders, and may perhaps make their life difficult enough to persuade them to go elsewhere.
Another important ingredient for a good security system is an “event logging” mechanism that keeps track of suspicious access. In Chapter 4, Stats and Tracking, you’ll find the basic mechanics of logging visitor information, including how to track IP addresses, while the observer pattern found in Chapter 7, Design Patterns could be used to “watch” the Auth class for the number of failed attempts.
You may want to tie the logging to some kind of alert mechanism that will warn you if someone attacks your site, giving you the chance to respond immediately. In critical environments, consider using an SMS gateway as your alerting system so that you’ll receive notification even when you’re not online.
How do I build a user registration system?
Having an authentication system is fine, but how do you fill it with users in the first place? If only yourself and a few friends will access your site, you can probably create accounts for all users through your database administration interface. However, for a site that’s intended to become a flourishing community to which anyone and everyone is free to sign up, you’ll want to automate this process. You’ll want to allow visitors to register themselves, but you’ll probably still need some level of “screening” so that you have at least a little information about the people who have signed up (such as a way to confirm their identity). A common and effective screening approach is to have the registrants confirm their email address.
The purpose of the screening mechanism is to give you the ability to make it difficult for users who have “broken the rules” and lost their account privileges to create new accounts. You have (at least one of) their email addresses – if they try to register again using that address, you can deny them access. Be warned, though; a new type of Internet service is becoming popular. Pioneered by Mailinator, these services provide users with temporary email addresses they can use for registrations.
Here, we’ll put together a registration system that validates new registrants using their email addresses; they’ll receive an email that asks them to confirm their registration via a URL.
More Classes!
A registration system is yet another great opportunity to build more classes! This time, though, it will be even more interesting, as we use the PEAR::HTML_QuickForm package (Chapter 9, Web Page Elements) and phpmailer (Chapter 8, Email) to do some of the work for the registration system. The rest will be handled by classes I’ve built myself, but the end result will be easy for you to customize and reuse in your own applications.
First of all, we need to visualize the process of (successfully) signing up a new user:
- The user fills in the registration form.
- On the user’s completion of the form, we insert a record into the signup table and send a confirmation email.
- The visitor follows the link in the email and confirms the account.
- We copy the details from the signup table to the user table. The account is now active.
We use two tables for handling signups, to separate the “dangerous” data from the “safe” data. You’ll want to have a cron job or similar to check the signup table on a regular basis and delete any entries that are older than, say, twenty-four hours. Separating the tables makes it easier to purge the contents of the signup table (avoiding unfortunate errors), and keep the user table trim so there’s no unnecessary impact on performance during user authentication.
The first thing we need is a class to handle the key steps in the signup process. To begin, we must define a set of constants for the table and column names used by the class. This will allow you to override their values in your scripts, should you use a different table structure.
Example 1.14. AccessControl/SignUp.php (in SPLIB) (excerpt)


# Modify these constants to match your user login and signup

# tables

// Name of users table

@define('USER_TABLE', 'user');

// Name of signup table

@define('SIGNUP_TABLE', 'signup');

// Name of login column in table

@define('USER_TABLE_LOGIN', 'login');

// Name of password column in table

@define('USER_TABLE_PASSW', 'password');

// Name of email column in table

@define('USER_TABLE_EMAIL', 'email');

// Name of firstname column in table

@define('USER_TABLE_FIRST', 'firstName');

// Name of lastname column in table

@define('USER_TABLE_LAST', 'lastName');

// Name of signature column in table

@define('USER_TABLE_SIGN', 'signature');

// Name of ID column in signup

@define('SIGNUP_TABLE_ID', 'signup_id');

// Name of confirm_code column in signup

@define('SIGNUP_TABLE_CONFIRM', 'confirm_code');

// Name of created column in signup

@define('SIGNUP_TABLE_CREATED', 'created');
With the constants out of the way, we can proceed to the member variables and constructor for the SignUp class:
Example 1.15. AccessControl/SignUp.php (in SPLIB) (excerpt)


/**

 * SignUp Class<br />

 * Provides functionality for for user sign up<br />

 * <b>Note:</b> you will need to modify the createSignup() method

 * if you are using a different database table structure

 * <b>Note:</b> this class requires

 * @link http://phpmailer.sourceforge.net/ PHPMailer

 * @access public

 * @package SPLIB

 */

class SignUp {

  /**

   * Database connection

   * @access private

   * @var object

   */

  var $db;


  /**

   * The name / address the signup email should be sent from

   * @access private

   * @var array

   */

  var $from;


  /**

   * The name / address the signup email should be sent to

   * @access private

   * @var array

   */

  var $to;


  /**

   * The subject of the confirmation email

   * @access private

   * @var string

   */

  var $subject;


  /**

   * Text of message to send with confirmation email

   *

   * @var string

   */

  var $message;


  /**

   * Whether to send HTML email or not

   * @access private

   * @var boolean

   */

  var $html;


  /**

   * Url to use for confirmation

   * @access private

   * @var string

   */

  var $listener;


  /**

   * Confirmation code to append to $this->listener

   * @access private

   * @var string

   */

  var $confirmCode;


  /**

   * SignUp constructor

   * @param object instance of database connection

   * @param string URL for confirming the the signup

   * @param string name for confirmation email

   * @param string address for confirmation email

   * @param string subject of the confirmation message

   * @param string the confirmation message containing

   *               <confirm_url/>

   * @access public

   */

  function SignUp(&$db, $listener, $frmName, $frmAddress, $subj,

                  $msg, $html)

  {

    $this->db             = &$db;

    $this->listener       = $listener;

    $this->from[$frmName] = $frmAddress;

    $this->subject        = $subj;

    $this->message        = $msg;

    $this->html           = $html;

  }
When we instantiate the class in the constructor above, we need to pass it a connection to the database; we do this using the MySQL class. Then, we tell it the URL to which registrants should be directed when they confirm their signup. We also give it a ‘From’ name and address for the signup email (e.g. Your Name <you@yoursite.com>), as well as the subject and message for the email itself. Finally, we need to identify whether or not this is an HTML email, so that phpmailer can format the message correctly.
Whether it’s HTML or not, the message should contain at least one special tag, <confirm_url/>. This acts as a “placeholder” in the message, identifying the location at which the confirmation URL that’s built by the SignUp class should be inserted.
Moving on, the createCode method is called internally within the class, and is used to generate the confirmation code that will be sent via email:
Example 1.16. AccessControl/SignUp.php (in SPLIB) (excerpt)


  /**

   * Creates the confirmation code

   * @return void

   * @access private

   */

  function createCode($login)

  {

    srand((double)microtime() * 1000000);

    $this->confirmCode = md5($login . time() . rand(1, 1000000));

  }
The createSignup method is used to insert records into the signup table:
Example 1.17. AccessControl/SignUp.php (in SPLIB) (excerpt)


  /**

   * Inserts a record into the signup table

   * @param array contains user details. See constants defined for

   *              array keys

   * @return boolean true on success

   * @access public

   */

  function createSignup($userDetails)

  {

    $login     = mysql_escape_string(

                   $userDetails[USER_TABLE_LOGIN]);

    $password  = mysql_escape_string(

                   $userDetails[USER_TABLE_PASSW]);

    $email     = mysql_escape_string(

                   $userDetails[USER_TABLE_EMAIL]);

    $firstName = mysql_escape_string(

                   $userDetails[USER_TABLE_FIRST]);

    $lastName  = mysql_escape_string(

                   $userDetails[USER_TABLE_LAST]);

    $signature = mysql_escape_string(

                   $userDetails[USER_TABLE_SIGN]);


    // First check login and email are unique in user table

    $sql = "SELECT * FROM " . USER_TABLE . "

            WHERE

              " . USER_TABLE_LOGIN . "='$login' OR

              " . USER_TABLE_EMAIL . "='$email'";

    $result = $this->db->query($sql);


    if ($result->size() > 0) {

      trigger_error('Unique username and email address required');

      return false;

    }


    $this->createCode($login);

    $toName = $firstName . ' ' . $lastName;

    $this->to[$toName] = $email;


    $sql = "INSERT INTO " . SIGNUP_TABLE . " SET

              " . USER_TABLE_LOGIN . "='$login',

              " . USER_TABLE_PASSW . "='$password',

              " . USER_TABLE_EMAIL . "='$email',

              " . USER_TABLE_FIRST . "='$firstName',

              " . USER_TABLE_LAST . "='$lastName',

              " . USER_TABLE_SIGN . "='$signature',

              " . SIGNUP_TABLE_CONFIRM . "='$this->confirmCode',

              " . SIGNUP_TABLE_CREATED . "='" . time() . "'";


    $result = $this->db->query($sql);


    if ($result->isError()) {

      return false;

    } else {

      return true;

    }

  }
When the registration form is submitted, we’ll use this method to create a record of the signup. Note that when the system checks to see whether the submitted user name or email address already exists in the database, a match will trigger an error. You could “catch” this error by defining your own custom error handler (see Chapter 10, Error Handling for more information).
We add slashes to the incoming fields to make sure there are no injection attacks (see Chapter 3, PHP and MySQL). Because we’re using QuickForm, any slashes added by magic quotes are automatically removed; but when you’re not using QuickForm, be sure to include the script from the section called “How do I write portable PHP code?”, which strips quotes from your form code.
Next, we use the sendConfirmation method to send a confirmation email to the person who’s just signed up:
Example 1.18. AccessControl/SignUp.php (in SPLIB) (excerpt)


  /**

   * Sends the confirmation email

   * @return boolean true on success

   * @access public

   */

  function sendConfirmation()

  {

    $mail = new phpmailer();

    $from = each($this->from);

    $mail->FromName = $from[0];

    $mail->From = $from[1];

    $to = each($this->to);

    $mail->AddAddress($to[1], $to[0]);

    $mail->Subject = $this->subject;

    if ($this->html) {

      $replace = '<a href="' . $this->listener . '?code=' .

                 $this->confirmCode . '">' . $this->listener .

                 '?code=' . $this->confirmCode . '</a>';

    } else {

      $replace = $this->listener . '?code=' . $this->confirmCode;

    }

    $this->message = str_replace('<confirm_url/>',

                                 $replace,

                                 $this->message);

    $mail->IsHTML($this->html);


    $mail->Body = $this->message;

    if ($mail->send()) {

      return TRUE;

    } else {

      return FALSE;

    }

  }
Finally, the confirm method is used to examine confirmations via the URL sent in the email:
Example 1.19. AccessControl/SignUp.php (in SPLIB) (excerpt)


  /**

   * Confirms a signup against the confirmation code. If it

   * matches, copies the row to the user table and deletes

   * the row from signup

   * @return boolean true on success

   * @access public

   */

  function confirm($confirmCode)

  {

    $confirmCode = mysql_escape_string($confirmCode);

    $sql = "SELECT * FROM " . SIGNUP_TABLE . "

            WHERE " . SIGNUP_TABLE_CONFIRM . "='$confirmCode'";

    $result = $this->db->query($sql);

    if ($result->size() == 1) {

      $row = $result->fetch();


      // Copy the data from Signup to User table

      $sql = "INSERT INTO " . USER_TABLE . " SET

              " . USER_TABLE_LOGIN . "='" .

                mysql_escape_string($row[USER_TABLE_LOGIN]) . "',

              " . USER_TABLE_PASSW . "='" .

                mysql_escape_string($row[USER_TABLE_PASSW]) . "',

              " . USER_TABLE_EMAIL . "='" .

                mysql_escape_string($row[USER_TABLE_EMAIL]) . "',

              " . USER_TABLE_FIRST . "='" .

                mysql_escape_string($row[USER_TABLE_FIRST]) . "',

              " . USER_TABLE_LAST . "='" .

                mysql_escape_string($row[USER_TABLE_LAST]) . "',

              " . USER_TABLE_SIGN . "='" .

                mysql_escape_string($row[USER_TABLE_SIGN]) . "'";


      $result = $this->db->query($sql);

      if ($result->isError()) {

        return FALSE;

      } else {

        // Delete row from signup table

        $sql = "DELETE FROM " . SIGNUP_TABLE . "

                WHERE " . SIGNUP_TABLE_ID . "='" .

                  $row[SIGNUP_TABLE_ID] . "'";

        $this->db->query($sql);

        return TRUE;

      }

    } else {

      return FALSE;

    }

  }

}
If an account is successfully confirmed, the row is copied to the user table (note that I had to re-escape the values stored in the signup table in case they contained SQL injections that were escaped when originally inserted), and the old row in the signup table is deleted. You will need to edit this method if your table structures do not match the ones used here.
Putting this class into action, we’ll modify the registration form we built in Chapter 9, Web Page Elements with QuickForm. For the sake of clarity, I’ve kept the registration form to a single procedural listing, but in practice, to help keep code both maintainable and readable, it would be better to restructure it using classes. This time, I’ve also used QuickForm’s templating features to modify the look of the page; you’ll find the details in the code for this chapter. Here, we’ll concentrate on the code that’s specific to the sign up process:
First, we have to include the five classes we’ll be using:
Example 1.20. 6.php (excerpt)


<?php

// Include the MySQL class

require_once 'Database/MySQL.php';


// Include the Session class

require_once 'Session/Session.php';


// Include the SignUp class

require_once 'AccessControl/SignUp.php';


// Include the QuickForm class

require_once 'HTML/QuickForm.php';


// Include the phpmailer class

require_once 'ThirdParty/phpmailer/class.phpmailer.php';


Once we set up the variables we need, we can instantiate our own classes:


Example 1.21. 6.php (excerpt)


// Settings for SignUp class

$listener = 'http://localhost/sitepoint/AccessControl/6.php';

$frmName = 'Your Name';

$frmAddress = 'noreply@yoursite.com';

$subj = 'Account Confirmation';

$msg = <<<EOD

<html>

<body>

<h2>Thank you for registering!</h2>

<div>The final step is to confirm

your account by clicking on:</div>

<div><confirm_url/></div>

<div>

<b>Your Site Team</b>

</div>

</body>

</html>

EOD;


// Instantiate the MySQL class

$db = &new MySQL($host, $dbUser, $dbPass, $dbName);


// Instantiate the Session class

$session = new Session;


// Instantiate the signup class

$signUp = new SignUp($db, $listener, $frmName,

                     $frmAddress, $subj, $msg, TRUE);


The following code checks to see if we have an incoming confirmation:


Example 1.22. 6.php (excerpt)


// Is this an account confirmation?

if (isset($_GET['code'])) {

  if ($signUp->confirm($_GET['code'])) {

    $display = 'Thank you. Your account has now been confirmed.' .

               '<br />You can now <a href="4.php">login</a>';

  } else {

    $display = 'There was a problem confirming your account.' .

               '<br />Please try again or contact the site ' .

               'administrators';

  }


// Otherwise display the form

} else {

  // ...form creation code omitted...
If not, execution moves on to building the body of the form, which I’ll omit here, as it was covered in Chapter 9, Web Page Elements. If you don’t have that volume, you can refer to the code archive.
Towards the end of the script appears the code that inserts a value into the signup table and, if all went well, sends the confirmation email:
Example 1.23. 6.php (excerpt)


  // If the form is submitted...

  if ($form->validate()) {

    // Apply the encryption filter to the password

    $form->applyFilter('password', 'encryptValue');


    // Build an array from the submitted form values

    $submitVars = array(

        'login' => $form->getSubmitValue('login'),

        'password' => $form->getSubmitValue('password'),

        'email' => $form->getSubmitValue('email'),

        'firstName' => $form->getSubmitValue('firstName'),

        'lastName' => $form->getSubmitValue('lastName'),

        'signature' => $form->getSubmitValue('signature')

    );


    // Create signup

    if ($signUp->createSignup($submitVars)) {

      // Send confirmation email

      if ($signUp->sendConfirmation()) {

        $display = 'Thank you. Please check your email to ' .

                   'confirm your account';

      } else {

        $display = 'Unable to send confirmation email.<br />' .

                   'Please contact the site administrators';

      }

    } else {

      $display = 'There was an error creating your account.' .

                 '<br />Please try again later or ' .

                 'contact the site administrators';

    }

  } else {

    // If not submitted, display the form

    $display = $form->toHtml();

  }

}
The finished registration form now looks like the one shown in Figure 1.2.
Figure 1.2. Sign on the Dotted Line
Missing Pieces
So that you don’t get bored, there are a couple of remaining pieces for you to fill in. Currently, the createSignup method triggers an error if there already exists a registered user with the login name or email provided by the new registrant. If you’re happy with QuickForm, you might want to split this check into a separate method that QuickForm can apply as a rule for each field in the form. This should reduce frustration when users find that the account name they chose already exists; QuickForm will generate a message to tell them what they did wrong, while preserving the rest of the values they entered.
If you plan to let users change their email addresses once their accounts are created, you’ll also need to confirm the addresses before you store them against the appropriate records in the user table. You should be able to reuse the methods provided by the SignUp class for this purpose. You might even consider reusing the signup table to handle this task; some modifications will be required to have the confirm/ method check to see if a record already exists in the user table, and if so, update it instead of creating a new row. Be very careful that you don’t create a hole in your security, though. If you’re not checking for existing records in the user table, a user could sign up for a new account with details that matched an existing row in the user table. You’ll then end up changing the email address of an existing user to that of a new user, which will cause some embarrassing moments at the very least.
How do I protect my site from auto sign ups?
I hope you’ll never suffer the misfortune of having someone try to put your site out of action, but when you expose your application to what is, after all, a global network, you need to be prepared for trouble. It’s difficult to prevent malicious attacks against your site and still offer genuine users an acceptable service – particularly if a malicious user simply decides to flood your site with requests for pages.
Where user registration systems are concerned, one common method of attack has been to create “robots” (typically Perl or PHP scripts), which act as Web browsers and use the forms you’ve built for your registration system to swamp your database with false sign ups. Although we’ve built a registration system that requires email confirmation of the account, the confirmation process can also be built into the “robot,” assuming it has access to the account to which the email confirmations are sent. Both Hotmail and Yahoo!, among many others, have been stung by this in the past.
The next level of protection is to introduce a mechanism that sorts the men from the ‘bots! Thankfully, the human brain is still vastly more powerful than a computer (at least, the sort of computer likely to be used to attack your site) and is capable of powerful optical character recognition beyond the scope of your average Perl script. Consider Figure 1.3, for example.
![]()
Figure 1.3. Humans Still Have the Edge
Now, you and I can see that the image contains the characters “PKPBPI30,” but a computer program trying to identify those letters will find the challenge a lot more difficult. Of course it’s possible, but people who have the capability to do it will, I hope, have better things to do with their time.
Here’s One I Wrote Earlier
Let’s turn to a handy PHP class I’ve prepared to solve just this problem:
Example 1.24. Images/RandomImageText.php (in SPLIB) (excerpt)


<?php

/**

 * RandomImageText<br />

 * Generate image text which is hard for OCR programs to

 * read but can still be read by humans, for use in registration

 * systems.

 * @package SPLIB

 * @access public

 */

class RandomImageText {

  /**

   * The background image resource

   * @access private

   * @var resource

   */

  var $image;


  /**

   * Image height in pixels

   * @access private

   * @var int

   */

  var $iHeight;


  /**

   * Image width in pixels

   * @access private

   * @var int

   */

  var $iWidth;


  /**

   * Font height in pixels

   * @access private

   * @var int

   */

  var $fHeight;


  /**

   * Font width in pixels

   * @access private

   * @var int

   */

  var $fWidth;


  /**

   * Tracks the x position in pixels

   * @access private

   * @var  int

   */

  var $xPos;


  /**

   * An array of font idenfiers

   * @access private

   * @var array

   */

  var $fonts;


  /**

   * RandomImageText constructor

   * @param string relative or full path to background jpeg

   * @param int font height to use

   * @param int font width to use

   * @access public

   */

  function RandomImageText($jpeg, $fHeight = 10, $fWidth = 10)

  {

    $this->image = ImageCreateFromJPEG($jpeg);

    $this->iHeight = ImageSY($this->image);

    $this->iWidth = ImageSX($this->image);

    $this->fHeight = $fHeight;

    $this->fWidth = $fWidth;

    $this->xPos = 0;

    $this->fonts = array(2, 3, 4, 5);

  }
The class needs to be provided with a JPEG image that will become the background over which we’ll scatter the letters. Ideally, you should use an image that has some kind of pattern on it, to make the problem of identifying the letters even more difficult. The $fHeight and $fWidth (font height and width) can be adjusted, but this really only impacts the space that appears around the characters, rather than increasing the size of the characters themselves.
The addText method is where the clever work takes place:
Example 1.25. Images/RandomImageText.php (in SPLIB) (excerpt)


  /**

   * Add text to the image which is "randomized"

   * @param string text to add

   * @param int red hex value (0-255)

   * @param int green hex value (0-255)

   * @param int blue hex value (0-255)

   * @return boolean true text was added successfully

   * @access public

   */

  function addText($text, $r=38, $g=38, $b=38)

  {

    $length = $this->fWidth * strlen($text);


    if ($length >= ($this->iWidth - $this->fWidth * 2)) {

      return FALSE;

    }


    $this->xPos = floor(($this->iWidth - $length) / 2);


    $fColor = ImageColorAllocate($this->image, $r, $g, $b);


    srand((float)microtime() * 1000000);

    $fonts = array(2, 3, 4, 5);

    $yStart = floor($this->iHeight / 2) - $this->fHeight;

    $yEnd = $yStart + $this->fHeight;

    $yPos = range($yStart, $yEnd);


    for ($strPos = 0; $strPos < $length; $strPos++) {

      shuffle($fonts);

      shuffle($yPos);

      ImageString($this->image,

                  $fonts[0],

                  $this->xPos,

                  $yPos[0],

                  substr($text, $strPos, 1),

                  $fColor);

      $this->xPos += $this->fWidth;

    }

    return TRUE;

  }
Provided with a text string, the class will scatter the letters on the image, using a randomly varying vertical position, and a font chosen at random from a list. Optionally, you can supply this method with red, green, and blue values, which will define the color of the text.
If the string you provide is too big for the image, no text will be displayed; the code generates an error notice, but you’ll have to pick this up with your error handler (see Chapter 10, Error Handling), as it will be invisible on the image.
The next two methods can be used to clear out any existing fonts registered with the class, and add new fonts. The default PHP fonts are somewhat dull and rather small, so you may want to consider adding your own. Check out PHP’s imagestring and imageloadfont functions for further details.
Example 1.26. Images/RandomImageText.php (in SPLIB) (excerpt)


  /**

   * Empties any fonts currently stored for use

   * @return void

   * @access public

   */

  function clearFonts()

  {

    return $this->fonts = array();

  }


  /**

   * Adds a new font for use in text generation

   * @param string relative or full path to font file

   * @return void

   * @access public

   */

  function addFont($font)

  {

    $this->fonts[] = imageloadfont($font);

  }
The getHeight and getWidth methods can be useful if you’re unsure of the exact dimensions of your background image and want to determine whether the text you want to add will fit on the background before you add it.
Example 1.27. Images/RandomImageText.php (in SPLIB) (excerpt)


  /**

   * Returns the height of the background image in

   * pixels

   * @return int

   * @access public

   */

  function getHeight()

  {

    return $this->iHeight;

  }


  /**

   * Returns the width of the background image in

   * pixels

   * @return int

   * @access public

   */

  function getWidth()

  {

    return $this->iWidth;

  }
Finally, the getImage method returns the PHP resource identifier for the image.
Example 1.28. Images/RandomImageText.php (in SPLIB) (excerpt)


  /**

   * Returns the image resource for use with

   * the ImageJpeg() function

   * @return resource

   * @access public

   */

  function getImage()

  {

    return $this->image;

  }

}
We still have to convert the image to a JPEG with the imagejpeg function; I’ve chosen to return the resource identifier rather than simply displaying the image itself, as I may want to manipulate the image further with other code and classes.
Now that we’ve prepared the class for adding text to an image, we need to update the SignUp class to provide a method that generates the text to appear in the image:
Example 1.29. AccessControl/SignUp.php (in SPLIB) (excerpt)


  /**

   * Creates a random string to be used in images

   * @return string

   * @access public

   */

  function createRandString()

  {

    srand((double)microtime() * 1000000);

    $letters = range ('A','Z');

    $numbers = range(0,9);

    $chars = array_merge($letters, $numbers);

    $randString = '';

    for ($i=0; $i<8; $i++) {

      shuffle($chars);

      $randString .= $chars[0];

    }

    return $randString;

  }
The trick now is to generate a random string with the above method, then store it in a session variable that’s accessible by the code that actually generates the image. First, we need to modify one or two parts of the registration form code from the previous solution.
In the section where we begin to build the form, make the following modifications:
Example 1.30. 7.php (excerpt)


  // Register a session variable for use in the image

  if (!$session->get('randomString'))

    $session->set('randomString', $signUp->createRandString());
The above code checks whether the random string has been created and stored in a session variable. If not, it creates one and stores it in a session variable.
Now, we add the form field and an img tag containing the image:
Example 1.31. 7.php (excerpt)


  // The image check field for "humanness"

  $form->addElement('text', 'imageCheck', 'Image Text:',

                    'class="signupData"');

  $form->addRule('imageCheck', 'Please enter text from image',

                 'required', false, 'client');


  // Server side validation!

  // Don't give away random string in JavaScript

  $form->addRule('imageCheck',

                 'Please confirm the text in the image',

                 'regex',

                 '/^' . $session->get('randomString') . '$/',

                 'server');


  // The image check field

  $form->addData('

    <tr valign="top">

      <td class="info">

        Enter the text as it<br />appears in the image

      </td>

      <td class="field">

        <img src="8.php" />

      </td>

    </tr>');
Note that the validation rule we’ve applied to this field uses server side validation only, not client side. If we did use client side validation, a regular expression stating exactly what the image contains would appear in JavaScript, and would be available for a computer program to read.
All that remains is the code that will display the image itself:
Example 1.32. 8.php


<?php

// Include Session class

require_once 'Session/Session.php';


// Include RandomImageText class

require_once 'Images/RandomImageText.php';


// Instantiate the Session class

$session = new Session;


// Instantiate RandomImageText giving the background image

$imageText = new RandomImageText('reg_image/reg_image.jpg');


// Add the text from the session

$imageText->addText($session->get('randomString'));


// Send the right mime type

header('Content-type: image/jpeg');


// Display the image

ImageJpeg($imageText->getImage());

?>
Note that we passed the random string via a session variable, as opposed to a query string variable, as this, too, would be available for reading by a “robot” script.
Figure 1.4 illustrates the form modified with the new image checking feature.
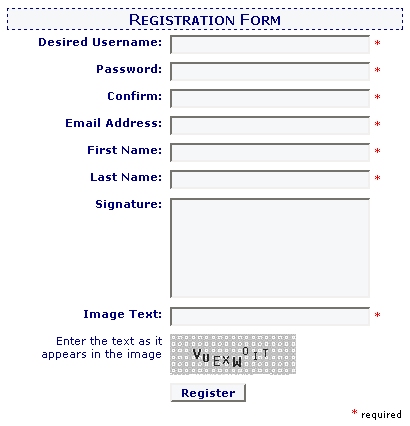
Figure 1.4. Humans Only, Thank You
How do I deal with members who forget their passwords?
In the last solution, I was happy to explain just how great human beings are in comparison to computers. Unfortunately, though, we have a tendency to “age out” important information such as the password we need to log into a site. A feature that allows users to retrieve forgotten passwords is an essential time saver. Overlook this, and you can expect to waste a lot of time changing passwords for people who have forgotten them.
If you encrypt the passwords in your database, you’ll need a mechanism that generates a new password that, preferably, is easy to remember. If you’re storing passwords as-is, without encryption, it’s probably acceptable simply to send the password to the user’s registered email address. Using an email address that you’ve already confirmed as valid is more reliable than the “Secret Question” approach. This common tactic asks users simple questions to refresh their memories, such as, “Where were you born?” and “What’s your date of birth?” Just ask yourself how many organizations, both on and offline, you’ve given that information to. Some online applications, such as forums, even make your birthday available for all to see, should you provide it. Details like this may well be common knowledge.
To solve the problem, we’ll build a general AccountMaintenance class, which will do some of the maintenance work for us, then supply it with the information it needs to either fetch an unencrypted password, or generate a new (memorable) password. The typical approach used to generate memorable passwords is inspired by the Secure Memorable Password Generator found at Codewalkers.com.
Password Reminder
Starting with the simple password fetching code, the AccountMaintenance class begins with the usual constants, which allow it to be applied to a different table structure if need be. Note, in particular, the USER_LOGIN_VAR constant, which must contain the same value as that defined by the Auth class.
Example 1.33. AccessControl/AccountMaintenance.php (in SPLIB) (excerpt)


<?php

/**

 * Constants which define table and column names

 */

# Modify this constant to reflect session variable name

// Name to use for login variable used in Auth class

@define('USER_LOGIN_VAR', 'login');

# Modify these constants to match your user login table

// Name of users table

@define('USER_TABLE', 'user');

// Name of user_id column in table

@define('USER_TABLE_ID', 'user_id');

// Name of login column in table

@define('USER_TABLE_LOGIN', 'login');

// Name of password column in table

@define('USER_TABLE_PASSW', 'password');

// Name of email column in table

@define('USER_TABLE_EMAIL', 'email');

// Name of firstname column in table

@define('USER_TABLE_FIRST', 'firstName');

// Name of lastname column in table

@define('USER_TABLE_LAST', 'lastName');

/**

 * AccountMaintenance Class<br />

 * Provides functionality for users to manage their own accounts

 * @access public

 * @package SPLIB

 */

class AccountMaintenance {

  /**

   * Database connection

   * @access private

   * @var object

   */

  var $db;


  /**

   * A list of words to use in generating passwords

   * @access private

   * @var array

   */

  var $words;


  /**

   * AccountMaintenance constructor

   * @param object instance of database connection

   * @access public

   */

  function AccountMaintenance(&$db)

  {

    $this->db = &$db;

  }


  /**

   * Given an email address, returns the user details

   * that account. Useful is password is not encrpyted

   * @param string email address

   * @return array user details

   * @access public

   */

  function fetchLogin($email)

  {

    $email = mysql_escape_string($email);

    $sql = "SELECT

              " . USER_TABLE_LOGIN . ", " . USER_TABLE_PASSW . ",

              " . USER_TABLE_FIRST . ", " . USER_TABLE_LAST . "

            FROM

              " . USER_TABLE . "

            WHERE

              " . USER_TABLE_EMAIL . "='$email'";

    $result = $this->db->query($sql);

    if ($result->size() == 1) {

      return $result->fetch();

    } else {

      return FALSE;

    }

  }
The fetchLogin method looks for a single row that matches the user’s email address (note this assumes you have declared a UNIQUE index on the email column so that entries can only appear once. If you use a different table structure, you’ll need to modify the query in this method).
Next, we put the simple forgotten password mechanism into action with QuickForm and phpmailer:
Example 1.34. 9.php (excerpt)


<?php

// Include MySQL class

require_once 'Database/MySQL.php';


// Include AccountMaintenance class

require_once 'AccessControl/AccountMaintenance.php';


// Include QuickForm class

require_once 'HTML/QuickForm.php';


// Include phpmailer class

require_once 'ThirdParty/phpmailer/class.phpmailer.php';


$host   = 'localhost'; // Hostname of MySQL server

$dbUser = 'harryf';    // Username for MySQL

$dbPass = 'secret';    // Password for user

$dbName = 'sitepoint'; // Database name


// phpmailer settings

$yourName  = 'Your Name';

$yourEmail = 'you@yourdomain.com';

$subject   = 'Your password';

$msg       = 'Here are your login details. Please change your ' .

             'password.';
Here, we’ve set up the environment as usual, including the necessary classes. We’ve also defined variables for the phpmailer class; these will be the same irrespective of who has forgotten a password.
And now, let’s set up QuickForm:
Example 1.35. 9.php (excerpt)


// Instantiate the QuickForm class

$form = new HTML_QuickForm('passwordForm', 'POST');


// Add a header to the form

$form->addHeader('Forgotten Your Password?');


// Add a field for the email address

$form->addElement('text', 'email', 'Enter your email address');

$form->addRule('email', 'Enter your email', 'required', FALSE,

               'client');

$form->addRule('email', 'Enter a valid email address', 'email',

               FALSE, 'client');


// Add a submit button called submit with label "Send"

$form->addElement('submit', 'submit', 'Get Password');
If the form has been submitted, we instantiate the MySQL and AccountMaintenance classes and use the fetchLogin method to determine whether there’s a matching email address in the user table. If there is, we use phpmailer to send the user an email containing the login and password.
Example 1.36. 9.php (excerpt)


// If the form is submitted...

if ($form->validate()) {

  // Instantiate MySQL connection

  $db = &new MySQL($host, $dbUser, $dbPass, $dbName);


  // Instantiate Account Maintenance class

  $aMaint = new AccountMaintenance($db);


  if (!$details =

      $aMaint->fetchLogin($form->getSubmitValue('email'))) {

    echo 'We have no record of your account';

  } else {

    $mail = new phpmailer();

    // Define who the message is from

    $mail->From = $yourEmail;

    $mail->FromName = $yourName;


    // Set the subject of the message

    $mail->Subject = $subject;


    // Build the message

    $mail->Body = $msg . "nnLogin: " . $details['login'] .

                  "nPassword: " . $details['password'];


    // Add the recipient

    $name = $details['firstName'] . ' ' . $details['lastName'];

    $mail->AddAddress($form->getSubmitValue('email'), $name);


    // Send the message

    if(!$mail->Send()) {

      echo 'An email has been sent to ' .

           $form->getSubmitValue('email');

    } else {

      echo 'Problem sending your details. Please contact the ' .

           'site administrators';

    }

  }

} else {

  // If not submitted, display the form

  $form->display();

}

?>
New Password
As I mentioned, if you’ve encrypted the password, you have a different problem to solve. PHP’s md5 function provides one-way encryption; once it’s scrambled, there’s no getting it back! In such cases, if members forget their passwords, you’ll have to make new ones for them. You could simply generate a random string of characters, but it’s important to remember that if you make your security systems too unfriendly, you’ll put legitimate users off.
Here, we’ll add to the AccountMaintenance class some further methods that can generate passwords, and subsequently modify the password stored in the database. I’ve used a list of 1370 words, stored in a text file, to build the memorable passwords. Be aware that if anyone knows the list of words you’re using, cracking the new password will be significantly easier, so you should create your own list. First, let’s look at the new class methods:
Example 1.37. AccessControl/AccountMaintenance.php (in SPLIB) (excerpt)


  /**

   * Given a username / email combination, resets the password

   * for that user and returns the new password.

   * @param string login name

   * @param string email address

   * @return array of user details or FALSE if failed

   * @access public

   */

  function resetPassword($login, $email)

  {

    $login = mysql_escape_string($login);

    $email = mysql_escape_string($email);

    $sql = "SELECT " . USER_TABLE_ID . ",

              " . USER_TABLE_LOGIN . ", " . USER_TABLE_PASSW . ",

              " . USER_TABLE_FIRST . ", " . USER_TABLE_LAST . "

            FROM

              " . USER_TABLE . "

            WHERE

              " . USER_TABLE_LOGIN . "='$login'

            AND

              " . USER_TABLE_EMAIL . "='$email'";

    $result = $this->db->query($sql);

    if ($result->size() == 1) {

      $row = $result->fetch();

      if ($password = $this->generatePassword()) {

        $sql = "UPDATE " . USER_TABLE . "

                SET

                " . USER_TABLE_PASSW . "='" . md5($password) . "'

                WHERE

                " . USER_TABLE_ID . "='" . $row[USER_TABLE_ID] .

                "'";

        $result = $this->dbConn->fetch($sql);

        if (!$result->isError()) {

          $row[USER_TABLE_PASSW] = $password;

          return $row;

        } else {

          return FALSE;

        }

      } else {

        return FALSE;

      }

    } else {

      return FALSE;

    }

  }
The resetPassword method, when given a combination of a login and an email address, identifies the corresponding row in the user table, and calls the generatePassword method (which we’ll discuss in a moment) to create a new password. It then updates the user table with the new password (using md5 to encrypt it), and returns the new password in an array containing the user details. If you’re using a different table structure, you’ll need to modify this method.
Note that we use both the login and email to identify the row, so it’s a little more difficult for other people to reset your members’ passwords. Although there’s no risk in individuals stealing the new password (unless they have control over a member’s email account), it will certainly irritate people if their password was being continually reset. Requiring both the login name and email of the user makes it a little more complex.
Of the next two methods, addWords is used to supply the class with an indexed array of words with which to build memorable passwords, while generatePassword constructs a random password from this list, adding “separators” that could be any number from 0 to 9, or an underscore character. The password itself will contain two words chosen at random from the list, as well as two random separators. The order in which these elements appear in the password is also random. The passwords this system generates look like “7correct9computer” and “48courtclothes,” which are relatively easy for users to remember.
Example 1.38. AccessControl/AccountMaintenance.php (in SPLIB) (excerpt)


  /**

   * Add a list of words to generate passwords with

   * @param array

   * @return void

   * @access public

   */

  function addWords($words)

  {

    $this->words = $words;

  }


  /**

   * Generates a random but memorable password

   * @return string the password

   * @access private

   */

  function generatePassword()

  {

    srand((double)microtime() * 1000000);

    $seperators = range(0,9);

    $seperators[] = '_';

    $count = count($this->words);

    if ($count == 0) {

      return FALSE;

    }

    $password = array();

    for ($i = 0; $i < 4; $i++) {

      if ($i % 2 == 0) {

        shuffle($this->words);

        $password[$i] = trim($this->words[0]);

      } else {

        shuffle($seperators);

        $password[$i] = $seperators[0];

      }

    }

    shuffle($password);

    return implode('', $password);

  }
First, we add to the form a new field for the user to enter their login name:
Example 1.39. 10.php (excerpt)


// Add a field for the login

$form->addElement('text', 'login', 'Enter your login name');

$form->addRule('login', 'Enter your login', 'required', FALSE,

               'client');
All that’s required now is a small modification to the process that occurs upon the form’s submission:
Example 1.40. 10.php (excerpt)


// If the form is submitted...

if ($form->validate()) {


  // Instantiate MySQL connection

  $db = &new MySQL($host, $dbUser, $dbPass, $dbName);


  // Instantiate Account Maintenance class

  $aMaint = new AccountMaintenance($db);


  // Fetch a list of words

  $fp = fopen('./pass_words/pass_words.txt', 'rb');

  $file = fread($fp, filesize('./pass_words/pass_words.txt'));

  fclose($fp);


  // Add the words to the class

  $aMaint->addWords(explode("n", $file));


  // Reset the password

  if (!$details = $aMaint->resetPassword(

        $form->getSubmitValue('login'),

        $form->getSubmitValue('email'))) {

    echo 'We have no record of your account';

  } else {

    // Instantiate phpmailer class

    $mail = new phpmailer();

    ...
This time, we read a file (refer to Chapter 4, Files for details on this process) to obtain a list of words, the file having one word per line. We pass the list of words to the AccountMaintenance class with the addWords method. Whether you choose to use a file, a database or even some cunning code mechanism based upon the pspell_suggest function (see the PHP Manual) is up to you; you simply need to provide a list to add with addWords.
The resetPassword method changes the password behind the scenes and returns an array containing the user details in the same way as the fetchPassword method; thus, the task of emailing users their new passwords is the same. The code is therefore omitted from the above listing.
How do I let users change their passwords?
You’re now able to deal with people who have forgotten their passwords. What about people who want to change their passwords?
A good “test of design” for many PHP applications is whether users can change their passwords without needing to log back into the application afterwards. It’s important to be considerate to your site’s users if you want them to stick around. Changing their passwords should not require users to log back in, provided you construct your application carefully.
Going back to the session-based authentication mechanism you saw earlier in this chapter, you’ll remember that the login and password are stored in session variables and rechecked on every new page by the Auth class. The trick is to change the value of the password in both the session variable and the database when users change their passwords.
First things first! Let’s build a new login page using QuickForm:
Example 1.41. 11.php


<?php

// Include QuickForm class

require_once 'HTML/QuickForm.php';


// If $_GET['from'] comes from the Auth class

if (isset($_GET['from'])) {

  $target = $_GET['from'];

} else {

  // Default URL: usually index.php

  $target = '12.php';

}


// Instantiate the QuickForm class

$form = new HTML_QuickForm('loginForm', 'POST', $target);


// Add a header to the form

$form->addHeader('Please Login');


// Add a field for the login name

$form->addElement('text', 'login', 'Username');

$form->addRule('login', 'Enter your login', 'required', FALSE,

               'client');


// Add a field for the password

$form->addElement('password', 'password', 'Password');

$form->addRule('password', 'Enter your password', 'required',

               FALSE, 'client');


// Add a submit button

$form->addElement('submit', 'submit', ' Login ');


$form->display();

?>
Note that in this case, we tell QuickForm to direct the submission of the form to another PHP script, rather than handling it locally on the same page.
As we’ve already been working on an AccountMaintenance class, this seems like a reasonable place to add the code that allows users to change their passwords:
Example 1.42. AccessControl/AccountMaintenance.php (in SPLIB) (excerpt)


  /**

   * Changes a password both in the database

   * and in the current session variable.

   * Assumes the new password has been

   * validated correctly elsewhere.

   * @param Auth instance of the Auth class

   * @param string old password

   * @param string new password

   * @return boolean TRUE on success

   * @access public

   */

  function changePassword(&$auth, $oldPassword, $newPassword)

  {

    $oldPassword = mysql_escape_string($oldPassword);

    $newPassword = mysql_escape_string($newPassword);


    // Instantiate the Session class

    $session = new Session();


    // Check the the login and old password match

    $sql = "SELECT *

            FROM " . USER_TABLE . "

            WHERE

              " . USER_TABLE_LOGIN . " =

              '" . $session->get(USER_LOGIN_VAR) . "'

            AND

              " . USER_TABLE_PASSW . " =

              '" . md5($oldPassword) . "'";

    $result = $this->db->query($sql);

    if ($result->size() != 1) {

      return FALSE;

    }


    // Update the password

    $sql = "UPDATE " . USER_TABLE . "

            SET

              " . USER_TABLE_PASSW . " =

              '" . md5($newPassword) . "'

            WHERE

              " . USER_TABLE_LOGIN . " =

              '" . $session->get(USER_LOGIN_VAR) . "'";

    $result = $this->db->query($sql);

    if (!$result->isError()) {

      // Store the new credentials

      $auth->storeAuth($session->get(USER_LOGIN_VAR),

        $newPassword);

      return TRUE;

    } else {

      return FALSE;

    }

  }
The changePassword method accepts three parameters: an instance of the Auth class (so it can use the storeAuth method it provides), an old password, and a new password.
It first checks that the combination of the old password and the login name (which it retrieves from the session) are correct. It’s a good idea to require the old password before changing it to something else; perhaps the user logged in at an Internet café and then left, forgetting to log out, or worse – their session was hijacked. This process at least precludes some potential damage, as it prevents anyone who “takes over” the session being able to change the password and thus assume total control. Instead, they’re only logged in as long as the session continues.
It’s time to put this into action in the page to which the login form submits…
Example 1.43. 12.php (excerpt)


<?php

// Include MySQL class

require_once 'Database/MySQL.php';


// Include Session class

require_once 'Session/Session.php';


// Include Authentication class

require_once 'AccessControl/Auth.php';


// Include AccountMaintenance class

require_once 'AccessControl/AccountMaintenance.php';


// Include QuickForm class

require_once 'HTML/QuickForm.php';


$host   = 'localhost'; // Hostname of MySQL server

$dbUser = 'harryf';    // Username for MySQL

$dbPass = 'secret';    // Password for user

$dbName = 'sitepoint'; // Database name


// Instantiate MySQL connection

$db = &new MySQL($host, $dbUser, $dbPass, $dbName);


// Instantiate the Authentication class

$auth = &new Auth($db, '11.php', 'secret');
We include all the classes needed for the code, then instantiate the MySQL and Auth classes. From the moment Auth is instantiated, the provision of an invalid login/password combination will see the visitor returned to the login form.
This time, just for variety, we use a switch statement to control the flow of logic on the page:
Example 1.44. 12.php (excerpt)


switch ($_GET['view']) {

  case 'changePassword':

    // Instantiate the QuickForm class

    $form = new HTML_QuickForm('changePass', 'POST',

                               '12.php?view=changePassword');


    // A function for comparing password

    function cmpPass($element, $confirm)

    {

      global $form;

      $password = $form->getElementValue('newPassword');

      return $password == $confirm;

    }


    // Register the compare function

    $form->registerRule('compare', 'function', 'cmpPass');


    // Add a header to the form

    $form->addHeader('Change your Password');


    // Add a field for the old password

    $form->addElement('password', 'oldPassword',

                      'Current Password');

    $form->addRule('oldPassword', 'Enter your current password',

                   'required', false, 'client');


    // Add a field for the new password

    $form->addElement('password', 'newPassword', 'New Password');

    $form->addRule('password', 'Please provide a password',

                   'required', FALSE, 'client');

    $form->addRule('password',

                   'Password must be at least 6 characters',

                   'minlength', 6, 'client');

    $form->addRule('password',

                   'Password cannot be more than 12 chars',

                   'maxlength', 50, 'client');

    $form->addRule('password',

                   'Password can only contain letters and ' .

                   'numbers', 'alphanumeric', NULL, 'client');


    // Add a field for the new password

    $form->addElement('password', 'confirm', 'Confirm Password');

    $form->addRule('confirm', 'Confirm your password',

                   'compare', false, 'client');


    // Add a submit button

    $form->addElement('submit', 'submit', 'Change Password');
Here, the usual QuickForm setup code builds a form for changing passwords. Notice again the cmpPass function, which compares the new password and the rules for the newPassword field. We perform most of the validation of the new password within the form, leaving it to the AccountMaintenance class to perform a final check against the old password before making the change.
On validation of the form, we instantiate the AccountMaintenance class and tell it to change the password.
Example 1.45. 12.php (excerpt)


    // If the form is submitted...

    if ($form->validate()) {


      // Instantiate Account Maintenance class

      $aMaint = new AccountMaintenance($db);


      // Change the password

      if ($aMaint->changePassword(

            $auth,

            $form->getSubmitValue('oldPassword'),

            $form->getSubmitValue('newPassword'))) {

        echo 'Your password has been changed successfully.

             '<br />Click <a href="' .$_SERVER['PHP_SELF'] .

             '">here</a>';

      } else {

        echo 'Error changing your password.<br />' .

             'Click <a href="' . $_SERVER['PHP_SELF'] .

             '">here</a>';

      }


    } else {

      // If not submitted, display the form

      $form->display();

    }

    break;
The script finishes with the default behavior of the switch statement; a simple menu is displayed, providing users with the option to change their passwords.
Example 1.46. 12.php (excerpt)


  default:

    echo '<b>Options:</b><br />';

    echo '<a href="' . $_SERVER['PHP_SELF'] .

         '?view=changePassword">Change Password</a>';

    break;

}

?>
Now that you know how to change passwords, it should be no problem for you to change other account settings, such as the first and last names and the signature, by adding these to the AccountMaintenance class. If you want to allow users to change their email address, you’ll need to examine the registration procedure used earlier in this chapter, and modify the SignUp class. You should make sure that users confirm a new email address before you allow them to change it.
How do I build a permissions system?
So far, you’ve already got an authentication system, which provides a global security system for your site. But are all your site’s members equal? You probably don’t want all of your users to have access to edit and delete articles, for example. To deal with this, you need to add to the security system further complexity that allows you to assign “permissions” to limited groups of members, permitting only these users to perform particular actions.
Rather than assigning specific permissions to particular accounts, which would quickly become a nightmare to administer, the way we’ll build a permissions system is to think in terms of Users, Groups and Permissions. Users (login accounts) will be assigned to Groups, which will have names like “Administrators,” “Authors,” “Managers,” and so on. Permissions reflect actions that users will be allowed to perform within the site, and they will also be assigned to Groups. From an administration perspective, managing all this will be easy, as it will be a simple matter to see which Permissions a particular Group has, and which users are assigned to that Group.
To build the relationships I’ve described requires the construction of many-to-many relationships between tables. This is explained as follows:
- A User can belong to many Groups.
- A Group may have many Users.
- A Permission can be assigned to many Groups.
- A Group may have many Permissions.
In practical terms, the way to build many-to-many relationships in MySQL is to use a lookup table, which relates to two other tables. The lookup table stores a two column index, each column being the key of one of the two related tables. For example, here’s the definition of the user2collection lookup table:
CREATE TABLE user2collection (

  user_id INT(11) NOT NULL DEFAULT '0',

  collection_id INT(11) NOT NULL DEFAULT '0',

  PRIMARY KEY (user_id, collection_id)

)
Notice that the primary key for the table uses both columns. In doing so, it makes sure that no combination of user_id and collection_id can appear more than once.
Note that I use “collection” to refer to “group” in MySQL; the use of “group” would confuse the current versions of the mysqldump utility, which, as you know from Chapter 3, PHP and MySQL, is a helpful tool for backing up a database.
The table below presents sample data from the user2group table:
This tells us that User 1 is a member of Group 2, User 2 is a member of Groups 1 and 2, User 3 is a member of Group 2, etc.
With the lookup tables defined (the other being called collection2permission), we can now perform queries across the tables to identify the permissions a particular user has been allowed. For example, the following query returns all the permissions for the user with user_id 1.
SELECT

  p.name as permission

FROM

  user2collection uc, collection2permission cp, permission p

WHERE

  uc.user_id = '1' AND

  uc.collection_id = cp.collection_id AND

  cp.permission_id = p.permission_id
Note that I’ve used aliases for table names, such as user2collection ug, to make writing the query easier.
Armed with that knowledge, it’s time we put together a class for users. The class will allow us to fetch all the information we need about users and, in particular, to check their permissions.
First, we need to define constants for the table and column names, so that we can use the class against different table structures:
Example 1.47. AccessControl/User.php (in SPLIB) (excerpt)


/**

* Constants defining table and column names

*/

# Modify this constants to match the session variable names

// Name to use for login variable

@define('USER_LOGIN_VAR', 'login');


# Modify these constants to match your user login table

// Name of users table

@define('USER_TABLE', 'user');

// Name of ID column in usre

@define('USER_TABLE_ID', 'user_id');

// Name of login column in table

@define('USER_TABLE_LOGIN', 'login');

// Name of email column in table

@define('USER_TABLE_EMAIL', 'email');

// Name of firstname column in table

@define('USER_TABLE_FIRST', 'firstName');

// Name of lastname column in table

@define('USER_TABLE_LAST', 'lastName');

// Name of signature column in table

@define('USER_TABLE_SIGN', 'signature');


// Name of Permission table

@define('PERM_TABLE', 'permission');

// Permission table id column

@define('PERM_TABLE_ID', 'permission_id');

// Permission table name column

@define('PERM_TABLE_NAME', 'name');


// Name of Permission table

@define('PERM_TABLE', 'permission');

// Permission table id column

@define('PERM_TABLE_ID', 'permission_id');

// Permission table name column

@define('PERM_TABLE_NAME', 'name');


// Name of User to Collection lookup table

@define('USER2COLL_TABLE', 'user2collection');

// User to Collection table user_id column

@define('USER2COLL_TABLE_USER_ID', 'user_id');

// User to Collection table collection_id column

@define('USER2COLL_TABLE_COLL_ID', 'collection_id');


// Name of Collection to Permission lookup table

@define('COLL2PERM_TABLE', 'collection2permission');

// Collection to Permission table collection id

@define('COLL2PERM_TABLE_COLL_ID', 'collection_id');

// Collection to Permission table permission id

@define('COLL2PERM_TABLE_PERM_ID', 'permission_id');
With the constants defined, we can get down to the meat of the class:
Example 1.48. AccessControl/User.php (in SPLIB) (excerpt)


/**

 * User Class<br />

 * Used to store information about users, such as permissions

 * based on the session variable "login"<br />

 * <b>Note:</b> you will need to modify the populate() and

 * checkPermission() methods if your database table structure

 * is different to that used here.

 * @access public

 * @package SPLIB

 */

class User {

  /**

   * Database connection

   * @access private

   * @var  object

   */

  var $db;

  /**

   * The id which identifies this user

   * @access private

   * @var int

   */

  var $userId;

  /**

   * The users email

   * @access private

   * @var string

   */

  var $email;

  /**

   * First Name

   * @access private

   * @var string

   */

  var $firstName;

  /**

   * Last Name

   * @access private

   * @var string

   */

  var $lastName;

  /**

   * Signature

   * @access private

   * @var string

   */

  var $signature;

  /**

   * Permissions

   * @access private

   * @var array

   */

  var $permissions;

  /**

   * User constructor

   * @param object instance of database connection

   * @access public

   */

  function User(&$db)

  {

    $this->db = &$db;

    $this->populate();

  }
To begin, we’ve defined some data members as well as the constructor, which takes an instance of the MySQL class. The constructor calls the method, populate:
Example 1.49. AccessControl/User.php (in SPLIB) (excerpt)


  /**

   * Determines the user's id from the login session variable

   * @return void

   * @access private

   */

  function populate()

  {

    $session = new Session();

    $sql = "SELECT

              " . USER_TABLE_ID . ", " . USER_TABLE_EMAIL . ",

              " . USER_TABLE_FIRST . ", " . USER_TABLE_LAST . ",

              " . USER_TABLE_SIGN . "

            FROM

              " . USER_TABLE . "

            WHERE

              " . USER_TABLE_LOGIN . " =

              '" . $session->get(USER_LOGIN_VAR) . "'";

    $result = $this->db->query($sql);

    $row = $result->fetch();

    $this->userId = $row[USER_TABLE_ID];

    $this->email = $row[USER_TABLE_EMAIL];

    $this->firstName = $row[USER_TABLE_FIRST];

    $this->lastName = $row[USER_TABLE_LAST];

    $this->signature = $row[USER_TABLE_SIGN];

  }
The populate method pulls this user’s record from the database and stores various useful pieces of information in the object’s variables, so we can easily get to them when, for example, we want to display that user’s name on the page. Most important is gathering the user_id value from the database, for use in checking permissions.
Next, we have some accessor methods that are used simply to fetch the values from the object’s variables:
Example 1.50. AccessControl/User.php (in SPLIB) (excerpt)


  /**

   * Returns the user's id

   * @return int

   * @access public

   */

  function id()

  {

    return $this->userId;

  }

  /**

   * Returns the users email

   * @return int

   * @access public

   */

  function email()

  {

    return $this->email;

  }

  /**

   * Returns the users first name

   * @return string

   * @access public

   */

  function firstName()

  {

    return $this->firstName;

  }

  /**

   * Returns the users last name

   * @return string

   * @access public

   */

  function lastName()

  {

    return $this->lastName;

  }

  /**

   * Returns the users signature

   * @return string

   * @access public

   */

  function signature()

  {

    return $this->signature;

  }
The checkPermission method determines whether a user has a named permission. It returns TRUE if it finds the permission named in the local permissions array:
Example 1.51. AccessControl/User.php (in SPLIB) (excerpt)


  /**

   * Checks to see if the user has the named permission

   * @param string name of a permission

   * @return boolean TRUE is user has permission

   * @access public

   */

  function checkPermission($permission)

  {

    // If I don't have any permissions, fetch them

    if (!isset($this->permissions)) {

      $this->permissions = array();

      $sql = "SELECT

                p." . PERM_TABLE_NAME . " as permission

              FROM

                " . USER2COLL_TABLE . " uc,

                " . COLL2PERM_TABLE . " cp,

                " . PERM_TABLE . " p

              WHERE

                uc." . USER2COLL_TABLE_USER_ID . "='" .

                  $this->userId . "' AND

                uc." . USER2COLL_TABLE_COLL_ID . "=

                  cp." . COLL2PERM_TABLE_COLL_ID . " AND

                cp." . COLL2PERM_TABLE_PERM_ID . "=

                  p." . PERM_TABLE_ID;

      $result = $this->db->query($sql);

      while ($row = $result->fetch()) {

        $this->permissions[] = $row['permission'];

      }

    }

    if (in_array($permission, $this->permissions)) {

      return TRUE;

    } else {

      return FALSE;

    }

  }

}
We’ve set it up so that if there are no permissions currently stored in the class’s $this->permissions array, checkPermissions fetches all of them. This means that if we need to check permissions more than once on a page, it will only be at the cost of a single query. You may take the alternative view that it’s better to use the name of the permission in the query as well, and then count the number of rows returned. This reduces the amount of memory required by PHP, but will generate one query for each permission you check. The SQL statement for this alternative approach (showing the real table and column names, rather than the constants) could be:
$sql = 'SELECT

          COUNT(*) AS num_rows

        FROM

          user2collect uc, collection2permission cp, permission p

        WHERE

          uc.user_id = "' . $this->userId . '" AND

          uc.collection_id = cp.collection_id AND

          cp.permission_id = p.permission_id AND

          p.name = "' . $permission . '"';
The User class fetches data on a “need to know” basis. That is, it’s fairly safe to assume that the basic, available user information will be required shortly after instantiation; hence, the use of the populate method – otherwise, we wouldn’t have created the object in the first place. The data pertaining to permissions, however, may not be needed every time the User class is instantiated. It’s likely that we’ll only check permissions on a restricted number of pages, so we can save ourselves a query when the user views public pages, leaving the checkPermission method to be called explicitly as needed. This approach is known as lazy fetching, and can be a useful approach to reducing unnecessary queries and performance overhead.
Having seen the class, let’s consider a demonstration. This login form script (13.php) is the same as 11.php, but it sends the post data to a different URL. Let’s look at a simple example of the permissions in action: first, we’ll include and set up the classes as usual, and put the new User class into action:
Example 1.52. 14.php (excerpt)


<?php

// Include MySQL class

require_once 'Database/MySQL.php';


// Include Session class

require_once 'Session/Session.php';


// Include Auth class

require_once 'AccessControl/Auth.php';


// Include User class

require_once 'AccessControl/User.php';


$host   = 'localhost'; // Hostname of MySQL server

$dbUser = 'harryf';    // Username for MySQL

$dbPass = 'secret';    // Password for user

$dbName = 'sitepoint'; // Database name


// Instantiate MySQL connection

$db = &new MySQL($host, $dbUser, $dbPass, $dbName);


// Instantiate the Authentication class

$auth = &new Auth($db, '13.php', 'secret');


// Instantiate the User class

$user = &new User($db);
Now, we have code that will change the page based on the value of $_GET['view']. Each view has a different permission, which we can then look up with the User object:
Example 1.53. 14.php (excerpt)


// Switch on the view GET variable

switch (@$_GET['view']) {

  case 'create':

    // Define permission (a name in permissions table)

    $permission = 'create';

    // Create a message for users with access to this area

    $msg = 'From here you can create new content';

    break;

  case 'edit':

    $permission = 'edit';

    $msg = 'From here you can edit existing content';

    break;

  case 'delete':

    $permission = 'delete';

    $msg = 'From here you can delete existing content';

    break;

  default:

    $permission = 'view';

    $msg = 'From here you can read existing content';

}


// Check the user's permission. If inadequate, change the msg

if (!$user->checkPermission($permission)) {

  $msg = 'You do not have permission to do this';

}

?>

<p><?php echo $msg; ?></p>

<p>

  <a href="<?php echo $_SERVER['PHP_SELF']; ?>">Main</a> |

  <a href="<?php echo $_SERVER['PHP_SELF'];

    ?>?view=create">Create</a> |

  <a href="<?php echo $_SERVER['PHP_SELF'];

    ?>?view=edit">Edit</a> |

  <a href="<?php echo $_SERVER['PHP_SELF'];

    ?>?view=delete">Delete</a>

</p>
This is a simple example, of course, but you could use the checkPermission method any way you like – perhaps simply to use if/else statements to decide what a user is allowed to do and see. Another approach would be to use a variable, such as the $msg variable we’ve used here, to store the name of a PHP script for use with an include statement.
Otherwise, that’s all there is to it. Now, all you need to do is build an administration interface to control Users, Groups and Permissions!
How do I store sessions in MySQL?
As discussed earlier in this chapter, the default behavior of sessions in PHP on the server side is to create a temporary file in which session data is stored. This is usually kept in the temporary directory of the operating system and, as such, presents a security risk to your applications, especially if you are using a shared server. It’s a good idea to be aware of the alternative; using a custom session handler provides an alternative data store which is fully under your control.
In this solution, I’ll provide you with a custom session handler that will store all session data in MySQL in a manner that will require no modification of any code. The custom handler code is a port of the PostgreSQL Session Handler for PHP, written by Jon Parise, and is supplied with the code for this chapter, in the subdirectory mysql_session_handler.
To install it, the first thing you need to do is modify the file mysql_session_handler.php, changing the lines that identify your database connection, shown here in bold:
Example 1.54. mysql_session_handler/mysql_session_handler.php (excerpt)


function mysql_session_open($save_path, $session_name)

{

  global $mysql_session_handle;


  /* See: http://www.php.net/manual/function.mysql-connect.php */

  $host = 'localhost';

  $user = 'harryf';

  $pass = 'secret';

  /* See: http://www.php.net/manual/function.mysql-select-db.php*/

  $dbas = 'sitepoint';


  $mysql_session_handle = mysql_connect($host, $user, $pass);

  mysql_select_db($dbas, $mysql_session_handle);

  return $mysql_session_handle;

}
Once you’ve done that, the next step is to override some php.ini settings with a .htaccess file that contains the following. Note that the PHP configuration setting auto_prepend_file can only be set in php.ini or by a .htaccess file. If you can’t use .htaccess in that way, you’ll need to include mysql_session_handler.php in all your scripts, which is best done by adding it to a script which is already included by all others, such as that where you keep central configuration information. The configuration values session.save_handler and session_save_path can both be controlled with the ini_set function (see Appendix A, PHP Configuration for more details). These will also need to be included in every script. In this case, your .htaccess file must contain the following:
Example 1.55. mysql_session_handler/.htaccess


php_value session.save_handler 'user'

php_value session.save_path 'php_sessions'

php_value auto_prepend_file '/path/to/mysql_session_handler.php'
The first line tells PHP that rather than using its default session handling mechanism, it will be told how to handle sessions by your own code. The value session.save_path refers to the name of the table where sessions are stored. The last line tells PHP to execute the mysql_session_handler.php file every time any other script is executed.
Finally, you need to create a table called php_sessions with the following structure:
CREATE TABLE php_sessions (

  session_id  VARCHAR(40) NOT NULL DEFAULT '',

  last_active INT(11)     NOT NULL DEFAULT '0',

  data        TEXT        NOT NULL,

  PRIMARY KEY (session_id)

)
With the .htaccess file placed in your Web root directory, all PHP scripts using sessions will store the session data in MySQL rather than in files.
The data stored by sessions has a format that looks like this:
myVar|s:11:"Hello World";ip_address|s:9:"127.0.0.1";Variables themselves are separated by either semicolons or {} in the case of arrays, while within each variable, the name and value is separated by |. The value itself is stored in a serialized form (see the PHP Manual for details).
So the above example corresponds to two variables:
$myVar = "Hello World";

$ip_address = "127.0.0.1";
Being able to decode this information with PHP will become important in the next solution.
How do I track who is online?
You may have seen applications such as vBulletin and phpBB, which let visitors see how many users are online (and sometimes, which users are online) at a given moment. Now that we have an authentication system, and a custom session handler that stores sessions in MySQL, implementing “Who is Online?” functionality is a breeze (well, almost)!
The first thing we need is (you guessed it!) a class that we can use to read and interpret stored session data from MySQL.
The constructor for the class simply initializes an array. This is used as a “first in first out” (FIFO) queue to which raw session data is added, and from which objects are returned along with properties that correspond to the variables stored in a given session.
Example 1.56. Session/SessionAnalyzer.php (in SPLIB) (excerpt)


/**

 * Session Analyzer

 * Examines serialized session data (as it appears on the file

 * system or in a database) and builds objects into which it

 * places the data stored in the session

 * <code>

 * $sa = new SessionAnalyzer();

 * $sa->addSession($some_serialized_session_data);

 * $sessionStore = $sa->fetch();

 * </code>

 * @package SPLIB

 * @access public

 */

class SessionAnalyzer {

  /**

   * A list of sessions, their data held in SessionStore objects

   * @var array

   */

  var $sessions;


  /**

   * SessionAnalyzer constructor

   * @param object instance of database connection

   * @access public

   */

  function SessionAnalyzer()

  {

    $this->sessions = array();

  }
The addSession method is used to put raw session data in the queue. It calls the private parseSession method, which is where the analysis of the raw session data actually occurs. The fetchSessions method allows us to get objects back from the queue, the properties of the object being the variables stored in the raw session data. Note that the objects returned are not related to the Session class we worked with earlier in this chapter. They are simply data containers – objects of class SessionStore (below) – and have no methods.
Example 1.57. Session/SessionAnalyzer.php (in SPLIB) (excerpt)


  /**

   * Gathers the sessions into a local array for analysis

   * @param string raw serialized session data to parse

   * @return void

   * @access public

   */

  function addSession($rawData)

  {

    $this->sessions[] = $this->parseSession($rawData);

  }


  /**

   * Iteraters over the SessionStore array

   * @return SessionStore

   * @access public

   */

  function fetch()

  {

    $session = each($this->sessions);

    if ($session) {

      return $session['value'];

    } else {

      reset($this->sessions);

      return FALSE;

    }

  }
I’ll leave the parseSession method to your imagination (or you can look at the code archive), as it has to do some serious string manipulation to interpret the session data correctly.
One word of warning. If you’re storing objects of your own classes in sessions, the class file needs to be included before you use SessionAnalyzer, or you’ll receive PHP errors about undeclared classes.
For your information, here’s the SessionStore class, which acts as the container for parsed session data:
Example 1.58. Session/SessionAnalyzer.php (in SPLIB) (excerpt)


/**

 * SessionStore

 * Container class in which to place unserialized session data

 * @package SPLIB

 * @access public

 */

class SessionStore {}
Now that we’re capable of analyzing sessions, here’s a simple script that counts the number of users online. It assumes we’re using the MySQL session handler you saw in the previous solution:
Example 1.59. 15.php


<?php

// Include MySQL class

require_once 'Database/MySQL.php';


// Include SessionAnalyzer class

require_once 'Session/SessionAnalyzer.php';


$host   = 'localhost'; // Hostname of MySQL server

$dbUser = 'harryf';    // Username for MySQL

$dbPass = 'secret';    // Password for user

$dbName = 'sitepoint'; // Database name


// Instantiate MySQL connection

$db = &new MySQL($host, $dbUser, $dbPass, $dbName);


// Instantiate the SessionAnalyzer class

$sAnalyzer = &new SessionAnalyzer();


$sql = "SELECT data FROM php_sessions";

$result = $db->query($sql);


while ($row = $result->fetch()) {

    // Add the raw session data

    $sAnalyzer->addSession($row['data']);

}


// Initialize variables for results of session analysis

$guests = 0;

$members = '';


// Loop through the queue of parsed sessions

while ($sessionStore = $sAnalyzer->fetch()) {

  if (isset($sessionStore->login)) {

    $members .= $sessionStore->login . ' ';

  } else {

    $guests++;

  }

}

// Format the output nicely


echo 'There are currently ' . $guests . ' guests online<br />';

echo 'Members online: ' . $members;

?>
The display looks like this:
There are currently 6 guests online

Members online: HarryF, BillG
I confess – I faked the number of users online for the purposes of having something to show you! If my private development PC was getting unknown visitors, I’d be worried.
“Who is Online?” functionality is more than just a nice gimmick. If you plan to add any kind of real time chat system to your site, “Who is Online?” is essential for allowing people to meet up. It also provides a user administration “snap shot” of what’s happening on your site, particularly if your authentication system has just sent you an SMS telling you someone is trying to break in.
Further Reading
- The WWW Security FAQ This is essential reading!
- HTTP Header Reference This summary of all HTTP headers is one for the bookmarks…
- Apache HTTP Authentication with PHP This tutorial takes a look at the essentials of HTTP authentication with PHP.
- Session Fixation Vulnerability in Web-based Applications This paper examines a session hijacking strategy where an intruder effectively hijacks the session before it’s even started. The PHP Authentication class developed in this chapter should prevent this from happening to your site’s users.
- Managing Users with PHP Sessions and MySQL This article introduces the principles of user authentication with sessions.
- Write Secure Scripts with PHP 4.2! Here’s a tutorial that explains the importance of writing scripts with
register_globalsswitched off. - PHP and the OWASP Top Ten Security Vulnerabilities This article provides a summary of recent findings from Open Web Application Security Project, described in PHP terms. It’s required reading!
- Custom Session Handlers in PHP4 This handy tutorial does a good job of explaining how to build custom session handlers. Be warned, though, that there have been mixed reports about the final code developed for this tutorial; in some environments it seems to cause various miscellaneous or intermittent errors.
Look out for more chapters from The PHP Anthology on SitePoint in coming weeks! If you can’t wait, download the sample chapters, or order your very own copy now!
Frequently Asked Questions (FAQs) about Anthology 2.1 Access Control
What is Anthology 2.1 Access Control?
Anthology 2.1 Access Control is a feature in the Anthology software suite that allows administrators to manage user permissions and access to different parts of the system. This feature is crucial in maintaining the security and integrity of the system, as it ensures that only authorized users can access certain data or perform certain actions.
How does Anthology 2.1 Access Control compare to other access control systems?
Anthology 2.1 Access Control stands out for its flexibility and ease of use. It allows administrators to set up complex permission structures with ease, and it’s designed to be intuitive and user-friendly. This makes it a great choice for organizations of all sizes, from small businesses to large corporations.
How do I set up Anthology 2.1 Access Control?
Setting up Anthology 2.1 Access Control is a straightforward process. First, you’ll need to create user roles, which define what actions a user can perform. Then, you’ll assign these roles to your users. You can also set up access control lists, which define what resources a user can access.
Can I customize the permissions in Anthology 2.1 Access Control?
Yes, Anthology 2.1 Access Control is highly customizable. You can create custom roles with specific permissions, and you can also set up access control lists to fine-tune what resources a user can access. This allows you to tailor the system to your organization’s specific needs.
What happens if a user tries to access a resource they don’t have permission for?
If a user tries to access a resource they don’t have permission for, they will be denied access. This helps to maintain the security and integrity of your system.
How does Anthology 2.1 Access Control handle session management?
Anthology 2.1 Access Control uses session management to keep track of a user’s activity during a session. This includes tracking what resources they access and what actions they perform. This information can be used for auditing and troubleshooting purposes.
Can I integrate Anthology 2.1 Access Control with other systems?
Yes, Anthology 2.1 Access Control can be integrated with other systems. This allows you to manage user permissions and access across multiple systems from a single interface.
How secure is Anthology 2.1 Access Control?
Anthology 2.1 Access Control is designed with security in mind. It uses advanced encryption and authentication methods to ensure that your data is secure. Additionally, it includes features like session management and access control lists to further enhance security.
Can I use Anthology 2.1 Access Control for remote work?
Yes, Anthology 2.1 Access Control is designed to support remote work. It allows administrators to manage user permissions and access from anywhere, making it a great choice for organizations with remote teams.
What kind of support is available for Anthology 2.1 Access Control?
Anthology offers comprehensive support for Anthology 2.1 Access Control. This includes documentation, tutorials, and a dedicated support team that can assist with any issues or questions you may have.