Using Angular Augury to Debug Your Code


Augury is an open-source tool allowing developers to profile and debug Angular 2 and 4 applications.
Modern web browsers provide developer consoles to inspect various elements on the page, which is really handy when trying to debug markup, styles, and scripts. However, this console isn’t enough to debug Angular applications that usually have lots of components, events, attributes, and a separate routing system.
Augury is a tool designed specifically for Angular apps. It’s an open-source debugging and profiling tool for Angular 2+ applications.
Augury is just a Chrome extension that’s quite simple to use, so you won’t need to spend hours and hours learning how to utilize this tool. We’re going to build a sample Angular app and then see Augury in action by exploring various parts of our project. So, let’s get started!
Key Takeaways
- Augury is an open-source tool specifically designed to debug and profile Angular 2+ applications. It visualizes the app’s structure in a tree form, allowing developers to inspect properties of objects, change them in real-time, view source code, insert breakpoints, work with events, and more.
- Augury is available as a Chrome extension and can be easily installed from the Chrome Web Store. After installation, it adds a new tab to the developer tools that provides insights into the application’s structure.
- The tool offers various features including a component tree, properties pane for selected components, ability to insert breakpoints, and an Injector Graph to confirm dependencies. It also provides the ability to inspect the routing system of the application.
- Augury is a powerful tool for Angular developers, offering a simple yet effective way to debug and profile Angular applications. It aids in understanding the application’s structure and behavior, helping to identify and fix issues.
Hello, Augury!
Augury visualizes your app’s structure in a form of a tree, showing how components and their dependencies relate to each other. It also allows you to inspect properties of your objects and change them on the fly. On top of that, you can easily view the source code of a specific component, insert breakpoints as needed, work with events, and more. Lastly, you can browse the application’s routing system, as well as view the full list of all utilized modules.
Augury is only available as a Chrome extension (there’s no Firefox support yet, unfortunately) and installing it is as simple as going to this page and pressing the Install button. After that, you may open the developer tools by pressing Ctrl + Shift + I (Windows/Linux) or Cmd + Opt + I (macOS). You’ll note that a new tab called Augury has appeared. After switching to this tab, you’ll either see the application’s structure or the phrase “This application is not an Angular application”. I’ve noticed that sometimes it may be required to re-open the Developer Console in order for Augury to analyze the page properly, so watch out.
Now that we have Augury installed, let’s proceed to the next section and prepare the sample application that we’ll use as a playground!
Building a Sample App
In order to see Augury in action, we need something to debug, right? In this section, I’m going to quickly guide you through the process of creating a very simple application (loosely based on the sample app from the Angular’s official tutorial) listing some users and allowing you to edit them. Alternatively, you may grab the source code from my GitHub repo.
Before getting started, install Angular CLI on your machine if you don’t have it yet:
npm install -g @angular/cli
Next, create the skeleton of our new project:
ng new sitepoint-augury
Change the application’s title by tweaking the src/app/app.component.ts file:
// ...

export class AppComponent {
  title = 'Augury Demo';
}
Tweak the src/app/app.component.html by removing all the links to documentation added automatically by code generator and add an <app-users></app-users> line:
<div style="text-align:center">
  <h1>
    Welcome to {{ title }}!
  </h1>
</div>

<app-users></app-users>
Of course, we need a User component, so generate it now by running:
ng generate component users
Change the src/app/users/user.component.ts file in the following way:
import { Component, OnInit } from '@angular/core';
import { User } from './user.model'; // <--- 1
import { UserService } from './user.service'; // <--- 2

@Component({
  selector: 'app-users',
  templateUrl: './users.component.html',
  styleUrls: ['./users.component.css']
})
export class UsersComponent implements OnInit {
  users: User[];

  selectedUser: User;

  onSelect(user: User): void { // <--- 3
    this.selectedUser = user;
  }

  constructor(private userService: UserService) { } // <--- 4

  ngOnInit() {
    this.getUsers(); // <--- 5
  }

  getUsers(): void { // <--- 6
    this.users = this.userService.getUsers();
  }

}
Main things to note here:
- We are importing a
Usermodel that will be created in a moment. - We’re also importing a
UserService. It will simply return a list of hardcoded users, but let’s pretend they’re being fetched from some remote location. - We’re allowing the users to be selected by clicking on them. The currently selected user is stored in a separate
selectedUserattribute. - Hook up the
userServiceusing the dependency injection mechanism. - Load the list of users once the component is initialized.
- In order to get users, we’re utilizing our
userService.
That’s pretty much it for this component.
Next, let’s create a model in a src/app/users/user.model.ts file. Each user is going to have an ID, a first and a last name:
export class User {
  id: number;
  first: string;
  last: string;
}
Nothing complex.
Now let’s proceed to the UserService that’s going to be defined in the app/src/users/user.service.ts file:
import { Injectable } from '@angular/core';
import { User } from './user.model';

@Injectable()
export class UserService {

  constructor() { }

  getUsers(): User[] {
    return [
      {
        id: 1,
        first: 'John',
        last: 'Doe'
      },
      {
        id: 2,
        first: 'Margaret',
        last: 'Brown'
      }
    ]
  }
}
The getUsers method simply returns an array of users with hardcoded data.
Now let’s display our users with the help of ngFor. Also, we’re going to add a click event listener and fire onSelect whenever a user is clicked on. When this happens, a form to edit the chosen user should be displayed (which is going to be done with the help of ngIf). Modify the src/app/users/user.component.html file like this:
<div *ngFor="let user of users" (click)="onSelect(user)"
[class.selected]="user === selectedUser">
  <p>{{user.last}}, {{user.first}} (ID: {{user.id}})</p>
</div>

<div *ngIf="selectedUser">
  <h3>Edit</h3>
  <label for="first">First</label>
  <input [(ngModel)]="selectedUser.first" placeholder="First name" id="first">

  <label for="last">Last</label>
  <input [(ngModel)]="selectedUser.last" placeholder="Last name" id="last">
</div>
We’re assigning a .selected CSS class to the chosen user, so let’s add some simple styling for it inside the src/app/users/user.component.css file:
.selected {
  font-weight: bold;
}
Lastly, we have to import FormsModule and UserService inside the src/app/app.module.ts file:
import { BrowserModule } from '@angular/platform-browser';
import { NgModule } from '@angular/core';
import { FormsModule } from '@angular/forms'; // <---
import { UserService } from './users/user.service'; // <---

import { AppComponent } from './app.component';
import { UsersComponent } from './users/users.component';
FormsModule should be listed in the imports section in the app.module.ts, whereas UserService goes to the providers:
@NgModule({
  declarations: [
    AppComponent,
    UsersComponent
  ],
  imports: [
    BrowserModule,
    FormsModule // <---
  ],
  providers: [
    UserService // <---
  ],
  bootstrap: [AppComponent]
})
That’s it! Our sample application is finished, and you can open it by running the following command:
ng serve --open
Component View
All right, so now let’s take a look at the goodies that Augury has to offer for us. Open Chrome and go to http://localhost:4200. A list of users should be displayed. Press Ctrl + Shift + I or Cmd + Opt + I, switch to the Augury tab, and press AppComponent in the left pane, under the Component Tree:
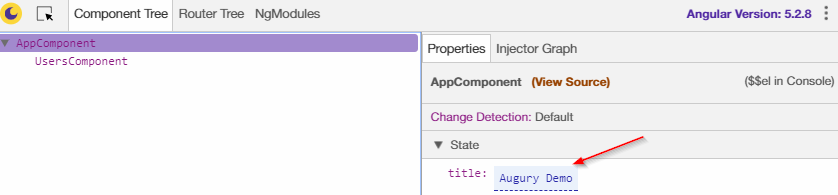
There are two panes here:
- To the left, you can see the Component Tree that has a list of the application’s components, properly nested.
- To the right, there’s a Properties pane for the selected component. Our
AppComponenthas only one propertytitle, which is displayed alongside its value (annotated with an arrow).
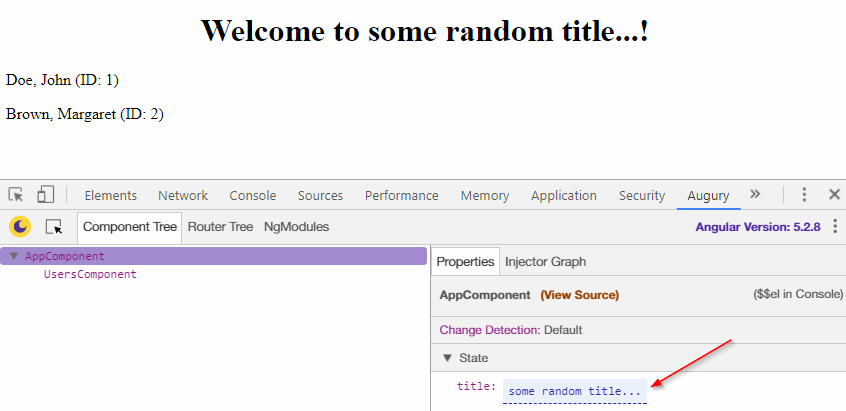
What’s interesting about the Properties pane is that you can change the values as needed and instantly observe the changes. For example, try changing the title:
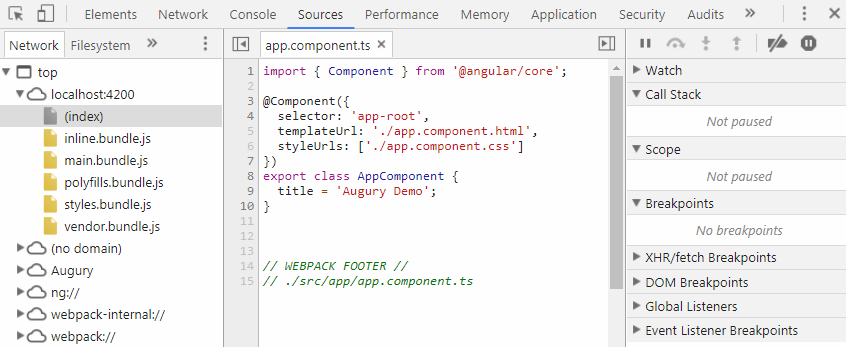
Also, there’s a View Source link next to the component’s name. Pressing it will display the source code for the chosen component, where you can easily insert breakpoints to stop code execution at an arbitrary point:
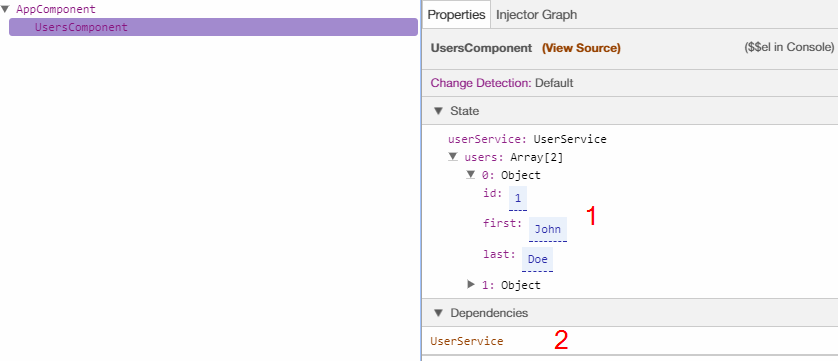
Now let’s return to the Component Tree and select UsersComponent. In the Properties tab we’ll see an array of users (point #1 in the screenshot below) as well as UserService listed in the Dependencies section (#2):
Next, let’s try to view the source for the UsersComponent. When the corresponding tab opens, you may insert a breakpoint at, for example, line 16 that says this.selectedUser = user;. To insert a breakpoint, simply click on the line number. Next, try selecting a user and you’re going to see the following:
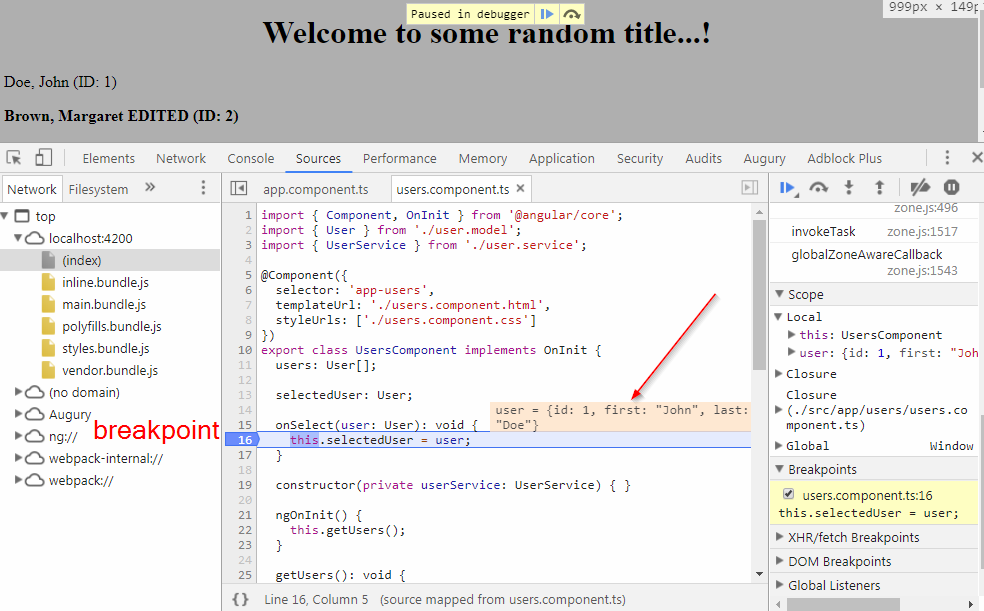
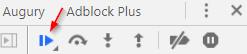
So, the code execution is paused and the currently selected user is displayed in that orange box. Once you’re done debugging this line, you can press the Resume Script Execution button:
The program will proceed and either stop at the next breakpoint or finish its job. Breakpoints can come in very handy if you suspect that the application is misbehaving due to the data being processed incorrectly at some specific method. You may have as many breakpoints as needed, which allows you to gradually explore the script and understand what’s going on with your data at various steps.
Forms
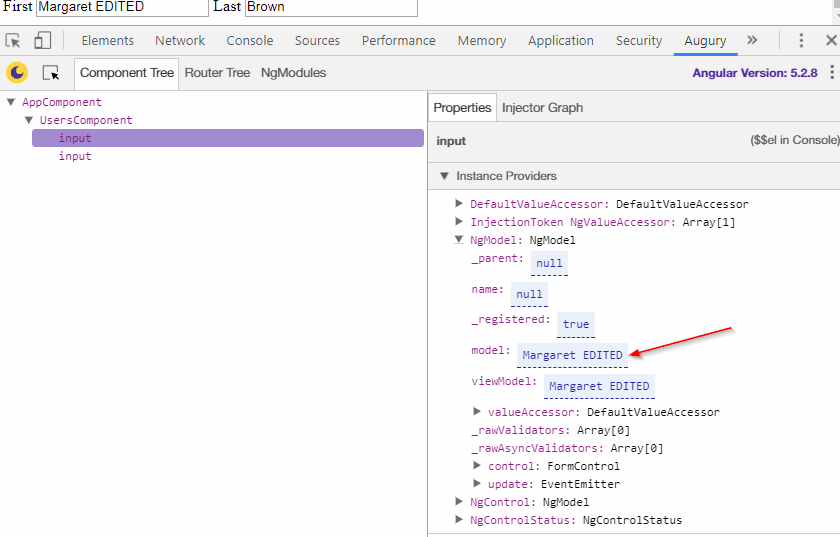
Note that after you select a user, the selectedUser property will be instantly added. Also, you’re going to see two inputs added to the UsersComponent:
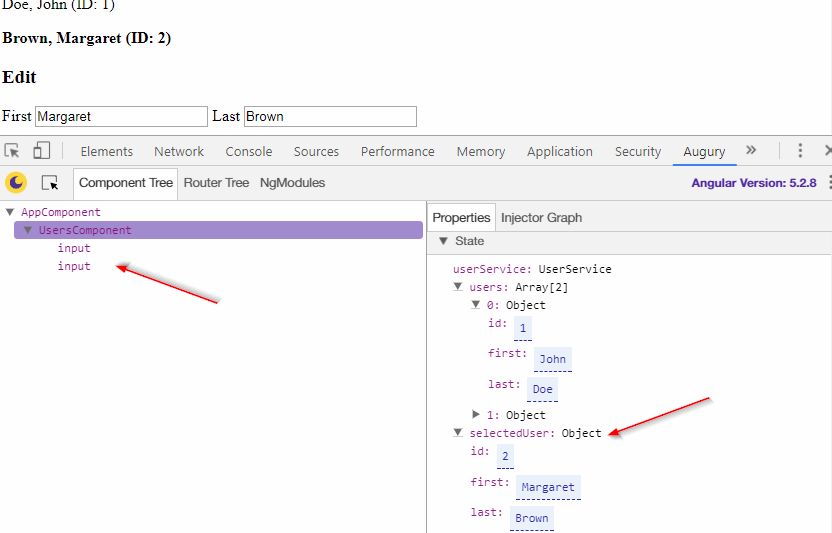
If we select one of these inputs, we’re going to see some quite detailed information about this control — specifically, what model it relates too. If I change the input’s value, the model is going to be updated as well:
Dependency Injection
As you remember, we have the UserService injected into the UsersComponent, right? This can be easily confirmed by selecting the UsersComponent and opening an “Injector Graph”:
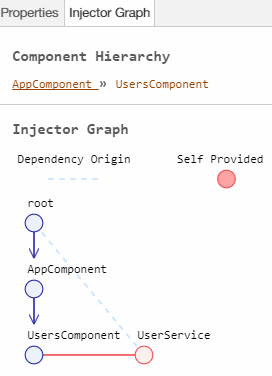
So, here we can see the Component Hierarchy and the Injector Graph itself. This graph illustrates the dependency tree:
rootis ourNgModuledefined in theapp.module.tsfile- Next, there’s an
AppComponent - Lastly, there’s the
UsersComponentitself.
Also, note that here we can see the UserService connected to the UsersComponent with a red line. This confirms that the service is definitely being injected into the component. You can also hover the mouse pointer over the UserService node to see more detailed information at the bottom of the tab:
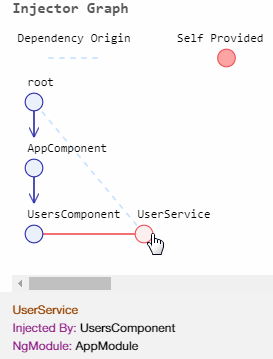
Dependency injection can help you to make sure that all the dependencies are hooked up properly, as many bugs arise simply because you forget to import some module.
NgModules
It’s also possible to view a full list of all modules utilized in the app as well as information about the providers, exports, and other stuff. It’s as simple as opening the NgModules tab:
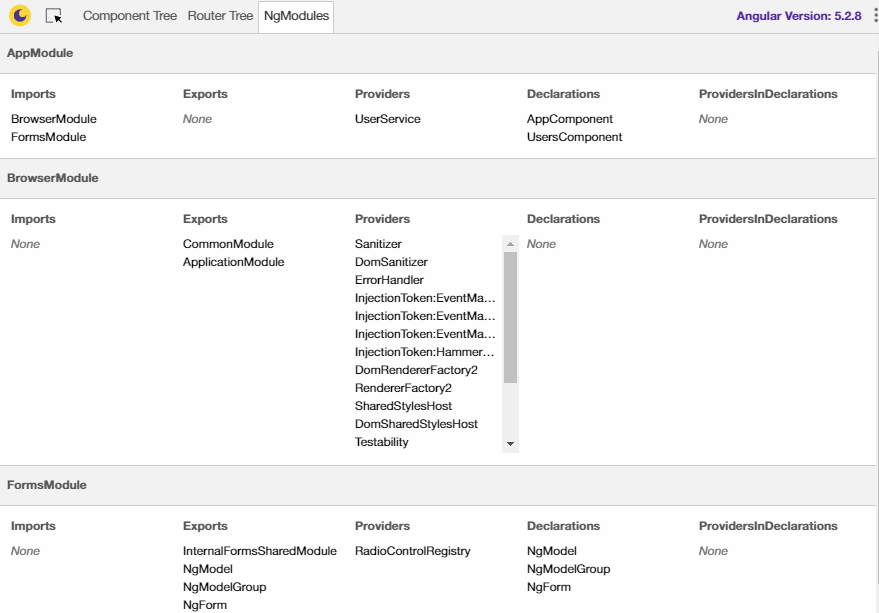
Unfortunately, this tab isn’t interactive, so you can’t select a module to view more detailed information about it. Still, it can come in really handy.
Routes
The last Augury feature is the ability to inspect the routing system of your application. We don’t have any routes in the demo app, but here’s an image taken from the official documentation that nicely illustrates this feature:
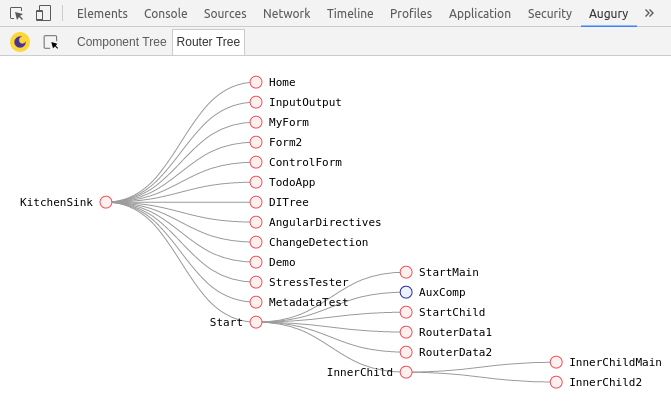
We can see all the application’s routes with ease. Even if a route is being lazy-loaded, this schema will be automatically updated when the corresponding route appears. How cool is that?
Conclusion
In this article, we’ve looked at the Augury profiler and debugger for Angular 2+ applications. We’ve seen how to install and launch this tool and discussed all its main features, including component tree, injection graph, breakpoints, and routing debugging.
As you see, this tool is quite simple, yet really powerful, so it’s definitely something each Angular developer should have in their toolbox! Which debuggers have you tried using when developing for client side? Did you like Augury’s features? As always, I thank you for staying with me and happy debugging.
Frequently Asked Questions (FAQs) about Angular Augury Debug Code
What is Angular Augury and why is it important for debugging?
Angular Augury is a Chrome and Firefox DevTools extension for debugging and profiling Angular applications. It’s important for debugging because it provides a visual representation of an application’s component tree and a real-time view of the component’s properties. This allows developers to understand and track the behavior of their application, making it easier to identify and fix issues.
How do I install Angular Augury?
Angular Augury can be installed as a browser extension. For Chrome, you can find it in the Chrome Web Store. For Firefox, it’s available in the Firefox Add-ons. Once installed, it will appear in your browser’s DevTools.
How do I use Angular Augury for debugging?
To use Angular Augury for debugging, open your Angular application in your browser, then open the DevTools. You’ll see an ‘Augury’ tab, which will show you the component tree of your application. You can click on any component to view its properties, inputs, outputs, and more.
What are the main features of Angular Augury?
Angular Augury provides several features for debugging and profiling Angular applications. These include a component tree, which shows the hierarchy of components; a component inspector, which displays the properties of a selected component; and a router tree, which shows the routing structure of your application.
Can I use Angular Augury with any version of Angular?
Angular Augury is compatible with Angular 2 and above. It may not work correctly with older versions of Angular.
What is the difference between Angular Augury and Angular DevTools?
While both Angular Augury and Angular DevTools are used for debugging Angular applications, they have some differences. Angular DevTools is a newer tool and has some additional features, such as a performance profiler. However, Angular Augury is still widely used and provides a detailed view of the component tree and router tree.
How can I troubleshoot issues with Angular Augury?
If you’re having issues with Angular Augury, make sure you’re using a supported version of Angular and your browser. If you’re still having problems, you can check the Augury GitHub page for known issues and solutions.
Can I use Angular Augury for performance profiling?
While Angular Augury provides some information about performance, such as change detection cycles, it doesn’t have a dedicated performance profiler. For detailed performance profiling, you might want to use Angular DevTools or other profiling tools.
How can I contribute to Angular Augury?
Angular Augury is an open-source project, and contributions are welcome. You can contribute by reporting issues, suggesting new features, or submitting pull requests. Check the Augury GitHub page for more information on how to contribute.
Is there any documentation or tutorials for Angular Augury?
Yes, there is documentation available on the Augury GitHub page, and you can find tutorials and articles on various websites and blogs. These resources can help you understand how to use Augury and make the most of its features.
Ilya Bodrov is personal IT teacher, a senior engineer working at Campaigner LLC, author and teaching assistant at Sitepoint and lecturer at Moscow Aviations Institute. His primary programming languages are Ruby (with Rails) and JavaScript. He enjoys coding, teaching people and learning new things. Ilya also has some Cisco and Microsoft certificates and was working as a tutor in an educational center for a couple of years. In his free time he tweets, writes posts for his website, participates in OpenSource projects, goes in for sports and plays music.


Published in
·Business·Conversion·Entrepreneur·Entrepreneurship·Entrepreneurship·Marketing·Revenue·September 17, 2015