

Key Takeaways
- The tutorial explains how to add CRUD operations to a simple CMS in Sinatra, allowing users to edit and delete pages. This involves creating route handlers and adding buttons to each page for editing and deleting.
- The tutorial also demonstrates how to create ‘pretty URLs’ based on the title of the page, rather than using MongoDB’s large id numbers. This is achieved by adding a new field to the Page model called ‘permalink’, which is automatically created based on the title.
- The tutorial concludes with the addition of some simple styling using Sass. It also previews what will be covered in the next part of the tutorial series, including the creation of an admin section, flash messages, cache pages, versioning and timestamps.
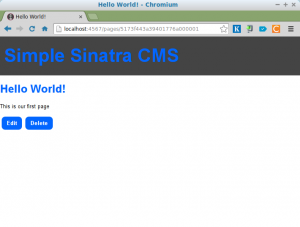 In part one we installed MongoDB and used Mongoid to create some pages for our Simple CMS. We also built a web front-end for adding and viewing pages. In this tutorial, we’re going to add the other two CRUD operations that will allow users to edit and delete pages. Before we add the functionality, let’s add a couple of buttons to each page to allow you to edit or delete the page. Edit the
 show.slim file so that it looks like the following:
  a href="/pages/#{@page.id}/edit" Edit this page,

  a href="/pages/delete/#{@page.id}" Delete this page
Editing Pages
We need to create a route handler for when the user clicks on the edit page URL. Add the following to main.rb (but make sure that it goes before the ‘/pages/:id’ route):
  get '/pages/:id/edit' do

    @page = Page.find(params[:id])

    slim :edit

  end
This finds the page that is to be edited in the database using the id provided in the URL and stores it in an instance variable called @page. This will be accessible in the view, which is called edit.slim. We need to create that, so let’s do that now. Save the following as edit.slim in the views directory:
  h1 Edit Page

  form action="/pages/#{@page.id}" method="POST"

    input type="hidden" name="_method" value="PUT"

    fieldset

      legend Edit page

      == slim :form

    input type="submit" value="Update"
Notice that this reuses the form partial that we used for the new page in the last tutorial. This keeps things consistent and keeps our code DRY. The form refers to values in the @page object, so some of the fields should be filled in with their current values. The form also has a hidden field that is used to tell Sinatra that the request is a PUT request. This is because most browsers don’t natively support any HTTP verbs other than GET and POST. The solution is to use Sinatra’s method override so that the request will be routed as if it was a PUT request. We are using a PUT request in this case because we are updating the resource.
Next, we need to deal with what happens when the form is submitted. We need another route handler to deal with that, so add the following to main.rb:
  put '/pages/:id' do

    page = Page.find(params[:id])

    page.update_attributes(params[:page])

    redirect to("/pages/#{page.id}")

  end
This finds the page that needs to be updated and updates it using Mongoid’s update_attributes method. It then redirects the user to the newly udpated page.
Deleting Pages
To delete a page, we are going to create a two-step process. First, we display a confirmation page to check that the user wishes to delete the page. Here is the route handler for that page:
  get '/pages/delete/:id' do

    @page = Page.find(params[:id])

    slim :delete

  end
This route handler simply finds the page that is to be deleted and then shows a confirmation page. We need to create a view for this page, saved as delete.slim in the views directory:
  h1 Delete Page

  p Are you sure you want to delete the page called #{@page.title}?

  form action="/pages/#{@page.id}" method="POST"

    input type="hidden" name="_method" value="DELETE"

    input type="submit" value="Delete"

  a href="/pages" cancel
We have to use a form to do this, as we will be using the DELETE HTTP method in our route handler that will delete the page. If we use a link then we can only use GET methods. We also need to use a hidden input field once again to use Sinatra’s method override, this time telling it to route the request as a DELETE method.
All that is left to do is add a route handler at the bottom of main.rb to deal with that request:
    delete '/pages/:id' do

      Page.find(params[:id]).destroy

      redirect to('/pages')

    end
This simply finds the page and uses the destroy method to remove it from the database. It then redirects to the page index.
Permalinks
So far we have been using the id of the Page object as a URL. MongoDB uses very big ids, so this means we have URLS such as /pages/5173f443a39401776a000001. These are very long, and not very descriptive, so it would be nice if we could create a ‘pretty URL’ based on the title of the page.
To do this we have to add a new field to our Page model called permalink. This can be done with the following line of code:
field :permalink, type: String, default: -> { make_permalink }
This is not going to be a field that is filled in by the user in a form. It will be automatically created based on the title. We do this by using adding a default value that is set with a lambda that refers to a method called make_permalink. This method takes the title of the page and removes any spaces or punctuation with a hyphen (‘-‘) using various string methods. Here is the method, it just needs to go inside the Page class:
  def make_permalink

    title.downcase.gsub(/W/,'-').squeeze('-').chomp('-') if title

  end
We can test this functionality in IRB using the following lines of code:
  $> irb

  2.0.0-p0 :001 > require './main'

   => true
Now, search for the first document in our collection and you’ll find, amazingly, it already has a permalink field with an appropriate value:
  2.0.0-p0 :002 > Page.first

  => #This is our first page
", permalink: "hello-world">
Welcome to the world of schemaless databases! Unfortunately, things are not as good as we first thought because if we try to query based on this field, we get an error:
  2.0.0p0 :003 > Page.find_by(permalink: "hello-world")

  Mongoid::Errors::DocumentNotFound:
This is because the Page object with its new permalink field needs to be saved. This is easily done using the following code:
  2.0.0p0 :004 > Page.first.save

   => true
Now we should be able to find the page using it’s permalink:
  2.0.0p0 :005 > Page.find_by(permalink: "hello-world")

   => #This is our first page
", permalink: "hello-world">
Great! This means that every page created so far just needs to be saved to get it’s own permalink. If you have lots of pages, you can do this in one hit with the following line of code:
2.0.0p0 :007 > Page.all.each{|page| page.save }
Everything seems to be working as it should. Now we just need to create the route handler for pretty URLS. These will simply be the permalink and won’t start with /pages. For example, going to http://localhost:4567/hello-world will show the page with the title of “Hello World!”. This route handler will actually match every route, so to allow other routes to get through we will use Sinatra’s pass method in a resuce block which will be invoked if the page cannot be found in the database.
Add the following code to main.rb:
  get '/:permalink' do

    begin

      @page = Page.find_by(permalink: params[:permalink])

    rescue

      pass

    end

    slim :show

  end
This route handler will try to find the page based on the permalink given in the URL and store it in the @page instance variable before displaying the page using the show view that we have already created. If it can’t find the page in the database, then an error is thrown. The rescue method catches the error and calls the pass method, so Sinatra will simply move along to the next route to see if it matches.
Adding Some Style
Everything is working just as we want, but it all looks a bit nasty. Sinatra makes it really easy to use Sass to put together some nice stylesheets. All you need to do is add the following route handler to main.rb:
get('/styles/main.css'){ scss :styles }
Then place the following line in your layout file:
link rel="stylesheet" href="/styles/main.css"
Then create a file called styles.scss and save it in the views directory. This is where you put all of your styles.
Here is one I knocked together. It adds a bit of color, makes the form a bit nicer and makes some of the links and submit input fields look like buttons:
  $blue: #0166FF;
  body{

    margin: 0;

    padding: 0;

    font: 13px/1.2 helvetica, arial, sans-serif;

  }
  h1,h2,h3,h4,h5,h6{

    color: $blue;

  }
  .logo {

    background: #444;

    margin: 0;

    padding: 20px 10px;

    font-size: 44px;

    a,a:visited{ color: $blue; text-decoration: none;}

  }
  .button{

    border: none;

    border-radius: 8px;

    padding: 8px 12px;

    margin: 4px;

    color: #fff;

    background: $blue;

    text-decoration: none;

    font-weight: bold;

    display: inline-block;

    width: auto;

    &:hover{

      background: darken($blue,20%);

    }

  }
  label{

    display: block;

    font-weight: bold;

    font-size: 16px;

  }
  form, input, textarea{

    width: 100%;

  }
  input, textarea {

    border: #ccc 1px solid;

    padding: 10px 5px;

    font-size: 16px;

  }
Note for some of these styles to work, you will need to add a class of button to the relevant elements in your views. For example, show.slim now looks like this:
  h1= @page.title

  - if @page.content

    == markdown @page.content
  a.button href="/pages/#{@page.id}/edit" Edit

  a.button href="/pages/delete/#{@page.id}" Delete
… and it looks a lot better for it!
That’s All Folks!
Now we have a fully functioning, albeit very simple, content management system. You can create, update, view and delete pages and they also have some pretty URLs based on their title. In the next part we’re going to create an admin section, flash messages, cache pages, versioning and timestamps. Please post in the comments any other features you’d like to see in the future.
Frequently Asked Questions about Building a Simple CMS in Sinatra
What is Sinatra and why is it used for building a CMS?
Sinatra is a Domain Specific Language (DSL) for quickly creating web applications in Ruby. It is a lightweight and flexible tool that allows developers to build applications with minimal effort. It is used for building a CMS because it provides a simple and efficient way to manage content on websites. With Sinatra, developers can easily create, read, update, and delete (CRUD) operations, which are the basic functions of a CMS.
How does Sinatra compare to other frameworks like Rails?
Sinatra is often compared to Rails as they are both Ruby-based frameworks. However, Sinatra is more lightweight and less complex than Rails. It doesn’t follow the Model-View-Controller (MVC) pattern like Rails, which makes it more flexible and easier to use for smaller applications. However, for larger and more complex applications, Rails might be a better choice due to its robustness and extensive features.
How can I implement user authentication in my Sinatra CMS?
User authentication can be implemented in Sinatra CMS using various gems like ‘bcrypt’ for password hashing and ‘sinatra-flash’ for displaying flash messages. You can also use ‘rack-protection’ gem for protection against typical web attacks. The implementation involves creating a User model, setting up routes for signup, login, and logout, and adding authentication checks in the routes.
How can I add a database to my Sinatra CMS?
You can add a database to your Sinatra CMS using the ‘ActiveRecord’ gem. ActiveRecord is an Object-Relational Mapping (ORM) tool that allows you to interact with your database like you would with SQL. In other words, it’s a way to create, read, update, and delete records from your database, using Ruby.
How can I handle errors in my Sinatra CMS?
Sinatra provides a built-in mechanism for error handling. You can define custom error pages using the ‘error’ method. You can also use the ‘halt’ method to immediately stop a request and return a specific response.
How can I test my Sinatra CMS?
You can test your Sinatra CMS using testing frameworks like RSpec or MiniTest. These tools allow you to write tests for your routes, models, and views to ensure that they are working as expected.
How can I deploy my Sinatra CMS?
You can deploy your Sinatra CMS on various platforms like Heroku, AWS, or DigitalOcean. The deployment process involves pushing your code to the platform, setting up the environment, and starting the server.
How can I add a search functionality to my Sinatra CMS?
You can add a search functionality to your Sinatra CMS using the ‘pg_search’ gem if you’re using PostgreSQL as your database. This gem allows you to create full-text search, using various search techniques.
How can I make my Sinatra CMS more secure?
You can make your Sinatra CMS more secure by implementing various security measures like using secure HTTP, adding user authentication, validating user input, and protecting against SQL injection and Cross-Site Scripting (XSS) attacks.
How can I improve the performance of my Sinatra CMS?
You can improve the performance of your Sinatra CMS by implementing caching, using a faster database, optimizing your Ruby code, and reducing the number of HTTP requests.

