

Today I’d like to talk about picture manipulation in HTML5, using pure JavaScript.
Key Takeaways
- Web Workers in JavaScript can be used to improve image manipulation performance by allowing for parallelization, particularly beneficial for low-end hardware with multiple cores.
- The article presents a test case where a sepia tone effect is applied to an image using JavaScript. The process involves computing a new RGB value for every pixel of the source picture and rendering it on the target canvas.
- Initially, a brute force method is used where the effect is applied to every pixel. This method, however, only uses one processor and can be slow.
- Web Workers are introduced to enhance performance. They work by dividing the image into segments and processing each segment independently, utilizing multiple processors. This reduces the overall processing time.
- While Web Workers can significantly improve performance on low-end hardware, the difference on recent computers might be small due to the overhead of memory copy. Thus, the complexity of the task must warrant the switch to Web Workers.
The Test Case
The test application is simple. On the left is a picture to manipulate and on the right is the updated result (a sepia tone effect is applied):

The page itself is simple and is described as follows:
<!DOCTYPE html>
<html>
<head>
    <meta charset="utf-8" />
    <title>PictureWorker</title>

    <link href="default.css" rel="stylesheet" />
</head>
<body id="root">
    <div id="sourceDiv">
        <img id="source" src="mop.jpg" />
    </div>
    <div id="targetDiv">
        <canvas id="target"></canvas>
    </div>
    <div id="log"></div>
</body>
</html>
The overall process to apply a sepia tone effect requires you to compute a new RGB value for every pixel of the existing source picture, and then render it on the <canvas> tag with id=”target”. Below are the formulae we use to create the new RGB values from the existing RGB values of a pixel:
finalRed= (red * 0.393) + (green * 0.769) + (blue * 0.189);
finalGreen = (red * 0.349) + (green * 0.686) + (blue * 0.168);
finalBlue= (red * 0.272) + (green * 0.534) + (blue * 0.131);
To make it a bit more realistic, I’ve added a bit of randomness to my sepia formulae. I create a noise value which ranges from 0.5 to 1, which determines the degree to which my final pixel output matches the RGB value calculated via the formulae above, versus the degree to which it retains its original RGB values.
function noise() {
    //Returns a value between 0.5 and 1
    return Math.random() * 0.5 + 0.5;
};

function colorDistance(scale, dest, src) {
    // returns a red, blue or green value for the 'sepia' pixel
    // which is a weighted average of the original value and the calculated value
    return (scale * dest + (1 - scale) * src);
};

var processSepia = function (pixel) {
    // takes a given pixel and updates its red, blue and green values
    // using a randomly weighted average of the initial and calculated red/blue/green values
    pixel.r = colorDistance(noise(), (pixel.r * 0.393) + (pixel.g * 0.769) + (pixel.b * 0.189), pixel.r);
    pixel.g = colorDistance(noise(), (pixel.r * 0.349) + (pixel.g * 0.686) + (pixel.b * 0.168), pixel.g);
    pixel.b = colorDistance(noise(), (pixel.r * 0.272) + (pixel.g * 0.534) + (pixel.b * 0.131), pixel.b);
};
Brute force
Obviously, the very first solution consists of using brute force, with a function that applies the previous code on every pixel. To get access to the pixels, you can use the canvas context with the following code, which creates a pointer to the source img and the target canvas:
var source = document.getElementById("source");

    source.onload = function () {
        var canvas = document.getElementById("target");
        canvas.width = source.clientWidth;
        canvas.height = source.clientHeight;

  // ... tempContext is the 2D context of canvas
        tempContext.drawImage(source, 0, 0, canvas.width, canvas.height);

        var canvasData = tempContext.getImageData(0, 0, canvas.width, canvas.height);
        var binaryData = canvasData.data;
    }
At this point, the binaryData object contains an array of every pixel and can be used to quickly read or write data directly to the canvas. With this in mind, we can apply the whole effect with the following code:
var source = document.getElementById("source");

    source.onload = function () {
        var start = new Date();

        var canvas = document.getElementById("target");
        canvas.width = source.clientWidth;
        canvas.height = source.clientHeight;

        if (!canvas.getContext) {
            log.innerText = "Canvas not supported. Please install a HTML5 compatible browser.";
            return;
        }

        var tempContext = canvas.getContext("2d");
        // len is the number of items in the binaryData array
        // it is 4 times the number of pixels in the canvas object
        var len = canvas.width * canvas.height * 4;

        tempContext.drawImage(source, 0, 0, canvas.width, canvas.height);

        var canvasData = tempContext.getImageData(0, 0, canvas.width, canvas.height);
        var binaryData = canvasData.data;

        // processSepia is a variation of the previous version. See below
        processSepia(binaryData, len);

        tempContext.putImageData(canvasData, 0, 0);
        var diff = new Date() - start;
        log.innerText = "Process done in " + diff + " ms (no web workers)";

     }
The processSepia function is just a variation of the previous one:
var processSepia = function (binaryData, l) {
for (var i = 0; i < l; i += 4) {
var r = binaryData[i];
var g = binaryData[i + 1];
var b = binaryData[i + 2];
binaryData[i] = colorDistance(noise(), (r * 0.393) + (g * 0.769) + (b * 0.189), r);
binaryData[i + 1] = colorDistance(noise(), (r * 0.349) + (g * 0.686) + (b * 0.168), g);
binaryData[i + 2] = colorDistance(noise(), (r * 0.272) + (g * 0.534) + (b * 0.131), b);
}
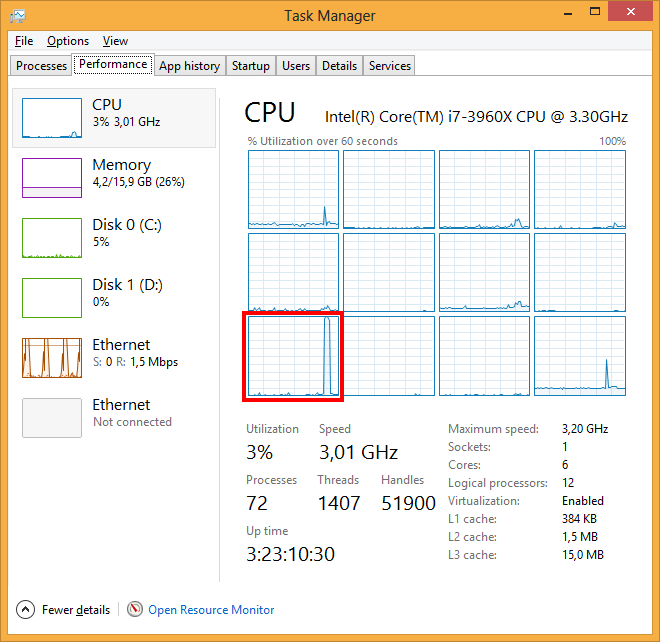
};With this solution, on my Intel Extreme processor (12 cores), the main process takes 150ms and, obviously, only uses one processor:
Enter web workers
The best thing you can do when dealing with SIMD (single instruction multiple data) is to use a parallelization approach, especially when you want to work with low-end hardware (such as phone devices) with limited resources.
In JavaScript, to enjoy the power of parallelization, you have to use the Web Workers. My friend David Rousset wrote an excellent paper on this subject.
Picture processing is a really good candidate for parallelization because (as in the case of our sepia tone function) every processing is independent. Therefore, the following approach is possible:
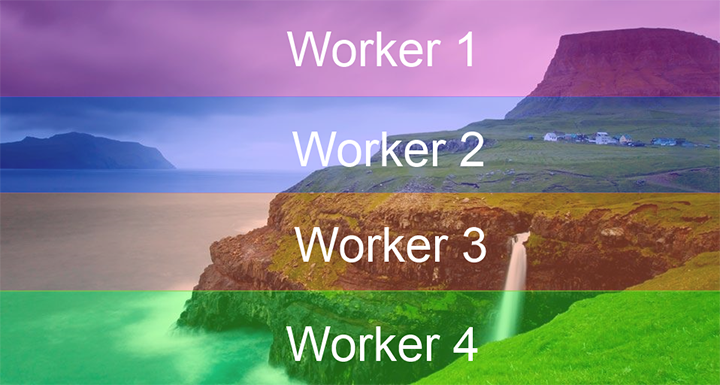
To do so, first of all you have to create a tools.js file to be used as a reference by other scripts.
// add the below functions to tools.js
function noise() {
    return Math.random() * 0.5 + 0.5;
};

function colorDistance(scale, dest, src) {
    return (scale * dest + (1 - scale) * src);
};

var processSepia = function (binaryData, l) {
    for (var i = 0; i < l; i += 4) {
        var r = binaryData[i];
        var g = binaryData[i + 1];
        var b = binaryData[i + 2];

        binaryData[i] = colorDistance(noise(), (r * 0.393) + (g * 0.769) + (b * 0.189), r);
        binaryData[i + 1] = colorDistance(noise(), (r * 0.349) + (g * 0.686) + (b * 0.168), g);
        binaryData[i + 2] = colorDistance(noise(), (r * 0.272) + (g * 0.534) + (b * 0.131), b);
    }
};
The main point of this script is that a portion of the canvas data, namely the part required for the current block to process, is cloned by JavaScript and passed to the worker. The worker is not working on the initial source but on a copy of it (using the structured clone algorithm). The copy itself is really quick and limited to a specific part of the picture.
The main client page (default.js) has to create four workers and give them the right part of the picture. Then every worker will callback a function in the main thread using the messaging API (postMessage / onmessage) to give back the result:
var source = document.getElementById("source");
source.onload = function () {
// We use var start at the beginning of the code and stop at the end to measure turnaround time
var start = new Date();
var canvas = document.getElementById("target");
canvas.width = source.clientWidth;
canvas.height = source.clientHeight;
// Testing canvas support
if (!canvas.getContext) {
log.innerText = "Canvas not supported. Please install a HTML5 compatible browser.";
return;
}
var tempContext = canvas.getContext("2d");
var len = canvas.width * canvas.height * 4;
// Drawing the source image into the target canvas
tempContext.drawImage(source, 0, 0, canvas.width, canvas.height);
// If workers are not supported
// Perform all calculations in current thread as usual
if (!window.Worker) {
// Getting all the canvas data
var canvasData = tempContext.getImageData(0, 0, canvas.width, canvas.height);
var binaryData = canvasData.data;
// Processing all the pixel with the main thread
processSepia(binaryData, len);
// Copying back canvas data to canvas
tempContext.putImageData(canvasData, 0, 0);
var diff = new Date() - start;
log.innerText = "Process done in " + diff + " ms (no web workers)";
return;
}
// Let say we want to use 4 workers
// We will break up the image into 4 pieces as shown above, one for each web-worker
var workersCount = 4;
var finished = 0;
var segmentLength = len / workersCount; // This is the length of array sent to the worker
var blockSize = canvas.height / workersCount; // Height of the picture chunck for every worker
// Function called when a job is finished
var onWorkEnded = function (e) {
// Data is retrieved using a memory clone operation
var canvasData = e.data.result;
var index = e.data.index;
// Copying back canvas data to canvas
// If the first webworker (index 0) returns data, apply it at pixel (0, 0) onwards
// If the second webworker (index 1) returns data, apply it at pixel (0, canvas.height/4) onwards, and so on
tempContext.putImageData(canvasData, 0, blockSize * index);
finished++;
if (finished == workersCount) {
var diff = new Date() - start;
log.innerText = "Process done in " + diff + " ms";
}
};
// Launching every worker
for (var index = 0; index < workersCount; index++) {
var worker = new Worker("pictureProcessor.js");
worker.onmessage = onWorkEnded;
// Getting the picture
var canvasData = tempContext.getImageData(0, blockSize * index, canvas.width, blockSize);
// Sending canvas data to the worker using a copy memory operation
worker.postMessage({ data: canvasData, index: index, length: segmentLength });
}
};
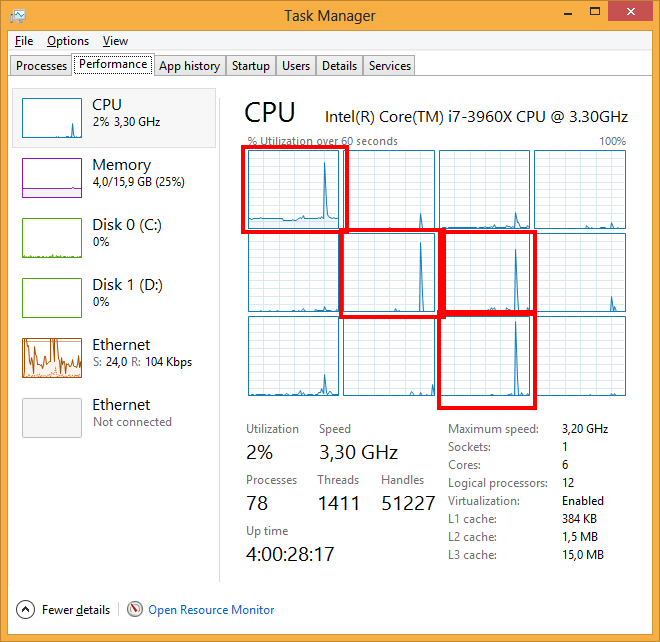
source.src = "mop.jpg";Using this technique, the complete process lasts only 80ms (from 150ms) on my computer and, obviously, uses four processors:
On my low-end hardware (based on dual core system), the process time goes down to 500ms (from 900ms).
The final code can be downloaded here, and a working example is posted here. For comparison, here is the same code without web workers.
A important point to note is that on recent computers the difference can be small, or even in favor of the code without workers. The overhead of the memory copy must be balanced by a complex code used by the workers. The above example of a sepia tone conversion might not be enough in some cases to warrant switching to web workers.
However, the web workers will really be useful on low-end hardware with multiple cores.
Porting to Windows 8
Finally I was not able to resist to the pleasure of porting my JavaScript code to create a Windows 8 application. It took me about 10 minutes to create a blank JavaScript project and copy/paste the JavaScript code inside. You can grab the Windows app code here, and feel the power of native JavaScript code for Windows 8!
Frequently Asked Questions (FAQs) about Web Workers and Image Manipulation Performance
What are the benefits of using web workers for image manipulation?
Web workers are a powerful tool for handling image manipulation tasks in JavaScript. They allow you to run JavaScript in the background, separate from the main execution thread of a web application. This means that you can perform complex image manipulation tasks without blocking the user interface or slowing down the overall performance of your application. Web workers can handle tasks such as resizing, cropping, filtering, and other image transformations, all while keeping your application responsive and smooth.
How do web workers improve the performance of image manipulation tasks?
Web workers improve the performance of image manipulation tasks by offloading these tasks to a separate thread. This means that the main thread, which is responsible for user interactions and rendering, is not blocked by these tasks. As a result, the application remains responsive even when performing complex image manipulations. This is particularly beneficial for applications that need to handle large images or perform complex image transformations.
What are some of the top open-source JavaScript libraries for image manipulation?
There are several open-source JavaScript libraries that can be used for image manipulation. Some of the most popular ones include Fabric.js, CamanJS, Jimp, Sharp, and Pica. These libraries offer a wide range of features for image manipulation, including resizing, cropping, filtering, and more. They also support a variety of image formats, making them versatile tools for any web application.
How can I use web workers in my own web application?
To use web workers in your web application, you first need to create a new Worker object in your JavaScript code. This object represents a background worker that can perform tasks without interfering with the user interface. You can then use the postMessage method to send data to the worker, and the onmessage event handler to receive results from the worker.
Are there any limitations or drawbacks to using web workers?
While web workers offer many benefits, there are also some limitations to be aware of. For example, web workers do not have access to the DOM, so they cannot directly manipulate HTML elements. They also cannot access certain JavaScript APIs, such as the window object or the document object. Additionally, communication between the main thread and worker threads is limited to message passing, which can be slower than direct function calls.
Can web workers be used with any JavaScript library?
Yes, web workers can be used with any JavaScript library. However, the library must be designed to work in a worker context, as workers do not have access to the DOM or certain JavaScript APIs. Some libraries, such as Fabric.js and CamanJS, are specifically designed to work with web workers and provide built-in support for them.
How does image manipulation with web workers compare to server-side image manipulation?
Image manipulation with web workers is performed on the client side, which means it can take advantage of the user’s device resources and does not require any server resources. This can result in faster performance and lower server load. However, server-side image manipulation can be more powerful and flexible, as it is not limited by the capabilities of the user’s device or the restrictions of web workers.
Can web workers be used for tasks other than image manipulation?
Yes, web workers can be used for a wide range of tasks that require intensive computation or processing. This includes tasks such as data processing, file I/O, network communication, and more. Any task that can be performed in JavaScript and does not require access to the DOM or certain JavaScript APIs can potentially be offloaded to a web worker.
Are web workers supported in all browsers?
Web workers are widely supported in modern browsers, including Chrome, Firefox, Safari, and Edge. However, they are not supported in Internet Explorer. It’s always a good idea to check the current browser support for web workers before using them in your application.
How can I debug a web worker?
Debugging a web worker is similar to debugging regular JavaScript code. You can use console.log statements to output information from the worker, and these messages will appear in the browser’s console. You can also use the debugger statement to pause execution of the worker and inspect its state. Most modern browsers also provide developer tools that allow you to inspect and debug workers.