
Hello everyone. If you are just joining the Origami party I suggest you first read the first part of this series “App Prototyping: Getting started with Facebook Origami”, which will introduce you to the Origami and Quartz Composer philosophy, GUI and teach you how to get up and running with you first Origami project.
Key Takeaways
- Origami is a tool developed by Facebook which allows users to create interactive and animated prototypes for mobile and web interfaces. It uses a layer-based, visual interface and supports a wide range of gestures and animations.
- To create a prototype, users need to import all of the image layers they intend to use and arrange them logically. They can then add a new layer patch and wire the Image output of the Layer Group patch into the input image property of the Layer patch.
- To create interactive elements, users can use patches such as the Hit Area patch to catch events, the Interaction 2 patch to catch interaction events, the Switch patch to trigger actions, the Transition patch to convert a number within a range, and the Pop Animation patch to animate a changing value.
- Origami is suitable for beginners, but it may take some time to become familiar with the interface and features. It offers a range of tutorials and resources to help new users get started. It can be integrated with Sketch, a popular design tool, to import designs and add interactive elements and animations.
What Are We Making?
In this article, I’d like to show you how to put together an attractive prototype equipped with animations and interactions in a few easy steps.

There is no better way to learn than by doing, so for this tutorial we will be prototyping a vacation photo sharing app.
For your convenience, if you don’t want to go through the trouble of designing a lookalike app just to follow this tutorial, you can find all the assets used in our example below by following this Link.
Before we start
Before we get going, there are a few key points that you’ll find helpful in understanding the way Origami works.
The Coordinates System
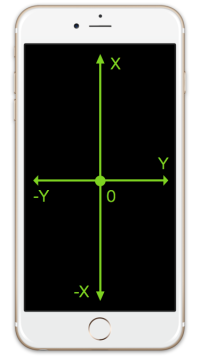
The first item you should keep in mind is the coordinates system. In contrast to building with quartz composer patches, Origami patches such as Layer/Layer Group or Text Layers use pixel coordinates.
Progress Values
Values in the range of 0 to 1 are a common concept in Origami prototyping. When putting together an animation you will need to wire a ‘switch patch’ that triggers either a 0 or 1 and is connected to a transition in which you configure different animation properties.
Like a common light switch, switches can only be in one of two positions – values of either 0 or 1, or ON and OFF, or Start and Finish. Switches are commonly used as triggers for other patches.
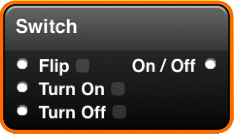
values 0 and 1 portrayed as ON and OFF state.
Keyboard Shortcuts
Luckily Origami comes equipped with a lot of keyboard shortcuts that speed up the prototyping process even more.
Shortcuts can be used when hovering the mouse over the work canvas.
You can find a full list of these shortcuts at the Origami’s official documentation page by following this link.

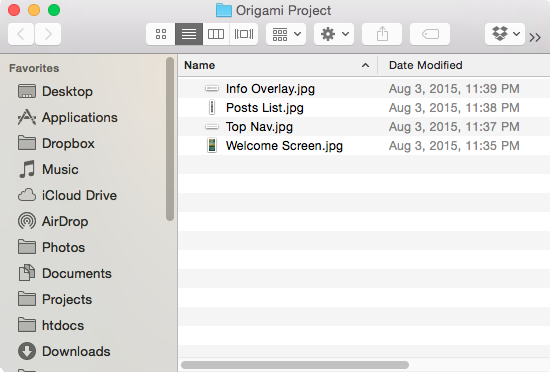
Folder Structures
While the location of your assets doesn’t directly affect the development of your prototype, it is convenient to keep all of your assets in one folder with the Origami project. So, just in case you mess up the wiring of a patch, you can just remove the layer completely and easily re-add it in the project again.
Let’s start prototyping
First we need to start a new Origami Project. If you don’t know how to do that, follow the instructions on the first article of this series as we mentioned earlier.
When starting a new project, I like to import all of the image layers that I intend to use and arrange them how they will logically appear in the prototype.
This saves a lot of time when you are dealing with a smaller project with just a few components like the one we are using in the example.
You can add an image layer by dragging and dropping pictures straight into the canvas. Alternatively, you can manually add an image layer from the patch explorer window.
Since we are building a 2-page prototype, it is good practice to use ‘Layer Group Patches’ so we don’t get lost in all the wiring that will go on for each page. Create a layer group patch by pressing ‘G’ on your keyboard (or by dragging and dropping the patch from the patch inspector).
After successfully adding the images in the Layer Group patch, you will notice that the Layer Group contents are not being rendered in the viewer. Don’t panic!
The issue is we haven’t yet told Origami to render the output that comes from the layer group patch on the device screen. To do this, we must add a new layer patch and wire the Image output of the Layer Group patch into the input image property of the Layer patch as shown in the GIF below.
After dividing the components of the second page and adding them to the layer group, you will notice that the items on the second page overlap those of the first.
There are many ways to solve this depending on what you are trying to achieve. Since we want the second page to slide in horizontally, we can move it out of the way by changing the X-position property of the patch to -800. Easy.
To configure and change patch properties, just click the patch inspector icon in the canvas window.

Great! Now we want to go to that second page when tapping the “Explore Now” button on the app’s welcome screen. We also want the second screen of the app to slide in elegantly – maybe even with a groovy little bounce while it does so.
To accomplish that we are going to drop 5 patches into our work canvas. Don’t worry if this sounds a little complex or overwhelming – you will see that it is fairly easy to wire them together once you understand the logic.
What we will be using
In the Patch Explorer window you are going to search for the following five patches:
- Hit Area patch: This is the place on the screen where you want to catch events
- Interaction 2 patch: This patch catches interaction events from a layer patch (or the whole screen if not connected to any patch).
- Switch patch: Switch patch uses exactly like a light switch. It starts out as off and when you flip it will turn on.
- Transition patch: This patch takes a number in the range of 0 to 1 and converts it to a number within a range starting with Start Value and ending in End Value.
- Pop Animation patch: This patch animates a changing value with a spring.
Connecting the Dots
We’ve got our patches – it’s time to wire them together.
First we set up our Hit Area patch on top of the “Explore Now” button to catch the Tap event through the Interaction patch.
After the Interaction patch catches the tap event on the hit area, it will trigger the ON state in our Switch patch, which will then send a value of 1 to the transition patch. This tells the transition patch to start increment from -800 to 0.
These incrementing numbers will be passed through a pop animation, the progress of which will be wired to the X-position of the Layer it’s connected to.
For this effect to work like the example, you should first change the patch properties of the Layer Group (which contains the output of our second page) to -800 X-position and give it an Anchor Point of the value of Center.
Since we have set the start value of the transition to -800, the Layer patch will zoom in from -800px horizontally off screen, before bouncing to a stop in the center of screen, thanks to our Pop Animation patch. To achieve the same effect to the example prototype, just change the Bounciness to 20 and Speed to 6 of the Pop Animation patch (but feel free to tweak it).
Creating the Second Page

Now it’s time to configure our second page. The elements of the second page are -a top bar -a list of posts -a small information overlay that slides down when you hit the info icon
Before we start playing with animations and interactions, we should position each element in its right spot.
First we’ll position the top bar which will be above everything else. It’s easy to center the top bar to the top of our screen by changing the Anchor Point property to Top Center.
Then we need to align the posts list. As you might notice the posts list seems to be cut short. To be able to browse all the posts through all the length of the image, we need to add a Scroll patch.
To make this Scroll patch work, you should wire the image input of the Scroll patch to the posts list image patch. Then wire the Y-position of the Scroll patch with the Y-position of the Layer patch.
The Scroll patch will extract the image height and supply a Y-position based on what we can see on the viewport.
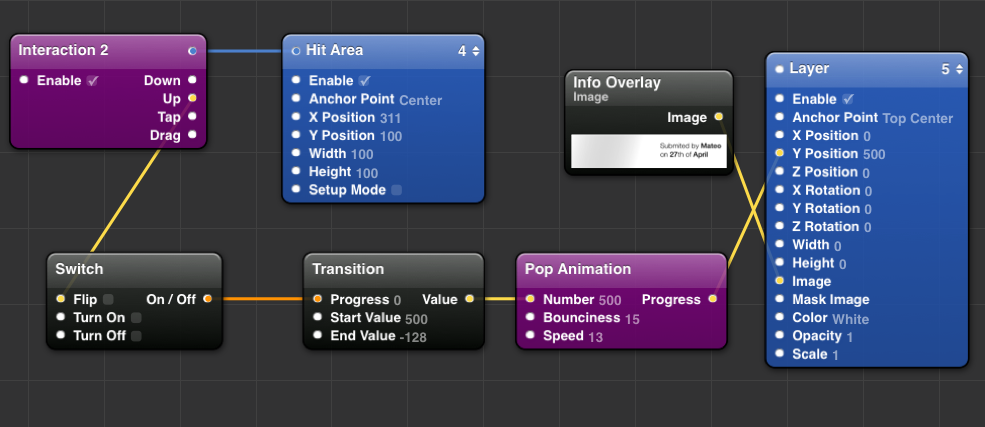
The third and final element we need to add is sliding info overlay that descends when we touch the info icon on the post. The logic behind this is essentially identical to the method we used for switching between pages.
We will drag in another Hit Area patch and wire it with an interaction patch which will flip our Switch patch. This, in turn, triggers our Transition patch to count from 500 to -128.
As before, these numbers will be passed to a Pop Animation Patch which will make our info panel bounce when it slides into position. In order for the modal to behave correctly with the given Transition patch values, you should give the Info modal an Anchor Point of Top Center.
For this to work correctly, we should position our info overlay 500px relative to the Y-axis, and give it a Top Center Anchor point. Both of these values can be added through the Patch Inspector Window for the selected patch.
Still with us?
Here’s what the result should look like.
So, Is Origami For You?
Origami is full of building blocks and tools. There is no single way to achieve anything in Origami and Quartz Composer in general.
The possibilities of wiring these block together are endless and that’s the most interesting part of it. Hopefully, you now have a better understanding of how different mechanisms in Origami work. Now you just need to tinker and come up with new ways to wire all these patches together. It’s like a Meccano set for prototypes!
If you have any questions or would like to know more about a certain functionality of Origami, check out their documentation. And please don’t hesitate to leave a comment below and I will get straight back at you.
Frequently Asked Questions about Building Prototypes with Origami
What is Origami and how is it used in prototype building?
Origami is a free tool developed by Facebook that is used for designing interactive and animated user interfaces. It’s a powerful tool that allows designers to create detailed, interactive prototypes of mobile and web interfaces. The tool uses a layer-based, visual interface that makes it easy to understand and use. It also supports a wide range of gestures and animations, making it a versatile tool for prototype building.
How does Origami compare to other prototyping tools?
Origami stands out from other prototyping tools due to its focus on interaction design and animation. It allows designers to create highly interactive and animated prototypes, which can be difficult to achieve with other tools. Additionally, Origami offers real-time previewing on your device, which can be a significant advantage when designing mobile interfaces.
Is Origami suitable for beginners?
While Origami has a slightly steeper learning curve compared to some other prototyping tools, it is still suitable for beginners. The tool offers a range of tutorials and resources to help new users get started. However, it may take some time to become familiar with the interface and features.
Can I use Origami for web design?
Yes, Origami can be used for both mobile and web design. It supports a wide range of gestures and animations, making it a versatile tool for designing interactive user interfaces.
How can I preview my designs in Origami?
Origami offers a feature called Origami Live, which allows you to preview your designs in real-time on your device. This can be particularly useful when designing mobile interfaces, as it allows you to see how your design will look and function on a mobile device.
Does Origami support collaboration?
Currently, Origami does not support real-time collaboration. However, you can export your designs and share them with your team for feedback.
Can I export code from Origami?
Yes, Origami allows you to export your designs as code. This can be a significant advantage when transitioning from design to development, as it can save time and ensure accuracy.
Is Origami free to use?
Yes, Origami is a free tool. You can download and use it without any cost.
What platforms does Origami support?
Origami is available for Mac OS. You can also preview your designs on iOS and Android devices using the Origami Live app.
Can I integrate Origami with other design tools?
Yes, Origami can be integrated with Sketch, a popular design tool. This allows you to import your Sketch designs into Origami and add interactive elements and animations.