

Redis is a super fast and efficient in-memory, key–value cache and store. It’s also known as a data structure server, as the keys can contain strings, lists, sets, hashes and other data structures.
Redis is best suited to situations that require data to be retrieved and delivered to the client as quickly as possible. It’s pretty versatile, and it has numerous use cases, including:
- caching
- as a NoSQL database
- as a message broker
- session management
- real-time analytics
- event streaming
If you’re using Node, you can use the node-redis module to interact with Redis. This tutorial explains basic Redis data structures and interactions, as well as several common use cases using the node-redis library.
You can find the final code versions of the exercises in the following GitHub repo.
Key Takeaways
- Redis is a versatile in-memory data structure server that excels in situations where quick data retrieval is crucial, such as caching, session management, and real-time analytics.
- Installation of Redis on Mac and Linux involves downloading the tarball, extracting it, and compiling it via terminal commands, whereas Windows users can utilize WSL or Redis-compatible alternatives like Memurai.
- The `node-redis` library allows Node.js applications to interact seamlessly with Redis, supporting operations on various data types such as strings, hashes, lists, and sets.
- Redis commands are accessible in Node.js through the `node-redis` client, enabling operations like setting, getting, deleting keys, and subscribing to messages.
- Practical use cases of Redis with Node.js include improving performance via caching mechanisms, using it as a message broker for pub/sub patterns, and managing user sessions efficiently.
- For session management, Redis can be integrated with the `express-session` middleware in Node.js applications to store session data securely and improve scalability.
Prerequisites and Installation
As its name suggests, before using the node-redis package, you need to install Node and Redis first.
Installing Node
Installing Node is pretty easy and you can follow this tutorial about installing multiple versions of Node using nvm.
Installing Redis
For Mac and Linux users, the Redis installation is pretty straightforward. Open your terminal and type the following commands:
wget https://download.redis.io/releases/redis-6.2.4.tar.gz
tar xzf redis-6.2.4.tar.gz
cd redis-6.2.4
make
Note: see the Redis download page for up-to-date commands.
After the installation ends, start the server with this command:
src/redis-server
You can also quickly try Redis by running the CLI:
src/redis-cli
redis> set foo bar
OK
redis> get foo
"bar"
If you’re a Windows user, like me, things get a bit more complicated — because, well, Redis doesn’t support Windows. Fortunately, there are some workarounds which we’ll explore briefly now.
- You can install WSL (Windows Subsystem for Linux). Here’s the official tutorial from Microsoft.
- You can install Memurai, which is Redis alternative for Windows. It’s fully Redis-compatible and currently supports Redis API 5. Here’s the installation page.
- You can use Redis in the cloud. Here’s a quick tutorial explaining how to set up an account.
I’m using the first option. I’ve installed the Ubuntu distribution and then installed Redis as described in the instructions for Mac and Linux users. If the make command fails, it’s probably because of missing packages that you need to install first. Install them and try again.
With Redis installed in Ubuntu, I run the server on the Linux side and then create my project on the Windows side. Basically I work on Windows, but I’m using the Redis from Linux. Cool, huh?
Note: I haven’t tried the other two options and can’t tell you how they work.
Redis with Node.js: Getting Started
To get started, let’s create a new Node project:
mkdir node-redis-example
cd node-redis-example
npm init -y
node-redis is the Redis client for Node. You can install it via npm using the following command:
npm install redis
Once you’ve installed the node-redis module, you’re good to go. Let’s create a simple file, app.js, and see how to connect with Redis from Node:
const redis = require('redis');
const client = redis.createClient();
By default, redis.createClient() will use 127.0.0.1 and 6379 as the hostname and port respectively. If you have a different host/port, you can supply them like so:
const client = redis.createClient(port, host);
Now, you can perform some actions once a connection has been established. Basically, you just need to listen for connect events, as shown below:
client.on('connect', function() {
  console.log('Connected!');
});
So, the following snippet goes into app.js:
const redis = require('redis');
const client = redis.createClient();

client.on('connect', function() {
  console.log('Connected!');
});
Now, type node app in the terminal to run the app. Make sure your Redis server is up and running before running this snippet.
Redis Data Types
Now that you know how to connect with Redis from Node, let’s see how to store key–value pairs in Redis storage.
Strings
All the Redis commands are exposed as different functions on the client object. To store a simple string, use the following syntax:
client.set('framework', 'ReactJS'); // OR
client.set(['framework', 'ReactJS']);
The above snippets store a simple string, ReactJS, against the key framework. You should note that both the snippets do the same thing. The only difference is that the first one passes a variable number of arguments, while the later passes an args array to client.set() function. You can also pass an optional callback to get a notification when the operation is complete:
client.set('framework', 'ReactJS', function(err, reply) {
  console.log(reply); // OK
});
If the operation failed for some reason, the err argument to the callback represents the error. To retrieve the value of the key, do the following:
client.get('framework', function(err, reply) {
  console.log(reply); // ReactJS
});
client.get() lets you retrieve a key stored in Redis. The value of the key can be accessed via the callback argument reply. If the key doesn’t exist, the value of reply will be empty.
Hashes
Many times storing simple values won’t solve your problem. You’ll need to store hashes (objects) in Redis. For that, you can use the hmset() function like so:
client.hmset('frameworks_hash', 'javascript', 'ReactJS', 'css', 'TailwindCSS', 'node', 'Express');

client.hgetall('frameworks_hash', function(err, object) {
  console.log(object); // { javascript: 'ReactJS', css: 'TailwindCSS', node: 'Express' }
});
The above snippet stores a hash in Redis that maps each technology to its framework. The first argument to hmset() is the name of the key. Subsequent arguments represent key–value pairs. Similarly, hgetall() is used to retrieve the value of the key. If the key is found, the second argument to the callback will contain the value which is an object.
Note that Redis doesn’t support nested objects. All the property values in the object will be coerced into strings before getting stored.
You can also use the following syntax to store objects in Redis:
client.hmset('frameworks_hash', {
  'javascript': 'ReactJS',
  'css': 'TailwindCSS',
  'node': 'Express'
});
An optional callback can also be passed to know when the operation is completed.
Note: all the functions (commands) can be called with uppercase/lowercase equivalents. For example, client.hmset() and client.HMSET() are the same.
Lists
If you want to store a list of items, you can use Redis lists. To store a list, use the following syntax:
client.rpush(['frameworks_list', 'ReactJS', 'Angular'], function(err, reply) {
  console.log(reply); // 2
});
The above snippet creates a list called frameworks_list and pushes two elements to it. So, the length of the list is now two. As you can see, I’ve passed an args array to rpush(). The first item of the array represents the name of the key, while the rest represent the elements of the list. You can also use lpush() instead of rpush() to push the elements to the left.
To retrieve the elements of the list, you can use the lrange() function like so:
client.lrange('frameworks_list', 0, -1, function(err, reply) {
  console.log(reply); // [ 'ReactJS', 'Angular' ]
});
Just note that you get all the elements of the list by passing -1 as the third argument to lrange(). If you want a subset of the list, you should pass the end index here.
Sets
Sets are similar to lists, but the difference is that they don’t allow duplicates. So, if you don’t want any duplicate elements in your list, you can use a set. Here’s how we can modify our previous snippet to use a set instead of a list:
client.sadd(['frameworks_set', 'ReactJS', 'Angular', 'Svelte', 'VueJS', 'VueJS'], function(err, reply) {
  console.log(reply); // 4
});
As you can see, the sadd() function creates a new set with the specified elements. Here, the length of the set is four, because Redis removes the VueJS duplicate as expected. To retrieve the members of the set, use the smembers() function like so:
client.smembers('frameworks_set', function(err, reply) {
  console.log(reply); // [ 'Angular', 'ReactJS', 'VueJS', 'Svelte' ]
});
This snippet will retrieve all the members of the set. Just note that the order is not preserved while retrieving the members.
This was a list of the most important data structures found in every Redis-powered app. Apart from strings, lists, sets, and hashes, you can store sorted sets, bitmaps and hyperloglogs, and more in Redis. If you want a complete list of commands and data structures, visit the official Redis documentation. Remember that almost every Redis command is exposed on the client object offered by the node-redis module.
Redis Operations
Now let’s have a look at some more important Redis operations, also supported by node-redis.
Checking the existence of keys
Sometimes you may need to check if a key already exists and proceed accordingly. To do so, you can use exists() function, as shown below:
client.exists('framework', function(err, reply) {
  if (reply === 1) {
    console.log('Exists!');
  } else {
    console.log('Doesn\'t exist!');
  }
});
Deleting and expiring keys
At times, you’ll need to clear some keys and reinitialize them. To clear the keys, you can use the del command, as shown below:
client.del('frameworks_list', function(err, reply) {
  console.log(reply); // 1
});
You can also give an expiration time to an existing key like so:
client.set('status', 'logged_in');
client.expire('status', 300);
The above snippet assigns an expiration time of five minutes to the key key.
Incrementing and decrementing
Redis also supports incrementing and decrementing keys. To increment a key, use the incr() function, as shown below:
client.set('working_days', 5, function() {
  client.incr('working_days', function(err, reply) {
    console.log(reply); // 6
  });
});
The incr() function increments a key value by 1. If you need to increment by a different amount, you can use the incrby() function. Similarly, to decrement a key you can use functions like decr() and decrby().
And here’s the final version of the app.js file:
const redis = require('redis');
const client = redis.createClient();

client.on('connect', function() {
  console.log('Connected!'); // Connected!
});

// Strings

client.set('framework', 'ReactJS', function(err, reply) {
  console.log(reply); // OK
});

client.get('framework', function(err, reply) {
  console.log(reply); // ReactJS
});

// Hashes

client.hmset('frameworks_hash', 'javascript', 'ReactJS', 'css', 'TailwindCSS', 'node', 'Express');

client.hgetall('frameworks_hash', function(err, object) {
  console.log(object); // { javascript: 'ReactJS', css: 'TailwindCSS', node: 'Express' }
});

// Lists

client.rpush(['frameworks_list', 'ReactJS', 'Angular'], function(err, reply) {
  console.log(reply); // 2
});

client.lrange('frameworks_list', 0, -1, function(err, reply) {
  console.log(reply); // [ 'ReactJS', 'Angular' ]
});

// Sets

client.sadd(['frameworks_set', 'ReactJS', 'Angular', 'Svelte', 'VueJS', 'VueJS'], function(err, reply) {
  console.log(reply); // 4
});

client.smembers('frameworks_set', function(err, reply) {
  console.log(reply); // [ 'Angular', 'ReactJS', 'VueJS', 'Svelte' ]
});

// Check the existence of a key

client.exists('framework', function(err, reply) {
  if (reply === 1) {
    console.log('Exists!');
  } else {
    console.log('Doesn\'t exist!');
  }
});

// Delete a key

client.del('frameworks_list', function(err, reply) {
  console.log(reply); // 1
});

// Increment a key

client.set('working_days', 5, function() {
  client.incr('working_days', function(err, reply) {
    console.log(reply); // 6
  });
});
When you run the file, you should see the following output in your terminal:
node app
Connected!
OK
ReactJS
{ javascript: 'ReactJS', css: 'TailwindCSS', node: 'Express' }
2
[ 'ReactJS', 'Angular' ]
4
[ 'Angular', 'ReactJS', 'VueJS', 'Svelte' ]
Exists!
1
6
Note: if something goes wrong and you need to start anew, you can use the FLUSHALL or FLUSHDB commands in the Redis CLI to delete all keys in all databases or in the current one respectivelly.
Redis Use Cases
Now that we’ve learned about the basics Redis data structures and operations in node-redis, let’s explore a couple of the use cases mentioned in the introduction.
Using Redis for caching
Caching is the process of storing retrieved and processed data temporarily in a “ready-to-use” state. This allows applications, in future requests, to access that data faster. This is crucial in the case of highly intensive and resource-consuming operations. Sometimes, queries require several operations (retrieving data from a database and/or different services, performing calculations on it, etc.) before the final data is composed and can be delivered to the client.
Instead, when we implement a caching mechanism, we can process the data once, store it on a cache and then retrieve it later directly from the cache without doing multiple operations and server calls again and again. Then, in order to provide fresh and up-to-date data, we just need to update the cache periodically.
For example, as we’ll see in the use case below, if we have some data coming from a third-party API, and that data is unlikely to be changed soon, we can store it in a cache once we retrieve it. The next time the server receives the same request, it retrieves the data from the cache instead of making a new database call.
Since Redis is an in-memory database, it’s the perfect choice for caching. So, let’s see how we can use it to create a caching mechanism now.
First, let’s install the following dependencies:
npm install express axios
- Express is a minimal and flexible Node web application framework that provides a robust set of features for web and mobile applications.
- Axios is a simple, promise-based HTTP client for the browser and Node.
Then, create new caching.js file in the root directory and put the following code inside:
const redis = require('redis');
const client = redis.createClient();
const axios = require('axios');
const express = require('express');

const app = express();
const USERS_API = 'https://jsonplaceholder.typicode.com/users/';

app.get('/users', (req, res) => {

  try {
    axios.get(`${USERS_API}`).then(function (response) {
      const users = response.data;
      console.log('Users retrieved from the API');
      res.status(200).send(users);
    });
  } catch (err) {
    res.status(500).send({ error: err.message });
  }
});

app.get('/cached-users', (req, res) => {

  try {
    client.get('users', (err, data) => {

      if (err) {
        console.error(err);
        throw err;
      }

      if (data) {
        console.log('Users retrieved from Redis');
        res.status(200).send(JSON.parse(data));
      } else {
        axios.get(`${USERS_API}`).then(function (response) {
          const users = response.data;
          client.setex('users', 600, JSON.stringify(users));
          console.log('Users retrieved from the API');
          res.status(200).send(users);
        });
      }
    });
  } catch (err) {
    res.status(500).send({ error: err.message });
  }
});

const PORT = 3000;
app.listen(PORT, () => {
  console.log(`Server started at port: ${PORT}`);
});
Here, we’re using the JSONPlaceholder service to get an API to work with. In our case, the API provides us with users data.
Next, we have two requests: /users and /cached-users.
In the first one, the users are retrieved without caching the result. Whenever we send that request again, the users data will be retrieved anew.
In the second one, a check is made first to see if the requested data is already stored in the cache. If it is, then the data is retrieved from Redis. Otherwise, if the users data isn’t stored in the cache, it will be first retrieved from the API call. In this case, the retrieved data will be also stored in the cache so that the next time it’s requested it will be retrieved faster.
To prove how important caching is for performance, we can perform the following test.
Run node caching in the terminal and visit the /users route in the browser.
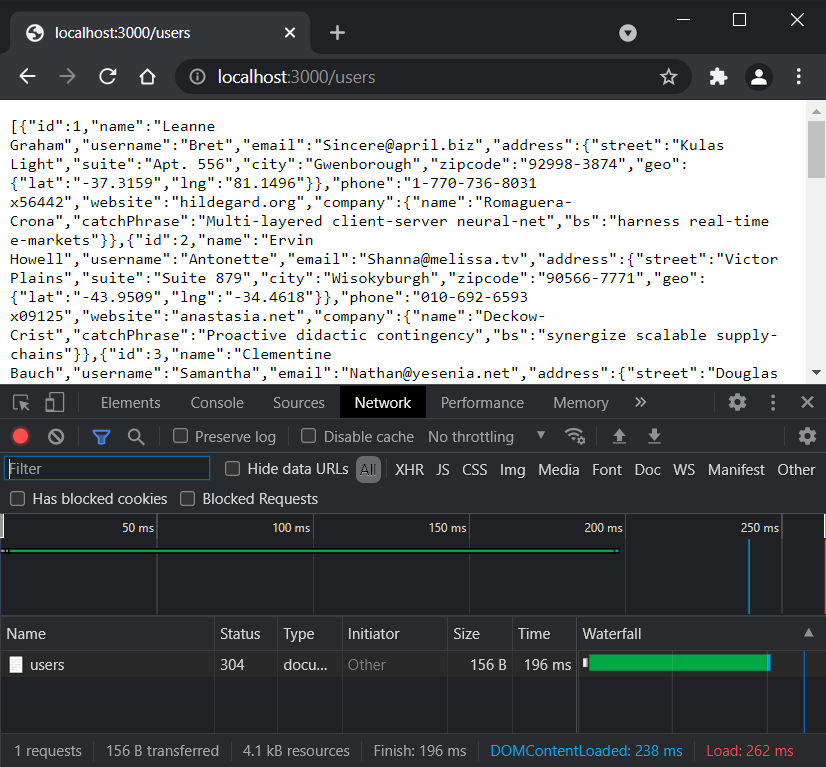
As we can see, the users data is successfully retrieved in 196ms.
Let’s now try the /cached-users route.
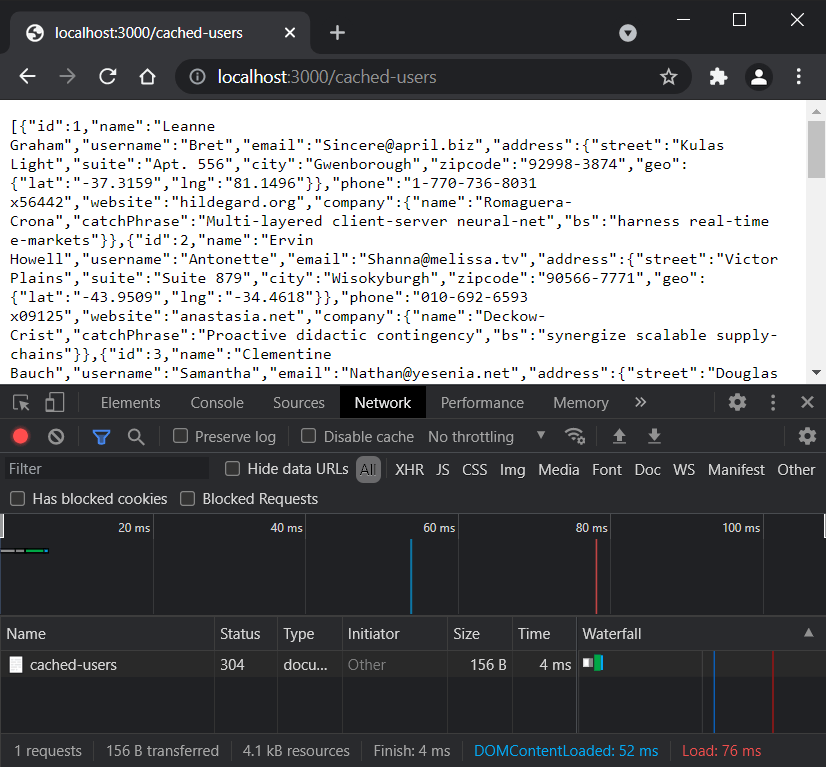
The first time we send the request, it will give us approximately the same time as we received in the previous route, because we don’t have the data stored in the cache yet, but when we send it again the result in time is drastically improved — only 4ms. This is a huge difference even in this small and simple example. Imagine the performance gain with thousands of users. So, indeed, the caching is pretty impressive!
Note that, depending on your machine and connection speed, the time numbers you’ll get can be different form mine here, but the important thing is the ratio between cached and non-cached data, which will remain approximately the same.
Using Redis as a message broker
The pub/sub (publish/subscribe) pattern is a pretty simple one that’s used for publishing messages on “channels”. These messages are then sent to all receivers subscribed to the channels. Let’s explore a simple example to make things a bit clearer.
To start, let’s first create a new publisher.js file in the root directory with the following content:
const redis = require('redis');
const publisher = redis.createClient();

const channel = 'status';

async function publish() {
  console.log(`Started ${channel} channel publisher...`)
  publisher.publish(channel, 'free');
}

publish();
Here, we define a channel named status. Next, in the publish() function, we publish the “free” message to the status channel.
Let’s now create new subscriber.js file with the following content:
const redis = require('redis');
const subscriber = redis.createClient();

const channel = 'status';

subscriber.subscribe(channel, (error, channel) => {
  if (error) {
      throw new Error(error);
  }
  console.log(`Subscribed to ${channel} channel. Listening for updates on the ${channel} channel...`);
});

subscriber.on('message', (channel, message) => {
  console.log(`Received message from ${channel} channel: ${message}`);
});
Here, we define the same channel. Then, we subscribe to that channel and listen to the message event.
Now, let’s see how this works. Open two instances of your terminal and run node subscriber in the first one.
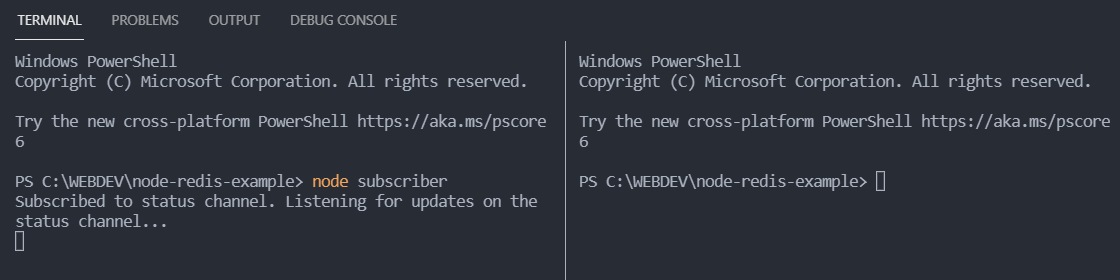
As we can see, the console message is logged successfully, telling us that we’re subscribed to the status channel and that we’re listening for updates on it.
Now run node publisher in the second terminal and pay attention what happens in the first one.
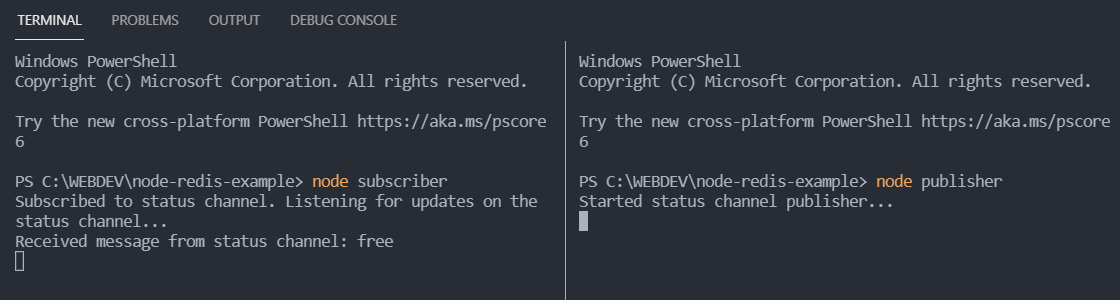
As we can see, the status channel is started successfully and the message “free” is received from the subscriber in the first terminal.
So, this is the pub/sub pattern presented here in a very simplistic way. But this simple mechanism can be used in much more complex scenarios. It all depends on our needs.
Using Redis for session management
The last use case which we’ll explore is how to use Redis for session management.
To start, we need to install the following dependencies:
npm install express-session connect-redis
- express-session is a simple session middleware for Express.
- connect-redis is a Redis-based session store.
Normally, session management implemented with the express-session package is done by using global variables stored in the Express server itself. But this approach isn’t efficient for production and has some significant disadvantages, as is stated in the express-session docs:
Warning The default server-side session storage,
MemoryStore, is purposely not designed for a production environment. It will leak memory under most conditions, does not scale past a single process, and is meant for debugging and developing.
So, what’s the solution? Well, here’s where Redis comes in. Via a connect-redis session store we can save session variables in an external Redis store and access them when we need to.
For example, in the next use case, a user logs into the app with their username and password. Then, the server generates a session ID and stores it in the Redis store. This session ID is sent to the client and saved as a cookie. Every time the user visits the home page, the cookie is sent back to the server, which checks if the Redis store has a session with the same ID. If yes, the home page loads without redirection to the login page.
Let’s see this in action.
Create new session.js file in the root directory with the following content:
const express = require('express');
const session = require('express-session');
const redis = require('redis');
const client = redis.createClient();
const redisStore = require('connect-redis')(session);

const app = express();

app.use(express.json());
app.use(express.urlencoded({extended: true}));

client.on('connect', function (err) {
  if (err) {
    console.log('Could not establish a connection with Redis. ' + err);
  } else {
    console.log('Connected to Redis successfully!');
  }
});

app.use(session({
  store: new redisStore({ client: client }),
  secret: 'topsecret~!@#$%^&*',
  resave: false,
  saveUninitialized: false,
  cookie: {
    sameSite: true,
    secure: false,
    httpOnly: false,
    maxAge: 1000 * 60 * 10 // 10 minutes
  }
}))

app.get('/', (req, res) => {
  const session = req.session;
  if (session.username && session.password) {
    if (session.username) {
      res.send(`<h1>Welcome ${session.username}! </h1><br><a href="/logout"><button>Log out</button></a >`)
    }
  } else {
    res.sendFile(__dirname + '/login.html')
  }
});

app.post('/login', (req, res) => {
  const session = req.session;
  const { username, password } = req.body
  session.username = username
  session.password = password
  res.type('html')
  res.send('Successfully logged in!')
});

app.get('/logout', (req, res) => {
  req.session.destroy(err => {
    if (err) {
      return console.log(err);
    }
    res.redirect('/')
  });
});

const PORT = 3000;
app.listen(PORT, () => {
  console.log(`Server started at port: ${PORT}`);
});
Here, we create a new session store. The session will be valid until the maxAge time we’ve defined in the session store configuration. After that time expires, the session will be automatically removed from the session store.
Then, we add three routes.
In the first one, representing the home page, we check if there’s an active session for the user, and if yes, the home page is loaded. If not, the user is redirected to the login page (login.html).
In the second route, we take the received username and password variables sent trough the form and write them to the session store.
In the third route, we destroy the session and redirect the user to the home page.
Now, we need to create the login.html file. Put the following content inside:
<!DOCTYPE html>
<html lang="en">
  <head>
    <meta charset="UTF-8" />
    <title>User Login</title>
  </head>
  <body>
    Username:
    <input type="text" id="username" /><br />
    Password:
    <input type="password" id="password" /><br />
    <input type="button" value="Login" id="submit" />
    <script src="https://cdn.jsdelivr.net/npm/axios/dist/axios.min.js"></script>
    <script>
      document.querySelector('#submit').addEventListener('click', submitForm);

      function submitForm() {
        const username = document.querySelector('#username').value;
        const password = document.querySelector('#password').value;

        axios.post('/login', {
          username: username,
          password: password
        })
        .then(function (response) {
          if (response.data === 'Successfully logged in!') {
            window.location.href = '/';
          }
        })
      }
    </script>
  </body>
</html>
Here, when the Login button is clicked, the username and password are sent to the server. When the server receives the user’s details successfully, the user is redirected to the home page.
It’s time to check how our session management works.
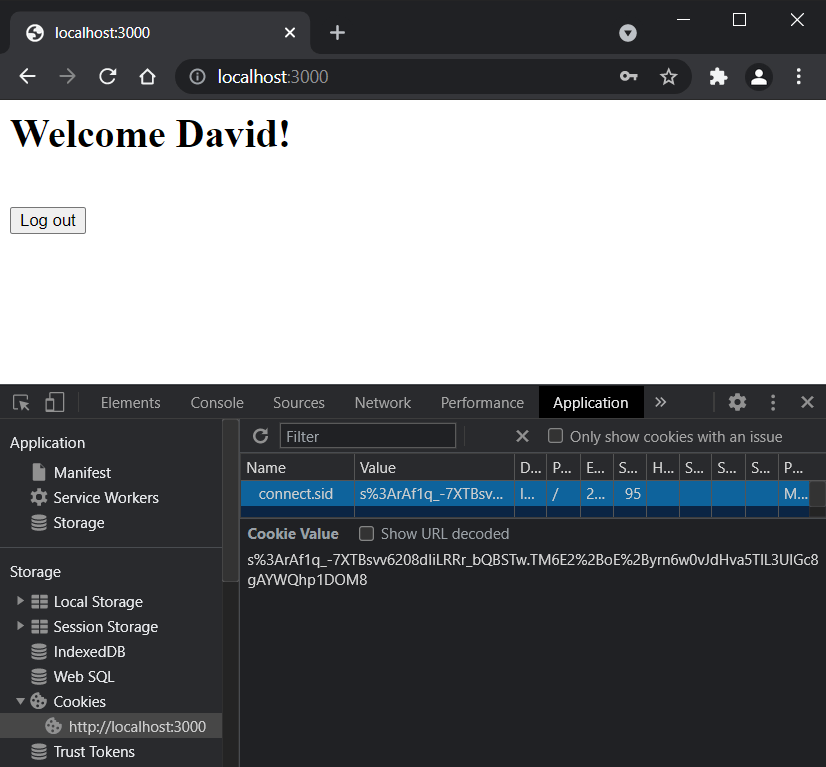
Run node session and go to http://localhost:3000/. Type whatever user details you wish and hit the Login button.
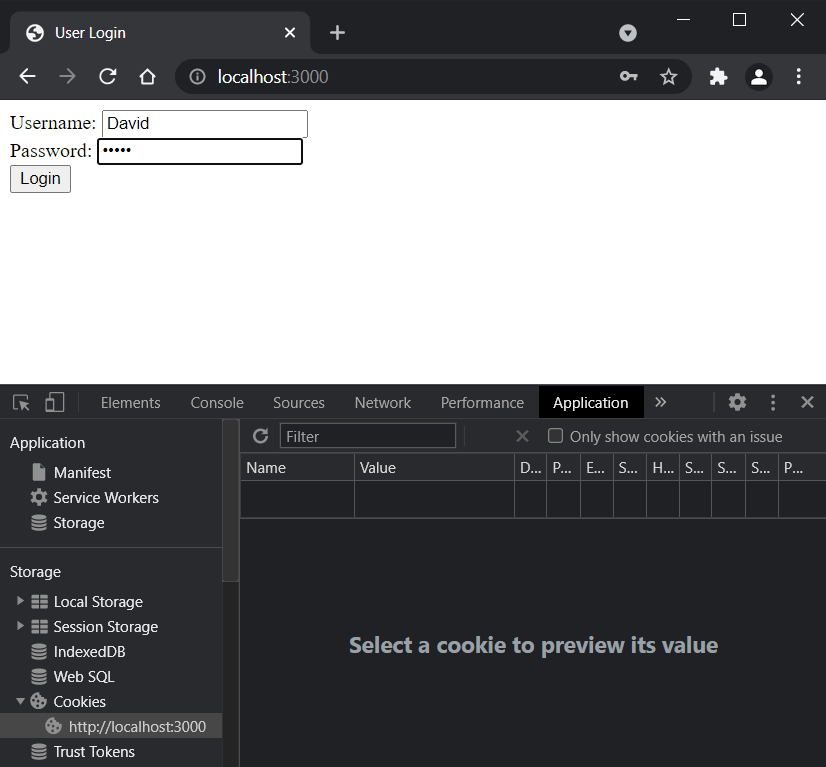
You’ll be logged in and met with a welcome message using the username you’ve just provided. Now, open browser devtools and go to the Application tab. In the left sidebar, find the Storage section, expand the Cookies list, and click on http://localhost:3000/. On the right-hand side you should see the cookie with default connect.sid name assigned.
Note that, in Firefox, the Storage section is a separate tab, so the Cookies list is directly under the Storage tab.
You can prove that the cookie key is written in Redis by running the KEYS * command in the Redis CLI, which will show a numbered list of all existing data keys:
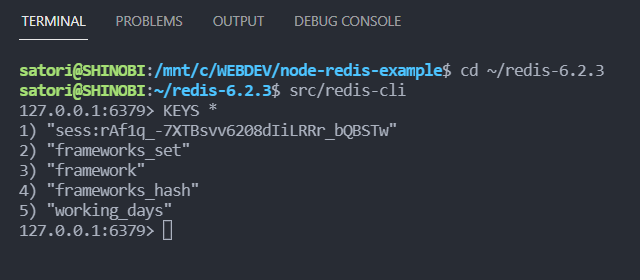
As you can see, our cookie key (starting with sess:) is the first one in the list. The other keys are from running our app.js file.
Now, click on the Log out button and run the KEYS * command again.
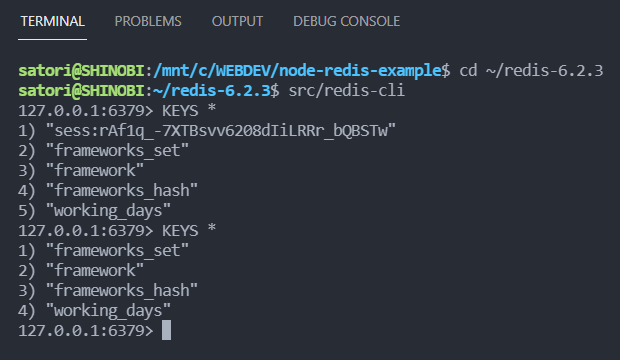
As you can see, the cookie key is now removed from Redis.
This is how we can implement simple session management using node-redis.
Conclusion
We’ve covered the basic and most commonly used operations in node-redis, as well as several handy use cases. You can use this module to leverage the full power of Redis and create really sophisticated Node apps. You can build many interesting things with this library, such as a strong caching layer, a powerful pub/sub messaging system, and more. To find out more about the library, check out the Redis documentation.
I hope you enjoyed reading the article. Let me know what you think on Twitter.
FAQs About Using Redis with Node.js
Redis is an open-source, in-memory data store that is often used as a caching mechanism or data store for frequently accessed data. When used with Node.js, it can improve the performance and scalability of web applications by reducing the load on the primary database and speeding up data retrieval.
You can use the popular node-redis library to connect to a Redis server. Install it with npm or yarn and require it in your Node.js application. Then, create a Redis client instance and connect to your Redis server.
Redis is commonly used for caching frequently accessed data, session management, real-time data storage, message queuing, and rate limiting. It can significantly improve the performance of web applications in various ways.
Yes, Redis can be used in conjunction with other databases. For example, you can use Redis for caching and real-time data while using a traditional database like MongoDB or MySQL for persistent storage. Combining them can provide the benefits of both caching and data durability.
No, Redis is not suitable for storing sensitive data. It is an in-memory data store and should not be used for data that needs secure storage, such as user credentials. For sensitive data, use a proper database with encryption and security measures.
Yes, Redis provides support for publish/subscribe messaging. You can use it for building real-time applications, chat systems, and more. The node-redis library also offers functionality for this purpose.