Using the Google Analytics API with PHP: Logging In

In this series, we’re going to see how we can use the Google Analytics API to interact with our Google Analytics data via PHP. We’ll be using Laravel on Homestead Improved, but you can follow along with any framework on any development environment – Laravel + HI is simply the fastest and recommended starting point.
Key Takeaways
- To use the Google Analytics API with PHP, it’s necessary to create a new project on the Google Developers Console and activate the Google Analytics API for that project. API credentials and developer keys are required to use the Google API.
- The Google Analytics API is divided into several APIs such as the Management API, Metadata API, Core Reporting API, Real Time Reporting API, Embed API, and MCF Reporting API. For this guide, focus is on the Management API, Metadata API, and Core Reporting API.
- To interact with Google APIs, a class called Google_Client is used. Parameters such as client ID, client secret, developer key, redirect URI, and scopes are set using this class. The Google_Client class is used to authenticate the user and get a token for the user.
- When using the Google Analytics API, there are certain limitations and quotas on the number of requests per day, per second, etc. It’s important to monitor the usage of the Google Analytics API in the PHP application using the Google Cloud Console.
Requirements
To be able to follow along, you need to have a Google Analytics account which you can get from the Google Analytics page.
You also need to be familiar with the basic usage of the Google Analytics dashboard.

What are we going to build?
In this article we’re going to build an app that looks like Google Analytics Explorer, but to make it short, we’re going to limit the functionality and discuss how we can extend our demo.
Google Analytics API
Overview
The Google Analytics API is divided into a number of APIs. We use each API depending on our needs:
-
Management API:
Provides access to Google Analytics configuration data like accounts, properties, views, goals… -
Metadata API:
Provides access to the list of columns (Dimensions, Metrics) so that we don’t need to hard code them inside our app. -
Core Reporting API:
Provides access to dashboard data, and most of the tasks are available through this API. -
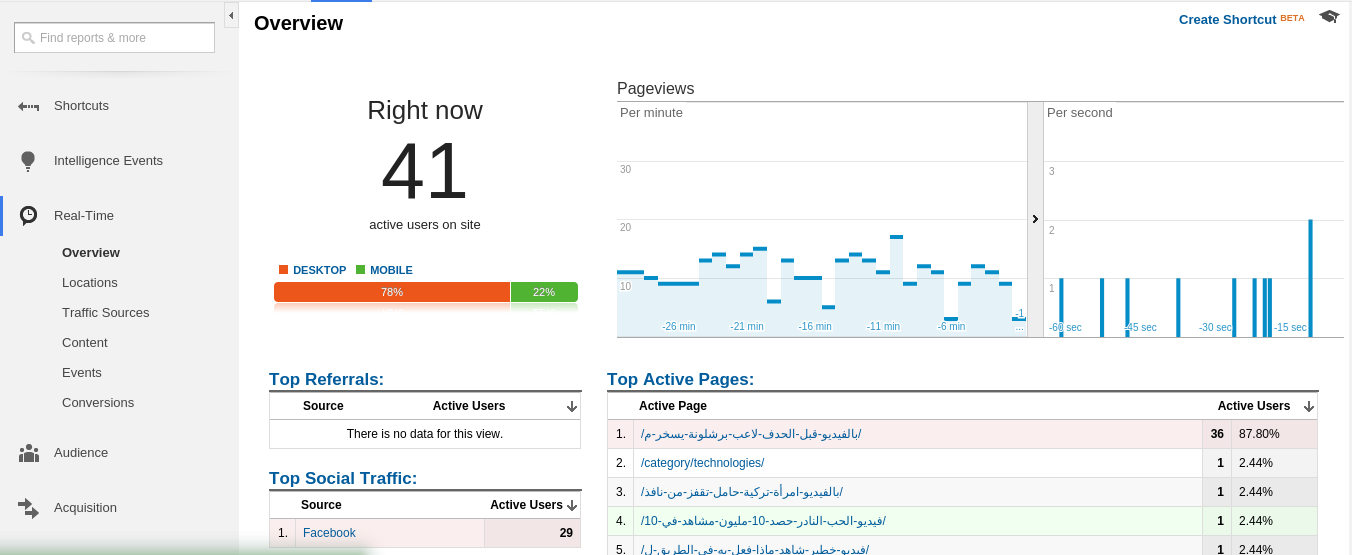
Real Time Reporting API:
Gives you access to real time data, like the one on your Google Analytics dashboard. At the time of this writing, this API is in beta.
-
Embed API:
This API allows you to create and embed dashboards in your website using javascript. -
MCF Reporting API:
Multi-Channel Funnels Reporting API enables you to request Multi-Channel Funnels data for an authenticated user, which means you can query data from multiple sources and use it for your own statistics.
In this article, we’re going to be focused on the Management API, Metadata API and Core reporting API. First, let’s start with some basic usage.
Basic Usage
To start using the API, we need to create a new project on the Google Developers Console.
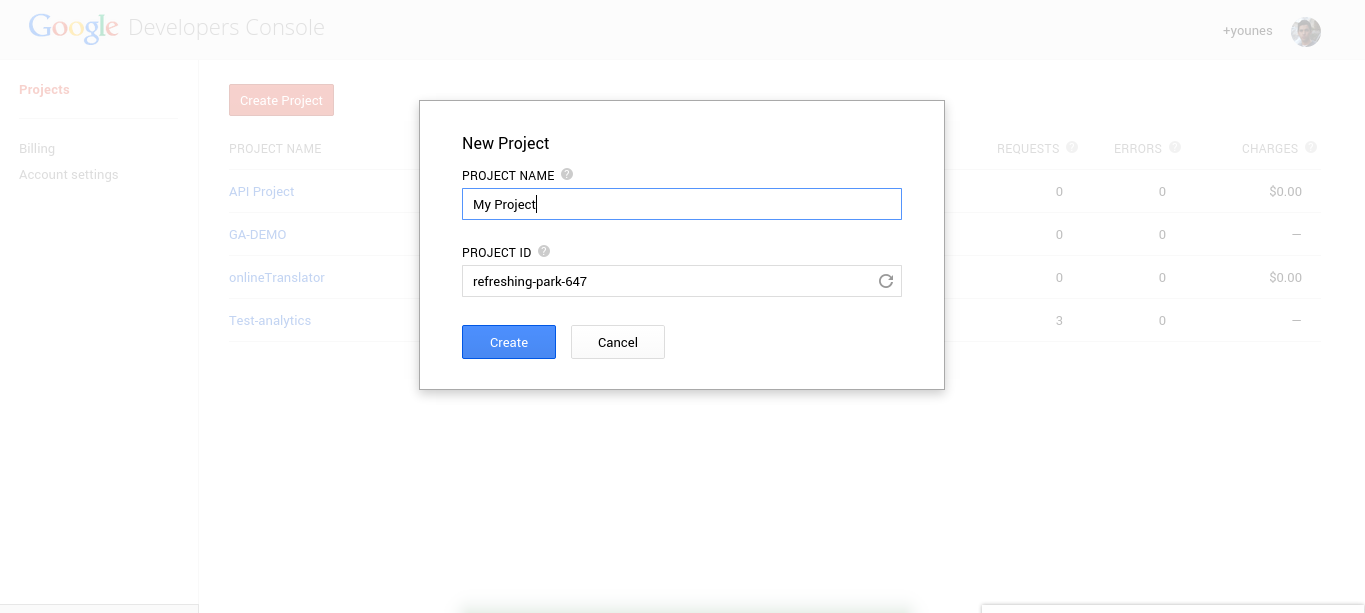
You project dashboard should look like this:
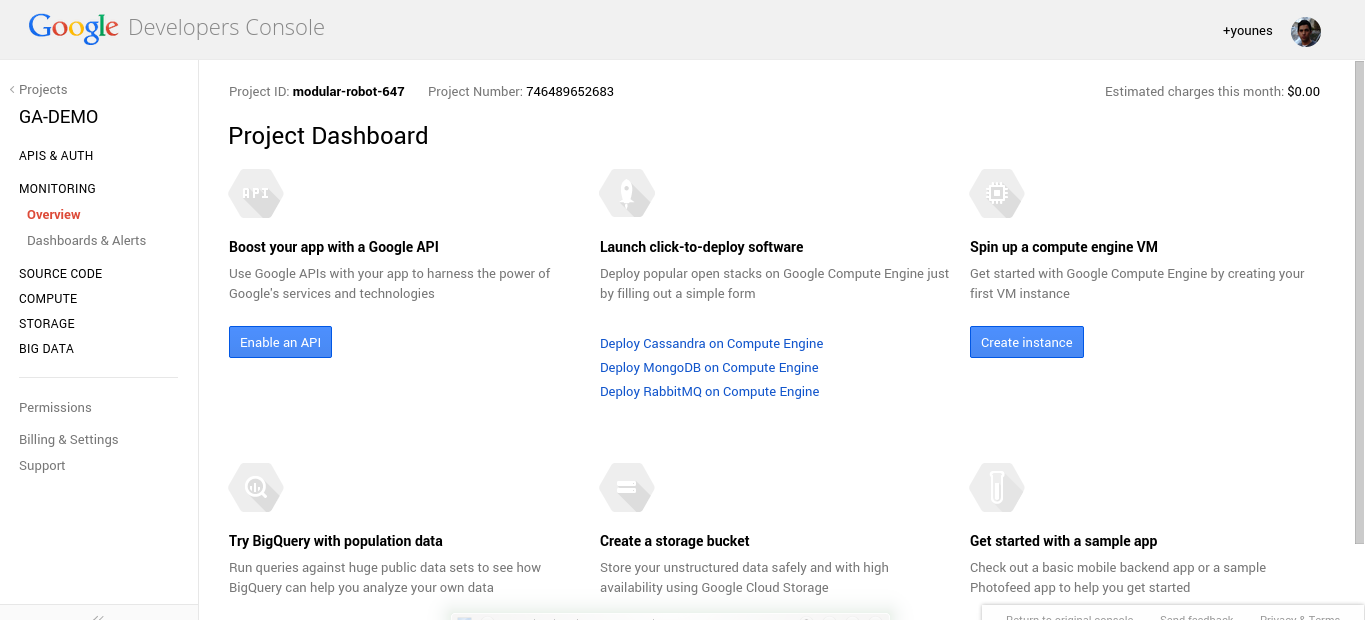
Now we have a project ready to use any of the provided Google services. Because we intend to use Google Analytics API, we need to activate it.
When you want to use a Google API you need to provide two things:
1) Your API credentials.
2) Your developer keys.
Go to menu, API & AUTH, select “APIs” and enable Analytics API
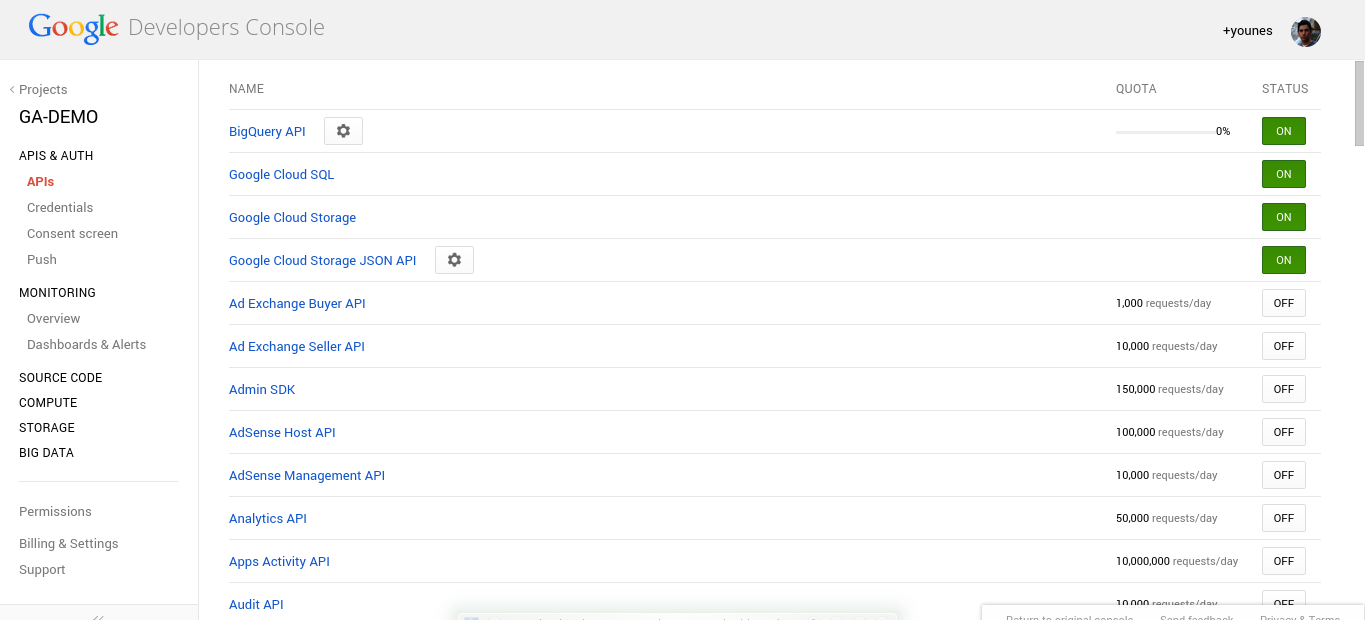
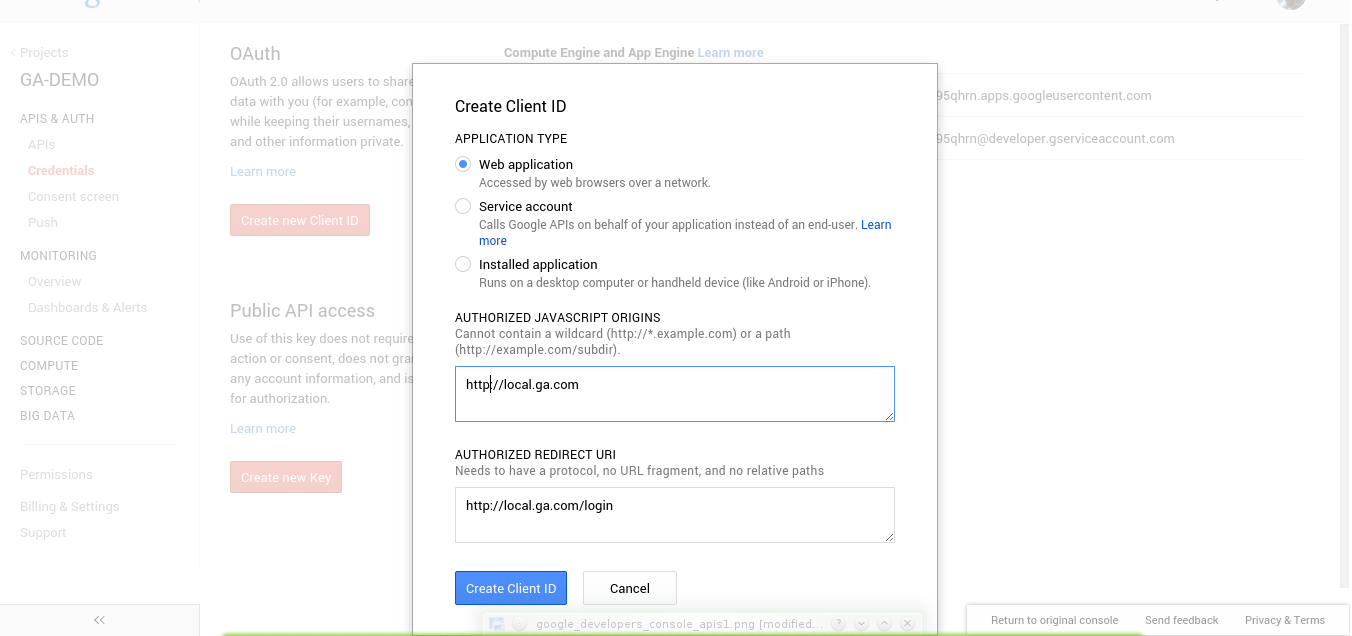
Under the API & AUTH menu, select the Credentials link, and select Create new client ID.
Select Web Application for our app, then enter your website URL and your login redirect page URL. Because we will be using Laravel in our demo, you can use localhost:8000 for the development phase, and don’t forget to change https to http in your URL.
At the bottom of the page, you have the Public API access. We need to create a new access key.
1) choose the Browser Key option for our demo.
2) on the http referrers box, you can leave the value empty to accept requests from anywhere, or specify your domain address.
Now we are ready to start playing around with the API.
Limits and Quotas
When working with Google Analytics API, we are limited to a number of requests per day, per second, etc. You can read the full doc page for more information.
Project Configuration
I will assume that you already know how to set up a new Laravel project on Homestead Improved.
We need to require "google/api-client": "dev-master" in our composer.json and update the dependencies.
In my app/config/, I will create a file called analytics.php where I can put my configuration.
return [
    'app_name'          => 'Your app name', //Can be anything
    'client_id'         => 'Your ID',//can be found on the credentials page
    'client_secret'     => 'Your secret ID',//on the credentials page
    'api_key'           => 'Your key'//can be found at the bottom of your credentials page
];
To keep things separated, i will create a folder named src inside my app directory and create a file called GA_Service.php where I can put all request logic.
// app/src/GA_Service.php
class GA_Service{
    //...
}
Trying to access this class somewhere in our code will result in a Class not found exception, so we can take advantage of composer autoloading feature.
In the composer.json file, go to the autoload classmap section and add our path to the list.
// composer.json
...

"autoload":{

    "classmap": [

        ...

        ,

		"app/src"

    ]

}
Don’t forget to run composer dump-autoload after saving the changes.
By default, Laravel includes a file called HomeController.php in the app/controllers directory. We will use it as our main app controller.
Back to the GA_Service class; to communicate with Google APIs we use a class called Google_Client. In our constructor, we will create a new instance and start filling the necessary parameters.
public function __construct( Google_Client $client ){
	$this->client = $client;
	$this->init();
}
private function init(){
		$this->client->setClientId(Config::get('analytics.client_id') );
		$this->client->setClientSecret(Config::get('analytics.client_secret'));
		$this->client->setDeveloperKey(Config::get('analytics.api_key'));
		$this->client->setRedirectUri('http://localhost:8000/login');
		$this->client->setScopes(array('https://www.googleapis.com/auth/analytics'));
}
Instead of instantiating the class inside the constructor, we pass it as a parameter and let Laravel’s IoC resolve it for us. For more details, be sure to check this article out.
The first three lines of the init method are self explanatory; the Config::get method grabs the configuration from the analytics.php file.
The redirect URI method is the redirection URL to be used after Google verification and it should match the one registered previously on the Google Console Dashboard.
The setScope method is where we specify the access level needed for our app:
-
https://www.googleapis.com/auth/analytics
View and manage Google Analytics Data -
https://www.googleapis.com/auth/analytics.manage.users
View and manage user permissions for Analytics accounts. -
https://www.googleapis.com/auth/analytics.readonly
Read-only access to the Analytics API.
After setting up our google client we’re going to set our login process:
// app/src/GA_Service.php
public function isLoggedIn(){
	if (isset($_SESSION['token'])) {
	  $this->client->setAccessToken($_SESSION['token']);
	  return true;
	}
	return $this->client->getAccessToken();
}//authenticate
public function login( $code ){ 	$this->client->authenticate($code);
 	$token = $this->client->getAccessToken();
  	$_SESSION['token'] = $token;
	return token;
}//login
public function getLoginUrl(){
	$authUrl = $this->client->createAuthUrl();
	return $authUrl;
}//getLoginUrlisLoggedIn: return true if the user has an access token to be used.getLoginUrl: if the user is not logged in, we get an authentication URL.login: we have already set a redirect URL on the Google API Dashboard, we receive back a$_GET['code']parameter that we can use to get a token for our requests.
Let’s use what we’ve got for now. Inside our controller:
// app/controllers/HomeController.php
class HomeController extends BaseController {
	private $ga;
	public function __construct( GA_Service $ga ){
		$this->ga = $ga;
	}
	public function index()
	{
		if( $this->ga->isLoggedIn() ){
			return 'Show home page';
		}
		else{
            $url = $this->ga->getLoginUrl();
			return View::make('login', [ 'url' => $url ]);
		}
	}//index
}//class
// app/routes.php
Route::get('/', 'HomeController@index');
Route::get('/login', 'HomeController@login');
We inject GA_Service into our controller, and when the user hits our index route, we check if he’s logged in. If not, we generate the authentication URL.
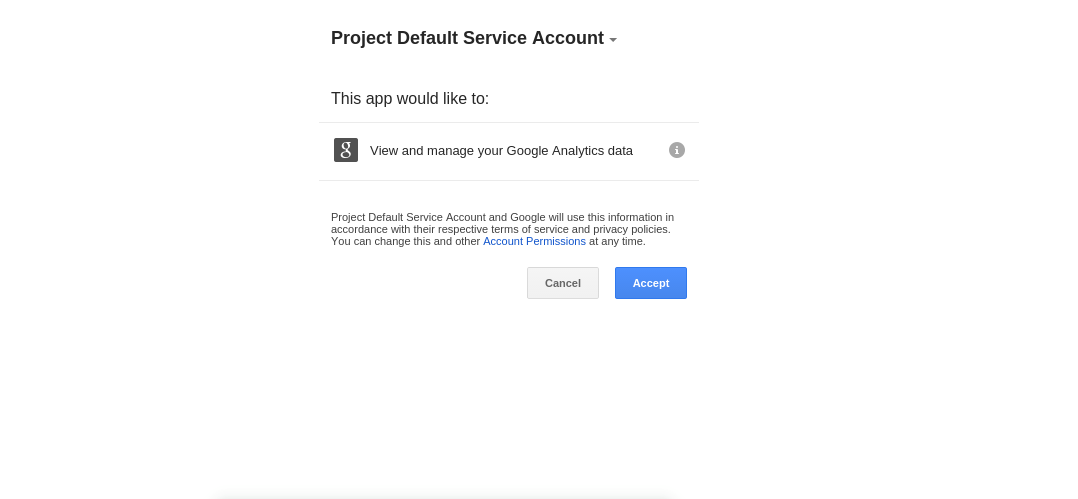
After accepting the request permission, you will be redirected to the login page with the code parameter.
// app/controllers/HomeController.php
public function login(){
	if( Input::has('code') ){
		$code = Input::get('code');
		$this->ga->login($code);
		return "Go to the home <a href='/'>page</a>";
	}
	else{
		return "Invalide request parameters";
	}//else
}//login
In our login function, we test if the code exists. If so, we pass it to our GA_Service::login function so we can authenticate and get a token for the user.
Wrapping up
In this part we discussed the basic usage of Google Analytics API. At this point, we have a token that we can use to query the list of APIs, and in the next part, we’re going to continue building our demo app using the Google Analytics API.
Frequently Asked Questions on Using Google Analytics API with PHP Logging
How can I get started with Google Analytics API using PHP?
To get started with Google Analytics API using PHP, you first need to create a project in the Google Cloud Console. After creating the project, enable the Google Analytics API for that project. Then, create credentials that your PHP application will use to call the API. Once you have the credentials, you can use them in your PHP code to call the Google Analytics API. Remember to install the Google Client Library for PHP in your project to make the API calls easier.
How can I handle errors when using Google Analytics API with PHP?
When using Google Analytics API with PHP, errors can occur during the API call. These errors can be caught and handled using try-catch blocks in your PHP code. The Google Client Library for PHP provides classes for different types of exceptions that can occur during an API call. You can use these classes to catch specific types of errors and handle them appropriately in your code.
How can I retrieve data from Google Analytics using the API with PHP?
To retrieve data from Google Analytics using the API with PHP, you need to make a GET request to the API endpoint. The request should include the ID of the Google Analytics view that you want to retrieve data from, and the metrics that you want to retrieve. The Google Client Library for PHP provides methods for making these requests and retrieving the data.
How can I filter data when retrieving it from Google Analytics using the API with PHP?
When retrieving data from Google Analytics using the API with PHP, you can filter the data by adding parameters to your GET request. These parameters can specify the dimensions and metrics that you want to filter by, and the conditions for the filter. The Google Client Library for PHP provides methods for adding these parameters to your request.
How can I paginate results when retrieving data from Google Analytics using the API with PHP?
When retrieving large amounts of data from Google Analytics using the API with PHP, you may need to paginate the results. This can be done by adding parameters to your GET request that specify the number of results to return per page, and the page number to return. The Google Client Library for PHP provides methods for adding these parameters to your request.
How can I update data in Google Analytics using the API with PHP?
To update data in Google Analytics using the API with PHP, you need to make a PUT or PATCH request to the API endpoint. The request should include the ID of the Google Analytics view that you want to update, and the data that you want to update. The Google Client Library for PHP provides methods for making these requests.
How can I delete data from Google Analytics using the API with PHP?
To delete data from Google Analytics using the API with PHP, you need to make a DELETE request to the API endpoint. The request should include the ID of the Google Analytics view that you want to delete data from. The Google Client Library for PHP provides methods for making these requests.
How can I authenticate my PHP application with Google Analytics API?
To authenticate your PHP application with Google Analytics API, you need to use the credentials that you created in the Google Cloud Console. These credentials can be used to create an instance of the Google_Client class in the Google Client Library for PHP, which can then be used to authenticate your application with the API.
How can I use the Google Client Library for PHP with Google Analytics API?
The Google Client Library for PHP provides classes and methods that make it easier to use the Google Analytics API. These include classes for making API requests, handling errors, and authenticating your application. To use the library, you need to install it in your project using Composer, and then include it in your PHP code.
How can I monitor the usage of Google Analytics API in my PHP application?
To monitor the usage of Google Analytics API in your PHP application, you can use the Google Cloud Console. The console provides tools for monitoring the number of API requests made by your application, the amount of data transferred, and the errors that occur. You can also set up alerts to notify you when certain usage thresholds are reached.
Younes is a freelance web developer, technical writer and a blogger from Morocco. He's worked with JAVA, J2EE, JavaScript, etc., but his language of choice is PHP. You can learn more about him on his website.

