SQLite 3 Beyond the Basics

In the introductory post to SQLite 3, we covered some basic commands, database and table creation, and more. In this one, we’ll go into more depth – exploring both familiar features from other databases and features that make SQLite stand out.

It is assumed you went through the introductory post before continuing with this one, or that you are comfortable with the basics of SQLite 3.
Key Takeaways
- SQLite 3 supports a variety of SQL commands and clauses such as SELECT, WHERE, ORDER BY, and LIMIT, providing flexibility in querying and managing data efficiently.
- The database system utilizes transactions to ensure ACID compliance, highlighting its capabilities in handling operations atomically, consistently, isolated, and durably.
- Advanced features like attaching and detaching databases enable simultaneous operations on multiple databases, enhancing data handling and query execution across different datasets.
- SQLite’s savepoint functionality allows for nested transactions, offering granular control over database changes and the ability to rollback to specific points within a transaction.
- Exporting and importing data is streamlined through the use of .dump and .read commands, facilitating easy data backup and restoration.
SELECT Query
SELECT is a standard SQL command and belongs in the Data Query Language (or DQL). It lets you perform queries on a database and fetch required records. The results can be further filtered using various clauses provided by SQLite.
Open up the terminal and type: sqlite3 Library.db
This would create a database named Library.db in the current directory. Now, let us create a table that stores information about library users. A library user must have a name, an ID provided by the library which is unique, a user’s age and their date of joining. The following SQL query will create this table:
CREATE TABLE Users (
  SerialNo INTEGER NOT NULL PRIMARY KEY AUTOINCREMENT,
  Name TEXT NOT NULL,
  Id TEXT NOT NULL UNIQUE,
  Age INTEGER NOT NULL,
  DOJ TEXT NOT NULL );
SerialNo is the Primary Key.
Remember: There can be any number of
UNIQUEcolumns in a table but there must only be onePRIMARY KEY.
Insert a record into the table using the following query:
INSERT INTO Users ( Name, Id, Age, DOJ)
VALUES ( 'Shivam', 'U123', 19, '2015-01-31' );
Note: SQLite does not have a different datatype just for dates. To store Dates in SQLite you must enter them in
YYYY-MM-DDformat or they will be treated as strings.
You can insert more records using the above command, but it would be tedious for a large set of data. We will use the .read meta-command. It executes SQL queries from the specified file. Save the following to a file called newusers.sql:
BEGIN TRANSACTION;

CREATE TABLE NewUsers (
    SerialNo INTEGER NOT NULL PRIMARY KEY AUTOINCREMENT,
    Name TEXT NOT NULL,
    Id TEXT NOT NULL UNIQUE,
    Age INTEGER NOT NULL,
    DOJ TEXT NOT NULL );

INSERT INTO NewUsers VALUES (1,  'Abraham',     'U123', 19, '2015-02-28');
INSERT INTO NewUsers VALUES (2,  'Michael',     'U124', 23, '2014-12-14');
INSERT INTO NewUsers VALUES (3,  'Steve',       'U125', 35, '2012-11-20');
INSERT INTO NewUsers VALUES (4,  'Ben',         'U126', 15, '2013-05-12');
INSERT INTO NewUsers VALUES (5,  'Alice',       'U127', 17, '2013-03-01');
INSERT INTO NewUsers VALUES (6,  'Christopher', 'U128', 19, '2014-05-03');
INSERT INTO NewUsers VALUES (7,  'Elena',       'U129', 27, '2011-07-14');
INSERT INTO NewUsers VALUES (8,  'Daniel',      'U130', 43, '2010-08-14');
INSERT INTO NewUsers VALUES (9,  'Candice',     'U131', 18, '2014-02-05');
INSERT INTO NewUsers VALUES (10, 'Billy',       'U132', 20, '2015-01-24');
INSERT INTO NewUsers VALUES (11, 'Michael',     'U133', 19, '2013-02-12');
INSERT INTO NewUsers VALUES (12, 'Alice',       'U134', 25, '2010-07-14');
INSERT INTO NewUsers VALUES (13, 'Richard',     'U135', 40, '2011-12-14');
INSERT INTO NewUsers VALUES (14, 'Lester',      'U136', 18, '2014-09-05');
INSERT INTO NewUsers VALUES (15, 'Malvo',       'U137', 21, '2015-01-04');
INSERT INTO NewUsers VALUES (16, 'Alice',       'U138', 19, '2013-02-02');
INSERT INTO NewUsers VALUES (17, 'Drako',       'U139', 24, '2010-12-02');

COMMIT;
and read it from the sqlite command line using:
.read newusers.sql
If everything goes well, you will have a NewUsers table with new records. Use the SELECT query to display them.
SELECT Id, Name, Age, DOJ
FROM NewUsers;
By default, column headers are not displayed and display mode is set to line. Switch on the header display by entering .header ON and change mode style to column using .mode column. Enter the SELECT query again.
Tip: Use the .show command to display values of various settings. You can also specify the column width manually using the .width1 meta-command.
You can change the number of columns to be displayed and specify another name (alias) for a header. For example:
SELECT Id AS 'User ID', Name, DOJ AS 'Date of Joining'
FROM NewUsers;
You can use the .schema command to display all the SQL statements that were used to create the database. You can optionally provide a table name to it, to display the schema of the particular table.
WHERE Clause
The WHERE clause specifies a condition to fetch the results. For instance, to fetch user IDs and names with age 20 or above we can enter the following query.
SELECT Id, Name FROM NewUsers
WHERE Age >= 20;
Operators
SQLite3 provides a number of operators to optimize the WHERE clause. Binary operators in the descending order of their precedence are:
||
*   /   %
+   -
<<  >>  &   |
<   <=  >   >=
=   ==  !=  <>  IS  IS NOT  IN  LIKE  GLOB  MATCH  REGEXP
AND
OR
SQLite3 supports four unary prefix operators, - + ~ NOT.
Besides these, there are some other operators like BETWEEN and EXISTS.
BETWEEN
Provides a range of values (minimum to maximum) to operate on. For example, to select users that have a date of joining between 12-30-2011 and 12-30-2014 and with age between 17 and 27 we can enter the following query:
SELECT * FROM NewUsers
WHERE DOJ BETWEEN '2011-12-30' AND '2014-12-30'
AND Age BETWEEN 17 AND 27;
AND, OR and NOT
The AND operator provides an intersection of two conditions, where as the OR operator provides a union of the two conditions. For example, to select users with Age greater than 20 and with SerialNo greater than 5, enter the query:
SELECT * FROM NewUsers
WHERE Age > 20 AND SerialNo > 5;
Now, to select users with Age > 20 or users with SerialNo > 5, enter:
SELECT * FROM NewUsers
WHERE Age > 20 OR SerialNo > 5;
The NOT operator is simply the negation of the corresponding condition. Users that do not have Ages between 20 and 30 can be extracted using:
SELECT * FROM NewUsers
WHERE Age NOT BETWEEN 20 AND 30;
IS and IS NOT
IS and IS NOT work same as = (equals to) and != (not equals to) respectively.
IN and NOT IN
The IN operator searches for a value in a list of literals. For example, to search for users with library IDs U124, U127 and U129:
SELECT * FROM NewUsers
WHERE Id IN ('U124', 'U127', 'U129');
LIKE and GLOB
LIKE does a pattern matching comparison using wildcards % and _. % wildcard matches zero or more characters and _ matches any single character. To select users with names beginning with ‘B’, ending with ‘y’ and the third last character as ‘l’ we may enter:
SELECT * FROM NewUsers
WHERE Name LIKE "B%l_y";
Note: LIKE is case insensitive, so “B%” and “b%” work the same when used with LIKE.
GLOB is similar to LIKE except it is case sensitive and uses Unix File Globbing syntax.
EXISTS
The EXISTS operator evaluates either to 0 or to 1. If the query to the right of EXISTS returns no rows then EXISTS returns zero and if the query returns one or more rows then EXISTS returns one.
SELECT EXISTS ( SELECT * FROM NewUsers WHERE Age < 10 );This would return a zero since there are no users with Age less than 10.
|| Operator
|| operator concatenates the specified strings. The below query would give the result: “sitepoint.com”.
SELECT 'sitepoint' || '.' || 'com';ORDER BY Clause
As it implies, the ORDER BY clause sorts the records in either ascending or descending order. It operates on a particular column and accepts ASC for ascending order and DESC for descending order.
For instance, to sort all user records in ascending order of Name.
SELECT * FROM NewUsers
ORDER BY Name ASC;
To sort user records in descending order of Age and with Date of Joining after 2013-05-12, you must enter the following query:
SELECT * FROM NewUsers
WHERE DOJ > '2013-05-12' ORDER BY Age DESC;
LIMIT Clause
LIMIT clause limits the number of results of a query to the specified number. It comes with an optional OFFSET flag that declares the number of records to be skipped. For example to select the sixth, seventh and eighth record we need to put a limit of three and an offset of 5.
SELECT * FROM NewUsers
LIMIT 3 OFFSET 5;
Note: The above query can also be written as:
SELECT * FROM NewUsers LIMIT 5, 3;
GROUP BY Clause
GROUP BY combines multiple records and groups them using one or more columns. For example, to count the number of users with a particular name we may enter the query:
SELECT Name, COUNT(Name) FROM NewUsers
GROUP BY Name;
HAVING Clause
If we need to specify a condition on groups we cannot use the WHERE clause because the WHERE clause specifies conditions on columns. To provide conditions on groups the HAVING clause is used. In the above example let us extract users with same names.
SELECT Name, COUNT(Name) FROM NewUsers
GROUP BY Name HAVING COUNT(Name) > 1;
DISTINCT
The DISTINCT keyword retrieves unique records. To fetch unique names enter the following query:
SELECT DISTINCT Name
FROM NewUsers ORDER BY Name;
Attaching and Detaching Databases
When operating with multiple databases, an alias can be attached to each database. The ATTACH DATABASE command attaches a name to a database. Enter .databases. You will get a list of database names and their respective files. The main database is the primary database. Besides main, there is a temporary, hidden database temp. Both of these can neither be attached nor be detached from an alias. Let us attach Library.db to an alias LIB.
ATTACH DATABASE 'Library.db' AS 'LIB';Consider another database Students.db. Attach it to STU.
ATTACH DATABASE 'Students.db' AS 'STU';Enter .databases. You will get something like this:
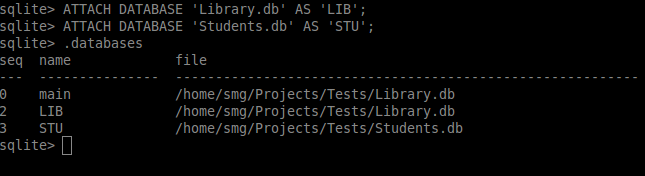
The seq column does not have the record 1 between 0 and 2. It is actually the hidden database temp.
Now you can execute queries on both databases in the same sqlite session. To select top ten records from LIB we may enter the following:
SELECT * FROM LIB.NewUsers
WHERE 1 LIMIT 10;
Suppose STU contains a table Students with the student names. We need to find out details of library users that are students (consider names to be a column in both Students and NewUsers for this example). We may enter the following query:
SELECT LIB.NewUsers.Id, LIB.NewUsers.Name, LIB.NewUsers.Age
FROM LIB.NewUsers
INNER JOIN STU.Students
ON STU.Students.Name = LIB.NewUsers.Name;
To detach Library.db from its alias LIB enter the following:
DETACH DATABASE 'LIB';Transactions
Once the database has been created we can perform queries to create and modify records in tables. One or more of these queries that change the previous state of the database give rise to a Transaction. So a transaction can include inserting, updating and deleting records. It also includes creation, modification and deletion of tables. A transaction can have several smaller executions inside – consider a bank’s database. A user withdraws money, their account status is updated, the bank’s status is updated, the log database gets a new record, etc – all this needs to happen flawlessly, otherwise the money will be missing in one table, creating a problem for everyone.
When you perform queries in the form of a transaction, the changes are not added directly to the database. You have to commit them yourself. This helps in case some error occurs or the system fails during a transaction. In such a situation, the database will not change its state and will not be left with partial changes.
SQLite is a Transactional database i.e. it is ACID compliant. ACID is an acronym for Atomicity, Consistency, Isolation and Durability. These terms are discussed below.
- Atomicity
-
Atomicity makes transactions indivisible. Either changes are committed all at once or the entire transaction fails.
- Consistency
-
Every transaction is consistent i.e. the final state reached after a transaction will also be a valid state.
- Isolation
-
Transactions are separated from one another in such a way that during their concurrent execution the failure of one will not affect the execution of others.
- Durability
-
Once a transaction has been committed successfully, the changes in the database will be permanent and immune to any system failures.
SQLite offers commands to control transactions. The following table lists the control commands.
| Command | Description |
|---|---|
| BEGIN TRANSACTION | Marks the beginning of a transaction. |
| ROLLBACK | Erases current transaction. If it is used with the TO keyword, it rollbacks to a particular savepoint. |
| COMMIT | Commits a transaction to database. It is another alias for END TRANSACTION. |
Besides these there are two more commands: SAVEPOINT and RELEASE. SAVEPOINT is similar to BEGIN except that you must provide a name to the beginning transaction, thus allowing you to nest transactions. RELEASE removes a predefined savepoint and merges a named transaction into its parent transaction.
Let us continue with Library.db. Start a transaction by entering: BEGIN TRANSACTION;. Insert some valid records in the table:
INSERT INTO NewUsers VALUES (18, 'Frank', 'U140', 45, '2009-11-02');
INSERT INTO NewUsers VALUES (19, 'Claire', 'U141', 43, '2009-11-01');
To save these changes you may enter COMMIT;. Or if you want to discard them enter ROLLBACK;.
SAVEPOINT statement starts the transaction with a name. Create a savepoint named SPT1 and add a new record.
SAVEPOINT SPT1;
INSERT INTO NewUsers VALUES (20, 'Ricky', 'U142', 26, '2011-07-22');
Create another savepoint SPT2 and add another record.
SAVEPOINT SPT2;
INSERT INTO NewUsers VALUES (21, 'Sundar', 'U143', 31, '2011-09-21');
Both these savepoints are nested (SPT2 in SPT1). You can commit both of them by entering:
RELEASE SAVEPOINT SPT1;When RELEASE is applied on the outermost savepoint of the nested savepoints, it commits all the savepoints starting with the most recent one. Thus SPT2 and SPT1 both are committed.
RELEASE SAVEPOINT SPT2;will release SPT2. But since it is child to the parent transaction SPT1, its fate depends on it. If SPT1 is rolled back so is SPT2.
To discard both of them, you can rollback to the outermost savepoint i.e. SPT1.
ROLLBACK TO SAVEPOINT SPT1;Autocommit mode
If you execute queries without explicitly defining a transaction, each query is wrapped in its own transaction and then executed. You can think of it as each query with a particular BEGIN TRANSACTION and a COMMIT statement. This is the autocommit mode. Autocommit mode is switched on by default.
If you explicitly start a transaction, the autocommit mode is turned off. After a commit (or rollback) to the same transaction the autocommit mode is again turned on.
Exporting Databases
At the beginning of the tutorial we imported a table to the database using the .read command. To export a database or table we use the .dump command. .dump displays the database in SQL text format. You can use the redirection operator in the command line to save the dump to a file.
sqlite3 Library.db '.dump' > LibBackup.sqlIf a file LibBackup.sql already exists, it is overwritten. The above command will dump the entire database to the file. You can optionally provide a table name as an argument to .dump. It will export that particular table. To dump NewUsers enter:
sqlite3 Library.db '.dump NewUsers' > LibBackup.sqlOutput Results
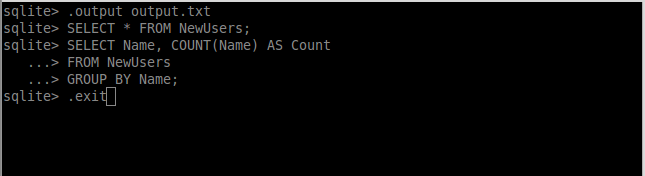
By default the output generated through a query is written on the standard output. SQLite provides the .output command to write the output of one or more queries to a file.
Enter .output output.txt and a few queries. The results will be written to output.txt stored in the current working directory. You can exit the sqlite session and view the file.
.output stdoutdisplays output to the standard output.
Conclusion
We’ve learned about SQLite operators and expressions. The tutorial also includes transactions and a brief discussion about SQLite’s transactional nature. I hope you found it useful; if you have any questions feel free to ask them in the comments and I will do my best to answer them.
.widthsets column width for column mode. Provide the width of characters in comma separated values. e.g..width 10, 20, 15↩
Frequently Asked Questions (FAQs) about SQLite 3 Beyond Basics
What is the significance of SQLite savepoints?
SQLite savepoints are a crucial feature that allows you to define a transaction within a transaction. This means you can create a savepoint in your transaction, perform some operations, and if you’re not satisfied with the results, you can rollback to the savepoint instead of the beginning of the transaction. This provides more control over your transactions and can be particularly useful in complex database operations where you might need to undo certain parts of the transaction without affecting the entire transaction.
How do I create a savepoint in SQLite?
Creating a savepoint in SQLite is quite straightforward. You simply use the SAVEPOINT command followed by the name you want to give to your savepoint. For example, SAVEPOINT savepoint1; will create a savepoint named ‘savepoint1’. Remember, the savepoint names are case-sensitive in SQLite.
How can I rollback to a savepoint in SQLite?
To rollback to a savepoint in SQLite, you use the ROLLBACK TO command followed by the name of your savepoint. For instance, ROLLBACK TO savepoint1; will rollback the transaction to the state at ‘savepoint1’. This will undo all the changes made after the savepoint was created.
Can I release a savepoint in SQLite? How?
Yes, you can release a savepoint in SQLite using the RELEASE command followed by the savepoint name. For example, RELEASE savepoint1; will release the savepoint named ‘savepoint1’. Releasing a savepoint means that you’re satisfied with the changes made after the savepoint and you want to keep them. Once a savepoint is released, you can’t rollback to it.
What happens if I try to rollback to a released savepoint?
If you try to rollback to a savepoint that has been released, SQLite will give an error. This is because releasing a savepoint means you’re committing to the changes made after the savepoint, and you can’t undo them.
Can I nest savepoints in SQLite?
Yes, SQLite allows you to nest savepoints. This means you can create a savepoint within a savepoint. This can be useful in complex transactions where you might need to define multiple points to rollback to.
How does SQLite handle nested savepoints?
When you rollback to a nested savepoint, SQLite undoes all changes made after the nested savepoint, including any changes made in other savepoints that were created after the nested savepoint. However, when you release a nested savepoint, only the changes made within the nested savepoint are committed. The outer savepoints are not affected.
Can I use the same name for different savepoints in SQLite?
No, SQLite does not allow you to use the same name for different savepoints in the same transaction. If you try to do so, SQLite will give an error.
What happens if I start a new transaction without committing or rolling back the previous one?
If you start a new transaction without committing or rolling back the previous one, SQLite will automatically commit the previous transaction. This is known as an implicit commit.
Can I use savepoints in SQLite with other SQL commands?
Yes, you can use savepoints in SQLite with other SQL commands. For example, you can use the SELECT command to check the state of your database at a savepoint, or the UPDATE command to make changes after a savepoint.
Shivam is an Open-source Software Developer with a keen interest in Web Development and Competitive Programming. A Python Zealot, casual gamer and a(n infrequent) blogger.