
On February 12th, Nitrous.IO, the cloud development environment that lets you set up virtual boxes in a flash and use them from whichever platform through their Web IDE, finally added PHP support – something users have been clamoring for.
You can read more about it in the announcement, but I figure it’s best if we demo by example and get a Laravel app up and running.
Note: This tutorial assumes basic Unix terminal proficiency.
Key Takeaways
- Nitrous.io, a cloud development environment, now supports PHP, allowing for the creation of a Laravel app within its platform. This allows for the set up of virtual boxes swiftly for use on any platform via their Web IDE.
- To begin, an account must be created on Nitrous.io, followed by the creation of a box. This box can be provisioned with PHP, and users can allocate as many resources to it as desired. The box can also run a PHP box using any other template, and install PHP related tools like Apache, PHP, MySQL, etc.
- The Nitrous.io platform allows for the installation of PECL libs, the configuration of a Virtual Host, and the installation of Composer. Composer is installed globally due to the limited hard drive space on boxes.
- Laravel is then fired up, and a sample Laravel app is created. The app is connected to MySQL, and the database name in the config file is changed to “sample”. The platform allows for the creation of a sample database with a test table and three rows of sample values.
Getting started
Create an account on Nitrous.io if you don’t have one yet, or follow my ref link here to do so (full disclosure, this gives me nitrous – the currency used to bring more powerful VMs online). After spiffying up your profile, I encourage you to go into Public Keys and add a public SSH key of your own if you generally use them for SSH connections and similar. A detailed guide is available on GitHub.
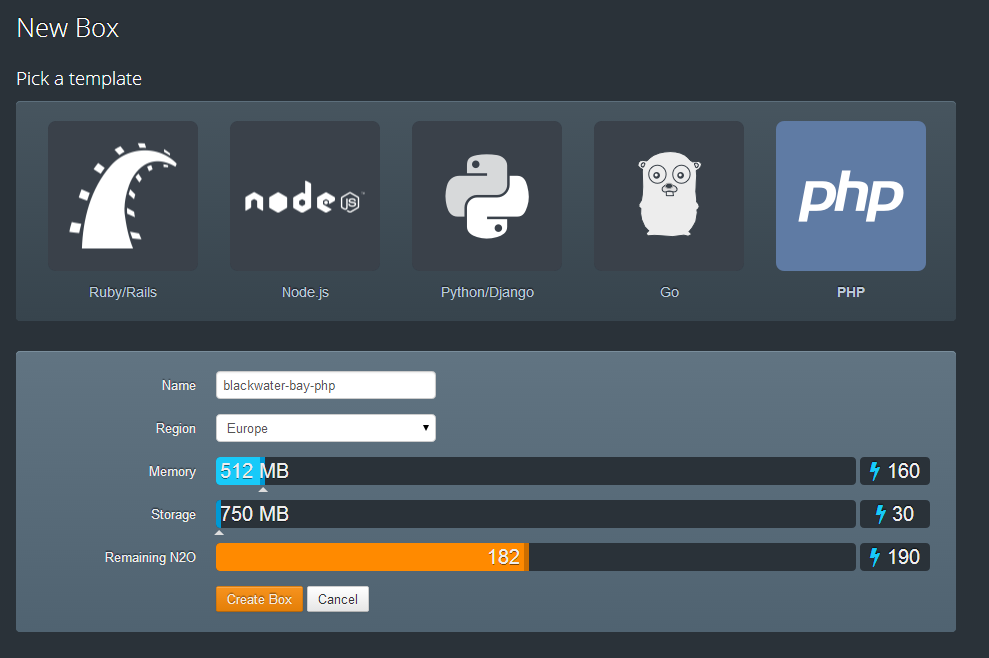
Creating a box
Let’s go into Boxes and click “New Box”. Select PHP, a region closest to you, and allocate as many resources as you wish – you can spend your entire Nitrous balance on this if you so choose – when you terminate a box, your nitrous is refunded.
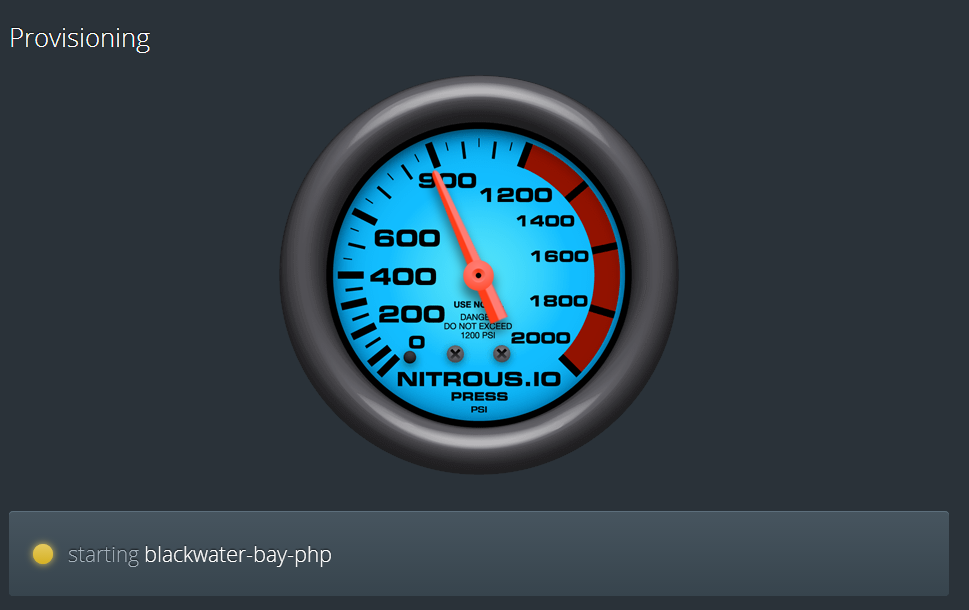
After clicking Create Box, your box will be provisioned – not unlike with Vagrant. You just won’t see as much output, and it’ll be much faster.
Once done, you’ll be greeted with a friendly and vaguely familiar interface, along with an introductory file that guides you through setting up the rest.

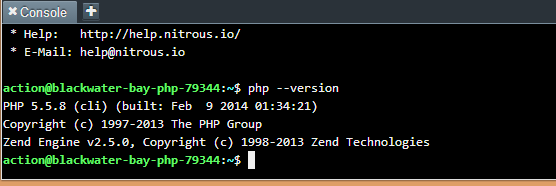
You can also run a PHP box by using any other template, and then using the Autoparts -> Install Parts menu to install PHP related tools like Apache, PHP, MySQL, etc. In the PHP box template, those parts are included. If you now use the included console to output the PHP version, you should see 5.5.8 displayed:
“Parts” is something like Nitrous’ custom tailored package manager, and you use it to start services and install parts. Parts can also automatically install WordPress for you, but who would want that anyway?
PhpInfo
Open the workspace folder, and create a file called index.php in the www subfolder with the contents:
<?php
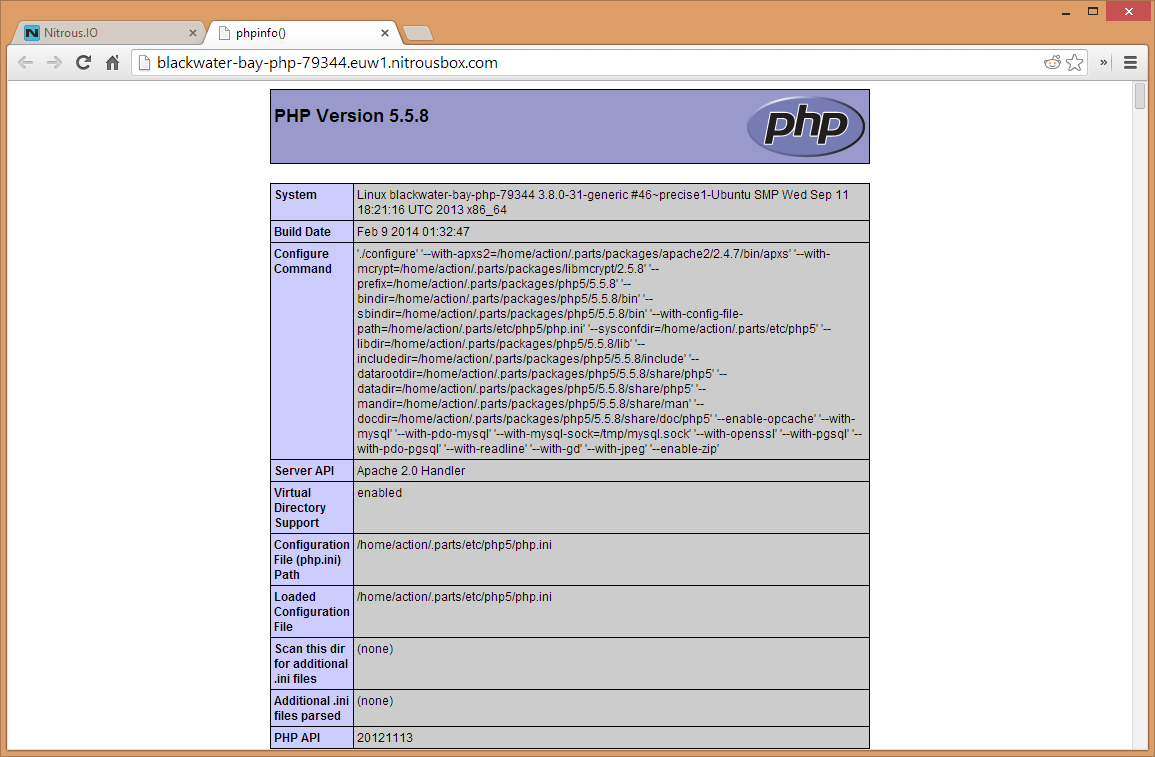
phpinfo();Then, go to Preview -> Port 3000 (the default). You should see the following PhpInfo screen in your browser:
Note that the other ports won’t work unless you configure them that way. The first one (3000 SSL) is a premium feature, and you’ll have to pay for it, while all others can be defined if you use the console to edit httpd.conf:
vim /home/action/.parts/etc/apache2/httpd.conf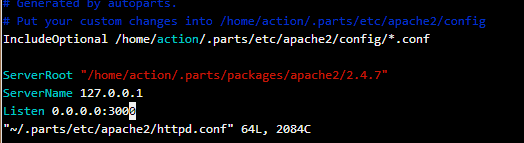
Note that you can access these files through the file browser as well, just remember to click “Show Hidden” at the bottom of the file browser. I find it simpler to go through the command line, though.
Installing PECL libs
Composer needs the Zip library to work, and installing it on our box is very simple, as per instructions
pear config-set php_ini /home/action/.parts/etc/php5/php.ini
pecl config-set php_ini /home/action/.parts/etc/php5/php.ini
pecl install zip
To paste in the console, remember to press CTRL + SHIFT + V instead of just CTRL + V. Building and installing might take a couple minutes, wait it out.
But having a www folder is so early 2000s. Almost smells of a shared host, doesn’t it? Let’s pro it up.
Configure a Virtual Host
There are two paths you can take here. One is defining multiple virtual hosts, as is common with Apache. The other is renaming the www folder to public and using the workspace folder as our app’s folder. I’m not a fan of the latter, because it imposes some limits on my pre-built apps, so let’s go with the former.
Once again, vim into httpd.conf: vim /home/action/.parts/etc/apache2/httpd.conf
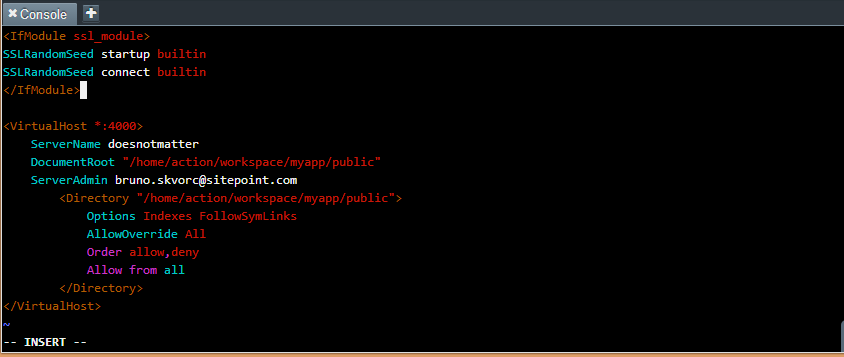
At the bottom of the file, add the following block:
<VirtualHost *:4000>
    ServerName doesnotmatter
    DocumentRoot "/home/action/workspace/myapp/public"
    ServerAdmin bruno.skvorc@sitepoint.com
        <Directory "/home/action/workspace/myapp/public">
            Options Indexes FollowSymLinks
            AllowOverride All
            Require all granted
            Order allow,deny
            Allow from all
        </Directory>
</VirtualHost>
Literally, add it to the end of the httpd.conf file:
Additionally, at the top of the file where it says Listen 0.0.0.0:3000, you should add another line: Listen 0.0.0.0:4000. Do this for every port you want listened to.
An alternative is putting all this into the config subfolder as the comment near the top of the httpd.conf file says. Pick your poison, either works.
Now create the folder mentioned in this configuration.
mkdir -p /home/action/workspace/myapp/publicThe -p parameter forces a recursive creation, meaning it creates all parent folders as well. Now add the same index.php file with the phpinfo(); content into this folder. A shorthand command to do it is this:
cd /home/action/workspace/myapp/public/
echo "<?php phpinfo();" > index.php
Restart Apache with parts restart apache2 and try opening the site on port 4000 via Preview -> Port 4000. You should see the same PhpInfo screen as before.
You can set up other virtual hosts in the same way.
Installing Composer
Update: Note that Composer is now pre-installed, and you can skip this step. Still, this part covers installing of custom binaries, so you might want to read it nonetheless.
Now that we got virtual hosts out of the way and can run several apps under one box if we so choose, let’s install Composer. We’ll be installing it globally – installing it once in every app makes absolutely no sense, especially on boxes with such limited hard drive space.
Nitrous.io boxes are limited in that you cannot create folders outside your home folder. To get around this limitation, we’ll just install it into a folder inside our home folder, and add said folder to the $PATH.
mkdir ~/.tools
cd ~/.tools
curl -sS https://getcomposer.org/installer | php
vim ~/.bashrc
Once vimmed, edit .bashrc by adding the following to the end of it:
export PATH=$PATH:$HOME/.tools/Then, reload the .bashrc file by executing source ~/.bashrc.
With that, Composer has been globally installed and you can use it from whichever app you want. Try it out by executing the following commands:
cd /home/action/workspace/myapp
composer self-update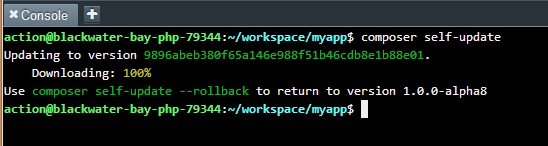
Creating a sample Laravel app
Composer, check. Virtual host, check. Let’s fire up Laravel, shall we? FYI, I chose Composer as the method of Laravel installation because it’s useful for much more than just Laravel, and you’ll eventually be needing it for other non-Laravel projects too.
First, let’s remove the myapp folder. Composer won’t create a project in a folder that’s not empty, so this will allow it to start from scratch.
rm -rf /home/action/workspace/myappThen, initiate the create-project command:
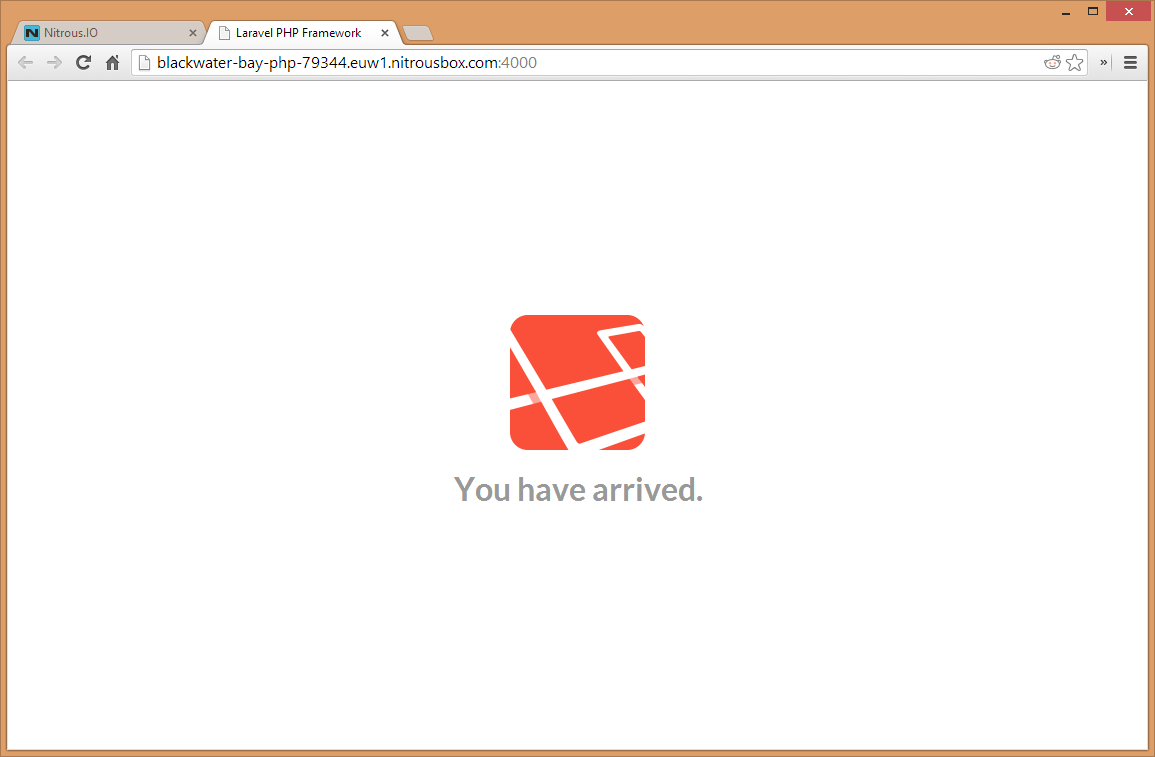
cd /home/action/workspace
composer create-project laravel/laravel myapp --prefer-dist
After a minute or two, everything should be downloaded. Visiting the same 4000 port on our box should give us the Laravel greeting screen.
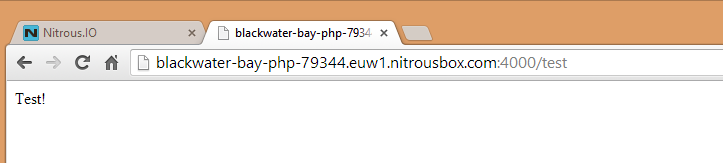
Following the Quick Start Instructions, we add a closure route to /test by adding the following content to app/routes.php:
Route::get('test', function()
{
    return 'Test!';
});
Now, visiting {$URL}:4000/test gives us the following output:
Connecting Laravel to MySQL
Let’s first check if our database works. Try punching in mysql -u root into the Nitrous command line, and see if you get in. If you can list databases with SHOW DATABASES;, change database to test with USE test; and then list tables in that database with SHOW TABLES; (result should be an empty set), you’re ready.
Laravel is, by default, configured to use the same insecure settings Nitrous uses – database username “root” with no password. As such, the connection is ready by default – all you need to do is change the database name in the config file to “sample”, as that is the one we’ll be using in the following example.
You should, naturally, change your credentials – in MySQL, add a user that’s only allowed to mess with a specific database, and add that user into the app/config/database.php file in the appropriate section. For user-based database privileges, read this answer. We won’t be doing that just for the purpose of this demo.
We could follow the Migration example in the quick start doc, but I’d rather do it all in one go and have our sample data ready instantly. To create a sample database with a test table and three rows of sample values, execute the following command in the Nitrous console, regardless of the folder you’re currently in:
wget -O- -q https://gist.github.com/Swader/8994154/raw/9bb8d253f92791de77fa01138febd404a306ccc6/sample.sql | mysql -u rootWhat this does, if you’re curious, is fetch my gist with the SQL code required to make it happen, outputs it to the standard output stream in the shell while silencing all errors and other log info, and applies it to MySQL after logging in as root.
We won’t be building a model just for the test data – I assume you can follow the extremely simple instructions on the Laravel page to make that happen yourself. Instead, we’ll just be demonstrating Laravel’s ability to connect to the database here.
In the routes file from before, replace our previously written closure with the following:
Route::get('test', function()
{
  var_dump(DB::select('select * from test'));
});
Refreshing the /test URL, we get the database output:

Conclusion
This article proved how simple it is to get a Laravel configuration up and running on Nitrous.io. Play around, look at the documentation, try to break things. If you do, just terminate and recreate the box – it’s that simple.
We’re in an age of virtual machines at every step, and our hardware and bandwidth are powerful enough to prevent us from polluting our main desktop environments with needless installations. Experiment without fear and let us know what you come up with, we’d love to take a look.
Frequently Asked Questions about Laravel and Nitrous.io
What is Laravel and why is it important?
Laravel is a popular open-source PHP framework used for web application development. It follows the MVC (Model-View-Controller) architectural pattern, providing an advanced structure for coding. Laravel simplifies tasks such as routing, security, and authentication, making it a preferred choice for developers. It’s important due to its robust features, scalability, and the ability to create applications quickly and efficiently.
What was Nitrous.io and how did it relate to Laravel?
Nitrous.io was a cloud-based platform that provided development environments for several programming languages, including PHP for Laravel. It allowed developers to set up, develop, test, and deploy their web applications entirely in the cloud. However, Nitrous.io shut down its services in 2016.
How can I set up a Laravel development environment now that Nitrous.io is no longer available?
There are several alternatives to Nitrous.io for setting up a Laravel development environment. These include Homestead, a pre-packaged Vagrant box that provides a wonderful development environment without requiring you to install PHP, a web server, and any other server software on your local machine. Docker is another popular choice, allowing you to package your application into a container, which can then be run on any platform.
What is the Blade templating engine in Laravel?
Blade is a simple, yet powerful templating engine provided with Laravel. Unlike other PHP templating engines, Blade does not restrict you from using plain PHP code in your views. All Blade views are compiled into plain PHP code and cached until they are modified, meaning Blade adds essentially zero overhead to your application.
How does Laravel ensure the security of web applications?
Laravel provides several security features out of the box to protect web applications. These include protection against cross-site request forgery (CSRF), cross-site scripting (XSS), and SQL injection. Laravel’s API also makes it easy to implement encryption and hashing, while its user authentication system helps protect restricted areas of your application.
How does Laravel handle database migrations?
Laravel’s database migrations provide a version control system for your database, allowing your team to modify and share the application’s database schema. Migrations are typically paired with Laravel’s schema builder to build your application’s database schema.
What is the current status of Nitrous.io?
Nitrous.io announced its shutdown in 2016. The cloud-based development platform discontinued its services and is no longer available for use. However, there are several other cloud-based development environments available that offer similar functionality.
How can I learn Laravel?
Laravel has a wealth of learning resources available. The official Laravel documentation is a great starting point, providing detailed instructions and examples. There are also numerous online tutorials, video courses, and books available. Laravel also has a large and active community, so you can find help on various forums and social media platforms.
Can I use Laravel for large-scale applications?
Yes, Laravel is a robust framework capable of handling large-scale applications. It provides tools for tasks such as task scheduling, event broadcasting, and filesystem abstraction, making it suitable for complex applications. Laravel’s architecture also supports the MVC pattern, which helps keep code organized and manageable, even for large applications.
What are some alternatives to Laravel?
There are several other PHP frameworks that can be used as alternatives to Laravel. These include Symfony, CodeIgniter, Yii, and Zend Framework. Each of these frameworks has its own strengths and weaknesses, so the best choice depends on your specific needs and preferences.