Publish Dynamic Data with SQL Server’s Web Assistant Wizard
As the Web and its development mature, more systems and applications release their own Web interfaces. If, for instance, you buy a wireless access point, it can be configured through a Web page. Or, consider Internet Information Server, which has its own local Website next to the standard Windows Console. In a broader sense, you will most likely have accessed your mail or news server through an online interface.
Database applications commonly use Web interfaces. MySQL, for example, can attribute part of its success to convenient online database administration tool, PHPMyAdmin. Its big brother, SQL Server, lacks such a useful interface, though it does offer the frequently overlooked Web Assistant Wizard.
Microsoft SQL Server’s Web Assistant Wizard generates HTML on the fly from database data. Its major benefit is that you don’t have to program anything. In order to show your dynamic data in an HTML page, you would typically need to write ASP, PHP or other server side code to create objects and connect to the database. After that, you’d need to open a recordset and loop through it. This is all taken care of by SQL Server itself: the data is forwarded to the Web server the moment it is updated in the database.
Another key benefit is performance. Instead of connecting to the database and creating the proper objects on every page request, the Wizard takes initiative on every change. Whenever relevant data is updated, SQL Server will ensure the underlying Web page is brought up to date as well. This means that the visitors to your site will be served much faster: there’s only a static HTML page for the server to handle.
How Does It Work?
Step 1: Prerequisites
To use the Web Assistant Wizard, you obviously need to equip yourself with SQL Server. You don’t need to be an experienced SQL Server user to understand the Web Assistant Wizard, but if you’re a beginner, you might find Mitchell Harper’s article, ‘Your First SQL Server 2000 Database‘, interesting. The examples I use here are based on SQL Server 2000, but the Wizard exists in earlier versions of SQL Server as well. Note that the SQL Server Agent should be running.
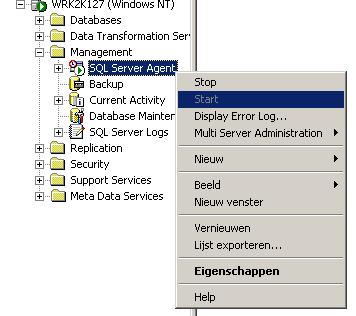
In addition to that, it’s convenient to have direct access to your Web server’s virtual directory. SQL Server can write its HTML output to a normal folder, but in that case you’d have to automate the file transfer to your Web server yourself.
Step 2: Get Started
Open your SQL Server Enterprise Manager and choose Wizards under Tools. This will provide you with an overview of available Wizards. You will find the Web Assistant Wizard when you open the Management tree view item.
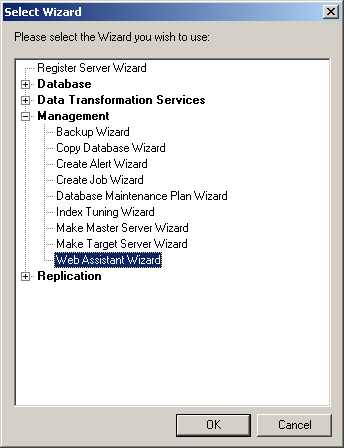
Step 3: Choose the Data Source from which you want to Publish Online
For sake of this example, we’ll use the Northwind database, which is created by default when installing SQL Server. After choosing the database mentioned above, you will notice the Wizard has three different ways of selecting data:
- Data from tables
- Results of stored procedures
- Data from a T-SQL statement
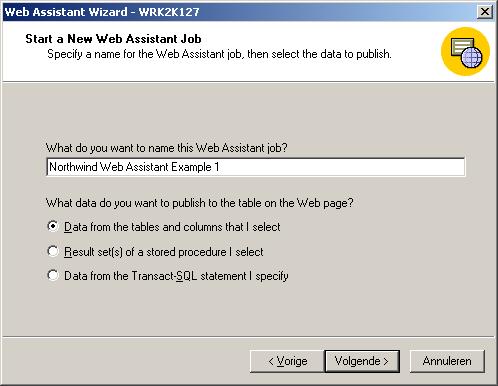
If you know how to write your own stored procedures and T-SQL statements (SQL Server’s own dialect of the ordinary Structured Query Language), these can offer you great powers. Here, however, we’ll continue with the much simpler first option.
Step 4: Choose the Data you want to Publish Online
After picking that first and most straightforward option, you will get the opportunity to choose the appropriate tables and columns. Choose Employees, add the columns with first and last name, and click Next twice.
Step 5: Schedule the Update
Usually, you’d like to update your pages when SQL Server data changes, so pick the fourth option for this example. As you can see, it’s also possible to schedule updates at regular intervals. Make sure you leave the option “Generate a Web page when the wizard is completed” on, so you can watch the results once we’ve finished.

Step 6: Indicate which Changes to Monitor
Last but not least, SQL Server needs to know which changes the HTML page should implement. Data modifications to any column will lead to the generation of a new Web page. Add the first and last name columns of the table Employees again, and click Next.
Step 7: Choose the Location of your Web Page
Pick a new name for the HTML page that SQL Server should generate. As previously mentioned, ideally you should refer to a directory on your Web server here, to ensure you have online access to the published data.

As you can see, it’s possible to influence the layout of the HTML page generated by SQL Server. We will just use the default options as we approach the closing stages. Click Next until you reach Finish, and SQL Server will confirm that it has successfully completed the task.
Step 8: Verify that your File was Created
Use your browser to reach the file you created in the previous step.
Step 9: Make Changes and Check the Update
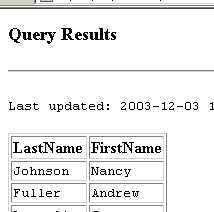
Notice that the first employee in your Web page is Nancy Davolio.
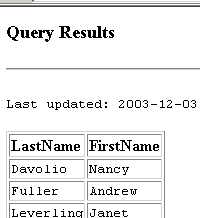
Now, revert to the Enterprise Manager and view the data of the Employees table in your Northwind database. Change the LastName value of Davolio to, say, Johnson.
Refresh your Web page, and you’ll see that Nancy is now called Johnson online as well.
Advanced Options
To keep the example simple, I’ve ignored a lot of the Web Assistant’s extra options. I won’t go into detail here, but the Wizard contains many possibilities for beginners and advanced users alike. Once you’ve become familiar and comfortable with the Web Assistant Wizard as well as with SQL Server, you might consider experimenting with the following, more advanced applications:
- Tweaking the layout of the HTML output
- The use of templates
- The use of your own T-SQL queries and stored procedures
- Updates at regular intervals, for instance once a day
- The possibility of editing all your options under Management->SQL Server Agent->Jobs
- The possibility of publishing Database Maintenance information online
- The use of the predefined ‘
sp_make_webtask‘ stored procedure in T-SQL queries
Each of these options deserves its own treatment in an article. Some have already appeared on SitePoint in one form or another — in David Clark’s ‘Stored Procedures on PHP and Microsoft SQL Server‘, for instance.
Conclusion
The Web Assistant Wizard is a great tool to help you quickly and easily publish database data. It enables you to view and share up-to-date data in any shape or form you choose, yet not to change or delete it. That restriction is the largest downside of the Wizard’s possibilities for me.
The performance win is clearly a big bonus. For larger Web development teams, the Web Assistant Wizard could also allow the sharing of responsibilities. The database manager will be responsible for the generation of data, while the Web developer can focus on building Web pages, i.e. the template in this case.
The Web Assistant is a powerful tool. Nonetheless, the Wizard and its benefits are little known among Web developers who work with SQL Server. Now that you have an idea of how to use it, consider what it can do to improve your online applications.
Frequently Asked Questions (FAQs) about Web Assistant Wizard and Servers
What is a Web Assistant Wizard and how does it work?
A Web Assistant Wizard is a tool designed to simplify the process of setting up and managing web servers. It provides a user-friendly interface that guides users through the process of configuring their server settings, installing necessary software, and managing their server’s performance. The wizard uses a step-by-step approach, asking users to input information or make selections at each stage. This makes it easier for users, especially those with limited technical knowledge, to set up and manage their servers.
How does the Web Assistant Wizard compare to SQL Server Management Studio?
While both the Web Assistant Wizard and SQL Server Management Studio (SSMS) are tools designed to help manage servers, they serve different purposes. The Web Assistant Wizard is primarily focused on setting up and managing web servers, while SSMS is a comprehensive tool for managing, configuring, and administering all components within Microsoft SQL Server. SSMS provides a broad range of functionalities including querying, designing, and managing data and databases, whereas the Web Assistant Wizard is more specialized and user-friendly for web server management.
What are the key components of SQL Server 2019 and 2022?
SQL Server 2019 and 2022 are editions of Microsoft’s relational database management system. They include several key components such as the Database Engine, which is used for storing, processing, and securing data, Analysis Services for online analytical processing of data, and Integration Services for data integration and transformation. They also include Machine Learning Services for running Python and R scripts, and Reporting Services for creating reports.
How can I publish a database using SQL Server Management Studio?
Publishing a database using SQL Server Management Studio involves several steps. First, you need to connect to the Database Engine. Then, in Object Explorer, expand the Databases folder, right-click the database you want to publish, and select Tasks > Generate Scripts. This will open the Generate Scripts wizard, which will guide you through the process of creating a script for your database. Once the script is generated, you can run it on the target server to create a copy of your database.
What is web server replication and how does it work?
Web server replication is a process where data from one web server is automatically copied or ‘replicated’ to one or more other servers. This is done to ensure that the data is available from more than one location, improving accessibility and reliability. Replication can be done in several ways, including snapshot replication, transactional replication, and merge replication, each with its own advantages and use cases. The choice of replication method depends on factors such as the size of the database, the frequency of changes, and the network environment.
Ruben is a senior software engineer and team manager for Capgemini in the Netherlands. He is specialized in Web development and Visual Basic applications.
Published in
·Cloud·Debugging & Deployment·Development Environment·PHP·Programming·Web·April 26, 2014


