


Key Takeaways
- NSNotification in Swift 3 allows communication and data transfer between classes and structures, and is not related to push notifications. It can be used to notify other view controllers or within a single view controller, and can be used to send data.
- The NSNotification system works by attaching an observer to a view-controller, which can send and receive data. The observer has four parameters: the Observer, the Selector (a function that runs when you notify), the name (the secret code), and the object (the sender). The observer can be removed when the view has been dismissed.
- While NSNotification is a powerful tool for data passing, it can lead to memory leaks if observers are not properly removed, and lacks type safety as data is passed as a dictionary and must be cast to the correct type when retrieved. It is best used for broadcasting information to multiple parts of your application, rather than for one-to-one communication.
This article was originally published at iOS Geek Community.
Today, let’s talk about how and why we use NSNotification to pass data and communicate/notify between classes and structs. By the way, NSNotification, unlike its name, has nothing to do with Push Notification — rookie mistake 101 (me).
Yes, there are many ways to pass data in Swift: Delegate, Key-Value Observing, Segue, and NSNotification, Target-Action, Callbacks. However, each one has its own pros and cons. They are like dining utensils. For example, I wouldn’t use chopsticks — although it’s pretty darn good — to drink soup.
Since there are many, I’m only going to cover one at a time, and I will going to mention why you should spoons instead of chopsticks along the way. It doesn’t make sense to tell the differences between chopsticks and knives before I have used both.
What I think you will learn
In this tutorial, you will learn 2 things. First, you will understand how to “notify” other view controllers or within a single view controller. Second, you will grasp the power of NSNotification and its weaknesses.
UI Component
There are two view-controllers. FirstVC and SecondVC. I assume you already know how to embed UINavigationController and connect IBOutlets and IBActions and so on.
SecondVC will notify FirstVC. When I say “notify”, it’s like poking. It’s not sending any data, but certainly, we can. I will explain how to send data a bit later in this article. The example below is analogous to a user making a profile update on Facebook or Instagram. I’m not using UITableView since that would be overkill for explaining the concept.
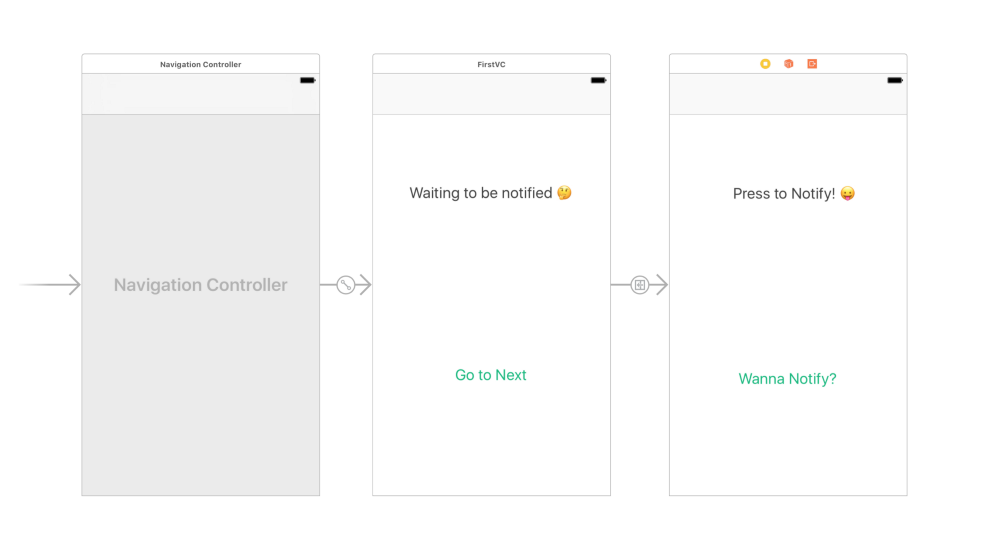
Before we jump in, let’s picture how we would implement this at an extremely high level. Imagine two viewcontrollers are like a beautiful couple. They both have smartphones (NSNotification Objects) to talk to each other. Second, each smartphone has two features: receiving and sending data. Lastly, to locate each other’s device, they have a common secret key. However, it’s up to each other whether one wants to pick up the call or simply ignore.
Since we have a general understanding how they communicate with each other, let’s dive into Swift ☝️
First, we are going to store the secret key. You can make a separate Swift file or just create one outside of any view-controller like this.
import UIKit
let myNotificationKey = "com.bobthedeveloper.notificationKey"
class SecondVC: UIViewController {}
myNotificationKey will be used to connect those smartphones together. Of course, just like some other couples, you can have more than one key for whatever purposes. 🙃
Now, it’s time attach a smartphone. Let’s call this an observer. The observer will have four parameters. It will ask Observer which will be self since you are attaching the smartphone to SecondVC. Second, Selector, which is a function that runs when you notify. Third, name which refers to the secret code. Lastly, object which I will explain later when dealing with FirstVC. Just put nil for now.
class SecondVC: UIViewController {
  @IBOutlet weak var secondVCLabel: UILabel!

  override func viewDidLoad() {
    super.viewDidLoad()
    NotificationCenter.default.addObserver(self,
                                           selector: #selector(doThisWhenNotify),
                                           name: NSNotification.Name(rawValue: myNotificationKey),
                                           object: nil)
  }

  func doThisWhenNotify() { print("I've sent a spark!") }
}
I don’t get the meaning of the default type property because there is no description in the API guideline. It says,*
“No overview available” — Apple
Anyway, SecondVC has a smartphone/observer, it’s time to send/notify when the button is tapped
@IBAction func tabToNotifyBack(_ sender: UIButton) {
  NotificationCenter.default.post(name: Notification.Name(rawValue: myNotificationKey), object: self)

  secondVCLabel.text = "Notification Completed!😜"
}
In this context, object refers to the sender. Since SecondVC is notifying itself, it’s self.
Since FirstVC hasn’t registered an observer yet, the spark/poking will not affect it. I mentioned earlier, the partner has the right to pick up the phone or just ignore. In iOS, we called this “loose coupling”. There is no crazy binding shit going on unlike sending data between view controllers using delegate/protocol. I know some of you guys are confused. I plan to write an article on how to pass data using delegate in the future. Also, I will discuss delegate vs NSNotification
Resource
Pass Data between ViewControllers in Swift 3 without Segue (YouTube)
Time to Receive
FirstVC is rather simple. It will add a smartphone and listen to the spark if it has the same secret key.
import UIKit

 class FirstVC: UIViewController {
   @IBOutlet weak var FirstVCLabel: UILabel!

   override func viewDidLoad() {
     super.viewDidLoad()
     NotificationCenter.default.addObserver(self,
                                            selector: #selector(doAfterNotified),
                                            name: NSNotification.Name(rawValue: myNotificationKey),
                                            object: nil) }

   func doAfterNotified() {
     print("I've been notified")
     FirstVCLabel.text = "Damn, I feel your spark"
   }
}
Now, let’s talk about object which is one of the parameters I skipped previously. If it is nil, you don’t care which/where smartphone is sending the data from as long as you have the secret key. I’ve never used anything
besides nil so maybe for those who’ve used it before can help me out. In other words, I don’t know how to implement
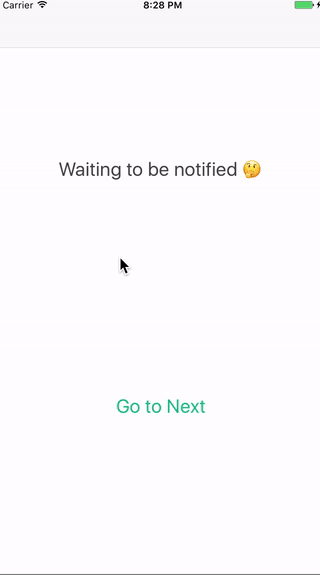
Now, it should look something like this.
By the way, imagine SecondVC is like Facebook live. As long as there are many other view-controllers that contain observers which listen to the secret key, it can notify a lot of people. However, it is done synchronously. For those who don’t understand what it means, the task happens one at a time while blocking any other activities until the task is done. So, it will slow down devices if there are too many view-controllers. (not sure how many is too many).
Source Code
Github
Passing Data
Now you’ve learned how to notify. Let’s quickly learn how to send data while notifying. This is legit. This is where the real magic happens.
In SecondVC, instead of using the good old way,
// Pass Spark
NotificationCenter.default.post(name: NSNotification.Name(rawValue: myNotificationKey), object: nil)
Now, you can send a spark that contains a dictionary
// Pass Data
NotificationCenter.default.post(name: NSNotification.Name(rawValue: myNotificationKey), object: nil, userInfo: ["name":"Bob"])
In the FirstVC, under viewDidLoad, you will insert this instead
NotificationCenter.default.addObserver(forName: NSNotification.Name(rawValue: myNotificationKey),
                                       object: nil,
                                       queue: nil,
                                       using:catchNotification)
I’m not going to talk about queue. If you put nil, the receiving task happens synchronously. In other words, if it’s not nil, FirstVC can receive data using Grand Central Dispatch. If you don’t understand GCD, don’t worry. I wrote two articles for you. Maybe I should write on how to pass data asynchronously using GCD! That would be interesting.
Resources
Intro to Grand Central Dispatch in Swift 3 (Medium)
UI & Networking like a Boss in Swift 3 (Medium)
You’ve noticed something different. That’s right catchNotification This function will consume the spark which contains userInfo! catchNotification looks something like
func catchNotification(notification:Notification) -> Void {
  guard let name = notification.userInfo!["name"] else { return }

  FirstVCLabel.text = "My name, \(name) has been passed! 😄"
}
As soon as the button from SecondVC is pressed, catchNotification runs automatically and contains userInfo passed from SecondVC. If you don’t understand how to unwrap optionals using the guard statement, feel free to check my video below.
Resource
Guard Statement (YouTube)
So, finally it should look something like this
Resource
Source Code
Remove Observer/Smartphone
If you want to remove any observer when the view has been dismissed, just insert the code below in FirstVC or any other view controllers.
override func viewDidDisappear(_ animated: Bool) {
  super.viewDidDisappear(true)
  NotificationCenter.default.removeObserver(self)
}
Last Remarks
This article took a bit longer than I 3had expected. But, it feels so good to write and engage with a lot of people. Thank you everyone for coming all the way to the bottom. Much appreciated. 👍
Recommended Articles:
Feel free to check out recommended articles:
Top 10 Ground Rules for iOS Developers
Intro to Grand Dispatch Central with Bob
Frequently Asked Questions (FAQs) about Passing Data with NSNotification between ViewControllers in Swift 3
What is NSNotification and how does it work in Swift 3?
NSNotification is a messaging system that allows different parts of your application to communicate with each other. It works by sending notifications to registered observers when certain events occur. In Swift 3, you can use the NotificationCenter class to add observers and post notifications. The NotificationCenter manages the sending and receiving of notifications, allowing data to be passed between different parts of your application without the need for direct coupling.
How do I pass data between ViewControllers using NSNotification in Swift 3?
To pass data between ViewControllers using NSNotification in Swift 3, you first need to define a notification name. This is done using the Notification.Name extension. You then add an observer in the receiving ViewController, specifying the notification name and a selector to handle the notification. In the sending ViewController, you post a notification with the same name and pass the data as a dictionary in the userInfo parameter.
Can I pass multiple data using NSNotification in Swift 3?
Yes, you can pass multiple data using NSNotification in Swift 3. The data is passed as a dictionary in the userInfo parameter when posting a notification. Each piece of data is associated with a unique key, allowing you to pass and retrieve multiple data.
How do I remove an observer from NSNotification in Swift 3?
To remove an observer from NSNotification in Swift 3, you use the removeObserver method of NotificationCenter. You can remove a specific observer, or all observers of a particular notification.
What are the potential issues with using NSNotification for data passing in Swift 3?
While NSNotification is a powerful tool for data passing in Swift 3, it can lead to issues if not used carefully. One potential issue is memory leaks if observers are not properly removed. Another issue is the lack of type safety, as data is passed as a dictionary and must be cast to the correct type when retrieved.
Can I use NSNotification to pass data between different threads in Swift 3?
Yes, NSNotification can be used to pass data between different threads in Swift 3. However, you need to be careful to ensure thread safety. Notifications are delivered on the thread where they were posted, so you may need to use Grand Central Dispatch (GCD) to ensure that the notification is handled on the correct thread.
How does NSNotification compare to other methods of data passing in Swift 3?
NSNotification provides a flexible and decoupled way of passing data between different parts of your application. However, it lacks the type safety of methods like delegation or segues, and can lead to issues if not used carefully. It is best used for broadcasting information to multiple parts of your application, rather than for one-to-one communication.
Can I use NSNotification with SwiftUI?
Yes, you can use NSNotification with SwiftUI. However, SwiftUI provides its own mechanisms for data passing and state management, such as @State and @Binding, which are often more appropriate for SwiftUI applications.
How do I debug issues with NSNotification in Swift 3?
Debugging issues with NSNotification in Swift 3 can be challenging due to its decoupled nature. However, you can use tools like breakpoints and the console to track the posting and receiving of notifications. You can also use the userInfo dictionary to pass additional debugging information.
Can I use NSNotification to pass data between different applications in Swift 3?
No, NSNotification is used for communication within a single application. To pass data between different applications, you would need to use other mechanisms, such as app extensions or URL schemes.

