
Key Takeaways
- Mastering complex selections in Photoshop requires understanding the use of various tools, including the Quick Selection Tool, Refine Edge, Smart Radius, and Decontaminate Colors.
- The Quick Selection Tool is effective for making loose selections of objects, while the Refine Edge menu allows for precise adjustments and extraction of intricate details like hair or fur.
- The Smart Radius and Decontaminate Colors options in the Refine Edge menu are essential for extracting fine details and removing unwanted color fringes around the object.
- For more complex selections where the Quick Selection Tool and Refine Edge may not yield perfect results, the Shift Edge Slider and Contrast Slider can be used to gradually add or remove image information.
Having the ability to effectively extract an image from its background is an essential skill for any designer, photographer, or creative professional. Many times we have unique challenges when attempting to separate a subject from its setting. Obstacles like poor contrast or the intricate shapes formed by hair and fur can make the process nearly impossible without the right techniques. In the first installment of Making Complex Selections in Photoshop, I covered fairly easy objects to select, such as a woman with a few wisps of hair sticking out, but this time we are going to cover making even more complex selections in Photoshop.
The example image below can be found here. To try and select each individual strand by hand would be extremely painstaking and nearly impossible. You could spend all day attempting to select this cactus with the lasso tools, and even revealing each strand with a mask would yield poor results. It would take hours to refine the mask for each strand by hand. Instead, select the Quick Selection Tool and make a loose selection of the object by clicking and dragging within the area. Hold Shift to add to the selection and hold the Option/Alt key to subtract from the selection. If you find that it’s taking too long to make a selection, increase the size of the Quick Selection Tool, as you would the Brush Tool, by hitting the “]” Key, until you have a decent sized cursor. Hit “[“ to lower the size for more tedious areas. (If you’d like to learn more about helpful, time-saving Photoshop keystrokes, check out 30+ Time-Saving Photoshop Keyboard Shortcuts.)

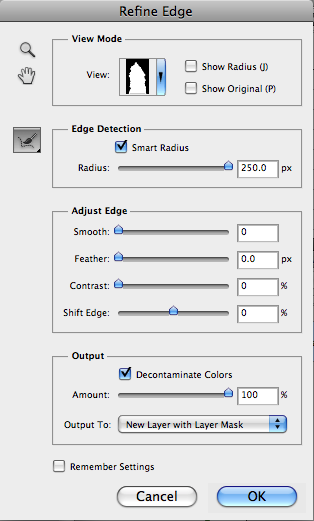
You can see from the image above that the selection is very loose. With the selection active, go to the Options Bar and click Refine Edge. The Refine Edge dialog box will come up, where you can refine and adjust your selection very precisely. Click the Smart Radius option to enable it, and move the slider all the way to the right. On more solid objects, be careful when using this, because it will take away solid, continuous areas of color around the edge that blend with the background color. However, this setting is perfect for fine, wispy hair or fibers. Click Decontaminate Colors and move its slider all the way to the right. This removes edges where the background color may have added a thin, unwanted fringe around the object.
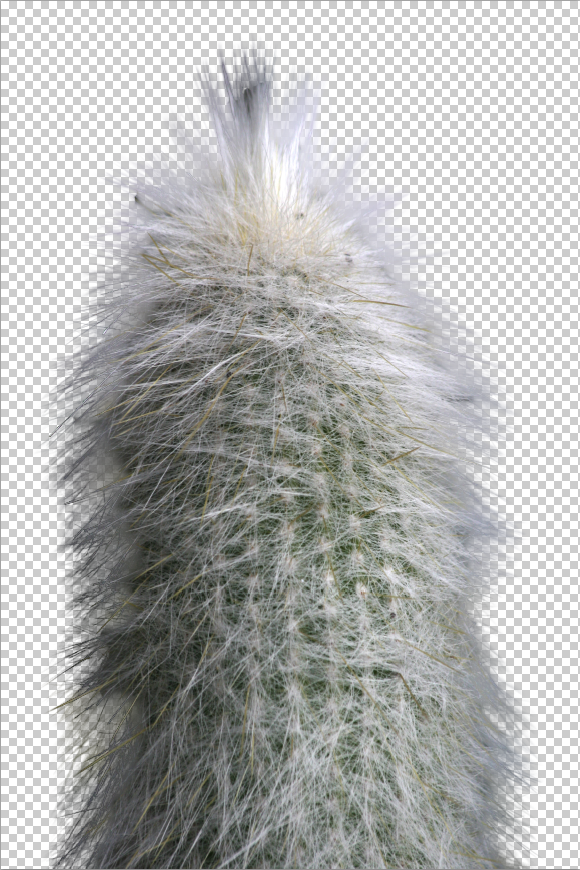
You can see that the Refine Edge menu has already done a great job of extracting the fine, fibrous edges around the cactus. Hit the “F” key to toggle between views and you can see that the mask view of the selection is very intricate and precise.

Select Output to New Layer with Layer Mask. This will create a new layer above the working layer based on the mask that we just made and refined. If there are any problem areas, we can fix them, but in this case we have none. Now, you can place your selected object over anything that you’d like without color contamination or any other concerns.
The fuzziness is just as prominent as it was in the original image, but now we can slide any color or image behind our object and composite a layout quickly and easily. Below, I added a bold purple to show the quality and precision of this selection technique.

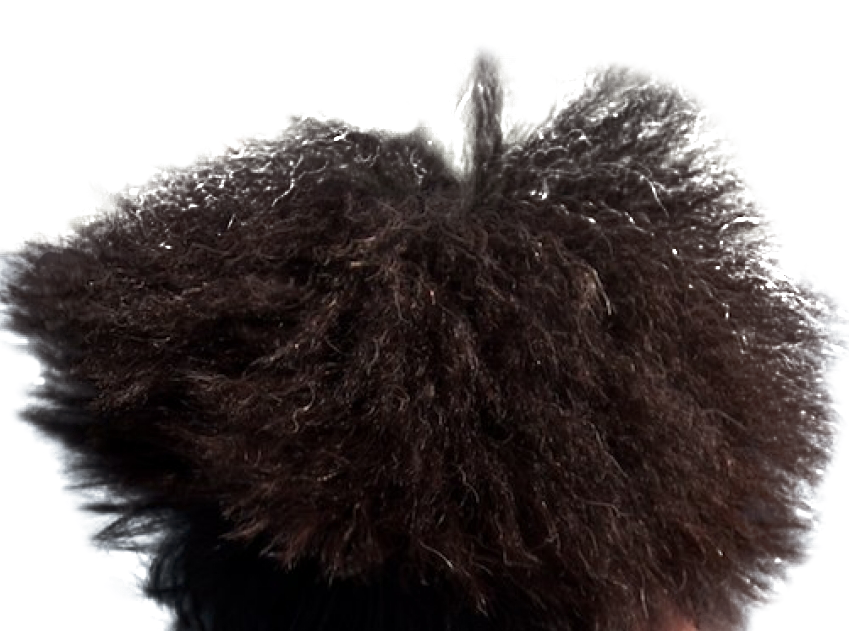
The next sample, which you can download here, has a decent amount of contrast between subject and background, but the fur is long and feathery, which is nearly impossible to select by hand. Select the Quick Selection Tool and make a loose selection, making sure to include as much of the bear as possible.
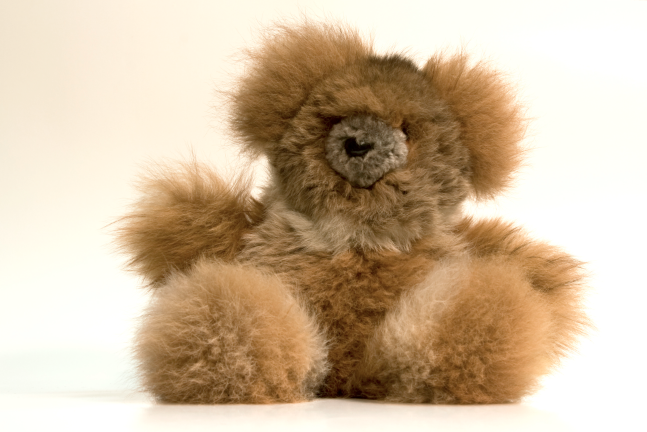

Using Smart Radius and Decontaminate Colors seems to do the trick instantaneously, but before exporting to a new layer, it is always good idea to hit the “F” key multiple times to toggle through the different backgrounds to make sure that you haven’t missed anything. The selection below looks good on white…

However, when we toggle through the different views (using the “F” key), when we get to the black background, where I realized that I had apparently missed a spot. Notice the area of white to the left of the head.
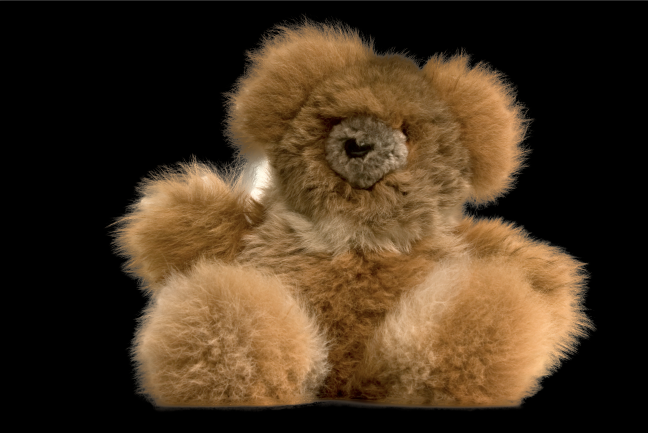
It turns out that the brush tool would not remove this area. It was actually quicker to exit the Refine Edge Menu by hitting cancel, and then holding Alt/Option while clicking with the Quick Selection Tool to remove that area from the selection. Afterward, I re-entered the Refine Edge menu, used the Smart Radius and Decontaminate Colors options, and exported the image to its own layer with a layer mask. The result is below. Note that there are no longer remnants of white anywhere around the bear.

The next example is a little more challenging due to the fact that there is background interference caused by the water. You can find the sample image here. Just like with the image before, make a rough selection with the Quick Selection Tool.
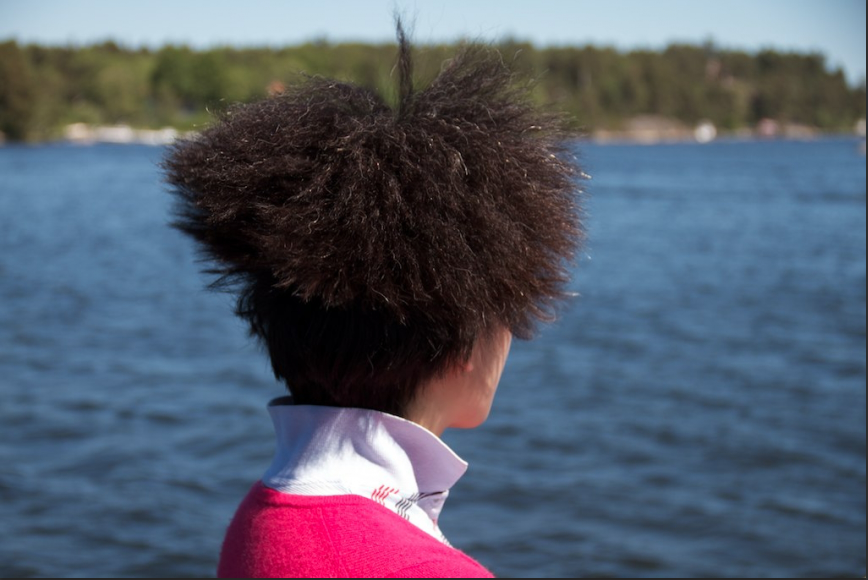

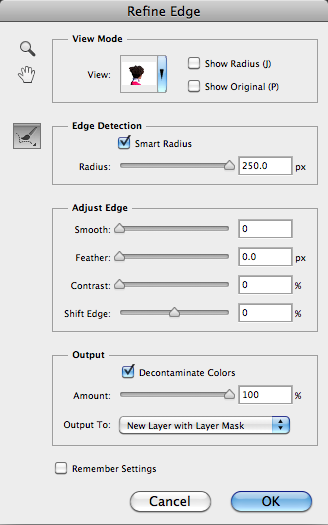
The difficult part about this selection is that the woman’s hair feathers out at the ends, and the dark, feathered ends blend into the foliage in the background, making a precise selection nearly impossible. Click Refine Edge in the options bar to bring up the Refine Edge dialog box. It is here that we will end up making most of our refinements. Check Smart Radius, and move the slider all the way to the right. Then, click Decontaminate Colors, and move that slider all the way to the right. In the drop down menu, choose New Layer With Layer Mask, but don’t click OK yet, because our selection isn’t quite as good as it needs to be. You can see that it needs to be more refined by toggling the different views (using the “F” key) until your image is placed over a white background.

The problem is that the top area — where the hair blends into the rest of the image — has a lot of extra color information. It isn’t as clean of a selection as it could be.
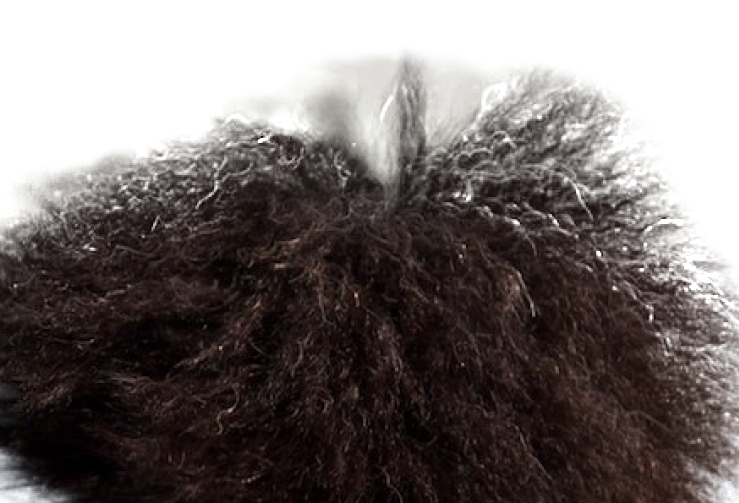
This problem can be solved with the brush tool found in the Refine Edge dialog box area. You can use one of several methods to manipulate your selection. The first option is to simply single-click over an area that should be included in the mask. Photoshop will resample the selection and attempt to add this to the original selection. The gray areas within the hair need to be removed; that is color information that doesn’t need to be included in the selection. Holding Alt/Option and doing a single click over these areas will cause Photoshop to recalculate the selection and remove these unwanted gray areas from the results. Two well-placed single-clicks while holding the Alt/Option key in the grey areas to the left and right of the strands of hair that are sticking straight up made a much better selection in these areas.

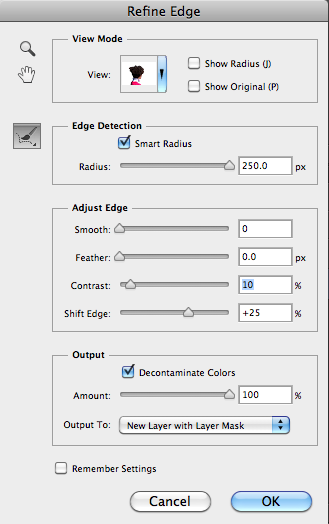
Now, the problem is that too much of the hair has been removed. We need to add image information back into the document, but the brush isn’t precise enough to pull this off. To add this information back in — without accidentally adding the water and foliage back in — move the Shift Edge Slider to the right to add image information gradually back into the selection. The value used here is 25. Then, move the contrast slider to the right roughly 10 points, and you’ll get a much better selection. Click OK to have Photoshop Duplicate the layer and apply the selection as a mask.
If you need to make any further adjustments, you can use black to paint out unwanted areas of the image, and you can use white to paint them back in on the mask. When you are finished, you can apply the mask to the image, so that you can drop it over a different background, or you can leave the mask in order to make more adjustments later. Here is the result placed on an entirely different background:

Conclusion
Making Complex Selections in Photoshop used to be a long, time-consuming process that took hours upon hours. Some images were thought of as impossible to extract from their background, but with the Refine Edge menu, you have the ability to quickly refine your selection to include fine, feathery sections of hair, animal fur, and long stands of fibers that are nearly impossible to work with by hand. The result is better Photoshop work, happier clients and colleagues, and lots of time saved.
Do you have any selection techniques of your own for complex selections? Are you often asked to perform very difficult Photoshop within a very small time frame?
Frequently Asked Questions (FAQs) about Mastering Complex Selections in Photoshop
What are the different selection tools available in Photoshop?
Photoshop offers a variety of selection tools, each with its unique features and uses. The Marquee tools allow you to make rectangular, elliptical, single row, and single column selections. The Lasso tools, including the Lasso tool, Polygonal Lasso tool, and Magnetic Lasso tool, are used for freehand, straight-edged, and magnetic selections respectively. The Quick Selection tool lets you quickly “paint” a selection using an adjustable round brush tip. The Magic Wand tool selects similarly colored areas. The Object Selection tool creates a fast and precise selection of a specific object in an image.
How can I refine the edges of my selection in Photoshop?
Photoshop provides a feature called ‘Refine Edge’ that allows you to fine-tune your selections. You can access this feature by going to the ‘Select’ menu and choosing ‘Refine Edge’. This opens a dialog box with various sliders that you can adjust to refine the selection’s edge, including Smooth, Feather, Contrast, and Shift Edge. You can also use the ‘Refine Radius’ tool to paint over areas of the selection edge that need further refinement.
What is the difference between the Quick Selection tool and the Magic Wand tool?
The Quick Selection tool and the Magic Wand tool both allow you to make selections based on color and tone. However, the Quick Selection tool is more like a brush, allowing you to ‘paint’ your selection, while the Magic Wand tool selects all adjacent pixels of a similar color with a single click. The Magic Wand tool is useful for selecting large areas of similar color, while the Quick Selection tool offers more precision and control.
How can I use the Pen tool for making complex selections?
The Pen tool is a versatile tool in Photoshop that allows you to create precise paths that can be converted into selections. To use the Pen tool for making selections, select the Pen tool from the toolbox, and then click on the canvas to create anchor points. You can click and drag to create curved lines. Once you have created your path, you can convert it into a selection by right-clicking on the path and choosing ‘Make Selection’.
What is the use of the Object Selection tool in Photoshop?
The Object Selection tool in Photoshop is a relatively new tool that uses Adobe’s Sensei AI technology to automatically select objects in an image. This tool can be incredibly useful for quickly selecting complex objects without having to manually trace around them. You can use the Object Selection tool by choosing it from the toolbox and then clicking and dragging a rectangle or lasso around the object you want to select.
How can I move or copy a selection to a new layer in Photoshop?
Once you have made a selection in Photoshop, you can move or copy it to a new layer. To move the selection, simply select the Move tool from the toolbox and then click and drag the selection. To copy the selection, go to the ‘Layer’ menu, choose ‘New’, and then ‘Layer via Copy’. This will create a new layer with just the selected area.
How can I deselect a selection in Photoshop?
To deselect a selection in Photoshop, you can either go to the ‘Select’ menu and choose ‘Deselect’, or you can use the keyboard shortcut Ctrl+D (Command+D on a Mac). If you want to deselect a specific area of a selection, you can use the Lasso tool or the Marquee tool while holding down the Alt (Option on a Mac) key.
Can I save my selection for future use in Photoshop?
Yes, you can save your selection for future use in Photoshop. To do this, go to the ‘Select’ menu, choose ‘Save Selection’, and then give your selection a name. You can then load this selection at any time by going to the ‘Select’ menu and choosing ‘Load Selection’.
How can I add to or subtract from a selection in Photoshop?
To add to a selection in Photoshop, hold down the Shift key while using any of the selection tools. To subtract from a selection, hold down the Alt (Option on a Mac) key while using any of the selection tools.
What is feathering in Photoshop and how can I use it?
Feathering in Photoshop is a technique used to create soft edges around a selection. This is useful for blending the edges of a selection with the rest of the image. To apply feathering to a selection, go to the ‘Select’ menu, choose ‘Modify’, and then ‘Feather’. You can then enter a feather radius to determine how soft the edges of the selection will be.