

Vector databases are commonly used to store vector embeddings for tasks like similarity search to build recommendation and question-answering systems. Milvus is one of the open-source databases that stores embeddings in the form of vector data, it is well suited because it has indexing features like Approximate Nearest Neighbours (ANN) enabling fast and accurate results.
In this article, we’ll demonstrate the steps of how to use a HuggingFace dataset, create embeddings from the dataset, and divide the dataset into two halves (testing and training). You’ll also learn how to store all the created embeddings into the deployed Milvus database by creating a collection, then perform a search operation by giving a question prompt and generating the most similar answers.
Key Takeaways
- Milvus, an open-source database, is effective for storing vector embeddings due to its indexing features like Approximate Nearest Neighbours (ANN) which enable fast and accurate results. This makes it useful for building recommendation and question-answering systems.
- A step-by-step guide is provided on how to deploy a server on Vultr, install the required packages, and build a question-answering architecture. This involves using a HuggingFace dataset, creating embeddings from the dataset, dividing it into testing and training halves, and storing the embeddings in a Milvus database.
- The guide further explains how to tokenize and embed a prompt, perform similarity searches, and generate the most relevant responses. The system can handle custom prompts and can adjust the number of questions per prompt.
- The question-answering system uses the Milvus database and a HuggingFace dataset to perform similarity searches and find the best suitable answers for a given prompt. It does this by creating an embedding of the question provided and calculating tensors.
Deploying a server on Vultr
- Sign up and log in to the Vultr Customer Portal.
- Navigate to the Products page.
- From the side menu, select Compute.
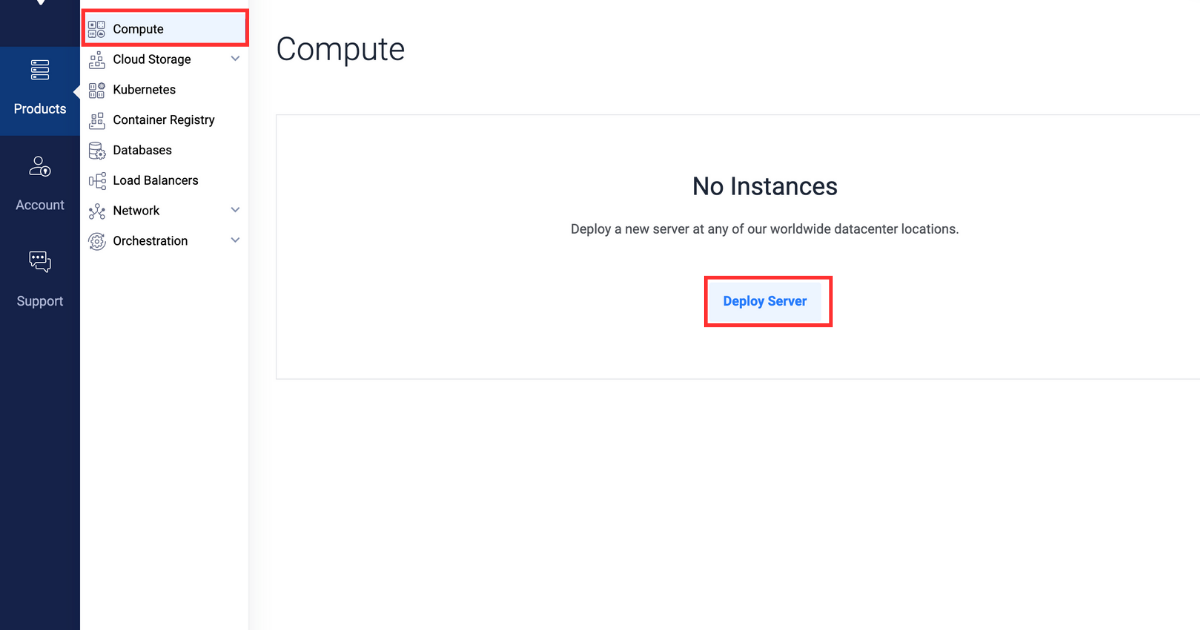
- Click the Deploy Server button in the center.
- Select Cloud GPU as the server type.
- Select A100 as the GPU type.
- In the “Server Location” section, select the region of your choice.
- In the “Operating System” section, select Vultr GPU Stack as the operating system.
 Vultr GPU Stack is designed to streamline the process of building Artificial Intelligence (AI) and Machine Learning (ML) projects by providing a comprehensive suite of pre-installed software, including NVIDIA CUDA Toolkit, NVIDIA cuDNN, TensorFlow, PyTorch and so on.
 - In the “Server Size” section, select the 80 GB option.
- Select any more features as required in the “Additional Features” section.
- Click the Deploy Now button on the bottom right corner.
- Navigate to the Products page.
- From the side menu, select Kubernetes.
- Click the Add Cluster button in the center.
- Type in a Cluster Name.
- In the “Cluster Location” section, select the region of your choice.
- Type in a Label for the cluster pool.
- Increase the Number of Nodes to 5.
- Click the Deploy Now button on the bottom right corner.
Preparing the server
Installing the required packages
After setting up a Vultr server and a Vultr Kubernetes cluster as described earlier, this section will guide you through installing the dependency Python packages necessary for making a Milvus database and importing the necessary modules in the Python console.
- Install required dependencies
pip install transformers datasets pymilvus torchHere’s what each package represents:
transformers: Provides access and allows to work with pre-trained LLM models for tasks like text classification and generation.datasets: Provides access and allows to work on ready-to-use datasets for NLP tasks.pymilvus: Python client for Milvus that allows vector similarity search, storage, and management of large collections of vectors.torch: Machine learning library used for training and building deep learning models.
- Access the python console
python3 - Import required modules
from pymilvus import connections, FieldSchema, CollectionSchema, DataType, Collection, utility
from datasets import load_dataset_builder, load_dataset, Dataset
from transformers import AutoTokenizer, AutoModel
from torch import clamp, sum
Here’s what each package represents:
pymilvusmodules:connections: Provides functions for managing connections with the Milvus database.FieldSchema: Defines the schema of fields in a Milvus database.CollectionSchema: Defines the schema of the collection.DataType: Enumerates data types that can be used in Milvus collection.Collection: Provides the functionality to interact with Milvus collections to create, insert, and search for vectors.utility: Provides the data preprocessing and query optimization functions to work with Milvus
datasetsmodules:load_dataset_builder: Loads and returns dataset object to access the database information and its metadata.load_dataset: Loads a dataset from a dataset builder and returns the dataset object for data access.Dataset: Represents a dataset, providing access to data-related operations.
transformersmodules:AutoTokenizer: Loads the pre-trained tokenization models for NLP tasks.AutoModel: It is a model loading class for automatically loading the pre-trained models for NLP tasks.
torchmodules:clamp: Provides functions for element-wise limiting of tensor values.sum: Computes the sum of tensor elements along specified dimensions.
Building a question-answering architecture
In this section, you’ll learn how to create a collection, insert data into the collection, and perform search operations by providing an input in question-answer format.
- Declare parameters, make sure to replace the
EXTERNAL_IP_ADDRESSwith actual value.DATASET = 'squad' MODEL = 'bert-base-uncased' TOKENIZATION_BATCH_SIZE = 1000 INFERENCE_BATCH_SIZE = 64 INSERT_RATIO = .001 COLLECTION_NAME = 'huggingface_db' DIMENSION = 768 LIMIT = 10 MILVUS_HOST = "EXTERNAL_IP_ADDRESS" MILVUS_PORT = "19530"Here’s what each parameter represents:
DATASET: Defines the Huggingface dataset to use for searching answers.MODEL: Defines the transformer to use for creating embeddings.TOKENIZATION_BATCH_SIZE: Determines how many texts are processed at once during tokenization, and helps in speeding up tokenization by using parallelism.INFERENCE_BATCH_SIZE: Sets the batch size for predictions, affecting the efficiency of text classification tasks. You can reduce the batch size to 32 or 18 when using a smaller GPU size.INSERT_RATIO: Controls the part of text data to be converted into embeddings managing the volume of data to be indexed for performing vector search.COLLECTION_NAME: Sets the name of the collection you are going to create.DIMENSION: Sets the size of an individual embedding you are going to store in the collection.LIMIT: Sets the number of results to search for and to be displayed in the output.MILVUS_HOST: Sets the external IP to access the deployed Milvus database.MILVUS_PORT: Sets the port where the deployed Milvus database is exposed.
- Connect to the external Milvus database you deployed using the external IP address and port on which Milvus is exposed. Make sure to replace the
userandpasswordfield values with appropriate values.If you are accessing the database for the first time then theuser= root andpassword= Milvus.connections.connect(host="MILVUS_HOST", port="MILVUS_PORT", user="USER", password="PASSWORD")
Creating a collection
In this section, you’ll learn how to create a collection and define its schema to store the content from the dataset appropriately. You’ll also learn how to create indexes and load the collection.
- Check collection existence, if the collection is present then it is deleted to avoid any conflicts.
if utility.has_collection(COLLECTION_NAME): utility.drop_collection(COLLECTION_NAME) - Create a collection named
huggingface_dband define the collection schema.fields = [ FieldSchema(name='id', dtype=DataType.INT64, is_primary=True, auto_id=True), FieldSchema(name='original_question', dtype=DataType.VARCHAR, max_length=1000), FieldSchema(name='answer', dtype=DataType.VARCHAR, max_length=1000), FieldSchema(name='original_question_embedding', dtype=DataType.FLOAT_VECTOR, dim=DIMENSION) ] schema = CollectionSchema(fields=fields) collection = Collection(name=COLLECTION_NAME, schema=schema)The following are the fields used to define the schema of the collection:
id: Primary field from which all the database entries are to be identified.original_question: It is the field where the original question is stored from which the question you asked is going to be matched.answer: It is the field holding the answer to eachoriginal_quesition.original_question_embedding: Contains the embeddings for each entry inoriginal_questionto perform similarity search with the question you gave as input.
- Create an index for the
original_question_embeddingfield to perform similarity search.index_params = { 'metric_type':'L2', 'index_type':"IVF_FLAT", 'params':{"nlist":1536} }collection.create_index(field_name="original_question_embedding", index_params=index_params)Upon the successful index creation of the specified field, the below output will be displayed:
Status(code=0, message=) - Load the collection to ensure that the collection is prepared to perform search operation.
collection.load()
Inserting data in the collection
In this section, you’ll learn how to split the dataset into sets, tokenize all the questions in the dataset, create embeddings, and insert them into the collection.
- Load the dataset, split the dataset into training and test sets, and process the test set to remove any other columns except for the answer text.
data_dataset = load_dataset(DATASET, split='all') data_dataset = data_dataset.train_test_split(test_size=INSERT_RATIO, seed=42)['test'] data_dataset = data_dataset.map(lambda val: {'answer': val['answers']['text'][0]}, remove_columns=['answers']) - Initialize the tokenizer.
tokenizer = AutoTokenizer.from_pretrained(MODEL) - Define the function to tokenize the questions.
def tokenize_question(batch): results = tokenizer(batch['question'], add_special_tokens = True, truncation = True, padding = "max_length", return_attention_mask = True, return_tensors = "pt") batch['input_ids'] = results['input_ids'] batch['token_type_ids'] = results['token_type_ids'] batch['attention_mask'] = results['attention_mask'] return batch - Tokenize each question entry using the
tokenize_questionfunction defined earlier and set the output totorchcompatible format for PyTorch-based Machine Learning models.data_dataset = data_dataset.map(tokenize_question, batch_size=TOKENIZATION_BATCH_SIZE, batched=True) data_dataset.set_format('torch', columns=['input_ids', 'token_type_ids', 'attention_mask'], output_all_columns=True) - Load the pre-trained model, pass the tokenized questions, generate the embeddings from the questions, and insert them into the dataset as
question_embeddings.model = AutoModel.from_pretrained(MODEL)def embed(batch): sentence_embs = model( input_ids=batch['input_ids'], token_type_ids=batch['token_type_ids'], attention_mask=batch['attention_mask'] )[0] input_mask_expanded = batch['attention_mask'].unsqueeze(-1).expand(sentence_embs.size()).float() batch['question_embedding'] = sum(sentence_embs * input_mask_expanded, 1) / clamp(input_mask_expanded.sum(1), min=1e-9) return batchdata_dataset = data_dataset.map(embed, remove_columns=['input_ids', 'token_type_ids', 'attention_mask'], batched = True, batch_size=INFERENCE_BATCH_SIZE) - Insert questions into the collection.
def insert_function(batch): insertable = [ batch['question'], [x[:995] + '...' if len(x) > 999 else x for x in batch['answer']], batch['question_embedding'].tolist() ] collection.insert(insertable)data_dataset.map(insert_function, batched=True, batch_size=64) collection.flush()The output will look like this:
Dataset({
        features: ['id', 'title', 'context', 'question', 'answer', 'input_ids', 'token_type_ids', 'attention_mask', 'question_embedding'],
        num_rows: 99
    })
Generating responses
In this section, you’ll learn how to provide a prompt, tokenize and embed the prompt to perform similarity search, and generate the most relevant responses.
- Create a prompt dataset, you can replace the question with any custom prompt and you can also the number of questions per prompt.
questions = {'question':['When was maths invented?']} question_dataset = Dataset.from_dict(questions) - Tokenize and embed the prompt.
question_dataset = question_dataset.map(tokenize_question, batched = True, batch_size=TOKENIZATION_BATCH_SIZE)question_dataset.set_format('torch', columns=['input_ids', 'token_type_ids', 'attention_mask'], output_all_columns=True)question_dataset = question_dataset.map(embed, remove_columns=['input_ids', 'token_type_ids', 'attention_mask'], batched = True, batch_size=INFERENCE_BATCH_SIZE) - Define the
searchfunction that performs search operations using the embeddings created earlier. The retrieved information is organized into lists and returned as a dictionary.def search(batch): res = collection.search(batch['question_embedding'].tolist(), anns_field='original_question_embedding', param = {}, output_fields=['answer', 'original_question'], limit = LIMIT) overall_id = [] overall_distance = [] overall_answer = [] overall_original_question = [] for hits in res: ids = [] distance = [] answer = [] original_question = [] for hit in hits: ids.append(hit.id) distance.append(hit.distance) answer.append(hit.entity.get('answer')) original_question.append(hit.entity.get('original_question')) overall_id.append(ids) overall_distance.append(distance) overall_answer.append(answer) overall_original_question.append(original_question) return { 'id': overall_id, 'distance': overall_distance, 'answer': overall_answer, 'original_question': overall_original_question } - Perform the search operation by applying the earlier defined
searchfunction in thequestion_dataset.question_dataset = question_dataset.map(search, batched=True, batch_size = 1) for x in question_dataset: print() print('Question:') print(x['question']) print('Answer, Distance, Original Question') for x in zip(x['answer'], x['distance'], x['original_question']): print(x)The output will look like this:
Question:
When was maths invented?
Answer, Distance, Original Question
('until 1870', tensor(33.3018), 'When did the Papal States exist?')
('October 1992', tensor(34.8276), 'When were free elections held?')
('1787', tensor(36.0596), 'When was the Tower constructed?')
('Poland, Bulgaria, the Czech Republic, Slovakia, Hungary, Albania, former East Germany and Cuba', tensor(38.3254), 'Where was Russian schooling mandatory in the 20th century?')
('6,000 years', tensor(41.9444), 'How old did biblical scholars think the Earth was?')
('1992', tensor(42.2079), 'In what year was the Premier League created?')
('1981', tensor(44.7781), "When was ZE's Mutant Disco released?")
('Medieval Latin', tensor(46.9699), "What was the Latin of Charlemagne's era later known as?")
('taxation', tensor(49.2372), 'How did Hobson argue to rid the world of imperialism?')
('light weight, relative unbreakability and low surface noise', tensor(49.5037), "What were advantages of vinyl in the 1930's?")
In the above output, the closest 10 answers are printed in a descending order for the question you asked along with the original questions those answers belong to, the output also shows tensor values with each answer, less tensor value means that the answer is more accurate for the question you asked.
Conclusion
In this article, you learned how to build a question-answering system using a HuggingFace dataset and Milvus database. The tutorial guided you through the steps to create embeddings from a dataset, store them into a collection, and then perform similarity search to find the best suitable answers for the prompt by creating the embedding of the question provided and calculating the tensors.
This is a sponsored article by Vultr. Vultr is the world’s largest privately-held cloud computing platform. A favorite with developers, Vultr has served over 1.5 million customers across 185 countries with flexible, scalable, global Cloud Compute, Cloud GPU, Bare Metal, and Cloud Storage solutions. Learn more about Vultr.