
Curiosity is one of the most important traits in our job. The other day, I found myself exploring PayPal documentation to find something interesting to learn (and share). After a while I stumbled upon the Log In with PayPal tool.
With the “Log In with PayPal” tool, your users can authenticate into your application using PayPal. It’s the same procedure we already know for Facebook, or maybe Twitter and GitHub.
Using this type of authentication is recommended if you want to integrate it with an e-commerce website, but you can use it in every situation and application that requires a user account or membership.
Key Takeaways
- Utilizing “Log In with PayPal” simplifies the authentication process for users, allowing them to log in using their existing PayPal credentials, thereby avoiding the need to remember additional usernames and passwords.
- “Log In with PayPal” is built on the OpenID Connect standard, ensuring a secure and standardized protocol for user authentication and data sharing.
- Implementing this feature can enhance user experience, especially on e-commerce platforms, by utilizing stored PayPal information like shipping addresses to streamline transactions.
- The setup process involves creating a PayPal application through the PayPal Developer Dashboard to obtain necessary credentials such as the Client ID and Client Secret, and configuring settings such as return URLs and data permissions.
- A test project can demonstrate the integration process, from user login via a PayPal button to handling the authorization code and accessing user profile data using PayPal APIs.
Why use ‘Log In with PayPal’?
One of the most important reasons to use it is simplicity. Your user will not need to remember another set of credentials – the same advantage OAuth via FB, Twitter, etc have. Also, the login procedure is absolutely secured: fewer concerns for you. However, it’s not just an email and a password.
When you create a PayPal account there is a lot of information that you specify. This info, using the APIs, can also be used in your application in many useful ways. One of the best examples I can give is the e-commerce one: why bother your user with asking him for a shipping address if you already know it? He already told PayPal where he lives! In terms of user experience, a simple button is way better than filling a form with many fields… and when it comes to shipping there are at least three or four of them.
Another great feature is that we are talking about a standard, because the Log In with PayPal tool is based on OpenID Connect which uses OpenID 2.0 and OAuth 2.0 open standards.
Using the PayPal tool also opens many new points of view for the merchant/applications. If you think about it, PayPal actually has more than 100 milions users. You are potentially expanding your user base. Everything also comes with a real time update of user data: if your user changes something about himself on PayPal, your application will “know it” immediately.
I presume that you now have really good reasons to start thinking about it. Let’s see how to implement this solution in a sample application.
How does it work?
Before diving into the implementation procedure, it’s going to be a good thing if you can understand the mechanism under the hood. Like we mentioned before, the Log In with PayPal tool is based on Open ID Connect. In the picture below, you can find all the information about the entire procedure in every single moment.

Everything starts with the application that we are developing: it could be the e-commerce we used before as an example. The Log In with PayPal button redirects the user to the PayPal Authentication and Authorization Service. After giving credentials, the user has to agree to share his data with our application. He will be informed of every single datum that he’s going to share with us. If everything goes fine, PayPal gives to the application an authorization code.
The next step is a communication between the merchant (the application) and the PayPal token service endpoint. The first gives to the second the authorization code, in order to receive the access token and the refresh token.
Using the access token the application can query the PayPal User Profile Service, getting everything it needs about user data. The signup (or login) procedure can be finished in a matter of seconds.
Now that things are more clear than before, we can proceed with the real implementation. Let’s get our hands dirty!
Creating a PayPal application
First of all, we have to create a PayPal application in order to obtain the Client ID and the Client Secret. We will use them for every single call to the API methods. They will be our credentials for the API services.
Go to the developer dashboard at https://developer.paypal.com/. From there, click on “Dashboard”, then on “Applications”. Click on “My apps” to access the list of the PayPal applications.
If it’s your first time here, you will probably see something like this.
![]()
Select “Create App”. You will be asked for a name for the application and a sandbox user as a reference.
Note: if this is your first time working with PayPal, you are probably curious about the Sandbox. As the name suggests, the Sandbox is a testing service that PayPal gives you to try your code without any consequences in the real world. It gives you the possibility to create fake users (both merchants and customers) to recreate entire workflows with fake users, to ensure that your code will work as you expect it to. The only difference between the Sandbox and the real life production code will be the endpoint that you will use. However, it will not be something difficult to change: just remove the sandbox prefix from the endpoint. If you need more information take a look at the docs: https://developer.paypal.com/docs/classic/lifecycle/sb_overview/.
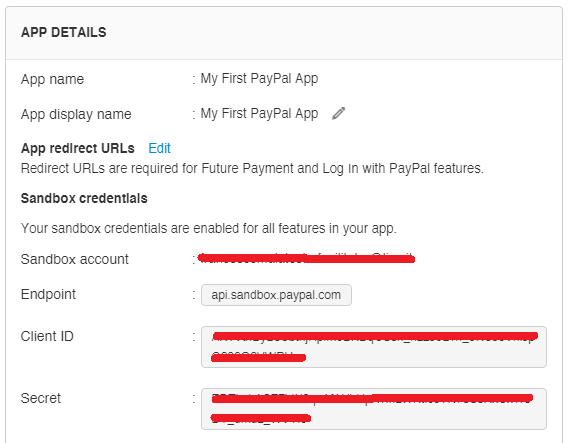
After giving the OK for the application creation, you will immediately see the Client ID and the Client Secret.
Note: don’t forget to set the return page URL here. It is the page where PayPal will redirect the user after the authentication step and it’s where you will have to deal with tokens and data. Click on “Edit” near “App redirect URLs”. You will be able to specify two different URLs: one for testing, one for production. In my case it is going to be something like http://myapp.ext/return.php.
Let’s scroll down the page and search for the “App Capabilities” section. This is where we will find the “Log In with PayPal” subsection. Click on “Advanced Options” to customize what data you will really need from your customer and other little things.
Here’s a complete overview of what you are going to find there:
- Choose what information we will need from the user: personal data, address data (physical one) and other data, related to the account type;
- Specify links to the privacy policy and the user agreement: in every real world situation we will need them;
- Additional permissions: other choices about many aspects of the integration. However, nothing that we need now;
Let’s click on “Save” to confirm our choices.
Our job is done here. Now we have our first PayPal application and we can use it to create our first example project.
The test project: a simple integration
In order to stay focused on the integration workflow I decided to make a little test application. Nothing complex: we will just simulate the login procedure on a site that requires authentication. That access will be made by logging in with PayPal. To be more accurate, here’s the complete flow that we are going to follow.
- The user arrives on the application page;
- I’m requesting access via PayPal to the user (with the button);
- The application opens a window with the guided PayPal procedure;
- The user inserts his credentials and gives the requested permissions;
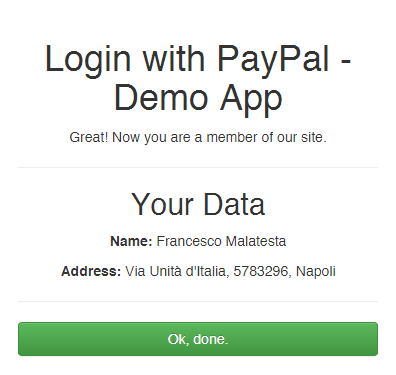
- The user is redirected to a “result page” where he will be able to see his PayPal account data. It is going to be our “confirmation” to understand that our integration worked well;
So, this is going to be our final confirmation screen.
Are you ready? Let’s do it.
Configuration and Installation
Even if it is a very small application, I will use the Httpful library in order to make calls to the PayPal API. I like it because it is:
- light;
- easy to install (via Composer);
- easy to understand (thanks to an intuitive syntax);
So, let’s create a folder for our project, and save a new composer.json file in it, in which we will write:
{

"require": {

"nategood/httpful": "*"

}

}
Just a composer update and we’re done.
After that, create two files: the first one, index.php, will work as a landing page for our example. The second one, result.php is going to receive the authorization code from PayPal and will work with API calls and the resulting data.
Open the index.php file and, at the same time, go with your browser at https://developer.paypal.com/webapps/developer/docs/integration/direct/identity/button-js-builder/. From here, you will be able to generate dynamically the code for our “Log In with PayPal” button. After generating it, just copy the code and paste it on the index.php page.
Here’s the generator page:
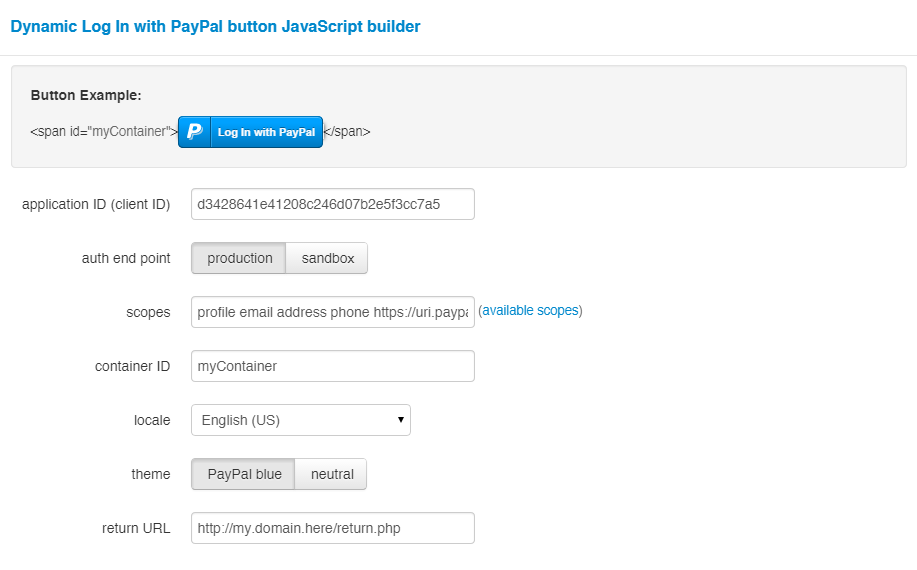
There are not many things to decide about. The first thing that we have to specify is going to be the Client ID that we want to use. Right after you can specify the endpoint you want to use: live production or sandbox (for testing)? Then, you can choose other little things about localization and customization in terms of “aesthetics”.
You will also have to fill the “return URL” again. Yes, use the same URL as before.
When you’re done, getting the generated code is really easy: just scroll down the page, you will find it there.
The index.php file
The index file now looks like this:
<!DOCTYPE html>

<html>

<head>

<!-- Latest compiled and minified CSS -->

<link rel="stylesheet" href="https://maxcdn.bootstrapcdn.com/bootstrap/3.2.0/css/bootstrap.min.css">
<!-- Optional theme -->

<link rel="stylesheet" href="https://maxcdn.bootstrapcdn.com/bootstrap/3.2.0/css/bootstrap-theme.min.css">
<!-- Latest compiled and minified JavaScript -->

<script src="https://maxcdn.bootstrapcdn.com/bootstrap/3.2.0/js/bootstrap.min.js"></script>
<title>Login with PayPal - Demo App</title>
<style type="text/css">

body {

text-align: center;

}

</style>

</head>

<body>

<h1>Login with PayPal - Demo App</h1>

<p>Welcome! No boring signup here. Just use the following button to login.</p>
<hr/>
<p><span id="myContainer"></span></p>
<script src="https://www.paypalobjects.com/js/external/api.js"></script>

<script>

paypal.use( ["login"], function(login) {

login.render ({

"appid": "my-application-client-id",

"authend": "sandbox",

"scopes": "profile email address phone https://uri.paypal.com/services/paypalattributes",

"containerid": "myContainer",

"locale": "en-us",

"returnurl": "http://sandbox.hellofrancesco.com/paypal_test/return.php"

});

});

</script>

</body>

</html>
In this specific case, as you can see from the code, I created a button for the sandbox. However, there is nothing else you can’t understand: as I often do, I used Bootstrap via CDN to give a basic style to the page. Now, save and run the page: we can already verify that the button works great! Here’s what we will find clicking on it.
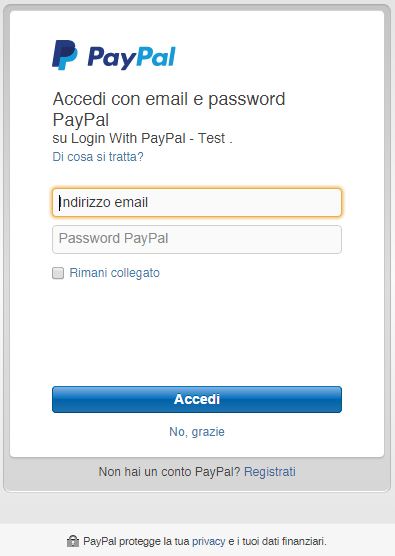
Note: don’t worry if you don’t understand what you read. I’m italian and I use PayPal in my language, actually.
We have to implement the login after the access in the result.php file, now.
The result.php file
Open result.php and give it this content:
<?php require('paypal_login.inc.php') ?>
<!DOCTYPE html>

<html>

<head>

<!-- Latest compiled and minified CSS -->

<link rel="stylesheet" href="https://maxcdn.bootstrapcdn.com/bootstrap/3.2.0/css/bootstrap.min.css">
<!-- Optional theme -->

<link rel="stylesheet" href="https://maxcdn.bootstrapcdn.com/bootstrap/3.2.0/css/bootstrap-theme.min.css">
<!-- Latest compiled and minified JavaScript -->

<script src="https://maxcdn.bootstrapcdn.com/bootstrap/3.2.0/js/bootstrap.min.js"></script>
<title>Login with PayPal - Demo App</title>
<style type="text/css">

body {

text-align: center;

padding:20px;

}

</style>

</head>

<body>

<h1>Login with PayPal - Demo App</h1>

<p>Great! Now you are a member of our site.</p>
<hr/>
<h2>Your Data</h2>

<p><b>Name:</b> <?php echo htmlspecialchars_decode($user->given_name . ' ' . $user->family_name); ?></p>

<p><b>Address:</b> <?php echo htmlspecialchars_decode($user->address->street_address . ', ' . $user->address->locality); ?></p>
<hr/>
<p><button class="btn btn-success form-control" type="button" onclick="window.close()">Ok, done.</button></p>

</body>

</html>
It is a simple screen with user data. We are using the $user object where all user information is stored. You will also notice that at the beginning of the file there is the inclusion of a paypal_login.inc.php file.
Create this new file now:
<?php

// helper package autoload.

require('vendor/autoload.php');
// setting some variables here.

$clientId = 'your-client-id';

$clientSecret = 'your-client-secret';

$requestData = '?grant_type=authorization_code&code='.$_GET['code'].'&return_url=http://sandbox.hellofrancesco.com/paypal_test/return.php';
// here we exchange the authorization code with access and refresh tokens.

$response = \Httpful\Request::get('https://api.sandbox.paypal.com/v1/identity/openidconnect/tokenservice' . $requestData)

->authenticateWith($clientId, $clientSecret)

->send();
$jsonResponse = json_decode($response->raw_body);
// checking out for errors.

if(isset($jsonResponse->error))

{

die('Error: just got some problems during operations. Try again.');

}
// getting user data, using the Identity APIs.

$response = \Httpful\Request::get('https://api.sandbox.paypal.com/v1/identity/openidconnect/userinfo/?schema=openid')

->contentType("application/json")

->authorization($jsonResponse->access_token)

->authenticateWith($clientId, $clientSecret)

->send();
// user data is here!

$user = json_decode($response->raw_body);
In the first section you can see the Composer autoload.php and some variable settings:
- the Client ID that we received right after the application’s creation;
- the Client Secret, obtained the same way;
- the variable
$requestDatawith all the information that we are going to pass to the token exchange endpoint;
Note: in $_GET['code'] you will find the authorization code that PayPal passes to our result.php page. As this is a test application, I used the value as it is. In a real world situation don’t forget to keep everything safe at the best you can by filtering this input.
Right after that you can find our first API call to the token dedicated service. As the comment also suggests, the get() method of the \Httpful\Request prepares the API call specifying what verb must be used. The syntax is really easy to understand – the chained method authenticateWith() sets up the authentication data using the Client ID and the Client Secret.
At that point, the send() method starts the call. The results are stored into the $response variable, instance of the Response class. Right after that, we take and decode the raw_body attribute. After a generic check to find possible errors, if everything is alright we can make the second API call, this time directly to the Identity API that handles the user data.
The returned object is another one of the same type as before, Response. This time, the request results are stored into a $user variable, the same that is going to be used in the result.php file that we saw before.
Our first example application is complete. We respected and implmented the entire workflow as we saw before, in the picture at the beginning of this article.
Conclusions and considerations
This application we just made is an extremely basic example. In a real world case, of course, you will have to implement many other things: first of all, a mechanism to store tokens in order to keep your user logged in. Also, you will have to consider making some calls to the token renewal service when it expires. You will have to use the refresh token to do it, with with this method.
We already talked about the reasons about why you should implement a similar solution on your application.
However, one of the best tools you can use with the Log In with PayPal is the Seamless Checkout. Used togheter, those two tools will let your customer complete an order and pay for it without leaving the website.
The “Log In with PayPal” feature is something that you can try and evaluate, in particular if you want to give your user an experience of a deeper integration of your application with one of the best (and most used) online payment services in the world.
Have you already tried it? What do you think? Let us know.
Frequently Asked Questions (FAQs) about User Login with PayPal
How secure is the user login with PayPal?
User login with PayPal is highly secure. PayPal uses advanced encryption and 24/7 fraud detection monitoring to ensure the security of your account. It also offers two-factor authentication for an additional layer of security. This means that even if someone knows your password, they won’t be able to access your account without a second piece of information, such as a code sent to your phone.
Can I implement user login with PayPal on my website?
Yes, you can implement user login with PayPal on your website. PayPal offers a variety of APIs and tools that allow you to integrate its services into your website. This includes the ability for users to log in using their PayPal credentials, which can simplify the login process and improve user experience.
What are the benefits of implementing user login with PayPal?
Implementing user login with PayPal can offer several benefits. It can simplify the login process for your users, as they won’t need to remember another username and password. It can also increase trust and security, as PayPal is a well-known and trusted brand. Additionally, it can potentially increase conversion rates, as users who are already logged into PayPal are more likely to complete a purchase.
How can I set up user login with PayPal on my website?
Setting up user login with PayPal involves several steps. First, you’ll need to create a PayPal developer account and set up a sandbox for testing. Then, you’ll need to create an app on the PayPal developer platform and obtain your client ID and secret. Finally, you’ll need to integrate the PayPal login API into your website. This process may require some technical knowledge, but there are many resources available to help you.
Can I use user login with PayPal for mobile apps?
Yes, you can use user login with PayPal for mobile apps. PayPal offers SDKs for both iOS and Android, which allow you to integrate PayPal services into your mobile apps. This includes the ability for users to log in using their PayPal credentials.
What information can I get from users who log in with PayPal?
When a user logs in with PayPal, you can get access to their PayPal ID, name, email, and address. This information can be used to personalize the user experience on your website or app. However, it’s important to note that you must comply with PayPal’s user agreement and privacy policy when handling this information.
What happens if a user forgets their PayPal login details?
If a user forgets their PayPal login details, they can recover them through PayPal’s account recovery process. This typically involves verifying their identity through their email or phone number. As a website owner, you don’t need to handle this process, as it’s managed by PayPal.
Can users still log in if PayPal is down?
If PayPal is down, users may not be able to log in using their PayPal credentials. However, it’s a good practice to offer multiple login options on your website or app. This way, users can still log in using other methods, such as their email and password, even if PayPal is unavailable.
Is user login with PayPal free?
Yes, user login with PayPal is free. However, if you use other PayPal services, such as processing payments, there may be fees involved. It’s important to review PayPal’s fee structure to understand the potential costs.
Can I customize the user login with PayPal button?
Yes, you can customize the user login with PayPal button. PayPal provides several button styles to choose from, and you can also create your own custom button. This allows you to match the button to the look and feel of your website or app.