
Key Takeaways
- The Pen tool in Illustrator is a versatile tool used for drawing straight lines, curves, and complex shapes. Drawing curves involves clicking and dragging, which sets a starting point and the direction of the curve, with an anchor point placed on the artboard when clicked, and direction lines and points drawn when dragged.
- A closed curved path, such as a circle, can be drawn using the Pen tool by dragging in the direction you want the curve to go, then dragging from a new point directly opposite the starting point, and closing the path by positioning the pointer over the starting point and clicking and dragging until the desired curve is achieved.
- Combining curved and straight path segments can be achieved by understanding the difference between smooth anchor points and corner points. The most challenging combination is joining two curves on a corner point, which can be mastered with practice.
- To improve skills with the Pen tool, it is recommended to practice combining curves and straight points by drawing the outlines of letters. This exercise is found to be useful for mastering the tool and creating complex shapes.
This is the final part of the series on drawing tools in Illustrator. In the last post we looked at how to use the Pen tool to draw straight line segments and how to use the Selection tools to edit entire paths and individual points. To conclude the series, today’s post is about drawing curves with the Pen. This is generally perceived to be the hardest part of using the Pen tool, but all it requires is a bit of practice and understanding of how the curves work.
Drawing curved paths
Unlike straight paths, curved paths are created by clicking and dragging. The first time you click and drag, you set a starting point for the curved path and importantly, you also determine the direction of the curve. As you continue to drag, a curved path is drawn between the previous point and the current point.
Two things happen when you click and drag with the Pen tool.
1. An anchor point is placed on the artboard when you click.
2. Direction lines and direction points are drawn when you drag.
We use the direction lines and points to determine the direction and shape of the curved path we’re drawing. Let’s start drawing.
1. Select the Pen tool ![]() from the toolbox or hit P as a shortcut.
from the toolbox or hit P as a shortcut.
2. Click and immediately drag the pen tool pointer upwards. 
When you release the mouse button, an anchor point appears where you first clicked and two direction lines extend above and below the anchor point.
3. Continue the curve, by clicking and dragging in the opposite direction to add another point. 
If you make a mistake while you’re drawing, choose Edit > Undo New Anchor Point (Ctrl +Z / Cmd + Z) to undo the last point you drew, and try again.
4. Do the same again to add another curve.
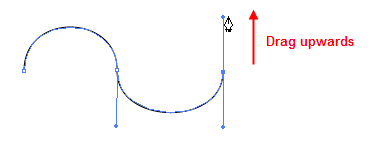
If you hold down Shift as you click and drag, you constrain the slope of the directional line to 45° increments.
5. To finish your path, just Ctrl + Click / Cmd + Click.
Drawing a closed curved path
Here’s how to draw a closed path, in this case a circle, using the Pen. Remember you always want to use as few anchor points as possible.
1. Click and drag upwards (or downwards – the direction you drag is the direction the curve will go). 
2. Drag down from a new point directly opposite your starting point.

3. Close the path by positioning the pointer over your starting point and clicking and once more dragging upwards until you have the curve you want.

Combining curved and straight path segments
Now that you’ve learned how to draw straight and curved paths individually, you’ll need to be able to put them together. You’ll be combining paths that combine corner points and smooth points. Smooth anchor points have directional lines that are opposite each other, 180° apart. Corner points either have no directional lines, only one directional line, or two directional lines that are at an angle that is not 180°. ( A little bit confusing, I know!)
Probably the most difficult combinations you’ll do is joining up two curves on a corner point. If you can do this, then you can do any type of drawing with the Pen. Let’s say you want to create something that looks like this;

1. Select the Pen tool.
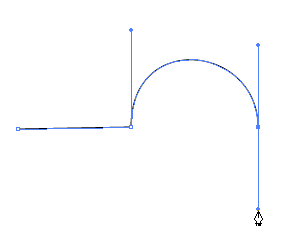
2. We’re starting with a straight segment, which is dead easy, so click once for your starting point (don’t drag) and the click again to put down your second anchor. 
3. Now we’re going into a curve. When you move the pointer over the last anchor point, the cursor changes to show what looks like an upside down “v”. This indicates that you are going to convert the point from being a straight point to a curved point. Click and drag upwards in one motion to start the curve. Then click and drag downwards to create your next anchor point and finish the curve you started. 
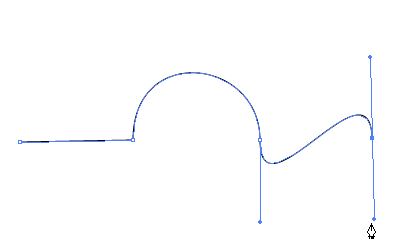
Now we need another curve. However you will find that if you simply click and drag a new point, it is not going to go where you want. You might get something like this;

Or something like this if you drag the opposite direction.
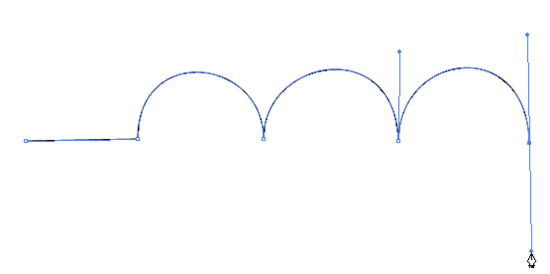
4. To prevent this happening, we need to start a new curve by holding down Alt / Option + Clicking on the last anchor point. You will again see the little upside down “v”. Holding down Alt/Option, drag upwards to create a second curve going up. Then click and drag your next point down to complete the curve. You should have something that looks like this;

5. Repeat step 4 to create a third “upwards” curve.
6. To finish up, we need to convert from a curved point to a straight point. Once again, hold down Alt / Option and click once on your last anchor point, release the Alt/Option key and then click again to put down your last anchor point. You should now have made a path that looks like this;

7. Ctrl / Cmd + click anywhere to complete the path.
There is, of course, lots more to learn about the Pen tool, but at this stage lots of practice combining straight segments and curves will turn you into a Pen-jockey really quickly. I will be returning to this topic in the coming weeks and will show you some tips and tricks to speed up and refine your Pen tool usage. In the meantime, a really good way to practice combining curves and straight points with the pen tool is to try drawing the outlines of letters. Start with easy ones like I and Z, then try lowercase T, S, P and so on. This is an exercise I give to my classes and they find it useful. 
I hope you’ve found this series on Illustrator’s drawing tools useful.
Are you new to the pen tool? Is it something you’ve been avoiding? What other tools would you like to know more about in Illustrator?
Related Reading:
Drawing In Illustrator, Part 1: The Line Tools
Drawing In Illustrator, Part 2: The Shape Tools
Drawing In Illustrator, Part 3: The Pencil & Smooth Tools
Drawing In Illustrator, Part 4: The Pen Tool – Straight Lines
Frequently Asked Questions (FAQs) about Illustrator Drawing Tools
How can I create smooth curves using the Pen tool in Illustrator?
Creating smooth curves with the Pen tool in Illustrator involves a few steps. First, select the Pen tool from the toolbar. Click on your artboard to create the first anchor point, then click again where you want the curve to end. Don’t release the mouse button on the second click. Instead, drag the mouse to create the curve. The direction and distance you drag the mouse will determine the shape of the curve. To finish the curve, release the mouse button. You can continue to add more curves by clicking and dragging the mouse. Remember, practice makes perfect when it comes to mastering the Pen tool.
What are the differences between the Pen tool in Illustrator and the Bezier tool in Inkscape?
While both the Pen tool in Illustrator and the Bezier tool in Inkscape are used to create custom shapes and lines, there are some differences. The Pen tool in Illustrator allows you to create both straight lines and curves in one go, while the Bezier tool in Inkscape requires you to set nodes for curves separately. Additionally, Illustrator offers more advanced features like the ability to add or subtract anchor points from a path, which is not available in Inkscape.
How can I edit curves created with the Pen tool in Illustrator?
To edit curves in Illustrator, you need to use the Direct Selection tool. First, select the Direct Selection tool from the toolbar. Then, click on the curve you want to edit. You’ll see anchor points appear on the curve. Click and drag these anchor points to adjust the shape of the curve. You can also adjust the direction handles that appear when you click an anchor point to fine-tune the curve’s shape.
How can I convert a straight line to a curve in Illustrator?
To convert a straight line to a curve in Illustrator, you need to use the Convert Anchor Point tool. First, select the Pen tool from the toolbar, then click and hold on it to reveal the hidden tools underneath. Select the Convert Anchor Point tool. Then, click and drag on a point on the straight line. As you drag, the straight line will become a curve.
How can I create complex shapes using the Pen tool in Illustrator?
Creating complex shapes with the Pen tool in Illustrator involves combining multiple straight lines and curves. Start by creating a straight line or curve, then continue to add more lines or curves by clicking and dragging on the artboard. To close the shape, click on the first anchor point you created. Remember, you can always edit the shape later using the Direct Selection tool.
How can I improve my skills with the Pen tool in Illustrator?
The best way to improve your skills with the Pen tool in Illustrator is through practice. Try creating different shapes, both simple and complex. Experiment with creating and editing both straight lines and curves. There are also many online tutorials and courses that can guide you through the process and provide you with exercises to practice.
Can I use the Pen tool to draw freehand in Illustrator?
While you can use the Pen tool to create custom shapes and lines, it’s not designed for freehand drawing. If you want to draw freehand in Illustrator, you should use the Pencil tool, the Brush tool, or the Blob Brush tool. These tools are more suited for freehand drawing as they allow you to draw naturally, like you would with a pencil or brush on paper.
How can I add or remove anchor points from a path in Illustrator?
To add or remove anchor points in Illustrator, you need to use the Add Anchor Point tool or the Delete Anchor Point tool. Both of these tools are hidden under the Pen tool in the toolbar. To add an anchor point, select the Add Anchor Point tool, then click anywhere on a path. To remove an anchor point, select the Delete Anchor Point tool, then click on the anchor point you want to remove.
How can I create straight lines with the Pen tool in Illustrator?
To create straight lines with the Pen tool in Illustrator, simply click on the artboard to create the first anchor point, then click again where you want the line to end. Unlike when creating curves, you don’t need to drag the mouse. To create a continuous straight line, keep clicking on the artboard. To finish the line, either click on the first anchor point to close the shape or press Ctrl (or Command on a Mac) and click anywhere on the artboard.
How can I adjust the thickness of lines created with the Pen tool in Illustrator?
To adjust the thickness of lines in Illustrator, you need to use the Stroke panel. First, select the line you want to adjust using the Selection tool. Then, go to the Stroke panel (Window > Stroke). Here, you can adjust the weight (thickness) of the line. You can also change the line’s cap (end) and corner styles, and apply a dashed line effect if desired.