

![]()
Atom is a fantastic editor and comes by default with all you need to develop your project … except maybe for one thing – that one detail that you’d love to see in Atom. That one thing could be anything: a keyboard shortcut to write faster; an important feature; or even syntax highlighting for a language you use but that isn’t supported by default.
The good news is that Atom is ready to welcome a lot of packages. You can extend its default features with these packages, written by the community. But what if you don’t find the package you’re searching for?
Writing your own package is not so complicated, so why not? In this tutorial we’ll see how to create our own package for Atom, by taking the example of a syntax highlighting package.
Key Takeaways
- Atom’s code editor can be customized by creating your own package, especially useful if you need a feature not provided by default.
- Start by initializing a new package in Atom by creating a folder in the `.atom/packages` directory and adding a valid `package.json` file.
- For syntax highlighting, create a `grammars` subfolder, define your language rules in a CSON file, and specify how Atom should recognize and highlight your language’s syntax.
- Test your package within Atom using the `View/Reload` feature to see changes immediately and ensure functionality.
- Publish your package to the Atom community by using the `apm publish` command after setting up a public repository on GitHub, allowing other developers to benefit from your work.
What We’ll Build
Recently I wanted to develop some programs in the Scilab language. As it’s a language used in maths, it’s not really the type of language we find by default in Atom, and there was no package for its syntax. That’s why I decided to write my own package: language-scilab.
Here we’ll write a similar package, for the language you want. We’ll see first how to initialize a brand new package with a valid package.json file. Then we’ll write some rules to highlight our language. Finally, we’ll see how to publish our package – so that any user of Atom will be able to use it.
Initializing a New Atom Package
Atom uses a configuration folder to store all your personal options, but also the packages you installed. This folder is named .atom, and is located in your personal folder (/home/user/.atom for instance).
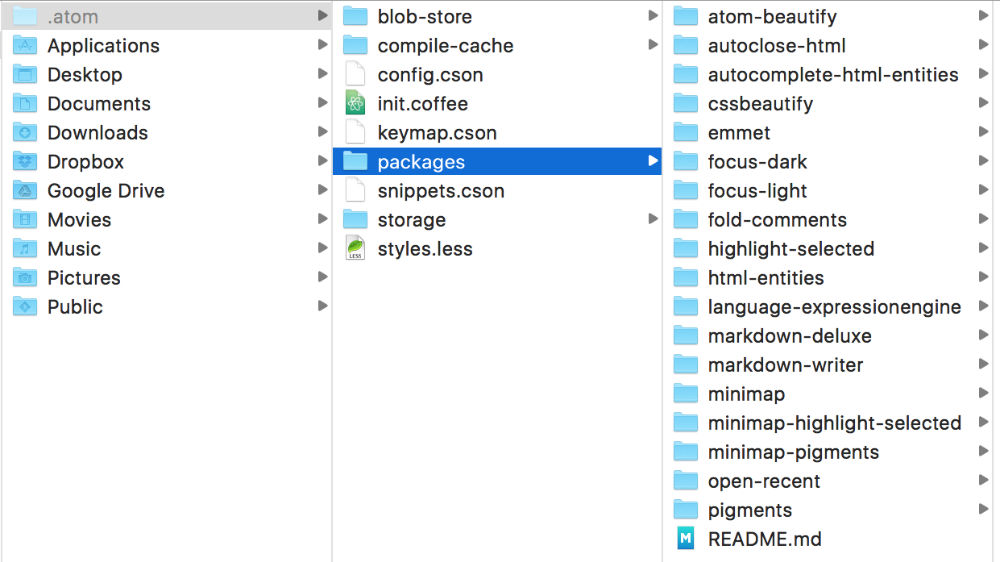
The packages you install are all located in the packages subfolder of this folder. Every package has its own folder. So the first step to create your package is to create the your folder, named after your package. In our example, I create the folder language-mylanguage: it’s a sort of naming convention when we want to add the support for a language.
For now, your package is invalid. To be recognized by Atom, it needs a package.json file at the root of the folder you just created.
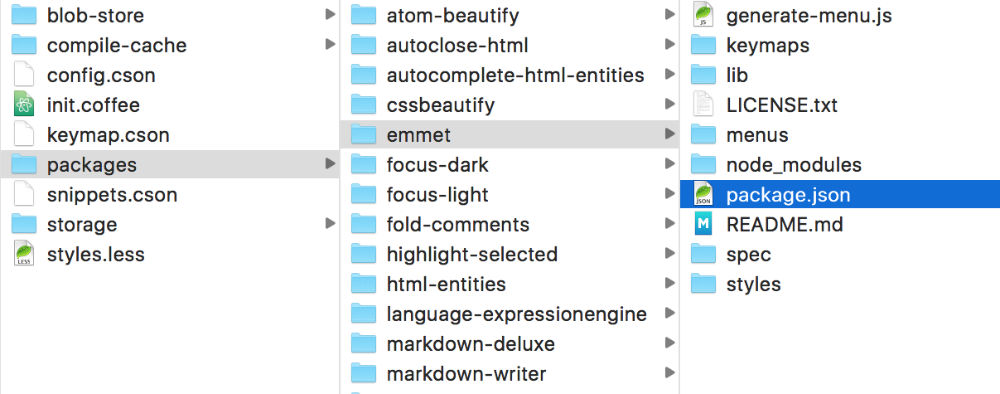
This file contains some information, like the name of your package or the repository where we can find it. Below is the package.json file of our language-mylanguage package (explanations follow):
{
  "name": "language-mylanguage",
  "version": "0.0.0",
  "description": "Mylanguage language support in Atom",
  "engines": {
    "atom": "*"
  },
  "dependencies": {},
  "repository": {
    "type": "git",
    "url": "https://github.com/JeremyHeleine/language-mylanguage.git"
  },
  "bugs": {
    "url": "https://github.com/JeremyHeleine/language-mylanguage/issues"
  },
  "license": "MIT"
}
We find several entries in this file. First, the name one: as you can guess, it contains the name of your package. You can (and you should) add a description with the description entry, basically to let the other users know about what your package does.
The version entry is filled with a version number, which must respect the following convention: major.minor.bug. Here we indicate 0.0.0. Even if you know that you’re developing the version 1.0.0 or 0.1.0 or your package, indicate 0.0.0. We’ll see why when we publish our package.
The engines entry can be used to indicate the minimal required version of Atom for your package to work. In the same vein, we find the dependencies entry to indicate other packages needed by your package. It must be used if you create a plugin for another package.
Then we find the repository entry. It’s the URL indicating where the public repository of your package is located. If you want to publish your package, you need this entry. You can leave it empty for now if you don’t want to create your public repository right now, but think about filling it before publishing.
The bugs entry is the URL where we can report issues affecting your package. Here we use the default page GitHub offers for every repository. Finally, a license name can be indicated with the license entry.
Other entries can be filled if you need them. They’re not mandatory. All available entries can be found on Atom documentation.
Now that your package has a valid package.json file, Atom can recognize it and load it. However, it’s totally useless right now, so it’s time to make it useful by giving it some features.
Note that Atom won’t load your package now: it loads all the installed packages at start. You can, however, force Atom to reload the packages with View/Reload. It’s useful for seeing the changes you just did on your package.
Creating a Syntax Highlighting Package
To add new syntax highlighting rules, you need to create a subfolder named grammars. In this folder, create a new CSON file named after the language you want to support (e.g. mylanguage.cson). This file will contain all your syntax highlighting rules.
Basic Information
Before identifying the syntax of our language, we need to tell Atom how to identify this language. This can be achieved thanks to three entries in your newly created CSON file:
'scopeName': 'source.mylanguage'
'name': 'Mylanguage'
'fileTypes': ['ext1', 'ext2']
The scopeName entry is a way to identify your language for themes, other packages or even configuration files. Generally we follow the convention used above.
The name entry contains the name of the language that will be displayed at the bottom right corner of Atom, when you are editing a file using your language.
Finally, the fileTypes entry contains an array listing all the file extensions used by your language. Each time you open a file using one of these extensions, Atom will automatically choose your syntax highlighting.
Syntax Rules
All the rules for your language must be declared in a fourth entry: patterns. We’ll see here two types of rules we can add. However, any added rule must be declared between {} in the patterns array:
'scopeName': 'source.mylanguage'
'name': 'Mylanguage'
'fileTypes': ['ext1', 'ext2']

'patterns': [
    {
        # First rule
    },
    {
        # Second rule
    },
    # …
    {
        # Last rule
    }
]
Matching a Syntax Element
Let’s build our first rule with match, the first type we’ll see. This rule will detect any number like 4, 7.2 or even .568, for instance:
{
    'match': '\\b(([0-9]+\\.?[0-9]*)|(\\.[0-9]+))\\b'
    'name': 'constant.numeric.mylanguage'
}
The match entry must be filled with a valid regex. Then, each time Atom sees text matching this regex, it will encapsulate it in a span element with the class names indicated in name. You can add several class names, each one separated by a dot.
You should notice that the regex contains more backslashes than usual. In fact, we can use every special character like \b to detect a word break. However, as your regex is nothing but a string, if you just type \b, the b will be escaped and nothing will happen. We want the \b string in our final regex, after the string being parsed. That’s why we need to escape the backslash. In practice, that means you need to double each backslash you type and \b becomes \\b.
You can add whatever class names you want in the name entry. However, there are some conventions to follow. Generally, indicate the type of element you want to highlight and finish with the name of the language. There are a lot of different types that are all shared by different editors. TextMate lists them in its documentation on naming conventions.
If you use these conventions, other developers can better understand what you’re doing. But there’s another reason why it’s a good idea to respect these conventions: themes.
In Atom, it’s the theme that decides which style will be displayed for element you want to highlight. These themes try to be compatible with the more languages possible, so they use these conventions.
That way, in the example above, we don’t have to add any CSS to stylize our numbers. As we use the convention, our theme automatically detects it. Better: as it’s the same convention used for every language, numbers in our language will be displayed the same way numbers are displayed in other languages.
Matching Several Elements in the Same Rule
The name entry should always be present. It’s here to highlight the entire text verifying the regex. But what if you want to highlight several elements in the same rule?
Let’s take an example with a function declaration like the following:
function nameOfTheFunction() {
}
We want to highlight the word function as a keyword, along with the name of the function. If we can match the function keyword to highlight it without any problem, the name of the function can’t be retrieved without this keyword. That’s why we need to highlight these two elements in the same rule. This can be achieved with the following rule:
{
    'match': '\\b(function)\\s+(\\w+)\\s*\\(.*\\)'
    'captures':
        '1':
            'name': 'keyword.control.mylanguage'
        '2':
            'name': 'entity.name.function.mylanguage'
    'name': 'meta.function.mylanguage'
}
The name entry still contains the class names that will encapsulate the whole text. However, we now find the captures entry, which needs some explanation.
Our regex contains capturing parentheses around function and the name of the function. As in other languages, these captures can be retrieved thanks to the captures entry. The 1 then refers to the first capture (the function keyword) and the 2 refers to the second (the name of the function). We apply the right class names to them with name.
With the function declaration above we obtain the following in Atom:
<span class="meta function mylanguage">
    <span class="keyword control mylanguage">function</span>
    <span class="entity name function mylanguage">nameOfTheFunction</span>
    …
</span>
Matching the Beginning and the End of a Rule
Sometimes it’s easier to detect the beginning and the end of an element than the element itself. It’s true for strings, for instance:
{
    'begin': '\''
    'end': '\''
    'name': 'string.quoted.single.mylanguage'
}
With this rule, Atom will search for a first quote to begin the string. Then, the next quote it finds will be the end of the string, as expected (the search is ungreedy). You can indicate the regexes you want as begin and end delimiters. As always, the name entry must be filled with the class names you want for the whole retrieved element.
For example, with this:
var best_site = 'SitePoint';… you get this:
var best_site = <span class="string quoted single mylanguage">'SitePoint'</span>;Capturing elements is also possible. Highlighting the quotes is, for example, a common task. To achieve this, you can use beginCaptures and endCaptures. The way they work is exactly the same as captures works for the match rule. The only difference is that with beginCaptures you can capture parentheses in the begin regex and, with endCaptures, you can capture elements in the end regex:
{
    'begin': '\''
    'beginCaptures':
        '0':
            'name': 'punctuation.definition.string.begin.mylanguage'
    'end': '\''
    'endCaptures':
        '0':
            'name': 'punctuation.definition.string.end.mylanguage'
    'name': 'string.quoted.single.mylanguage'
}
With the same JavaScript line as above, you’ll now get this:
var best_site =
    <span class="string quoted single mylanguage">
        <span class="punctuation definition string begin mylanguage">'</span>
        SitePoint
        <span class="punctuation definition string end mylanguage">'</span>
    </span>;
Finally, you can also capture elements placed between your delimiters. As match is not used, you can’t use captures, but you can use patterns instead.
This new entry is an array listing the elements you want to highlight inside the current highlight. It’s a regex to execute only between your delimiters. In the example below, we escape \' to highlight the fact that it’s a special character in our string:
{
    'begin': '\''
    'beginCaptures':
        '0':
            'name': 'punctuation.definition.string.begin.mylanguage'
    'end': '\''
    'endCaptures':
        '0':
            'name': 'punctuation.definition.string.end.mylanguage'
    'name': 'string.quoted.single.mylanguage'
    'patterns': [
        {
            'match': '\\''
            'name': 'constant.character.escape.mylanguage'
        }
    ]
}
You can add as many patterns as you want. With the rule above, if we want to highlight the following JavaScript code:
var best_site = 'It\'s SitePoint';… we’ll get this:
var best_site =
    <span class="string quoted single mylanguage">
        <span class="punctuation definition string begin mylanguage">'</span>
        It<span class="constant character escape mylanguage">\'</span>s SitePoint
        <span class="punctuation definition string end mylanguage">'</span>
    </span>;
Publishing an Atom Package
So now our package works great … for us. If you needed your package, chances are that other developers also need it. In this case, why not share your work, so that everyone can enjoy it?
The very first thing to do before publishing your package is to check if a package with the same name as yours already exists. To do that, you can search for this name in Atom itself (in the options, where you can install packages). You can also check the URL https://atom.io/packages/name-of-your-package: if you get an error, the package doesn’t exist yet, and you can publish yours.
To publish your package, you’ll need a public repository, like the ones you can create on GitHub. Refer to the tips above on how to indicate your repository’s URL in the package.json file of your package.
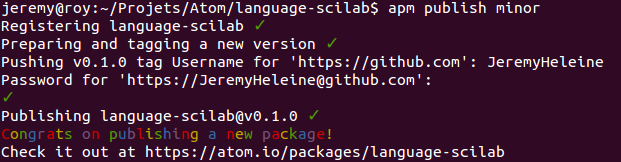
Now you’re ready to publish your package. In a terminal, go to your package’s folder and type apm publish minor to publish your first minor version. You can also publish a major or very minor version by replacing minor with major or patch.
This command will do several things. If it’s the first time you’ve used it, it will begin by registering your package’s name. Then, it will retrieve the current version number and increase it. That’s why we indicated 0.0.0 as a version number for our package: by using apm-publish, it will automatically become 0.1.0 (with minor). Then, the command creates the corresponding Git tag and pushes these changes. For this step, your credentials will be required.
Finally, your package is published, without you having to have anything else.
You can unpublish one of your packages with apm unpublish name-of-the-package. Be careful if you also want to delete your GitHub repository: you have to unpublish your package before deleting your repository. If you delete your repository first, you won’t be able to unpublish your package.
Closing Words
Atom is a very powerful editor. With packages, you can enhance it and add the features you need. Now you know how to create yours and how to publish them.
As Atom is very flexible, you can do a lot of different things with packages. That also means that we can’t describe in one article how to write any type of package. That’s why we only saw here how to create a syntax highlighting package. However, initializing and publishing your package will always be done in the same way.
If you’ve got any questions or comments, please reply below. Have you created a package of your own? Tell us about it!
Frequently Asked Questions (FAQs) about Writing a Syntax Highlighting Package for Atom
What is a syntax highlighting package in Atom?
A syntax highlighting package in Atom is a plugin that enhances the readability and context of the text in different programming languages. It uses different colors and fonts to distinguish between elements of the code such as keywords, variables, strings, and comments. This makes it easier for developers to understand the structure and semantics of the code, leading to more efficient coding and debugging.
How do I start creating a syntax highlighting package for Atom?
To start creating a syntax highlighting package for Atom, you first need to install Atom and open it. Then, go to the ‘Packages’ menu, select ‘Package Generator’, and then ‘Generate Package’. This will create a new package directory with all the necessary files and folders. You can then start writing your syntax highlighting rules in the ‘grammars’ folder.
How do I write syntax highlighting rules in Atom?
Syntax highlighting rules in Atom are written in the ‘grammars’ folder of your package directory. These rules are written in CSON (CoffeeScript Object Notation) format, which is similar to JSON but more concise and easier to write. Each rule consists of a ‘match’ and a ‘name’. The ‘match’ is a regular expression that matches a certain pattern in the code, and the ‘name’ is the type of token that this pattern represents.
How do I test my syntax highlighting package in Atom?
To test your syntax highlighting package in Atom, you can use the ‘Developer: Reload Window’ command from the command palette. This will reload Atom and apply your new syntax highlighting rules. You can then open a file in the language that your package supports and see if the syntax highlighting works as expected.
How do I publish my syntax highlighting package in Atom?
To publish your syntax highlighting package in Atom, you first need to create a new repository on GitHub and push your package code to it. Then, you can use the ‘apm publish’ command from the command line to publish your package to the Atom package registry. You will need to provide a version number and a tag message for your release.
How do I update my syntax highlighting package in Atom?
To update your syntax highlighting package in Atom, you can make changes to your package code and then use the ‘apm publish’ command again with a new version number. This will update your package in the Atom package registry and make it available for users to update.
How do I uninstall my syntax highlighting package in Atom?
To uninstall your syntax highlighting package in Atom, you can go to the ‘Settings’ menu, select ‘Packages’, find your package in the list, and click the ‘Uninstall’ button. This will remove your package from Atom and no longer apply your syntax highlighting rules.
How do I troubleshoot problems with my syntax highlighting package in Atom?
If you encounter problems with your syntax highlighting package in Atom, you can use the ‘Developer: Toggle Developer Tools’ command from the command palette to open the developer tools. This will show any errors or warnings related to your package. You can also use the ‘Developer: Reload Window’ command to reload Atom and see if the problem persists.
Can I use other languages besides CoffeeScript to write syntax highlighting rules in Atom?
Yes, you can use other languages besides CoffeeScript to write syntax highlighting rules in Atom. However, Atom’s built-in grammar system is based on TextMate’s grammar system, which uses regular expressions to match patterns in the code. Therefore, any language that can generate regular expressions can be used to write syntax highlighting rules in Atom.
Can I share my syntax highlighting package with others?
Yes, you can share your syntax highlighting package with others by publishing it to the Atom package registry. This will make your package available for others to install and use in their own Atom editor. You can also share your package code on GitHub or other code hosting platforms.