
This tutorial will help outline all that you need to know when it comes to WordPress taxonomies.
We will begin by discussing what taxonomies are, how they can be interacted with, and why they are important.
Later in the tutorial, we will go through the step-by-step process of creating your own custom taxonomies.
By the end, you should have a strong grasp of what taxonomies are and how you can leverage your own custom taxonomies to suit your website needs.
Key Takeaways
- Understand that WordPress taxonomies are systems for grouping posts or pages under categories and tags, which can be customized to enhance site organization.
- Utilize the `register_taxonomy()` function to create custom taxonomies tailored to specific content types, improving content management and user navigation.
- Remember that custom taxonomies can be hierarchical, like categories, or flat, like tags, depending on the ‘hierarchical’ argument in the taxonomy registration.
- Add custom taxonomies to posts using the WordPress editor, where you can assign pre-existing or newly created terms to each post.
- Modify theme files to display custom taxonomy terms on your website, ensuring that each term links to its respective archive page.
- Leverage custom taxonomies for enhanced content organization, enabling more precise categorization and improved user experience on your WordPress site.
What Are WordPress Taxonomies?
Taxonomies, in their simplest sense, are a way to group together related items using one or more sets of words.
WordPress uses taxonomies to provide a simple mechanism to group together your posts and pages. Out of the box, WordPress comes with two main types of taxonomies:
- Categories
- Tags
These two taxonomies provide you an easy way to group your posts together using names / groupings that make sense to you, and your readers. For example, you could create a new category called ‘Featured’ which you can then assign specific posts to.
When you create a category or tag, you are creating a ‘Term’ within a ‘Taxonomy’. This is useful to know: categories and tags are just WordPress’ default implementation. You can create your own ‘Taxonomies’ with ‘Terms’ that suit your needs.
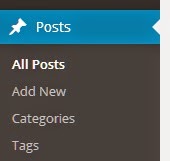
Categories and Tags Admin Areas
WordPress automatically creates administration areas for you to easily add your tags and categories. These administration areas are located inside the ‘Posts’ menu as sub-menus.
Both the categories and tags administration screens will look similar, giving you an easy way to add new terms to your website.

Assigning Categories and Tags to Your Posts
The easiest way to attach your categories and tags to your post is via the WordPress editor.
When you are editing your post / page you will notice a metabox that contains your categories and tags. These boxes often appear underneath your ‘publish’ metabox. These boxes are what you will need to use to assign your terms to the currently edited post.

Both the tag and category metaboxes will let you assign multiple terms to your post. You will be able to add terms you have created previously via their administration menus, or you can create and assign them on the fly (these new terms will then be selectable for other posts in the future).
What Does WordPress Do with Its Taxonomies?
WordPress will do a series of things with its in-built taxonomies, including:
-
Create a single term listing page: WordPress will create a new page for this term. The URL of the term itself will be the name of the taxonomy followed by the name of the term. For example, if you had a ‘category’ named ‘featured’, the URL would be /category/featured. The purpose of this page is essentially to act as a listing page.
-
Create a link to the single taxonomy listing page on your individual posts: If you attach the in-built terms to your post, when you view your post on the front end, WordPress will display a clickable name of the term, generally directly under the title of the post. Clicking on the term will take you to the term listing page.
-
List your terms inside widgets: WordPress comes prebuilt with several ‘widgets’ that allow you to easily add content to your site’s widget areas (like sidebars and footers). Both your ‘categories’ and ‘tag cloud’ widgets will pull in your terms and display them as clickable links.
-
Add your terms to the navigation menu: All of your tags and categories are added to the navigation administration menu where you define and build your main menu. This allows you to easily create a link directly to your most commonly used term.
Depending on your theme, there may be be other areas that take advantage of your taxonomies.
Creating Your Own Custom Taxonomies
While the inbuilt categories and tags may suit your organisational needs, more often that not, you will need more ways in which to group together your posts, especially if you are using custom post types.
How to Register Your Own Custom Taxonomy
To create your own custom taxonomies you will need to define your taxonomy using the register_taxonomy function. This function takes in three values as follows register_taxonomy($taxonomy, $object_type, $args). A brief summary of these values are detailed below:
-
$taxonomy– Name of the new taxonomy you are creating. Where WordPress calls their taxonomy ‘categories’ or ‘tags’, you may want to give yours another name, such as ‘members’. This name has to be under 32 characters in length and may only use letters and the underscore character. -
$object_type– Name of the post type to which you want to attach this taxonomy. WordPress’postpost type has both categories and tags attached to it. You may want to attach your new taxonomy to an existing post type, or your own custom post type that you have previously created. You have two options in this case:-
A single string representing the name of the post type such as
$object_type = 'post' -
An array of strings for the names of the post types such as
$object_type = array('post','page')
-
-
$args– These are your arguments used to set the various options for your new taxonomy. There are multiple options that you can set. Several of these are mandatory, but most are optional (WordPress will handle any missing arguments):-
label– The plural name for your taxonomy, for example ‘members’, if you were creating a membership taxonomy. -
labels– An array of your names and values that will be used for the taxonomy. These are used in administration areas for management. This array specifies all of the labels used for your taxonomy. If you leave this empty, WordPress will use yourlabelvalue and set these. In addition, you can skip specific non-needed values and they will be defaulted.-
name– Plural name of the taxonomy. -
singular_name– Singular name used for one term within the taxonomy. -
menu_name– Text to be displayed on the WordPress administration back-end (along the left hand side administration menu). -
all_items– Viewing all terms from the taxonomy. -
view_item– Viewing a single term from the taxonomy. -
update_item– Updating a single taxonomy. -
add_new_item– Add new term text. -
parent_item– Used with hierarchal taxonomies, generally set toParent $taxonomy_name. -
parent_item_colon– Same as above, but also adding a colon to the end. -
search_items– Search text used when looking through your taxonomy. -
popular_items– Popular term name, used in the back-end administration section for non hierarchical terms. Can easily be set toPopular $taxonomy_name. -
separate_items_with_commas– This text is displayed for non-hierarchical taxonomies, this is the text shown on the taxonomy meta box for individual posts (this is shown directly under the ‘add’ button). -
add_or_remove_items– This text is displayed for non-hierarchical taxonomies. This text is only shown with JavaScript disabled inside the taxonomy meta box for individual pages. -
choose_from_most_used– This text is displayed for non-hierarchical taxonomies, at the bottom of the taxonomy meta box and when selected it will show a listing of the most used terms. -
not_found– This text is displayed for non-hierarchical taxonomies, inside the taxonomy meta box only once you have clicked on the ‘Chose From Most used’ highlighted text. Once clicked, WordPress will look for the most used terms. If there are none, this text will be displayed.
-
-
public– Determines if your taxonomy will be shown and be able to be queried against. -
show_ui– Determines if WordPress will display an administration area for your taxonomy. If this is not set, you won’t have an area to manage your terms. -
show_in_nav_menus– Determines if the terms from this taxonomy will be selectable in your navigation menu. -
show_tagcloud– Determines if WordPress will include your taxonomy’s terms inside the tag cloud widget. -
meta_box_cb– Lets you specify a function used to output the design of the taxonomies meta box inside your single posts. If not selected WordPress will use its default. -
show_admin_column– This determines if your taxonomy’s terms will appear inside a new column for your post listings. Setting this to ‘true’ will display a new column for your specified post type that will display all of its attached terms. -
hierarchical– Determines if your taxonomy can levels such as parents / children (like categories) or are all flat in level (like tags). -
update_count_callback– Name of a function to call when there has been an update to the attached post type. When this taxonomy’s post type changes, this function will be called. -
query_var– Determines the name used for querying the post type. By default this is set to the name of the taxonomy itself. If set to a string, that string will be used. This is best left to its default value. -
rewrite– This can be set in multiple ways. Setting this to ‘false’ will disable permalinks. If this has not been set to false, you can specify multiple element such as the ‘slug’. This is best left to its default true value. -
capabilities– Determines the capabilities (permissions) needed to interact with the taxonomy such as deleting, adding, assigning. This is best left to its default value. -
sort– Specifies that when assigning terms to a post, it should remember the order. -
_builtin– Determines if this term is a ‘built in’ taxonomy or a custom taxonomy. This should not be touched when creating your taxonomy
-
Remember to check the check the WordPress codex on custom taxonomies, as it outlines what values are mandatory and which are optional (along with what values are valid).
Creating Your First Custom Taxonomy
As you can see, there are several options that you can set to tweak your taxonomy for your own requirements.
While you can individually set all of your taxonomies options, the majority of the time it is best to let WordPress fall back to its defaults settings.
For this tutorial, we are going to create a new taxonomy called Members which we will attach to our already existing Post post type.
//create a function that will attach our new 'member' taxonomy to the 'post' post type

function add_member_taxonomy_to_post(){
    //set the name of the taxonomy

    $taxonomy = 'member';

    //set the post types for the taxonomy

    $object_type = 'post';
    //populate our array of names for our taxonomy

    $labels = array(

        'name'               => 'Members',

        'singular_name'      => 'Member',

        'search_items'       => 'Search Members',

        'all_items'          => 'All Members',

        'parent_item'        => 'Parent Member',

        'parent_item_colon'  => 'Parent Member:',

        'update_item'        => 'Update Member',

        'edit_item'          => 'Edit Member',

        'add_new_item'       => 'Add New Member',

        'new_item_name'      => 'New Member Name',

        'menu_name'          => 'Member'

    );
    //define arguments to be used

    $args = array(

        'labels'            => $labels,

        'hierarchical'      => true,

        'show_ui'           => true,

        'how_in_nav_menus'  => true,

        'public'            => true,

        'show_admin_column' => true,

        'query_var'         => true,

        'rewrite'           => array('slug' => 'member')

    );
    //call the register_taxonomy function

    register_taxonomy($taxonomy, $object_type, $args);

}

add_action('init','add_member_taxonomy_to_post');
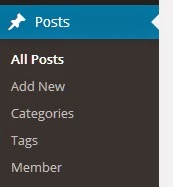
Executing the above code will create a new taxonomy with the name Members and attach it to the Post post type. When you view the back-end of your website you will now see a new sub-menu inside the Post menu. Clicking on this new Members sub-menu will take you to the taxonomy administration screen.
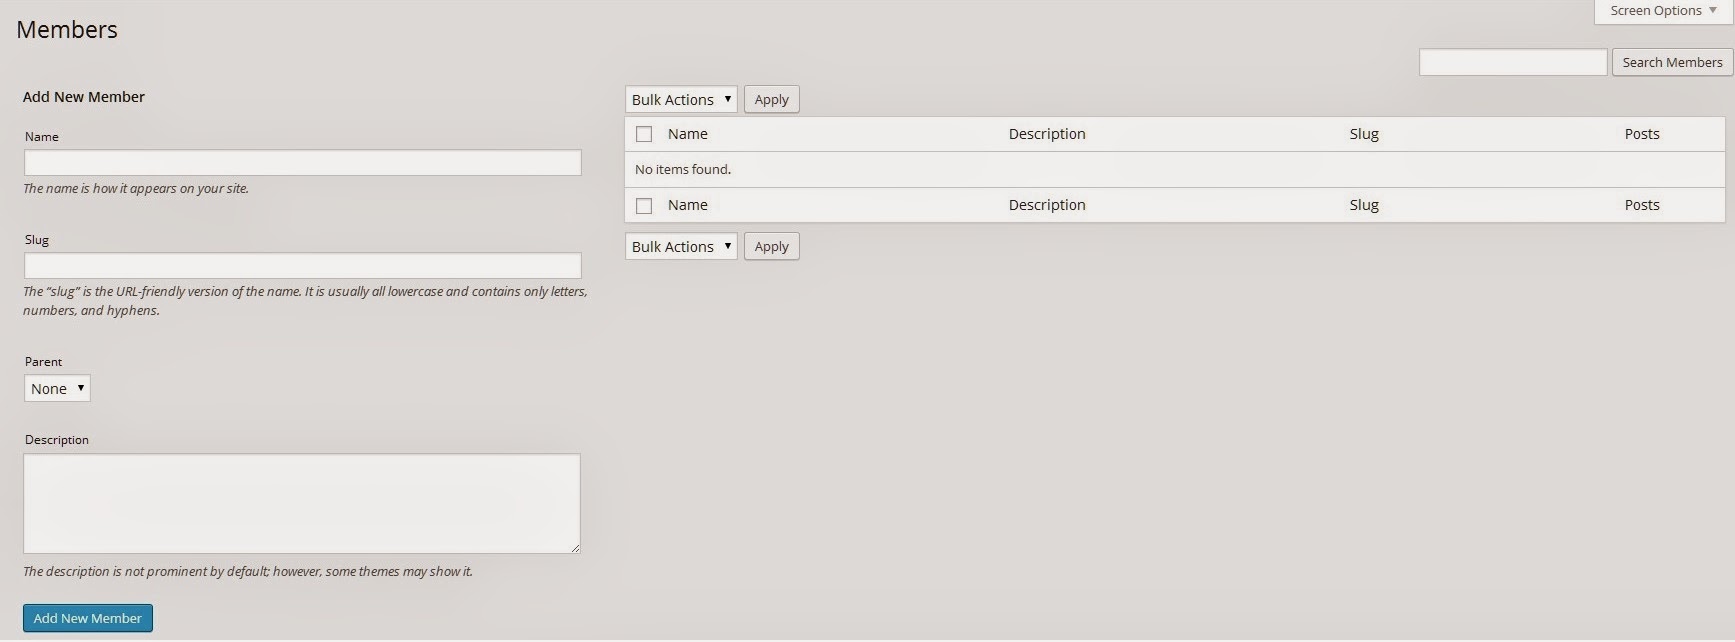
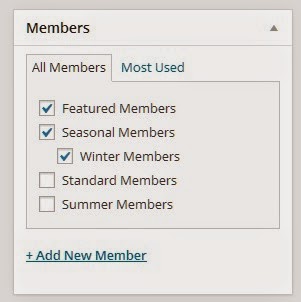
Your taxonomy administration screen will look like either the category or tag screens depending on what you set your hierarchical argument to. Our new member interface looks as follows:
Creating Your New Terms
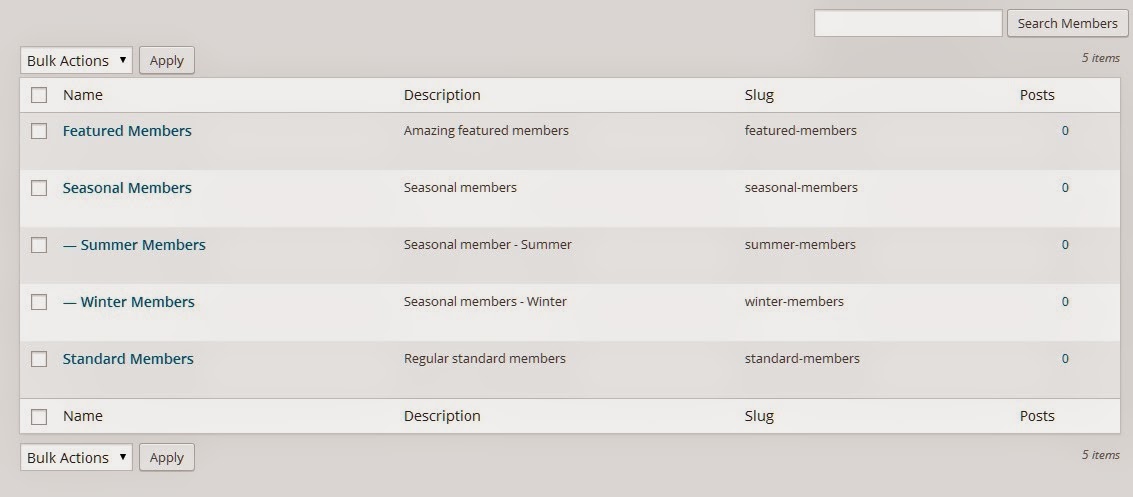
With your taxonomy registered you can now create your new terms (in our case members) to your hearts content.
We have created three new top level terms. Our terms are called Featured Members,Standard Members and Seasonal Members.
Our featured and standard members are single level terms while our seasonal members are multi levelled, with two terms as its children called Winter Members and Summer Members.
This is easy to visualise when you consider categories. Categories can have many sub-categories or even none at all.
Adding Your Terms to Your Post
You can add as many terms as you like to your posts. You assign these terms by editing the post itself and using the taxonomy meta box to attach the terms.
Interacting with Your Taxonomy / Terms
Once you have created and assigned your terms to your posts, you will need to modify your theme to take advantage of your new taxonomy.
WordPress will display its category and term related links when you view your individual posts. However, because you have registered your own taxonomy, you will need to customise your template to ensure that your terms are displayed.
Changing Your Theme Files to Show Your New Taxonomy
As you have added an additional taxonomy, you will need to slightly modify your theme template files to ensure that your terms are shown. This involves editing a few theme files and interacting with some WordPress functions.
Understanding Your Single Template File
If you are working on a child theme (and you should be), you can open up your single.php template file. While we won’t be editing this file, it’s important to know that this file handles the output of all single posts. Since we have attached our member taxonomy to posts, we will start here.
Your single.php should look something like the following. I am using Twenty Thirteen as my parent theme, but overall most single.php files have the same core functionality.
<?php

get_header(); ?>

	<div id="primary" class="content-area">

		<div id="content" class="site-content" role="main">

			<?php /* The loop */ ?>

			<?php while ( have_posts() ) : the_post(); ?>

				<?php get_template_part( 'content', get_post_format() ); ?>

				<?php twentythirteen_post_nav(); ?>

				<?php comments_template(); ?>

			<?php endwhile; ?>

		</div><!-- #content -->

	</div><!-- #primary -->

<?php get_sidebar(); ?>

<?php get_footer(); ?>
The main part you need to focus on is the get_template_part('content',get_post_format()). This function is what will actually display all of your single post content and it is here that we will need to perform our changes.
Understanding Your Content Template File
content.php is the file responsible for outputting your posts content. In actuality, it is the main file used to output all post type content, when there is no more specific template to load, it will load content.php.
The first part of get_template_part() will take the name of the file you are trying to load. The second parameter (which is optional) will then look for a specific version of that file. As an example get_template_part('content','video') will look for a file called ‘content-video.php’. When called by itself, such as get_template_part('content’), it will look for a file named ‘content.php’
What we want to do is edit our content template part. However, this presents some difficulty because meta information such as taxonomies are handled differently in different themes.
-
Twenty Thirteen: In Twenty Thirteen, meta information is displayed using the
twentythirteen_entry_meta()function. This function loops through your post’s categories / tags and is called from within content.php (and all of your other ‘content’ files such as ‘content-video.php’). -
Twenty Fourteen: In Twenty Fourteen, meta information is displayed inside of content.php directly (in addition, each of the other ‘content’ files such as ‘content-video.php’ also manually process this).
Creating a Function to Output Your New Taxonomy Terms
Our solution will be to create a quick function that has the sole job of displaying our new ‘member’ terms.
Open up your functions.php and enter in the following code:
function display_member_taxonomy_terms($post_id){
    //get all terms assigned to this post

    $member_terms = get_the_terms($post_id,'member');

    //if we have member terms assigned to this post

    if($member_terms){

        echo '<div class="member-terms-meta">';

        echo '<span class="term-title"> Member Terms: </span>';

        //loop through each term

        foreach($member_terms as $term){

            //collect term information and display it

            $term_name = $term->name;

            $term_link = get_term_link($term,'member');

            echo '<a href="' . $term_link . '">';

                echo '<span class="term">' . $term_name . '</span>';

            echo '</a>';

        }

        echo '</div>';

    }

}
Calling Your New Function Inside Your Content File
Once you have added this function to your functions.php file, open up your content.php and find where your ‘entry-meta’ is being outputted. Call your new function inside this ‘entry-meta’ div. I have called our function above the standard Twenty Thirteen meta function as detailed below:
<div class="entry-meta">

	<?php display_member_taxonomy_terms($post->ID); ?>

	<?php twentythirteen_entry_meta(); ?>

	<?php edit_post_link( __( 'Edit', 'twentythirteen' ), '<span class="edit-link">', '' ); ?>

</div><!-- .entry-meta -->
When you open up your single posts, you will see that the member terms are now displayed above the standard category and tag terms (so long as you have assigned member terms).
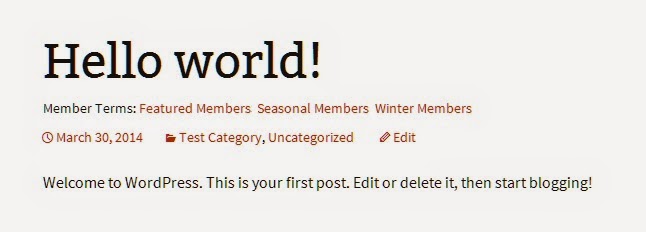
Understanding What We Just Did
To get your new terms to display, what we did was first call a function named display_member_taxonomy_terms($post->ID);from within your content.php file. This function takes in the current post ID and attempts to show all terms belonging to our new taxonomy that have been assigned to this post.
We first called $member_terms = get_the_terms($post_id,'member'); to collect our terms for this post. The get_the_terms($post_id,$taxonomy_name) function takes in an ID of a post, along with a taxonomy name and gives us all attached terms for that taxonomy. In our situation, we passed it our current post id and also the ‘member’ taxonomy.
Next, we check to see if we have any results using a simple if statement if($member_terms). If we have do have terms to display, we loop through each of our terms using our for loop foreach($member_terms as $term). This loop lets us iterate through each term and access its information.
Finally, we accessed the name of the term (to display it to the user) and also fetched the URL of the term using the get_term_link($term_object,$taxonomy_name) function. This function takes in a term object and the name of the taxonomy, and gets the direct link to the term itself.
Wrapping Things Up
As you can see, creating custom taxonomies can provide you with a wide range of new ways to organise your websites content such as your posts.
By creating a new taxonomy and associated terms and assigning them to a post, you can create a layer of organisation which you can leverage to further categorise content for your website.
Frequently Asked Questions about Custom WordPress Taxonomies
What are the benefits of using custom taxonomies in WordPress?
Custom taxonomies in WordPress provide a way to group posts and custom post types together. They offer a more flexible way to organize content and improve the overall user experience. For instance, if you run a book review site, you can create a custom taxonomy for ‘Genre’ to categorize books into different genres. This makes it easier for your visitors to find the content they’re interested in, thereby enhancing user engagement and retention on your site.
How do I create a custom taxonomy in WordPress?
Creating a custom taxonomy in WordPress involves adding a few lines of code to your theme’s functions.php file. You’ll need to use the ‘register_taxonomy()’ function, which allows you to specify the taxonomy name, object type it applies to, and an array of arguments to define the taxonomy’s behavior and labels. It’s important to note that you should have a basic understanding of PHP before attempting to create custom taxonomies.
Can I assign a custom taxonomy to a specific post type?
Yes, you can assign a custom taxonomy to a specific post type in WordPress. When registering your custom taxonomy using the ‘register_taxonomy()’ function, you can specify the post type in the ‘object_type’ parameter. This allows you to create taxonomies that are specific to certain post types, providing a more organized and efficient way to manage your content.
How do I display custom taxonomies on my website?
Displaying custom taxonomies on your website can be done by editing your theme files. You can use the ‘get_the_term_list()’ function to retrieve the terms of your custom taxonomy and display them in your posts. This function returns an HTML string of taxonomy terms associated with a post and given taxonomy.
Can I create hierarchical custom taxonomies?
Yes, WordPress allows you to create hierarchical custom taxonomies, similar to categories. When registering your custom taxonomy, you can set the ‘hierarchical’ argument to true. This allows you to create parent and child terms within your taxonomy, providing a more structured way to organize your content.
How do I add custom fields to my custom taxonomies?
Adding custom fields to your custom taxonomies can be done using the Advanced Custom Fields plugin. This plugin allows you to add custom fields to your taxonomy terms, providing a more flexible way to manage and display additional information about your terms.
Can I rename or delete a custom taxonomy?
Yes, you can rename or delete a custom taxonomy in WordPress. However, this involves modifying your theme’s functions.php file and can potentially break your site if not done correctly. It’s recommended to backup your site before making any changes to your theme files.
How do I add a custom taxonomy to my WordPress menu?
You can add a custom taxonomy to your WordPress menu by going to Appearance > Menus in your WordPress dashboard. From there, you can add your custom taxonomy terms to your menu just like you would with regular pages or categories.
Can I use custom taxonomies with custom post types?
Yes, custom taxonomies can be used with custom post types in WordPress. This allows you to create a more complex content structure, providing a more flexible and efficient way to manage your content.
How do I optimize my custom taxonomies for SEO?
Optimizing your custom taxonomies for SEO involves creating unique and descriptive slugs, using relevant keywords in your taxonomy descriptions, and ensuring that your taxonomy pages provide valuable content to your visitors. Additionally, you can use SEO plugins like Yoast SEO to further optimize your custom taxonomies.