

Key Takeaways
- An Instagram-like photo sharing app can be built using only standards compliant web technologies such as Canvas, File API, Drag/Drop, Web Workers, ES5 and CSS3, demonstrating the evolved capabilities of the web platform.
- The app, named InstaFuzz, allows users to load a photograph and apply digital filters to it, showcasing the image’s potential look with each filter. Filters can be applied additively for a layered effect.
- The app uses the Handlebars JavaScript templating system for rendering the list of filters, CSS3 @font-face fonts for text rendering, and CSS3 box-shadow rule for subtle shadow effects. It’s crucial to use vendor prefixed versions of CSS rules for all supported browsers and specify the W3C version of the rule as well.
When I started out on this app I was only really just interested in seeing if the web platform had really evolved to a point where an app like the hugely popular Instagram app could be built using just HTML, JavaScript and CSS.
As it turns out we can in fact do exactly that. This article walks you through the technologies that make this possible and shows how it is entirely feasible today to build interoperable web applications that provide a great user experience no matter what brand of browser the user is running.
If you happen to be one of the two or so people who have not heard about Instagram then you might be pleased to hear that it is a hugely popular photo sharing and social networking service that allows you to take pictures, apply interesting digital filters on them and share them with the world. The service became so popular that it was acquired by Facebook for a bag full of cash and stock in April of 2012.
InstaFuzz is the name of the app I put together and while I don’t expect to be acquired by Facebook or anybody else for a billion green it does, however, make the case that an app such as this one can be built using only standards compliant web technologies such as Canvas, File API, Drag/Drop, Web Workers, ES5 and CSS3 and still manage to run well on modern browsers such as Internet Explorer 10, Google Chrome and Firefox. And you could easily use the code to build a Windows Store app too.
About the app
If you’d like to take a look at the app, then here’s where it is hosted:
http://blogorama.nerdworks.in/arbit/InstaFuzz/
As soon as you load it up, you’re presented with a screen that looks like this:
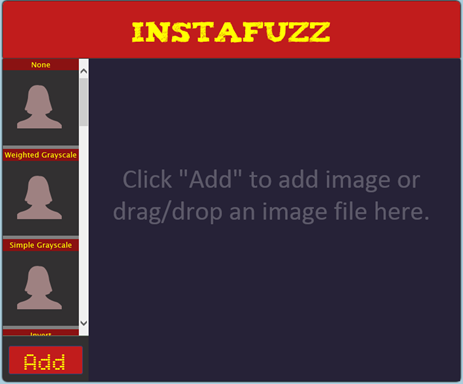
The idea is that you can load up a photograph into the app either by clicking on the big red “Add” button on the bottom left hand corner or drag and drop an image file into the blackish/blue area on the right. Once you do that you get something that looks like this:
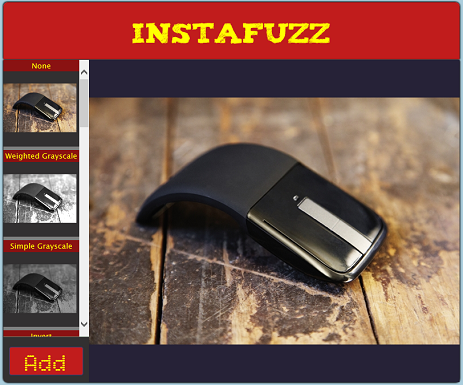
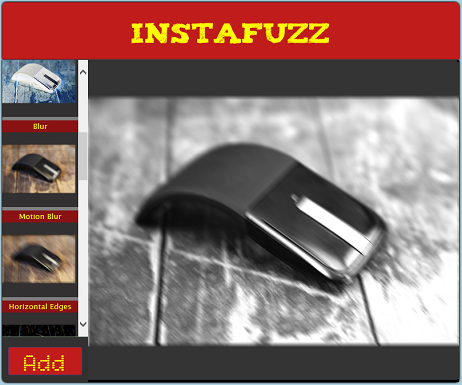
You’ll note that a list of digital filters listed on the left of the screen shows a preview of what the image would look like if you were to apply the said filter. Applying a filter is a simple matter of clicking on one of the filter previews on the left. Here’s what it looks like after applying the “Weighted Grayscale” filter followed by a “Motion Blur”. As you can tell filters are additive – as you keep clicking on filters, they are applied on top of what was applied earlier:
Let’s next take a look at how the UI layout has been put together.
UI Layout
The HTML markup is so little that I can actually reproduce the contents of the BODY tag in its entirety here (excluding the SCRIPT includes):
<header>

    <div id="title">InstaFuzz</div>

</header>

<section id="container">

    <canvas id="picture" width="650" height="565"></canvas>

    <div id="controls">

        <div id="filters-list"></div>

        <button id="loadImage">Add</button>

        <input type="file" id="fileUpload"

           style="display: none;"

           accept="image/gif, image/jpeg, image/png" />

    </div>

</section>

<!-- Handlebar template for a filter UI button -->

<script id="filter-template" type="text/x-handlebars-template">

    <div data-filter-id="{{filterId}}">

        <div>{{filterName}}</div>

        <canvas width="128" height="128"></canvas>

    </div>

</script>
There’s nothing much going on here. Pretty much everything should be standard fare. I will however draw attention to the fact that I am using the Handlebars JavaScript templating system here for rendering the markup for the list of filters on the left of the screen. The template markup is declared in the HTML file (the SCRIPT tag in the snippet shown above) and then used from JavaScript. The template markup is then bound to a JavaScript object that supplies the values for handlebars expressions such as {{filterId}} and {{filterName}}. Here’s the relevant piece of JS from the app with a bit of DOM manipulation help from jQuery:
var templHtml = $("#filter-template").html(),

    template = Handlebars.compile(templHtml),

    filtersList = $("#filters-list");

var context = {

    filterName: filter.name,

    filterId: index

};

filtersList.append(template(context));
As you can tell from the HTML markup, all the filter preview boxes feature a CANVAS tag, as does the big box on the right where the final output is rendered. We’ll go into a bit more detail later on in the article as to how canvas technology is used to achieve these effects.
The app also uses CSS3 @font-face fonts to render the text in the header and the “Add” button. The fonts have been taken from the excellent Font Squirrel site and here’s what the declaration looks like:
@font-face {

    font-family: 'TizaRegular';

    src: url('fonts/tiza/tiza-webfont.eot');

    src: url('fonts/tiza/tiza-webfont.eot?#iefix')

           format('embedded-opentype'),

         url('fonts/tiza/tiza-webfont.woff') format('woff'),

         url('fonts/tiza/tiza-webfont.ttf') format('truetype'),

         url('fonts/tiza/tiza-webfont.svg#TizaRegular') format('svg');

    font-weight: normal;

    font-style: normal;

}
This directive causes the user agent to embed the font in the page and make it available under the name assigned to the font-family rule which in this case is “TizaRegular”. After this we can assign this font to any CSS font-family rule like how we normally do. In InstaFuzz I use the following rule to assign the font to the header element:
font-family: TizaRegular, Cambria, Cochin, Georgia, Times,

    "Times New Roman", serif;
You might also have noticed that there is a subtle shadow being dropped on the page by the container element.
This is made possible using the CSS3 box-shadow rule and here’s how it’s used in InstaFuzz.
-moz-box-shadow: 1px 0px 4px #000000, -1px -1px 4px #000000;

-webkit-box-shadow: 1px 0px 4px #000000, -1px -1px 4px #000000;

box-shadow: 1px 0px 4px #000000, -1px -1px 4px #000000;
This causes the browser to render a shadow around the relevant element. Each comma separated section in the value specifies the following attributes of the shadow:
- Horizontal offset
- Vertical offset
- Spread distance – positive values have the effect of softening the shadow
- Shadow color
One can specify multiple shadow values separated by comma as in fact has been done above. Note that I’ve also specified the shadow using vendor prefix syntax for Firefox and Chrome/Safari using the moz and webkit prefixes. This causes the shadow to continue to work in versions of those browsers where support for this capability was provided using the vendor prefixed version of the rule. Note that the W3C version of the rule – box-shadow – is specified last. This is done deliberately to ensure that in case the browser supports both the forms then only the W3C behavior is actually applied to the page.
One often finds that web developers either fail to include vendor prefixed version of a given CSS3 rule for all the browsers that support that rule and/or fail to include the W3C version as well. Often developers just put the webkit version of the rule ignoring other browsers and the W3C standard version. This causes two problems – [1] poor user experience for users who are using non-webkit browsers and [2] it ends up resulting in webkit becoming a de-facto standard for the web. Ideally we want W3C to be driving the future of the web and not one specific browser implementation. So here are some things to remember when playing with experimental implementations of CSS features:
- Use vendor prefixed versions of CSS rules by all means but remember to specify the rule for all supported browsers and not just the one that you happen to be testing the page in (if you’re using Visual Studio to edit your CSS then you might be interested in the supremely excellent extension for Visual Studio called Web Essentials that makes the job of managing vendor prefixes about as simple as it can possibly get).
- Remember to specify the W3C version of the rule as well.
- Remember to order the occurrence of the rules so that the W3C version shows up last. This is to allow clients that support both the vendor prefixed version and the W3C version to use the W3C specified semantics for the rule.
That’s all for now. In the next and final article in this series, we’ll take a look at how the app supports drag/drop of files, the use of File API, how the filters themselves work and how we prevent the UI thread from freezing by delegating the core number crunching work to web workers.
Frequently Asked Questions (FAQs) about Building an Instagram-like Photo Sharing App
What are the key features to include in an Instagram-like photo sharing app?
The key features to include in an Instagram-like photo sharing app are user registration and login, photo uploading, photo editing, photo sharing, liking and commenting on photos, following other users, and a search function. These features are essential to creating a social media platform where users can interact with each other through photos.
How can I ensure the privacy and security of users’ data in my photo sharing app?
Ensuring the privacy and security of users’ data is crucial. You can do this by implementing secure user authentication, encrypting sensitive data, using secure connections, and regularly updating and patching your app to fix any security vulnerabilities. It’s also important to have clear privacy policies and terms of service that inform users about how their data is used and protected.
How can I monetize my Instagram-like photo sharing app?
There are several ways to monetize a photo sharing app. You can use in-app advertising, offer premium features for a fee, or use a freemium model where the basic app is free but users can pay for additional features or services. You can also partner with brands for sponsored content or promotions.
What technologies and tools can I use to build a photo sharing app?
You can use a variety of technologies and tools to build a photo sharing app. HTML5, CSS, and JavaScript are essential for front-end development. For back-end development, you can use Node.js, Express.js, and MongoDB. You can also use cloud services like AWS or Google Cloud for hosting and storage.
How can I make my photo sharing app user-friendly and engaging?
To make your app user-friendly and engaging, focus on creating a clean, intuitive user interface. Make sure your app is easy to navigate and that features are easy to find and use. You can also include features that encourage user interaction, such as photo contests, challenges, or community events.
How can I optimize my photo sharing app for performance?
To optimize your app for performance, you can use techniques like lazy loading, image compression, and caching. It’s also important to regularly monitor your app’s performance and fix any issues that arise.
How can I promote my photo sharing app to attract users?
You can promote your app through social media, content marketing, search engine optimization, and paid advertising. You can also use app store optimization techniques to improve your app’s visibility in app stores.
How can I handle user-generated content in my photo sharing app?
Handling user-generated content can be challenging. You need to have policies in place for moderating content and dealing with inappropriate or offensive content. You can use automated moderation tools, but it’s also important to have human moderators to review content.
How can I integrate social media into my photo sharing app?
You can integrate social media into your app by allowing users to share their photos on other social media platforms. You can also allow users to log in with their social media accounts, which can help increase user engagement and retention.
How can I keep my photo sharing app updated and relevant?
To keep your app updated and relevant, regularly add new features and improvements based on user feedback and industry trends. It’s also important to regularly update your app’s design to keep it fresh and modern.

