‘Reskinnable’ SVG Symbols: How to Make Them (..and Why)


Key Takeaways
- SVGs have gained popularity in modern web design due to their scalability, small file size and ability to be styled with CSS, making them ideal for responsive sites.
- While SVGs can be styled using CSS, this is only possible if the SVG code is embedded in the HTML page. This means you can’t modify a single portion of the SVG unless it’s embedded.
- The concept of a ‘Reskinnable SVG symbol’ is introduced, where the ‘bones’ of the SVG image remain the same but the surface appearance can be easily changed.
- The article presents a solution to the problem of not being able to modify a single portion of an SVG. This involves creating a symbol for each shape in the SVG, each within the same viewBox, allowing each element to be styled however you like.
- The author provides a detailed workflow for building SVG symbols using Adobe Illustrator and Gulp, and notes that this method is compatible with all modern browsers.

The widespread adoption of SVG in modern web pages has really ramped in 2016 thanks to its, file size, scalability and CSS.
It can be used for icon systems (take a look at Build Your Own SVG Icons), although icon fonts, in some cases, can be preferable (some info here: The Great Icon Debate: Fonts Vs SVG).
But SVG can also be used for logos or graphic elements (at least not overly complex ones) and its natural flexibility makes it a perfect solution for responsive sites (take a look at Sara Soueidan’s Making SVGs Responsive with CSS).
The use of SVG makes it possible to target and change the size and color of an entire element through CSS, but, unless your SVG code is embedded in your HTML page, you can’t modify a single portion of it in this way.
The Problem
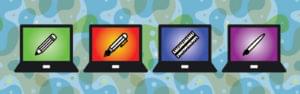
Let’s look at a simpler example. Here we have an image that we need to display in a range of colors.

Of course, traditionally we would simply create three standalone images – each with a different flavor. But what if we wanted to use a single SVG file and style it at render time?
Furthermore, is there a way we make our image a ‘SVG symbol’ to take advantage of browser caching?
I’m going to refer to this a “Reskinnable SVG symbol” – the “bones” of your SVG image remain the same but it’s easy to change the surface appearance.
The perfect solution would be accessing symbol elements through a CSS selector and add some rules to them (the same method that we would have used with embedded SVG).
In the following sample, I’ve added a class (top, right, bottom and left) to each triangle, arranged the image as a symbol and tried to modify it thru CSS, in this way:
.top { fill: #356BA5; }
.right { fill: #357FD9; }
/* and so on... */
Unfortunately, at the moment this only works with Firefox, as the following Codepen demonstrates. The second image appears in tones of blue only on Firefox (I’ve embedded the symbol code in the pen for convenience, but we have the same results with external SVG files).
See the Pen svg element editing (demo 1) by Massimo Cassandro (@massimo-cassandro) on CodePen.
See the Pen SVG CSS styling (demo 1) by Massimo Cassandro (@massimo-cassandro on CodePen.
In large projects, where we may have many elements like that, maintenance issues are an important factor, so I’m always searching for a way to better organize project assets.
My goal was a pure CSS solution: the previous sample can be rewritten using a single-triangle-SVG to be rotated, moved and colored using CSS.
But I didn’t like this solution: it seems to me that it simply moves the problem, without solving it. How many real-world logos have components that all have the same shape?
Sara Soueidan explains the problem much better then I do and offers us a clever solution using CSS variables. Unfortunately CSS variables are still an experimental technology and Microsoft browsers don’t support them.
The Solution
As it often happens, the solution is so head-slappingly simple that it will make you feel stupid for not having thought about it before.
I came across it looking at the new Medium logo some months ago (it seems Medium has since changed their logo code – you’ll have to take my word).

You can see that Medium logo consists of four ‘shapes’, each filled with a different flat color. The B&W version is identical to the green one (except for the colour, of course).
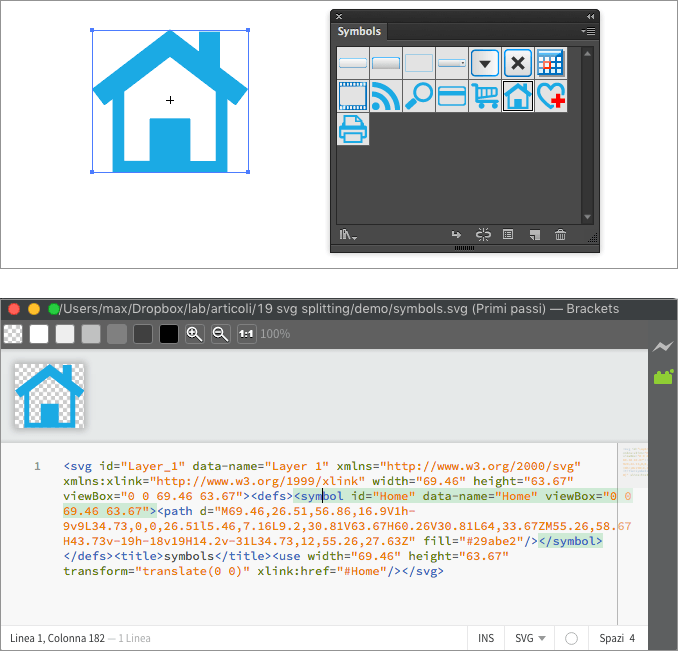
The solution for having a single file for both versions was to simply build a symbol for each shape, each of them within the same viewBox.
Let’s apply it to our example and create a symbol for each shape in our image. They all share the same viewBox of the whole image (0 0 54 54), so they place themselves in the right position without any additional instruction. Just take care to avoid fill, stroke, style etc. attributes in the symbol code).
<svg xmlns="https://www.w3.org/2000/svg">
	<symbol id="top" viewBox="0 0 54 54">
		<polygon points="54 0 0 0 27 27 54 0"></polygon>
	</symbol>
	<symbol id="right" viewBox="0 0 54 54">
		<polygon points="54 54 54 0 27 27 54 54"></polygon>
	</symbol>
	<symbol id="bottom" viewBox="0 0 54 54">
		<polygon points="0 54 54 54 27 27 0 54"></polygon>
	</symbol>
	<symbol id="left" viewBox="0 0 54 54">
		<polygon points="0 0 0 54 27 27 0 0"></polygon>
	</symbol>
</svg>
So now we can assemble them into a single SVG container:
<svg>
	<use class="top" xlink:href="#top"></use>
	<use class="right" xlink:href="#right"></use>
	<use class="bottom" xlink:href="#bottom"></use>
	<use class="left" xlink:href="#left"></use>
</svg>
Each use element can be styled however you like, and, most importantly, it is compatible with all modern browsers:
See the Pen SVG CSS styling (demo 2) by Massimo Cassandro (@massimo-cassandro on CodePen.
That’s all.
We just have to arrange our SVG files in this way. We can, of course, do it manually, but if you have to manage many graphic elements or you need to quickly edit and reuse them in more projects, you need a smarter and faster workflow. I’ve found my solution using Adobe Illustrator and a bit of Gulp.
SVG Symbols building workflow
The basics of this technique are the same I’ve just covered in my Build Your Own SVG Icons and Create an Icon Font Using Illustrator & IcoMoon articles, so take a look at them for the first steps.
Say we have two elements, just like in the image below. Each of them is arranged in a specific artboard:
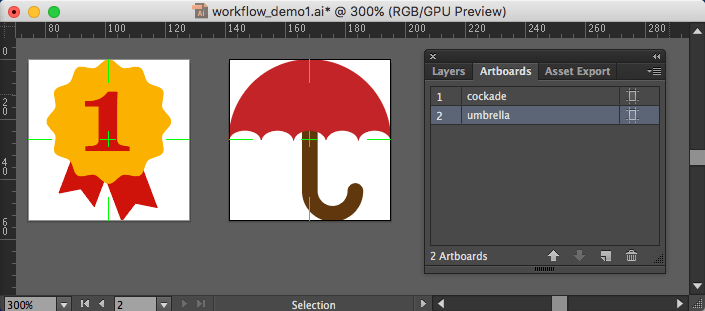
We gave them some color for convenience, although we know that the fill color (as well as, if there are any, the stroke one, the stroke size and so on) will be edited through CSS.
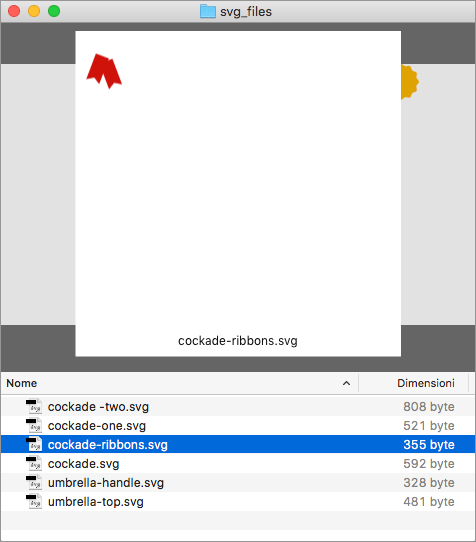
Since each symbol must have its artboard, we now have to split each image in as many artboards as each colored part.
This can be made very quickly in Illustrator, cutting each element, selecting the target artboard and choosing the Paste in place command.
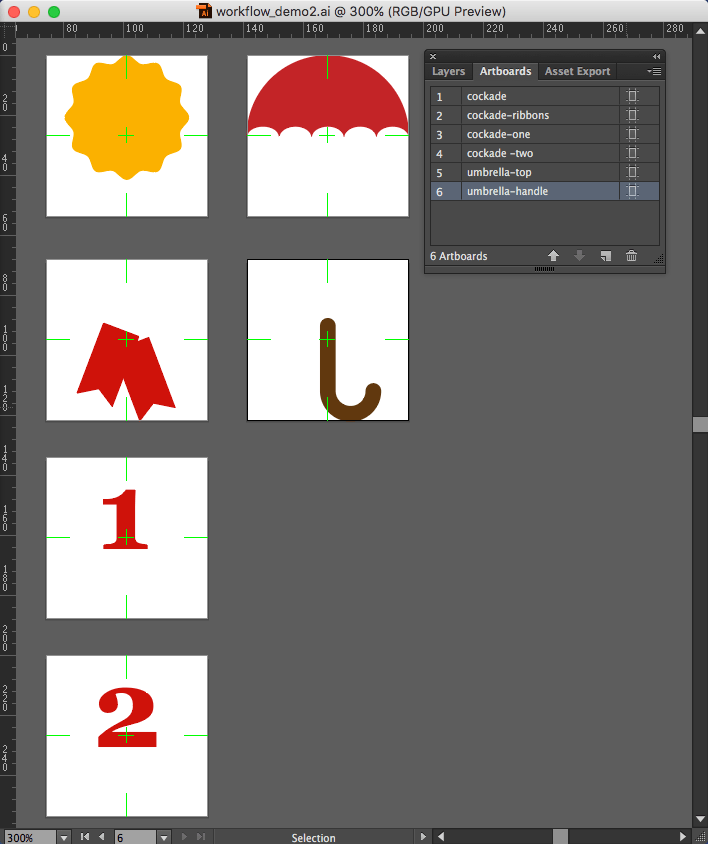
Note that each artboard has a specific name: it will be used for symbols IDs.
Now we can export our artboards to SVG using the brand new File → Exports → Export for screens command.
This is a really useful new tool of the latest Illustrator versions: it allows you to save each artboard or user-defined asset in many formats with a single command.
Choose “Artboards” from the export panel, set “SVG” as output format and select the destination folder:
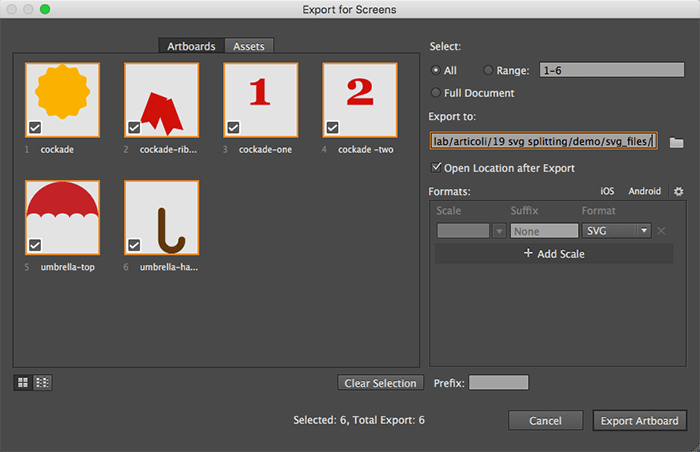
Each artboards will be exported as a single SVG file:
Now we need to put together all files as SVG symbols and to delete some SVG attributes we don’t need: a little gulp script will help us to do so very quickly.
Time for Gulp
The next section is slightly more technical, but – if you’re up for it – it will give you a fast, clean way to produce versatile SVGs like this.
I’ve already written about Gulp on SitePoint, and you can also find a lot of resources on the web about Gulp installing and all related arguments, so I’ll assume you’ve already installed it and that you know what we’re talking about.
Anyway, if you don’t like Gulp, you can also do all the following steps manually. I’ve done this many times before starting using Gulp: it is definitely a good way to learn and it’s more than enough in small projects or where a constant editing and maintenance work is not requested.
So, we have some SVG files, each of them is arranged just like the example below (the d attribute has been shortened for convenience):
<svg id="Layer_1" data-name="Layer 1" xmlns="https://www.w3.org/2000/svg" width="54" height="54" viewBox="0 0 54 54">
<title>umbrella-handle</title>
<path d="..." fill="#603813"></path>
</svg>
Our goal is to arrange all images as SVG symbols in a unique file while stripping away all the unwanted attributes:
<svg xmlns="https://www.w3.org/2000/svg">
	<symbol id="umbrella_handle" viewBox="0 0 54 54"> ... </symbol>
	<symbol id="umbrella_top" viewBox="0 0 54 54"> ... </symbol>
	<!-- and so on ... -->
</svg>
Beside Gulp, our job needs some other extensions:
- First of all, gulp-svgstore and gulp-svgmin to combine and minify our svg files
-
gulp-rename to adjust
idnames and to give our destination files a specific name. This module is particulary needed if you want to use the previous Illustrator SVG export command, we’ll cover it later.
Now we can arrange our Gulpfile (the code is also available as a public Gist):
var gulp = require('gulp')
	,rename = require('gulp-rename')
	,svgstore = require('gulp-svgstore')
	,svgmin = require('gulp-svgmin')
;
gulp.task('default', function() {
	gulp.src(['svg_files/*.svg'])
		.pipe(rename(function (path) {
	        path.basename = path.basename.replace(/__icon_prefix__/, '');
	        return path;
	    }))
	    .pipe(svgmin(function (file) {
	        return {
		        // https://github.com/svg/svgo/tree/master/plugins
			    plugins: [
			    	{ cleanupIDs: { remove: true, minify: true } }
			    	, { removeDoctype: true }
			    	, { removeComments: true }
			    	, { removeStyleElement: true }
			    	, { removeDimensions: true }
			        , { cleanupNumericValues: { floatPrecision: 2  } }
			        , { removeAttrs: { attrs: ['(fill|stroke|class|style)', 'svg:(width|height)'] } }
			    ]
			    //,js2svg: { pretty: true } // uncomment for readability
			};
	    }))
	    .pipe(svgstore())
    	.pipe( rename('my-icons.svg') )
    	.pipe(gulp.dest('./'));
});
After the modules are loaded, we indicate the files we want to parse (svg_files/*.svg).
SVGstore uses the name of each file to set the symbol id attributes (i.e. a file named umbrella.svg will become a symbol with id="umbrella"). If you are using the new Illustrator Export for screens panel, you can avoid the first rename command, since your files will be named exactly as the artboards they come.
But older versions of Illustrator create file names by concatenating the Illustrator file name with the artboard name, so we’ll need to rename files removing the Illustrator file name prefix:
path.basename = path.basename.replace(/__icon_prefix__/, '')Now we can clean our files. gulp-svgmin is the Gulp version of SVGO a “Nodejs-based tool for optimizing SVG vector graphics files” (Jake Archibald released an online version of SVGO that is really useful if you want to arrange your files manually).
SVGO has a lot of configurable options (you can browse through all of them in the project page), but we are in need of just a few (you can, of course, customize the script according to your needs):
-
cleanupIDs: removes all ids from your files -
removeDoctype,removeCommentsandremoveStyleElement: strip all doctypes comments and<style>elements -
removeDimensionsremoves allwidthandheightsattributes if viewbox is present -
cleanupNumericValuesrounds numeric values to a sensible level of precision -
removeAttrsremoves all specified attributes
Next, the files are passed to svgstore to be combined in a unique file, which is then renamed and saved.
After using it a few times, you should be able to arrange it in a few minutes for each project, and it will give you the ability to quickly rebuild your SVG symbols file any time you need to.
This is an example of the result (even in this pen, I embedded the svg file for convenience, but you can safely link it as an external file):
See the Pen svg css styling (demo 3) by Massimo Cassandro (@massimo-cassandro) on CodePen.
Are there any caveats?
Since this method is based on styling use elements, we have problems when they are removed by a polyfill, as we see in svg4everybody.
In browsers that doesn’t support external symbols link (all IE), svg4everybody replaces all use elements with the content of the matching symbols. So all css rules that apply to use don’t take effect.
This can be solved adapting your CSS selectors to inner symbols element (path, circle, etc.), but it can be a little tricky.
Extra bonus
There are infinite variants of this workflow: you can deal with strokes, text, etc.
Another interesting feature to be explored is the use of Illustrator Symbols: they are exported as SVG symbols, and this opens up a lot of possibilities.
Thanks for reading.
Frequently Asked Questions on Reskinnable SVG Symbols
What are the benefits of using SVG symbols over other image formats for web design?
SVG symbols offer several advantages over other image formats like JPEG, PNG, or GIF. Firstly, SVGs are scalable vector graphics, which means they can be resized without losing quality. This is particularly useful for responsive web design where the same image needs to be displayed at different sizes on different devices. Secondly, SVG symbols can be styled with CSS, allowing for greater design flexibility. Lastly, SVGs are typically smaller in file size than their bitmap counterparts, which can lead to faster load times and improved website performance.
How can I modify the color of an SVG symbol?
You can modify the color of an SVG symbol using CSS. By default, SVGs inherit the color of their parent element. However, you can override this by targeting the SVG or its child elements in your CSS and applying the desired color. For example, you could use the fill property to change the color of the SVG’s interior, or the stroke property to change the color of its outline.
Can I use SVG symbols in all web browsers?
SVG symbols are widely supported across all modern web browsers, including Chrome, Firefox, Safari, and Edge. However, older versions of Internet Explorer (IE8 and below) do not support SVGs. If you need to support these older browsers, you may need to provide a fallback in the form of a PNG or JPEG image.
How can I animate an SVG symbol?
SVG symbols can be animated using CSS animations or JavaScript. CSS animations are simpler and more performant, but JavaScript provides more control and flexibility. You can animate various properties of an SVG, such as its position, size, rotation, color, and opacity.
Can I use SVG symbols in my HTML?
Yes, SVG symbols can be embedded directly into your HTML. This can be done using the
How can I make my SVG symbols accessible?
To make your SVG symbols accessible, you should provide alternative text using the <title> and
Can I use SVG symbols in my CSS?
Yes, SVG symbols can be used as background images in your CSS. This can be done by encoding the SVG as a data URL and using it as the value for the background-image property. However, this method does not allow you to style or animate the SVG with CSS.
How can I optimize my SVG symbols for performance?
There are several ways to optimize your SVG symbols for performance. Firstly, you can minify your SVG code to reduce its file size. Secondly, you can use gzip compression to further reduce the file size. Lastly, you can use HTTP/2 to serve your SVGs, which allows for faster and more efficient data transfer.
Can I use SVG symbols in my JavaScript?
Yes, SVG symbols can be manipulated with JavaScript. This allows you to dynamically change the properties of an SVG, such as its color, size, position, and visibility. You can also use JavaScript to animate SVGs, create interactive SVGs, and load SVGs dynamically.
How can I create responsive SVG symbols?
To create responsive SVG symbols, you should use relative units (like percentages) instead of absolute units (like pixels) for your SVG’s width and height. This allows the SVG to scale with its parent element. You can also use the viewBox attribute to specify the aspect ratio and coordinate system of the SVG, which allows it to scale proportionally.
Massimo is a web and graphic designer and front-end developer based in Roma, Italy.


Published in
·Canvas & SVG·Design·Design & UX·HTML & CSS·Illustration·Performance·Sketch·UI Design·July 4, 2017
Published in
·Animation·Canvas & SVG·Design·Design & UX·HTML & CSS·Illustration·UI Design·UX·Web·June 9, 2022