
Slack is a popular tool for encouraging better communication among team members. It comes with a slew of helpful features and services including third-party integrations and webhook support. Slack webhooks can be fun and useful, and they’re easy to set up. In this tutorial we’ll set up a simple server using Node.js and Heroku that will respond to your team’s messages from Slack as a “bot.” Familiarity with JavaScript and Git will be helpful. If you haven’t used Git before, take a look at Git for Beginners to get started. Access to a Slack account is also assumed, but don’t worry – they’re free!
Key Takeaways
- Slack Bots Simplified: Setting up a Slack bot involves creating an integration via Slack’s web interface, configuring webhooks, and using Node.js and Express to create a server that interacts with Slack messages.
- Node.js and Heroku Deployment: Utilize Express framework for the server setup and Heroku for deploying the bot, ensuring the bot is accessible online.
- Bot Interaction Logic: Develop the bot’s logic to respond to specific commands in Slack, such as greeting users or processing commands like dice rolls, with responses formatted in JSON.
- Expanding Bot Capabilities: Explore further integrations like Slash Commands and Incoming WebHooks to enhance bot functionalities, enabling more interactive and dynamic responses within Slack channels.
- Continuous Development and Integration: Encourage ongoing development by integrating with various APIs (e.g., GitHub, Yelp) to broaden the bot’s utility, making it a versatile tool for team collaboration and productivity.
Creating a New Slack Integration
From the Slack web interface, open the menu in the top left corner next to your team’s name and select Configure Integrations. Here, you can see a dashboard with all the integrations available to you. Scroll to the very bottom under DIY Integrations & Customizations, and add an Outgoing WebHook. Read the short description and then click Add Outgoing WebHooks Integration.

You will see the Outgoing WebHook configuration and an example of what the request and response payloads should look like. Our first bot will simply greet the user when called. To do this, we will allow the hook to listen for the Trigger Word “hello” on any channel. We don’t know the URL it will be posting to yet, so we will come back to this page later.
Creating a Web Server
We’ll be using Express 4 on Node.js to build a simple web server.
Create a new directory for your app, and run npm init to generate your package.json file. In your package.json dependencies, include "express": "^4.x.x" and "body-parser": "^1.x.x". The body-parser package will be used to parse the payload sent from Slack. Create the server file named app.js. Here, we will require the necessary modules, add the body parser middleware, error handler, and a test route. Then, we tell the server to start listening.
var express = require('express');

var bodyParser = require('body-parser');
var app = express();

var port = process.env.PORT || 3000;
// body parser middleware

app.use(bodyParser.urlencoded({ extended: true }));
// test route

app.get('/', function (req, res) { res.status(200).send('Hello world!') });
// error handler

app.use(function (err, req, res, next) {

  console.error(err.stack);

  res.status(400).send(err.message);

});
app.listen(port, function () {

  console.log('Slack bot listening on port ' + port);

});
Run the server with node app and verify that visiting http://localhost:3000 responds with “Hello world!”.
Writing the Bot Logic
Create a file named hellobot.js
This module will be where our bot logic lives. It will include one exported function that returns a message to Slack with status code 200. We’ll start by parsing the data that Slack sends to our server, and then we’ll respond with a properly formatted payload of our own. To do this, let’s revisit our Outgoing WebHook under Configured Integrations. The Outgoing Data example shows us all the info Slack sends when an Outoing WebHook is triggered.
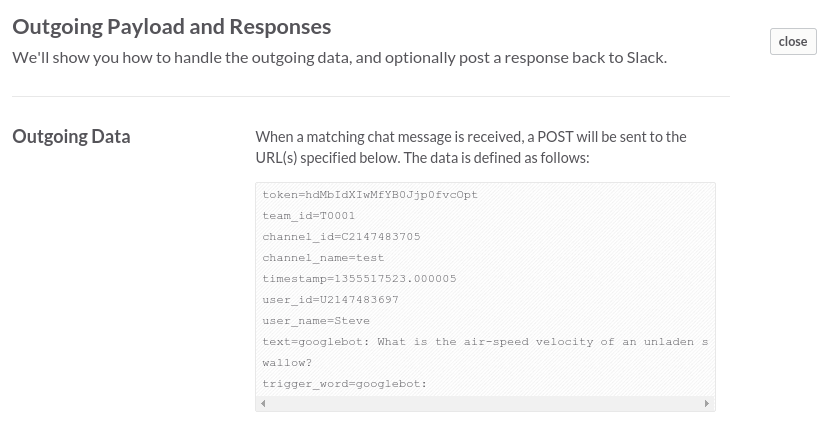
You can see that some of the data can be useful for authentication or routing, but for now we’re just going to focus on the user_name property. Using this value, we can send a personalized greeting back to the user.
module.exports = function (req, res, next) {

  var userName = req.body.user_name;

  var botPayload = {

    text : 'Hello, ' + userName + '!'

  };
  // avoid infinite loop

  if (userName !== 'slackbot') {

    return res.status(200).json(botPayload);

  } else {

    return res.status(200).end();

  }

}
Here we create our botPayload object. The only necessary property is botPayload.text, which defines what our bot will display when we respond. Add the text property with a greeting to the user, and respond with JSON and a status code of 200. Notice that our bot’s response is our Outgoing WebHook’s trigger word! To avoid an infinite loop, we can check the user_name of the body. All hooks post as “slackbot”, even if the name appears differently in chat. We can use this fact to keep our hook from responding to itself.
Back in app.js, require the bot module at the top.
var hellobot = require('./hellobot');
Then, add a route that listens for a POST to /hello.
app.post('/hello', hellobot);
Let’s do a quick test. Run the app again using node app, and in another terminal window use curl to make sure the app responds as we expect it to. (Note: since our bot only looks for one value here, there’s no need to include the entire Slack payload in our test).
curl -X POST --data "user_name=foobar" http://localhost:3000/hello
If our app works, we should see a response that looks like this:
{"text":"Hello, foobar!"}
Now, it’s time to put our bot online.
Deploying the App on Heroku
Heroku is a convenient service that helps you get a web server online for free in very little time. Deployments are made by pushing your code to their git server where it is automatically deployed and run. Create an account on Heroku or log in if you already have an account.
Once you’ve logged in, you’ll see your Heroku dashboard. Click the + in the top right to create a new app. Follow the instructions provided to log in to Heroku on your computer. Deployment is easy, but there is a lot to know the first time you deploy an app. Make sure you follow this guide when you’re getting your app set up. We’ll do some double checks along the way, but there’s a lot of good info in there that’s outside the scope of this article.
Before we can deploy our bot, we’ll need to tell Heroku how to run the app. This is done by creating a Procfile. Your Procfile only needs a single line:
web: node app
Once you you’ve done this, you can commit your changes and push to heroku. Heroku automatically installs the node modules, and you’ll see the results of your deployment. If everything went smoothly, you’ll see a link to your app at the bottom. Copy that URL, and then visit your Outgoing WebHook’s configuration page once again. Add the URL you copied to the URL(s) input field with the /hello route appended and modify the name and icon of the hook if you’d like.

There’s one more step to get the bot online: we need to give it a Dyno. In the terminal, enter:
heroku ps:scale web=1
This tells Heroku to give your app one web worker. Careful; your app only gets one free dyno per month!
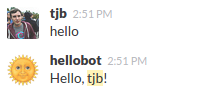
Your bot should be online now, so go back into Slack and test it out!
If you didn’t get a response, go back and check your code. You can use the terminal command heroku logs to see details about the requests as well as any console.log() statements you’ve added.
Not too difficult, was it? We successfully set up a webhook in Slack, deployed our app to Heroku, and got the two to talk to each other! A bit more work than a simple “hello world” program, but much more rewarding. Now that we have our server running, we can easily add more hooks and responses. Hellobot is pretty friendly, but it’s not that useful. In the next section we’ll use Slack’s other webhook types to create a dice roll chat command.
DiceBot – Using Slack Commands and Incoming WebHooks
In the last section, we used an Outgoing WebHook that listened to chat for a trigger word, sent a message to our server, and displayed the response. In this section, we’ll use two other tools for creating custom integrations: Slash Commands and Incoming WebHooks. Visit the Configure Integrations page and take a look at the other options under DIY Integrations & Customizations. Let’s start by adding the Slash Commands integration. Read the short description, set the command to “/roll”, and add the integration. The next page shows the configuration. You can see that the Outgoing Data looks similar to the Outgoing WebHook we configured earlier. We’ll use the app we created in the last section for this section, so we can use the same URL, but this time we’ll POST to the route /roll.
Notice that the Slash Command integration can respond to the user, but only in private. What use is a dice roll if only you can see the dice? Slack suggests using an Incoming WebHook in tandem with Slash Commands to send messages to chat. Go back to the Configure Integrations page and add an Incoming WebHook. Read the description, select a channel, and add the hook. Don’t worry about what channel you picked; we can specify the channel in our bot’s response. Because we can choose the channel in our app, it means that we can also use this integration for any other bots we create. The Incoming WebHook doesn’t have much in the way of configuration, but it does have a lot of important information for constructing our bot’s response payloads. The most important part is the Webhook URL. We’ll be POSTing to this from our app in order to send messages to Slack.
Responding to Slash Commands from the Server
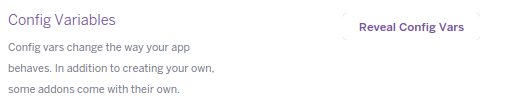
Since we’ve pointed our Slash Command at the route /roll, we can add that route to our server alongside of hellobot. We’ll be using a secret URL for our incoming hook, so it’s a good idea to keep it hidden in case you want to make your code public. A good way to do this is to use Heroku’s config vars.
Let’s also add request to our package to use with the incoming hook:
npm install --save request
Now we’ll add dicebot.js. Dicebot will export one function, but we’ll need two additional functions: one to POST to the Incoming WebHook, and one to roll the dice.
var request = require('request');
module.exports = function (req, res, next) {

};
function roll () {

}
function send () {

}
As many tabletop gamers know, there are many more types of dice than just six-sided dice. Other dice have four sides, eight sides, ten sides, twenty sides, and more! A special notation is used when rolling these dice: <number of dice>d<sides of dice>. So, rolling two six-sided dice is notated as “2d6”. We can let users roll multiple dice using this notation, but we’ll have to check for correct input from the user.
Let’s start by initializing some variables and parsing the input. We’ll set some default values in case the user wants to omit input.
module.exports = function (req, res, next) {

  // default roll is 2d6

  var matches;

  var times = 2;

  var die = 6;

  var rolls = [];

  var total = 0;

  var botPayload = {};
  if (req.body.text) {

    // parse roll type if specified

    matches = req.body.text.match(/^(\d{1,2})d(\d{1,2})$/);
    if (matches && matches[1] && matches[2]) {

      times = matches[1];

      die = matches[2];

    } else {

      // send error message back to user if input is bad

      return res.status(200).send('<number>d<sides>');

    }

  }

}
The regular expression above is pretty reliable for parsing dice rolls and limits the values to two-digit numbers only so the user can’t go crazy. If the user messed up their syntax, we send back a hint.
Rolling the dice with the user input is easy enough. See this thread for an explanation of how a random roll works. For truly random rolls you could contact the random.org API. Let’s write the roll function.
function roll (min, max) {

  return Math.floor(Math.random() * (max - min + 1) + min);

}
Then, in our main function we’ll make some rolls and build a message to respond with. Let’s include the name of the roller so other users can see who used the /roll command.
// roll dice and sum
for (var i = 0; i < times; i++) {
var currentRoll = roll(1, die);
rolls.push(currentRoll);
total += currentRoll;
}
// write response message and add to payload
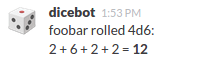
botPayload.text = req.body.user_name + ' rolled ' + times + 'd' + die + ':\n' +
rolls.join(' + ') + ' = *' + total + '*';
We added the message to the botPayload.text property with some Slack formatting around total to make it bold. We can also configure the name, icon, and channel using the response payload. We’ll set the channel based on the channel the user issues the roll command from. Slack suggests using the name of the channel in the payload, but that means we’d have to prepend it with “#”. Instead, we can use the channel ID, which will allow us to post in public channels as well as private groups. For the icon, a convenient die emoji exists, though you could provide a better image using icon_url.
botPayload.username = 'dicebot';

botPayload.channel = req.body.channel_id;

botPayload.icon_emoji = ':game_die:';
The payload looks good. Let’s write the send function. I’ve chosen to store only the path tokens in Heroku’s config vars. Make sure to send the body as a string of JSON.
function send (payload, callback) {

  var path = process.env.INCOMING_WEBHOOK_PATH;

  var uri = 'https://hooks.slack.com/services' + path;
  request({

    uri: uri,

    method: 'POST',

    body: JSON.stringify(payload)

  }, function (error, response, body) {

    if (error) {

      return callback(error);

    }
    callback(null, response.statusCode, body);

  });

}
In our main function, we’ll initiate the send request. If it works, we can respond to the Slash Command with an empty 200. If not, we can use the values from our send() callback to build an error. This will trigger the error handler in app.js and send back 400, which will notify the user of the error.
// send dice roll

send(botPayload, function (error, status, body) {

  if (error) {

    return next(error);

  } else if (status !== 200) {

    // inform user that our Incoming WebHook failed

    return next(new Error('Incoming WebHook: ' + status + ' ' + body));

  } else {

    return res.status(200).end();

  }

});
Let’s run our server and curl it again. This time, we’ll need to include the channel_id. You can use the Slack API tester to find the correct channel_id. Since the Incoming WebHook has already been set up, it should hear our server call it. We’ll also need to include the Incoming WebHook path in our environment since the app isn’t on Heroku yet.
INCOMING_WEBHOOK_PATH=/your/path/tokens node app
curl -X POST --data "user_name=foobar&channel_id=C0123ABCD&text=4d6" http://localhost:3000/roll`
Looks good! Let’s deploy it.
Redeploying to Heroku
Since we used Heroku’s config vars to store our webhook’s token, don’t forget to set it in the app’s Settings menu.
Then use git to add the new files, commit your changes, and push to your heroku remote. Heroku will install node modules and start the server. Before we test it, let’s start watching the logs in real time:
heroku logs -t
With our hooks all set up, our roll command should be ready to go. Try out a few rolls! If something didn’t work, you can use the Heroku logs to debug. To see the completed app in its entirety, check out this GitHub repo.
Continuing Development
These two bots demonstrate all the tools you need to start writing your own chat bots and integrations. You can integrate many services into bots, or you can try to make a convincing conversation partner. APIs and node modules exist for you to achieve both of these goals.
Some other ideas for bots:
- a bot that uses the GitHub API to show you open pull requests
- a bot that uses the Yelp API to help your team decide on lunch
- a bot that does Google searches for you
- a bot that talks to you only with buzzwords and jargon
If you come up with good ideas, share your code! Bots are fun to make, and they’ve never been easier to create.
Frequently Asked Questions (FAQs) about Slack Bots
How can I create a Slack bot?
Creating a Slack bot involves a few steps. First, you need to go to the Slack API website and create a new bot user. You’ll need to give your bot a name and choose a workspace where it will operate. After creating the bot, you’ll receive a Bot User OAuth Access Token, which you’ll use to authenticate your bot in your code. Then, you can start writing your bot’s code using a programming language like JavaScript or Python. You’ll use the Slack API to send and receive messages.
What are some useful features I can add to my Slack bot?
There are many features you can add to your Slack bot depending on what you want it to do. For example, you can program your bot to respond to specific commands or keywords, send scheduled messages, or even integrate with other APIs to pull in data from external sources. You can also add interactive elements like buttons or dropdown menus to your bot’s messages.
How can I test my Slack bot?
You can test your Slack bot by inviting it to a channel in your workspace and interacting with it. You can send messages to the bot and check if it responds correctly. You can also use the Slack API’s methods for testing, such as the api.test and auth.test methods.
Can I use my Slack bot in multiple workspaces?
Yes, you can use your Slack bot in multiple workspaces. You’ll need to install the bot in each workspace where you want it to operate. Each workspace will have its own Bot User OAuth Access Token, which you’ll use to authenticate your bot in that workspace.
How can I improve the performance of my Slack bot?
There are several ways to improve the performance of your Slack bot. One way is to optimize your code by reducing unnecessary API calls or processing. You can also use caching to store data that your bot uses frequently, reducing the need for repeated API calls. Additionally, you can use asynchronous programming techniques to allow your bot to perform multiple tasks at the same time.
How can I make my Slack bot interact with users?
You can make your Slack bot interact with users by programming it to respond to messages or commands. You can use the message event to listen for incoming messages, and the chat.postMessage method to send messages. You can also add interactive elements like buttons to your bot’s messages, which users can click to trigger actions.
Can I integrate my Slack bot with other services?
Yes, you can integrate your Slack bot with other services. Slack provides a variety of APIs and features that allow you to integrate with external services. For example, you can use incoming webhooks to receive data from other services, or outgoing webhooks to send data to other services.
How can I handle errors in my Slack bot?
You can handle errors in your Slack bot by using error handling techniques in your programming language. For example, in JavaScript, you can use try...catch statements to catch and handle errors. You can also use the error event to listen for any errors that occur while your bot is running.
Can I customize the appearance of my Slack bot?
Yes, you can customize the appearance of your Slack bot. You can set a custom icon and name for your bot when you create it. You can also customize the appearance of your bot’s messages by using attachments or blocks, which allow you to add color, images, and other formatting.
How can I ensure the security of my Slack bot?
You can ensure the security of your Slack bot by following best practices for bot development. This includes keeping your Bot User OAuth Access Token secret and not sharing it with anyone. You should also validate any data that your bot receives to ensure it’s from a trusted source. Additionally, you should regularly update your bot’s code to fix any security vulnerabilities.