

Zend Technologies is the company which funds the development of the Zend Engine (the engine PHP is based on), as well as Zend Framework and some other projects like Apigility. They also build proprietary software of high professional caliber, designed for high intensity PHP work in large companies – software like Zend Studio and Zend Server – though both are excellent tools for solo devs as well. In this post, we’ll be taking a look at the latter.
Key Takeaways
- Zend Server 7, developed by Zend Technologies, is a web application that aids in running, deploying, debugging and preparing other applications. It can be installed on production servers to handle hosting, clustering, file distribution and more.
- Zend Server 7 supports GUI-based management of other libraries and projects for ease of use, and is compatible with all operating systems and platforms. It can be installed alongside Apache or Nginx and supports PHP version 5.4 or 5.5.
- Key features of Zend Server 7 include the Z-Ray, a real-time debugger that provides real-time insight on the internal workings of an app, Library Management, which allows you to add new libraries to the Zend Server environment, and Web API, which allows you to write new interfaces for it in any language or style.
- While Zend Server 7 offers a rich suite of features for managing, deploying, distributing and debugging PHP applications, it significantly ties your application to itself. Its benefits include ease of deployment and debugging, but it may limit the portability of your app.
What is Zend Server?
Zend Server is, essentially, a locally-run web application which helps you run, deploy, debug and production-prepare other applications you write. It’s more than a developer helper, though – you can install it on your production servers and have it take care of hosting, clustering, file distribution and more.
It automatically installs Zend Framework (both version 1 and 2 for some reason) and Symfony 2, and supports GUI-based management of other libraries and projects for total ease of use. All operating systems and platforms are supported, and you can install it alongside Apache or Nginx – your choice. You can have it pull in PHP version 5.4 or 5.5, and it will do the rest on its own once you run the installation script.
The latest version of ZS, version 7, comes in several licenses and flavors, so give those a read if you’d like to know about the differences.
The concept of Zend Server might be a bit too abstract to grasp right now if you’ve never encountered it before, so let’s just walk through it instead.
Installing Zend Server
Installing is done with their installer, which varies depending on platform. To install it into an Ubuntu 14.04 box, see our quick tip. If you’d like to follow along as we walk through the features, please do this now. It shouldn’t take more than 10 minutes.
If you’re on a Linux OS and didn’t follow our Quick Tip, please remember to modify the log file permissions as described here. This is necessary for Zend Server to have log access, and for it to be able to spawn virtual hosts.
Features
Let’s take a deeper look at ZS now and examine its features.
GUI
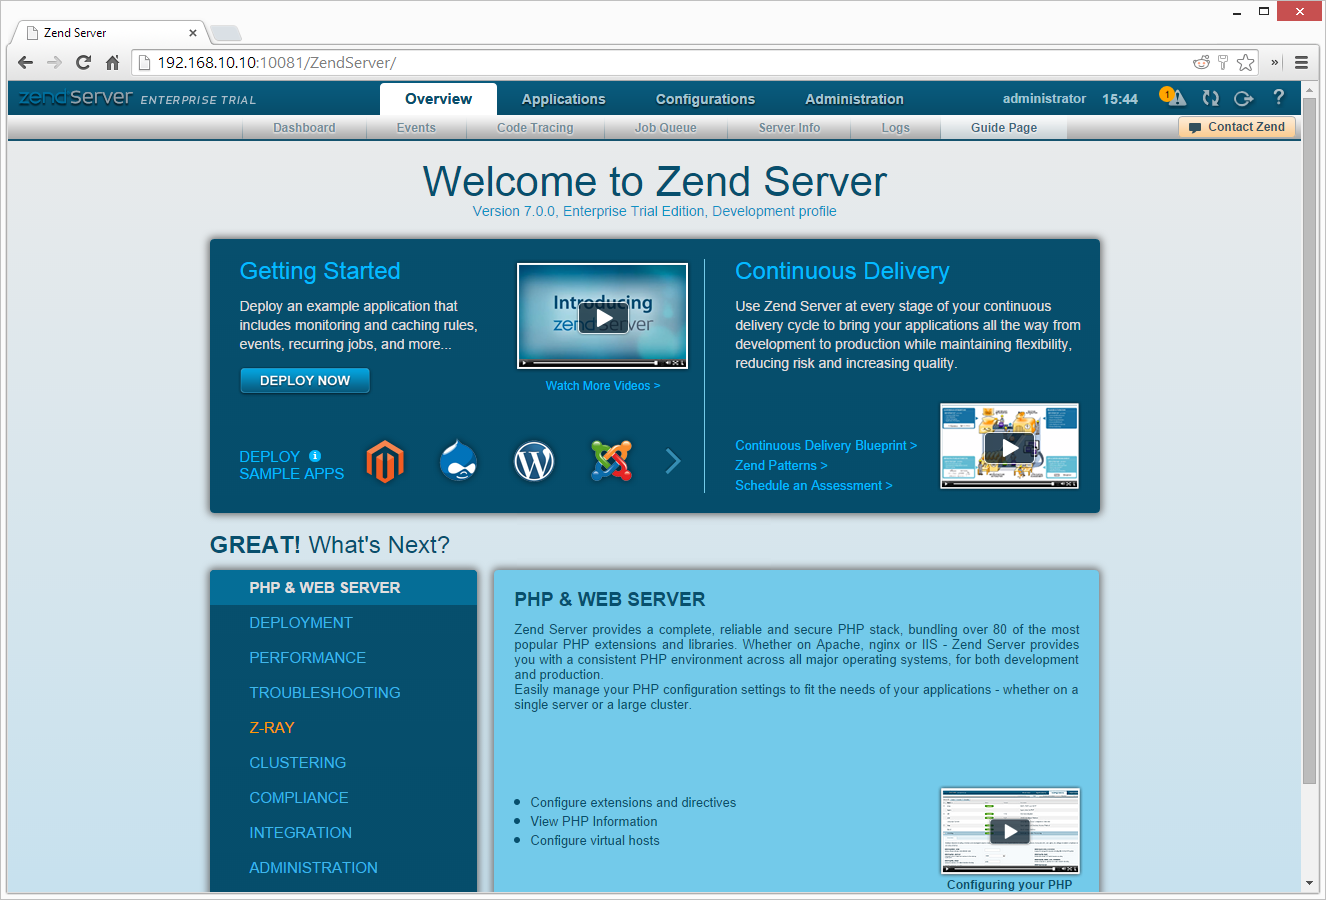
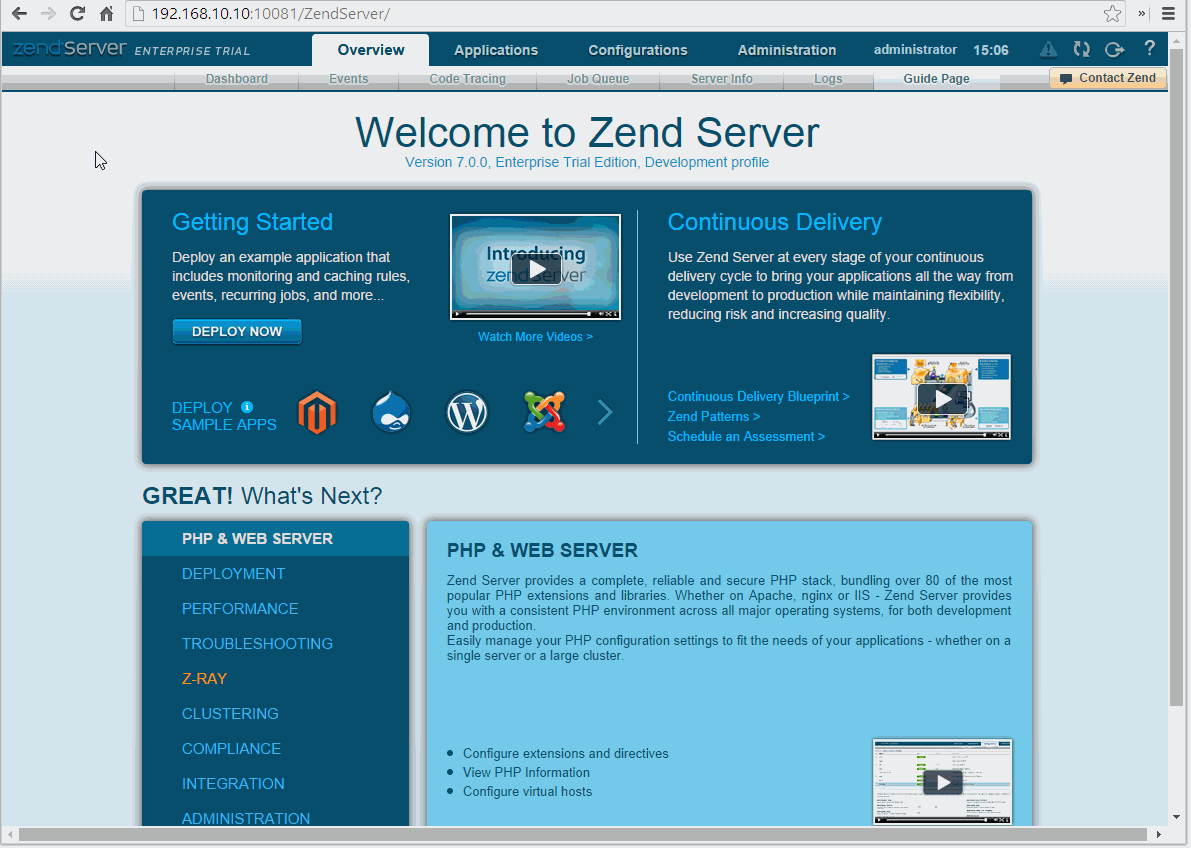
The front end is extremely fast – surprisingly so. Even though full page reloads happen, the screens load so fast you could be forgiven for assuming it’s ajax. A fast dynamic menu adorns the top of the control panel, and though it could use upgrades in the design department, it conveys the available options clearly. I could name dozens of occasions on which I wished I didn’t have to log into a company’s back-end simply due to the slow loading times that await me. Having an interface working this smoothly really makes one want to use it.
As you can see in the figure above, the first screen that greets us is the guide page of the overview screen, with some helpful guides and videos. The lower half will give you hints on what to fine-tune next, regarding PHP configuration and the rest, and the app will notify you with a modal popup when a server restart is required (such as after enabling some PHP extensions, for example). After you scroll through the “What’s next” options, you’ll notice they’re commonly repeated and can all be accessed via the main menu, too. For example, you can access Virtual Host management through PHP & WEB SERVER, but also through Applications -> Virtual Hosts.
Look around in the top menu to get a glimpse of all the other options – there are certainly too many for us to take a look at in one post.
Library Management
One feature that mustn’t go unmentioned is Library Management. Reachable at Applications -> Libraries, this interface allows you to add new libraries to the Zend Server environment, update them as patches come out, and – perhaps best of all – makes them all available across the server(s) for all apps. They’re automatically added to the include path, and you can use them in your projects.
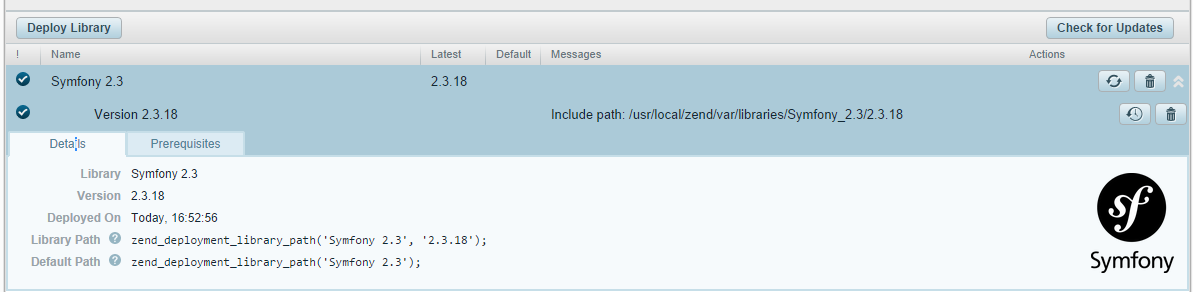
You might think this would slow your application down due to having yet another huge include path to look through, but you’d be wrong. To actually use a deployed library in your project, you need to insert an API call as described here. Notice the “Library Path” value in the figure above – including it in your project automatically enables it.
Obviously, this binds your application rather heavily to Zend Server – a subject ripe for another discussion as it has its pros and cons.
Z-Ray
Z-Ray monitors requests made to the Web server, and displays relevant, live and detailed information on a Web page component in your browser. This information includes: request execution time, events, log entries, database queries, functions, and more. Using Z-Ray, developers get real insight into their PHP code, allowing them to inspect, debug and optimize their pages, resulting in fast and stable applications.
Zend’s real-time debugger implementation, Z-Ray can hook into your requests as they happen and provide real time up to date insight on what’s going on internally. You’ll be able to easily identify the slowest parts of your app, you’ll see errors before even PHP logs them, and you’ll be able to fine tune your application like never before.
To read more about Z-Ray, see here or wait for our review to come out.
Web API
It’s impressive that Zend Server is fully web API enabled. What this means is that you can write new interfaces for it in any language or style you see fit – even mobile apps to power it – and manage your Zend Server deployed applications from anywhere.
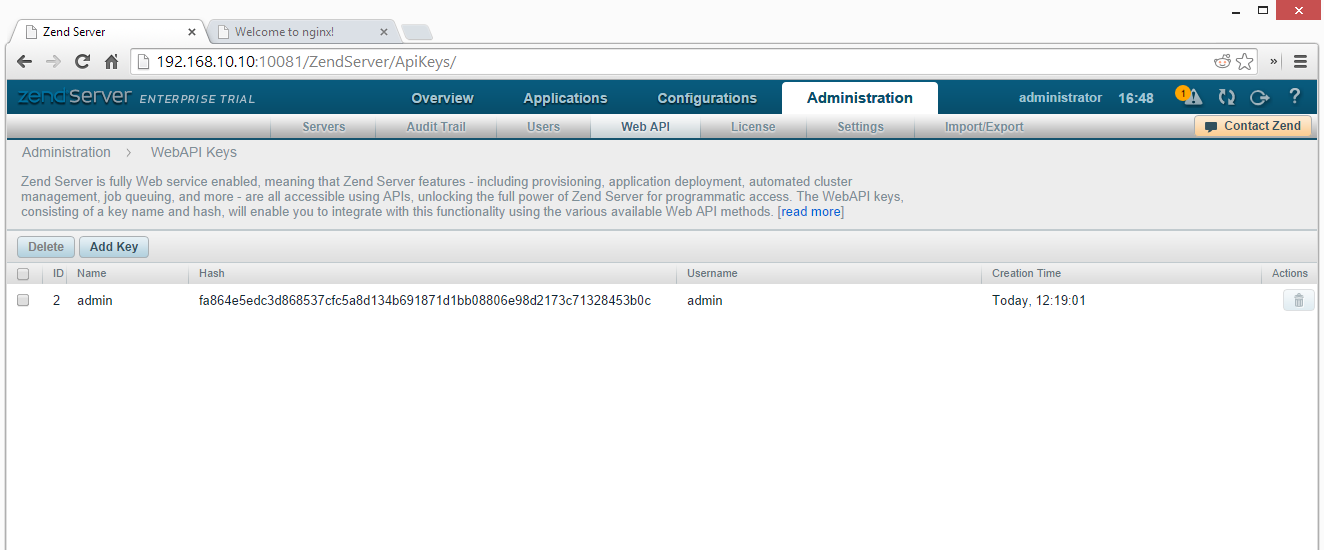
This is a feature you don’t see often, if at all, in back end interfaces for applications and application management, so I was pleasantly surprised to encounter it.
Custom PHP Extensions
What if I want to use a custom PHP extension, though? How do we pull that off? Is it even possible? Maybe I’d like to build my apps using Phalcon, but still continue to manage them with Zend Server, blending the best of two worlds.
The good news is – it’s possible. It’s a bit outside the scope of this post, however, so have a look at the Quick Tip we’ve written for that exact purpose.
Deploying Applications
Let’s see how easy it is to get started deploying apps with Zend Server 7.
Prepared App
There are several prepared apps ZS knows how to install. For example, to find out how you can install PhpMyAdmin, read the optional Step 5 of our Quick Tip – it’s about one minute of work to get it up and running.
Demo App
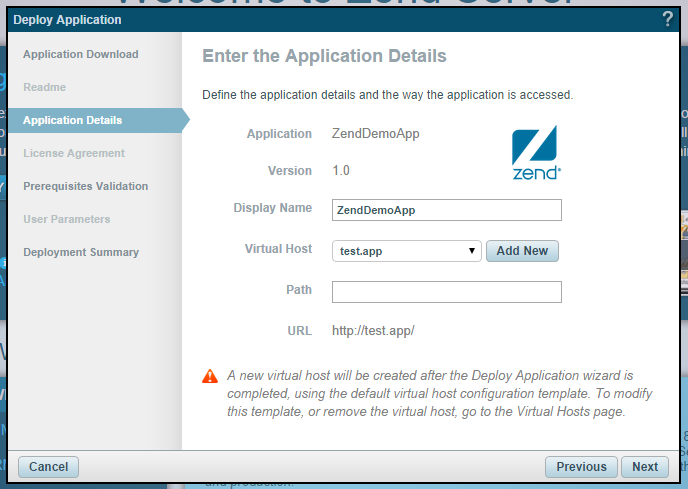
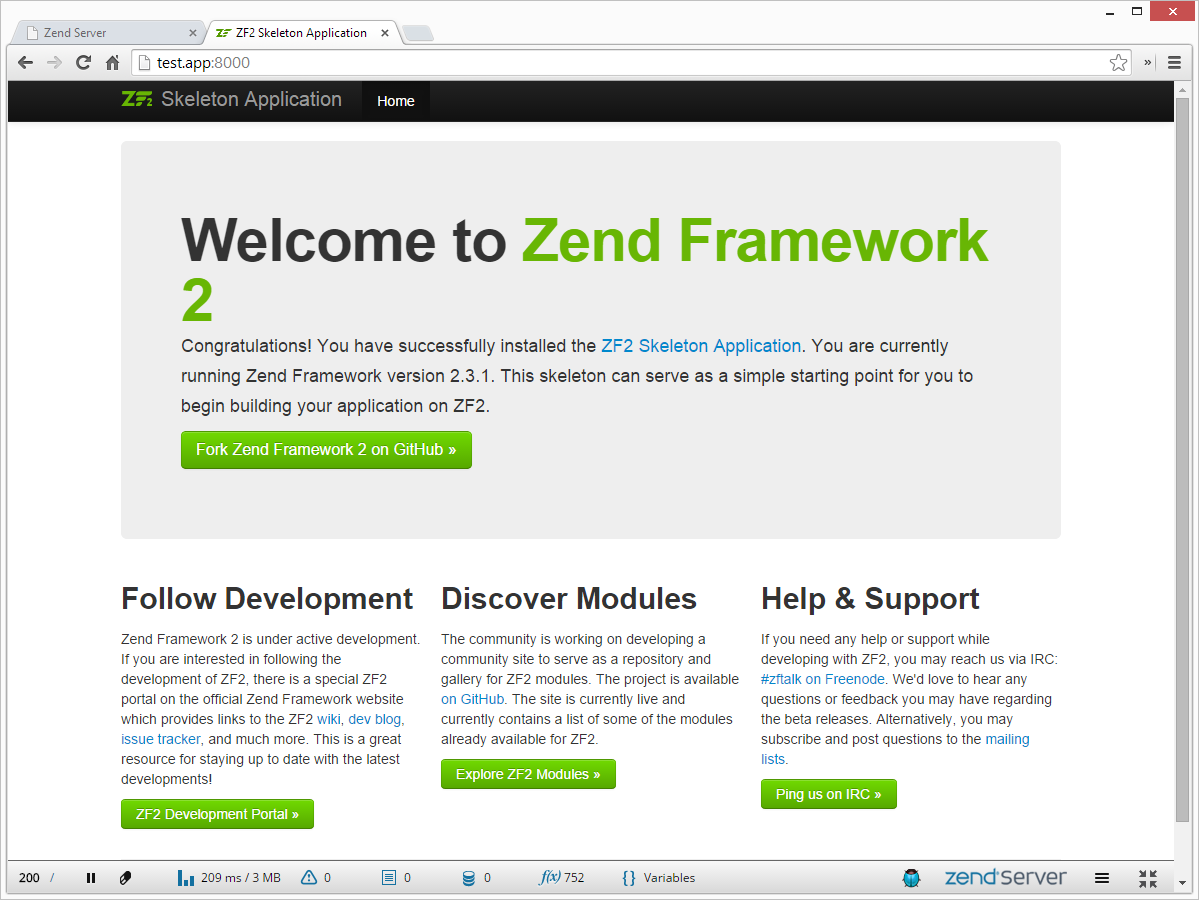
Zend Server also offers the installation of a demo Zend Framework 2 application. To install it, we click the generic “Deploy Now” button and follow the steps.

For the host name, I picked test.app, a host I defined a while back for all VM experimentation purposes. I encourage you to add some experimentation hostnames to your host’s hosts file, so you can live a hosts-free life when playing around with Vagrant, and defining short-life apps.
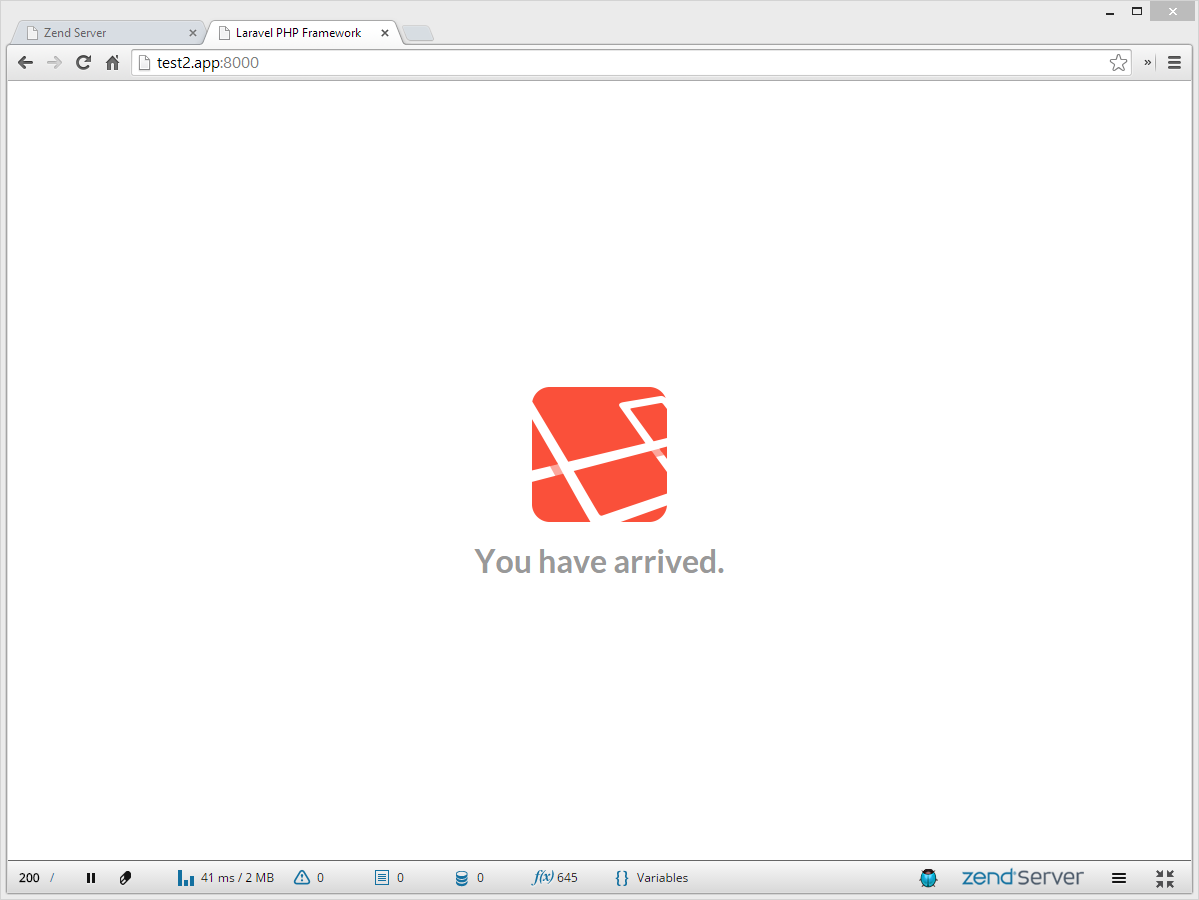
After deployment, you should be able to access the ZF2 demo application via host:8000, or in my case, like so:
Blank App
What if we want a blank app, though? Do we always need to use templates? Nope. There are two types of apps you can custom-add to the ZS management interface. We’ll cover them next, but first, go to Applications -> Apps in the GUI – you need to see the two options from the screenshot below.

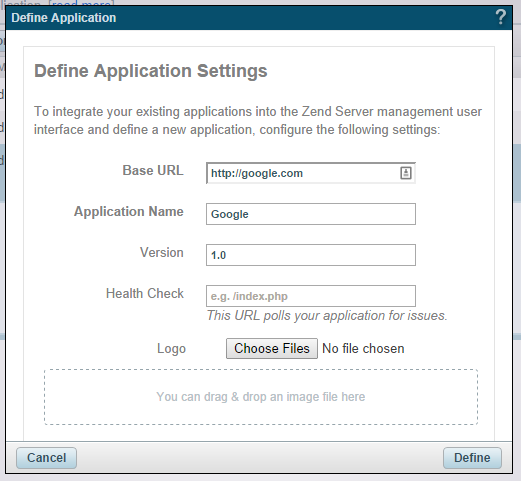
Adding an installed application (Define)
Define Application will let you point ZS to an existing and working PHP application. The application can, but doesn’t have to be on this server – remote applications can be added, too. However, it’s important to note that defining an application does not put the app at the mercy of ZS, and so ZS cannot manage it (deploying, reading logs, reinstalling, debugging and more). It’s simply there as a “still alive” checker for another app (notice the health check URL – that URL is pinged and reports any problems encountered).
Let’s add Google.

This isn’t very fun though. Let’s have a look at deployment. If you’d like to know more about Defining, see here.
Deploying a new application (Deploy)
Deploying an application is a significantly more complex, exciting and useful endeavor. First, we need a sample application somewhere on the server. Let’s go with Laravel’s skeleton app.
To use the command line PHP that comes with ZS7, we need to add it to our path. In the VM, in the terminal, execute the following:
echo "PATH=\"/usr/local/zend/bin:\$PATH"\" >> ~/.profile
source ~/.profile
php --version
If you got a good version output for PHP and not a “command not found” error, you’re all set. Now let’s install Composer globally and initiate the Laravel project.
cd ~/Code
curl -sS https://getcomposer.org/installer | php
sudo mv composer.phar /usr/local/bin/composer
composer create-project laravel/laravel test2.app --prefer-dist
You can quickly check that it renders properly by executing php public/index.php.
In order to be able to deploy this application on Zend Server, we need to turn it into a deployable package.
cd ~/Code
zdpack create laravel-package
zdpack is the packager which, through the create command, creates the necessary package subfolders for us in the folder laravel-package. What we need to do now, is move the Laravel application code into the data subfolder:
mv test2.app/* laravel-package/data/Then, it’s recommended we edit the deployment.xml file. It contains data such as project name and description, database connection credentials, and other metadata. The only thing we need to modify is the docroot node – set it to data/public instead of data. See full list of available nodes here.
Validate the changed XML file with zdpack validate deployment.xml, and if all goes well package it with
cd ~/Code
zdpack pack laravel-package
This will create a laravel-package.zpk file which you can upload through the “Deploy” popup in the Zend Server GUI:
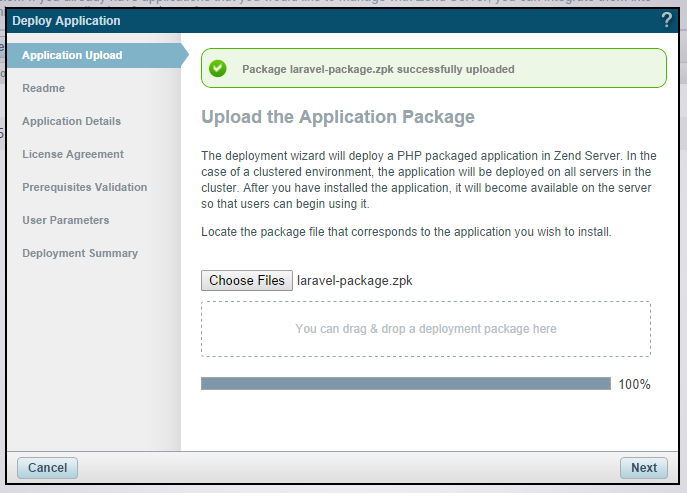
If you go through the wizard the app should successfully deploy, but running it through the browser still won’t work. What gives?
Debugging
Let’s use this opportunity to debug the problem. By going into the Dashboard and selecting “laravel-package” or what ever you named your app, you should see it consists of 100% errors. It looks like it’s trying to do some file operations, but fails.
Obviously, we’re dealing with some file permission errors. In fact, if we look at the stack trace, we can see exactly which file the app is trying to create:

To alleviate this, we’ll need to perform some permission fixes. In the “Virtual Hosts” section of ZS, you can easily find out where each app resides on the filesystem. Armed with this knowledge, we can execute the command:
sudo chmod 777 -R /usr/local/zend/var/apps/http/test2.app/80/0.1_7/app/storageNote that full permission (777) is probably not the optimal way to go here, security-wise, so keep it 777 in development only. In production, you would make sure the user that Zend runs PHP as is the owner of the app/storage folder. Reload the URL of our Laravel test app now, and notice it works like a charm:
Conclusion
Zend Server 7 is a feature rich suite for managing, deploying, distributing and debugging of PHP applications. In a way, it binds your application to itself, so once you go ZS, you don’t go back – similar to HHVM. Whether or not the additional features are worth it, however, is up to you to decide. Do you favor ease of deployment and debugging, or would you rather keep your app 100% instant-portable?
Either way, ZS is a godsend for any administrator in charge of several projects, and I’ll definitely be testing its features more in the coming months. Will you join me? Care to give it a shot and report back with potential troubles and/or important features we missed? Looking forward to your comments!
Frequently Asked Questions about Zend Server 7
What are the key features of Zend Server 7?
Zend Server 7 is a PHP application server that offers a range of features designed to optimize productivity, performance, scalability, and reliability. These include Z-Ray, a revolutionary debugging tool that provides real-time insights into the inner workings of your code, and application performance monitoring, which helps identify and fix performance issues. It also offers code tracing functionality, page caching, job queue, and session clustering, among other features.
How does Zend Server 7 differ from other PHP application servers?
Zend Server 7 stands out from other PHP application servers due to its unique features like Z-Ray, which provides unprecedented visibility into your code, and its robust performance optimization tools. It also offers a user-friendly interface, easy integration with popular IDEs, and support for a wide range of PHP versions and frameworks.
How can I install Zend Server 7?
Zend Server 7 can be installed on a variety of platforms, including Windows, Linux, and Mac OS X. The installation process involves downloading the appropriate package from the Zend website, running the installer, and following the on-screen instructions. Detailed installation guides are available on the Zend website.
What is Z-Ray in Zend Server 7?
Z-Ray is a powerful debugging and productivity tool included in Zend Server 7. It provides real-time, in-depth insights into your code, helping you identify and fix issues, optimize performance, and improve the quality of your code. Z-Ray displays information about requests, database queries, functions, and more, right in your browser.
How can I optimize the performance of my PHP applications with Zend Server 7?
Zend Server 7 offers several tools to help optimize the performance of your PHP applications. These include application performance monitoring, which identifies performance issues and provides detailed diagnostics, and page caching, which improves the response time of your applications. You can also use Z-Ray to gain insights into your code and identify areas for optimization.
What kind of support is available for Zend Server 7?
Zend offers comprehensive support for Zend Server 7, including 24/7 technical support, regular software updates, and access to a wealth of resources and documentation. There’s also a vibrant community of Zend Server users who can provide advice and assistance.
Can I use Zend Server 7 with my existing PHP applications?
Yes, Zend Server 7 is designed to work with existing PHP applications. It supports a wide range of PHP versions and frameworks, and its features like Z-Ray and application performance monitoring can be used to enhance the performance and reliability of your existing applications.
How does Zend Server 7 ensure the reliability of my PHP applications?
Zend Server 7 includes several features designed to enhance the reliability of your PHP applications. These include session clustering, which ensures that session data is always available, even if a server fails, and job queue, which allows you to schedule and execute tasks in the background, improving the responsiveness of your applications.
What is the job queue in Zend Server 7?
The job queue in Zend Server 7 is a feature that allows you to schedule and execute tasks in the background, without affecting the responsiveness of your applications. You can use it to perform tasks like sending emails, generating reports, and processing large amounts of data.
Can I integrate Zend Server 7 with my existing development tools?
Yes, Zend Server 7 can be easily integrated with a wide range of development tools, including popular IDEs like Zend Studio and PhpStorm. It also offers APIs that allow you to integrate it with your existing development and operations workflows.