

In this article, we are going to look at how we can create a Drupal module which will allow your users to like your posts. The implementation will use jQuery to make AJAX calls and save this data asynchronously.

Key Takeaways
- The article provides a detailed guide on how to create a “liking” module in Drupal, which allows users to like posts. The module uses jQuery to make AJAX calls and save data asynchronously.
- The module creation process involves setting up a new Drupal module, defining a table schema to store likes for each post and user, creating a menu callback to handle likes, displaying the like button on each post, and adding jQuery logic to update the user interface.
- The module uses AJAX to send requests to a callback menu function, which updates the like count and returns the new total count and like status. The returned data is then used to update the user interface.
- The article also answers frequently asked questions about integrating social media platforms with Drupal, the purpose of the Social Auth module, creating a social hub, the Open Social module, creating a social course, adding a liking feature, customizing the appearance of social media buttons, and using the Social Auth module with multiple social media platforms.
Creating your Drupal like module
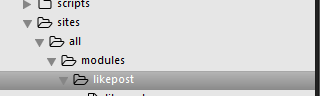
Let’s start by creating the new Drupal module. To do that we should first create a folder called likepost in the sites\all\modules\custom directory of your Drupal installation as shown below:
Inside this folder, you should create a file called likepost.info with the following contents:
name = likepost

description = This module allows the user to like posts in Drupal.

core = 7.x
This file is responsible for providing metadata about your module. This allows Drupal to detect and load its contents.
Next, you should create a file called as likepost.module in the same directory. After creating the file, add the following code to it:
/**
* @file
* This is the main module file.
*/
/**
* Implements hook_help().
*/
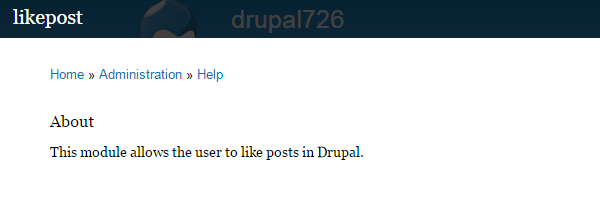
function likepost_help($path, $arg) {
if ($path == 'admin/help#likepost') {
$output = '<h3>' . t('About') . '</h3>';
$output .= '<p>' . t('This module allows the user to like posts in Drupal.') . '</p>';
return $output;
}
}
Once you have completed this you can go to the modules section in your Drupal administration and should be able to see the new module. Do not enable the module yet, as we will do so after adding some more functionality.
Creating the schema
Once you have created the module file, you can create a likepost.install file inside the module root folder. Inside, you will define a table schema which is needed to store the likes on each post for each user. Add the following code to the file:
<?php
/**

* Implements hook_schema().

*/

function likepost_schema() {

    $schema['likepost_table_for_likes'] = array(

        'description' => t('Add the likes of the user for a post.'),

        'fields' => array(

            'userid' => array(

                'type' => 'int',

                'not null' => TRUE,

                'default' => 0,

                'description' => t('The user id.'),

            ),
            'nodeid' => array(

                'type' => 'int',

                'unsigned' => TRUE,

                'not null' => TRUE,

                'default' => 0,

                'description' => t('The id of the node.'),

                ),
        ),
        'primary key' => array('userid', 'nodeid'),

    );

    return $schema;

}
In the above code we are are implementing the hook_schema(), in order to define the schema for our table. The tables which are defined within this hook are created during the installation of the module and are removed during the uninstallation.
We defined a table called likepost_table_for_likes with two fields: userid and nodeid. They are both integers and will store one entry per userid – nodeid combination when the user likes a post.
Once you have added this file, you can install the module. If everything has gone correctly, your module should be enabled without any errors and the table likepost_table_for_likes should be created in your database. You should also see the help link enabled in the module list next to your likepost module. If you click on that you should be able to see the help message you defined in the hook_help() implementation.
Creating a menu callback to handle likes
Once we have enabled the module, we can add a menu callback which will handle the AJAX request to add or delete the like. To do that, add the following code to your likepost.module file
/**

* Implements hook_menu().

*/

function likepost_menu() {

    $items['likepost/like/%'] = array(

        'title' => 'Like',

        'page callback' => 'likepost_like',

        'page arguments' => array(2),

        'access arguments' => array('access content'),

        'type' => MENU_SUGGESTED_ITEM,

    );

    return $items;

}
function likepost_like($nodeid) {

    $nodeid = (int)$nodeid;

    global $user;
    $like = likepost_get_like($nodeid, $user->uid);
    if ($like !== 0) {

        db_delete('likepost_table_for_likes')

        ->condition('userid', $user->uid)

        ->condition('nodeid', $nodeid)

        ->execute();

        //Update the like value , which will be sent as response

        $like = 0;

    } else {

        db_insert('likepost_table_for_likes')

        ->fields(array(

        'userid' => $user->uid,

        'nodeid' => $nodeid

        ))

        ->execute();

        //Update the like value , which will be sent as response

        $like = 1;

    }
    $total_count = likepost_get_total_like($nodeid);

    drupal_json_output(array(

        'like_status' => $like,

        'total_count' => $total_count

        )

    );
}
/**

* Return the total like count for a node.

*/

function likepost_get_total_like($nid) {

    $total_count = db_query('SELECT count(*) from {likepost_table_for_likes} where nodeid = :nodeid',

    array(':nodeid' => $nid))->fetchField();

    return (int)$total_count;

}
/**

* Return whether the current user has liked the node.

*/

function likepost_get_like($nodeid, $userid) {

    $like = db_query('SELECT count(*) FROM {likepost_table_for_likes} WHERE

    nodeid = :nodeid AND userid = :userid', array(':nodeid' => $nodeid, ':userid' => $userid))->fetchField();

    return (int)$like;

}
In the above code, we are implementing hook_menu() so that whenever the path likepost/like is accessed with the node ID, it will call the function likepost_like().
Inside of likepost_like() we get the node ID and the logged in user’s ID and pass them to the function likepost_get_like(). In the function likepost_get_like() we check our table likepost_table_for_likes to see if this user has already liked this post. In case he has, we will delete that like, otherwise we will insert an entry. Once that is done, we call likepost_get_total_like() with the node ID as a parameter, which calculates the total number of likes from all users on this post. These values are then returned as JSON using the drupal_json_output() API function.
This menu callback will be called from our JQuery AJAX call and will update the UI with the JSON it receives.
Displaying the Like button on the node
Once we have created the callback, we need to show the like link on each of the posts. We can do so by implementing hook_node_view() as below:
/**

 * Implementation of hook_node_view

 */

function likepost_node_view($node, $view_mode) {

    if ($view_mode == 'full'){

        $node->content['likepost_display'] =  array('#markup' => display_like_post_details($node->nid),'#weight' => 100);
        $node->content['#attached']['js'][] = array('data' => drupal_get_path('module', 'likepost') .'/likepost.js');

        $node->content['#attached']['css'][] = array('data' => drupal_get_path('module', 'likepost') .'/likepost.css');

    }
}
/**

* Displays the Like post details.

*/

function display_like_post_details($nid) {
    global $user;

    $totalLike =  likepost_get_total_like($nid);

    $hasCurrentUserLiked = likepost_get_like($nid , $user->uid);
    return theme('like_post',array('nid' =>$nid, 'totalLike' =>$totalLike, 'hasCurrentUserLiked' => $hasCurrentUserLiked));
}

/**

* Implements hook_theme().

*/

function likepost_theme() {

    $themes = array (

        'like_post' => array(

            'arguments' => array('nid','totalLike','hasCurrentUserLiked'),

        ),

    );

    return $themes;

}
function theme_like_post($arguments) {

    $nid = $arguments['nid'];

    $totalLike = $arguments['totalLike'];

    $hasCurrentUserLiked = $arguments['hasCurrentUserLiked'];

    global $base_url;

    $output = '<div class="likepost">';

    $output .= 'Total number of likes on the post are ';

    $output .= '<div class="total_count">'.$totalLike.'</div>';
    if($hasCurrentUserLiked == 0) {

        $linkText = 'Like';

    } else {

        $linkText = 'Delete Like';

    }
    $output .= l($linkText, $base_url.'/likepost/like/'.$nid, array('attributes' => array('class' => 'like-link')));
    $output .= '</div>';

    return $output;
}
Inside likepost_node_view() we check for when the node is in the full view mode and we add the markup returned by the function display_like_post_details(). We also attached our custom JS and CSS file when the view is rendered using the attached property on the node content. In function display_like_post_details() we get the total number of likes for the post and whether or not the current user has liked the post. Then we call the theme function which will call the function theme_like_post() which we have declared in the implementation of ‘hook_theme’ but will allow the designers to override if required. In theme_like_post(), we create the HTML output accordingly. The href on the link is the $base_url and the path to our callback appended to it. The node ID is also attached to the URL which will be passed as a parameter to the callback.
Once this is done, add a file likepost.css to the module root folder with the following contents:
.likepost {

    border-style: dotted;

    border-color: #98bf21;

    padding: 10px;

}
.total_count {

    font-weight: bold;

}
.like-link {

    color:red;

}
.like-link:hover {

    color: red;

}
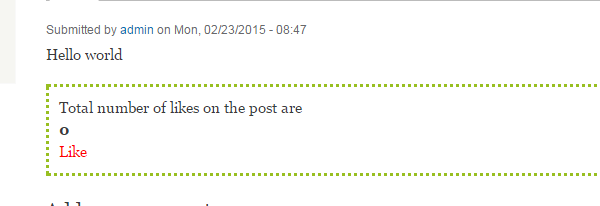
Now if you go to the complete page of a post you will see the Like post count as shown below.
Adding the jQuery logic
Now that we see the like link displayed, we will just have to create the likepost.js file with the following contents:
jQuery(document).ready(function () {
    jQuery('a.like-link').click(function () {

        jQuery.ajax({

            type: 'POST',

            url: this.href,

            dataType: 'json',

            success: function (data) {

                if(data.like_status == 0) {

                    jQuery('a.like-link').html('Like');

                }

                else {

                    jQuery('a.like-link').html('Delete Like');

                }
                jQuery('.total_count').html(data.total_count);

            },

            data: 'js=1'

        });
        return false;

    });

});
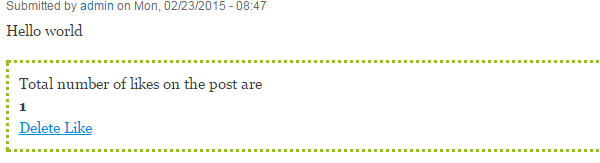
The above code binds the click event to the like link and makes an AJAX request to the URL of our callback menu function. The latter will update the like post count accordingly and then return the new total count and like status, which is used in the success function of the AJAX call to update the UI.
Conclusion
jQuery and AJAX are powerful tools to create dynamic and responsive websites. You can easily use them in your Drupal modules to add functionality to your Drupal site, since Drupal already leverages jQuery for its interface.
Have feedback? Let us know in the comments!
Frequently Asked Questions about Building a Liking Module in Drupal
How can I integrate social media platforms with my Drupal website?
Integrating social media platforms with your Drupal website can be achieved by using the Social Media module. This module provides an API for managing social media platforms and integrating them into your website. It allows you to add, edit, and delete social media platforms, as well as manage the content that is shared on these platforms. You can also customize the appearance of your social media buttons and choose where they appear on your website.
What is the purpose of the Social Auth module in Drupal?
The Social Auth module in Drupal is designed to allow users to register and login to your website using their social media accounts. This can greatly simplify the registration and login process for your users, as they won’t need to remember another username and password. The module supports a wide range of social media platforms, including Facebook, Twitter, Google, and LinkedIn.
How can I create a social hub on my Drupal website?
Creating a social hub on your Drupal website can be achieved by using the Social Hub module. This module allows you to aggregate content from various social media platforms and display it in a single location on your website. You can customize the appearance of your social hub and choose which social media platforms to include.
What is the Open Social module in Drupal?
The Open Social module in Drupal is a distribution that allows you to create your own social network on your Drupal website. It includes features such as user profiles, groups, activity streams, and notifications. It’s a great way to foster community and engagement on your website.
How can I create a social course on my Drupal website?
Creating a social course on your Drupal website can be achieved by using the Social Course module. This module allows you to create and manage online courses on your website. You can create course content, manage enrolments, track progress, and award certificates. It’s a great way to provide educational content to your users and foster engagement on your website.
How can I add a liking feature to my Drupal website?
Adding a liking feature to your Drupal website can be achieved by using the Liking module. This module allows users to like content on your website, similar to how they would on social media platforms. It’s a great way to foster engagement and interaction on your website.
Can I customize the appearance of the social media buttons on my Drupal website?
Yes, you can customize the appearance of the social media buttons on your Drupal website. This can be achieved by using the Social Media module, which allows you to choose the size, shape, and color of your social media buttons. You can also choose where the buttons appear on your website.
Can I use the Social Auth module with multiple social media platforms?
Yes, the Social Auth module supports a wide range of social media platforms, including Facebook, Twitter, Google, and LinkedIn. You can choose which platforms to enable for your users.
Can I moderate the content that is displayed in my social hub?
Yes, the Social Hub module allows you to moderate the content that is displayed in your social hub. You can choose which social media platforms to include, and you can filter the content based on keywords, hashtags, or user accounts.
Can I track the progress of users in my social course?
Yes, the Social Course module allows you to track the progress of users in your social course. You can see which lessons they have completed, how much time they have spent on the course, and their scores on any quizzes or assessments.

