

Key Takeaways
- Git offers two powerful tools for debugging code: Git blame and Git bisect. Git blame helps identify who made a specific change in the code and when, while Git bisect helps find the commit that introduced a bug using a binary search algorithm.
- Git blame is most effective when you know which file contains the problematic code. By running ‘git blame filename’, you can see who last modified each line of the file and when. To understand more about the commit that introduced the bug, you can use ‘git show commit_id’.
- Git bisect is useful when you’re unsure what is causing the error and there are numerous commits to check. It performs a binary search between a known good commit and a known bad commit, narrowing down the range until it finds the exact commit that introduced the bug. This process can be automated using a unit test that identifies the bug and a test script.
When you are working with a huge code base, you may discover bugs in your code (or worse, in someone else’s code) that prevent you from proceeding any further in your development. You can checkout to an old commit to see if the bug was present there — but this is often the worst way of doing so. Imagine you have a hundred commits to check — how much time would be wasted?
Thankfully, Git has two tools that help you with debugging. We will have a look at both and try to understand their use cases. Let us start by intentionally introducing a bug into our code:
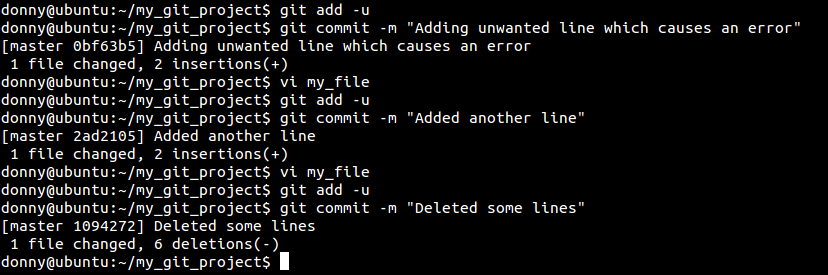
I’ve added a line to the file my_file that is unwanted and assumed to cause the error. I also add a few commits after that to bury the faulty commit. Let us verify that the faulty line has been added to the file by running the following:
cat my_file
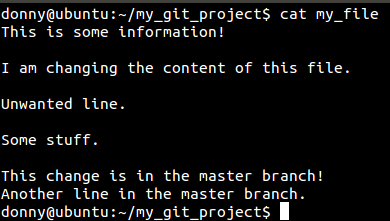
Notice the “Unwanted line” that is supposedly causing the error.
Debugging with Blame
Once you have discovered a bug, you may or may not know the location of the faulty code. Let’s say that you do. In our case, let’s say that you know my_file is causing the trouble. In that case, we can run the following command to get more information about the lines in the files, and the commits those lines belong to.
git blame my_file
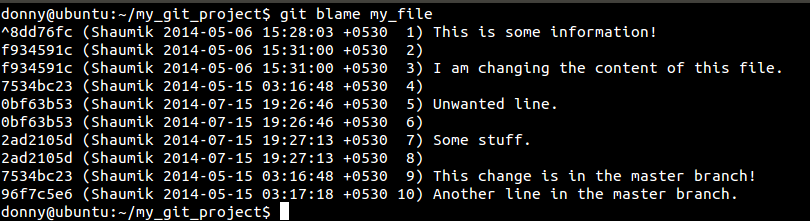
If you look at the output of git blame, you can see that commit 0bf63b53 is what introduced the bug (“Unwanted line”). If you want to check what else was changed in that commit, or want more information about the same, you can run the following:
git show 0bf63b53
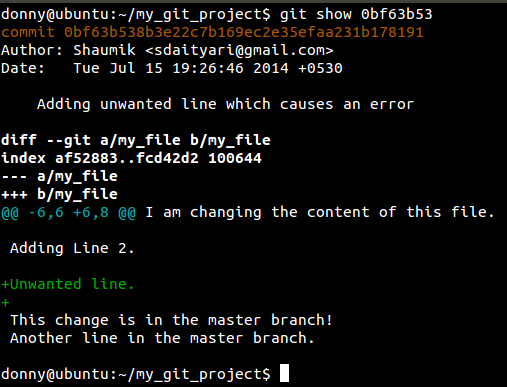
There you go — we now know which commit caused the error and what else was changed in that commit. We can proceed to fixing the error.
Debugging with Bisect
git blame helps you when you have some idea about what is causing the problem. What if you had no idea what is causing the error and there are hundreds of commits before you can go back to a working state? This is where git bisect comes into play.
I will mention it once again — git bisect for a trivial situation like our case is overkill. However, I am going through the process for demonstration purposes only.
Imagine git bisect as a wizard that takes you through your commits to find out which commit brought in the error. It performs a binary search to look through the commits, before arriving at the one that introduced the bug.
To start off, we need to select a “good” commit, where the bug is not present. We then need to select a “bad” commit where the bug was present (ideally the latest commit that contains the bug, so you can assign it as “bad”). Git then walks you through recent commits and asks you whether they are “good” or “bad”, until it finds the culprit. It’s essentially a binary search algorithm over the array of commits to find which commit was the first “bad” commit.
A very important thing to note here is that you should be searching for a single bug in this process. If you have multiple bugs, you need to perform a binary search for each of the bugs.
Working with the same bug in the case of git blame, we will assume that we don’t know what file has the error. To check if an error is present in a certain commit, we will run cat my_file to see if the contents of the file contain the unwanted line.
Start the git bisect Wizard
We will run the following command to tell Git that we are going into binary search mode to find a bug:
git bisect start
Select a Good Commit
After we start the wizard, we need to inform Git about the commit where everything was working. Let’s examine the commit history to find the commit we want.
git log --oneline
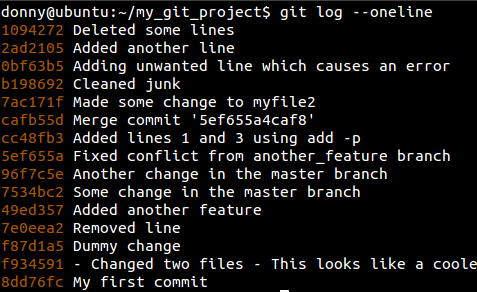
We go with 8dd76fc, which is the oldest one:
git bisect good 8dd76fc
Select a Bad Commit
After we have assigned the “good” tag to a good commit, we need to find a bad commit so that Git can search in between those two and tell us where the bug was introduced. Since we know that the latest commit (1094272) has the error, we go with that one:
git bisect bad 1094272
Assign Commits as “Good” or “Bad”
Once we have assigned our good and bad commits (which serve as the initial and final pointers for our search) Git walks us through the commits and asks us whether each commit contains the bug.

Notice in the screen shot that 7 revisions would be covered in roughly 3 steps. The number of steps grows logarithmically. Since 22 < 7 < 23, we need three steps. If there were a hundred revisions, we would need roughly 7 steps and if there were a thousand revisions, we would need about 10 steps.
Now we are presented with commit cc48fb and we need to ascertain if it’s a good or a bad commit. In our case, we check the contents of the file and see if the unwanted line is present:
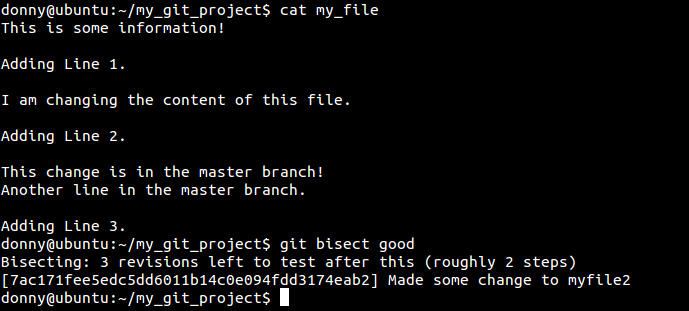
Since the line is not present, we designate it as a good commit.
git bisect good
We continue this process for the next few steps until git bisect finds the first bad commit:

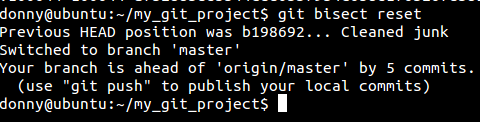
After we are done with the commit, we need to come out of the Git binary search mode:
git bisect reset
You may want to have a look at this nice screencast on Git Bisect, which takes you through the process that I have discussed.
Automating the Process
We have gone through the process of debugging in Git interactively. If you are familiar with unit testing, you could write a unit test that identifies the bug. In case you want to run the tests automatically, you need to provide Git the test script that you have written.
git bisect start

git bisect run [location_to_script_file]
Replace location_to_script_file with the actual location of the script file, removing the square brackets.
Here’s a tutorial on how to mechanize the process of debugging in Git in PHP.
Conclusion
We took an overly simplified case to explain a very powerful concept. If you know what file has the bad code, you should proceed with git blame without a second thought. However, if you have no idea what is causing the error, and your repository is considerably large, with an enormous history, git bisect is definitely the way to go.
How do you debug your code? Do you like binary search in Git? Do you have a better way of doing the same thing? Let us know in the comments below.
Frequently Asked Questions (FAQs) about Debugging with Git
What is the main purpose of Git blame and Git bisect?
Git blame and Git bisect are powerful tools used in debugging code. Git blame is used to determine who made a particular change in the code and when it was made. This is useful when you’re trying to understand why a particular line of code exists or when it was introduced. On the other hand, Git bisect is used to find the commit that introduced a bug by using a binary search algorithm. It automates the process of finding the commit that introduced a bug, saving you time and effort.
How can I use Git blame effectively?
To use Git blame effectively, you need to understand its basic usage and options. The basic usage is ‘git blame filename’. This will show you who last modified each line of the file and when. You can also use options like ‘-L’ to limit the output to a specific range of lines, and ‘-e’ to show the email address of the person who made the change. Remember, the goal of using Git blame is not to assign blame, but to understand the history of the code.
How does Git bisect work?
Git bisect works by performing a binary search between a known good commit and a known bad commit. You start by telling Git bisect the bad commit (usually the current commit) and a good commit where the bug did not exist. Git bisect will then checkout a commit in the middle of that range. You test that commit, tell Git bisect whether it’s good or bad, and Git bisect will continue narrowing down the range until it finds the exact commit that introduced the bug.
Can I use Git blame and Git bisect together?
Yes, you can use Git blame and Git bisect together to debug code. You can start with Git blame to find out when a problematic line of code was introduced. If you need to find out exactly which commit introduced a bug, you can then use Git bisect. Using these tools together can give you a comprehensive view of the history of your code and help you find and fix bugs more efficiently.
What are some common problems when using Git blame and Git bisect, and how can I solve them?
One common problem when using Git blame is that it can be difficult to understand the output if there have been many changes to the file. In this case, you can use the ‘-L’ option to limit the output to a specific range of lines. Another common problem is that Git bisect can sometimes give you a commit that doesn’t seem to be related to the bug. This can happen if there are multiple bugs, or if the bug was introduced in one commit and then modified in another. In this case, you can use ‘git bisect visualize’ to see a graphical representation of the bisect process and better understand what’s happening.