
Key Takeaways
- NW.js is a framework that allows developers to create native applications using web technologies such as HTML, JavaScript, and CSS, resulting in hybrid apps which offer essential advantages over normal web apps.
- Compared to Electron, another framework for hybrid apps, NW.js has several advantages including support for chrome.* APIs, Chrome apps, NaCl and PNaCl applications, V8 snapshot source code protection, a built-in PDF viewer, print previews, and Node.js integration in Web Workers.
- The process of creating a hybrid application with NW.js involves setting up a project structure, creating a manifest file, and creating a main view. An example application built using these instructions can be found on GitHub.
- NW.js can be installed for development and production using the packages ‘nw’ and ‘nw-builder’ respectively. Packaging and distribution can be eased by adding npm scripts to the package.json file.
- Testing and debugging of NW.js applications can be done manually since NW.js is based on Chromium. Automated unit tests can be implemented using a NW.js launcher plugin for Karma, such as karma-nodewebkit-launcher.
This article was peer reviewed by Tim Severien and Joan Yin. Thanks to all of SitePoint’s peer reviewers for making SitePoint content the best it can be!

NW.js is a framework for creating native applications using web technologies like HTML, JavaScript and CSS. In the simplest case, you’re developing a web application using your normal workflow. At the end of the process, you run a generator that compiles everything to a native application that then just displays your web application like a browser does. These applications are called “hybrid apps”.
Hybrid apps aren’t just great because they’re written in languages you’re already familiar with (HTML, JavaScript and CSS), but also because they offer essential advantages over normal web apps:
- Control over browser and browser version (you know which browser your application is called by). NW.js hybrid apps are displayed using Chromium — an open-source browser running behind Google Chrome. Therefore, apps that are working in Chrome should also work with NW.js.
- Control over viewports. You could, for example, define a fixed or minimum/maximum viewport.
- No same-origin policy restrictions due to local files. If you open a local file from the file system, the browser blocks XMLHttpRequest requests of files that aren’t located within the same directory. This behavior can be disabled in NW.js apps.
They also offer custom APIs that bring the following advantages:
- Node.js integration
- clipboard access
- access to the file system
- hardware access (e.g. to get a list of printers)
- tray icons
- custom file chooser dialogs
- shell integration (open files or URLs in default file explorer or browser)
- the option to customize the entire window (close buttons, menu bar) and context menus
- the ability set and get zoom level.
Sounds great? Then let’s get started. In this article, we’ll become familiar with NW.js in practice and learn how to create a hybrid application. An example application that was built using the instructions from this article can be found on GitHub.
Advantages of NW.js in Comparison to Electron
First, there’s one thing to mention: NW.js isn’t the only framework for hybrid apps. There’s another competitor called Electron. It started in 2013, two years after NW.js, but because it’s from GitHub it quickly became well known. Now you might be interested in the differences between them. Here are the advantages of NW.js compared to Electron:
- Supports
chrome.*APIs. These APIs can be used to interact with the browser. (You can find more information about this in the NW.js docs.) - Has Chrome apps support. Chrome apps are packaged applications that are written with web languages. (More info in the Chrome developer docs.) These applications are different from NW.js, because they have no Node.js integration and are published using the Chrome Web Store. (Chromium will remove its support until August, 2018 (see their blog post). But according to this post NW.js will still support Chrome apps.)
- Supports NaCl (Native Client) and PNaCl (Portable Native Client) applications. They focus on performance and are therefore primarily written in C and C++. (See this tutorial about how to use them in NW.js.)
- Has a V8 snapshot source code protection, used to secure your application’s source code. Using the
nwjctool, your code will be compiled to native code. (See this article for more information.) - Has a built-in PDF viewer.
- Allows print previews.
- Supports Node.js integration in Web Workers. They are used to write multi-threaded applications.
However, Electron also has some advantages worth mentioning:
- Built-in auto-updater (you can follow this issue about an auto-updater for NW.js).
- Automatic crash reporting to a remote server. NW.js only writes a local file that can then be submitted manually.
There’s also a fundamental difference. NW.js applications specify their entry point in the form of an HTML file. This HTML file will be opened in the GUI directly.
Electron applications, on the other hand, specify a JavaScript file as their entry point. This JavaScript file is opened in a separate main process, and can then open an HTML file in the GUI. This means that you could theoretically run Electron apps without a GUI. Also, closing the GUI won’t close the main process; you’ll need to terminate it manually by calling an API method.
While Electron opens the door for desktop applications written with JavaScript and without a GUI, NW.js applications are probably easier to set up, in case you just want to display an HTML-based application.
Note: If you really prefer the advantages of Electron, check out SitePoint’s recent article on creating desktop apps with Electron.
Creating a Demo Application
Let’s start creating our application that we’ll later compile to a native application. Because there are many ways to set up a web application — with various JS languages (TypeScript, CoffeeScript, etc.), module loaders (RequireJS, webpack, SystemJS, etc.), frameworks (AngularJS, React, Vue.js, etc.) and preprocessors (SCSS, LESS, Haml, etc.) — and everyone has their own favorites, we just use the basic technologies HTML, CSS and JS (ES6 standard).
There’s no boilerplate (starter project) for NW.js that’s open for any setup. All of them are built for a specific framework, module loader or preprocessor. Therefore, we implement a simple NW.js application from scratch ourself. It’ll be easy to understand, and you can later easily customize it to your needs, or switch to a boilerplate.
Project Structure
First, we need to create our project structure and files:
nw.js-example/
├── src/
│   ├── app/
│   │  └── main.js
│   ├── assets/
│   │  └── icon.png
│   ├── styles/
│   │  └── common.css
│   ├── views/
│   │  └── main.html
│   └── package.json
└── package.json
Explanation:
src/contains the source files of our application.src/app/contains our JavaScript files.src/assets/contains images. In our example, only the fileicon.png— which will be shown as a window icon in the window — should be square.src/styles/normally contains SCSS or LESS files — in our example, just a simple CSS file.src/views/contains HTML view files.src/package.jsonis the manifest file for NW.js applications (see the manifest format). We also specify dependencies for our application here.package.jsonis an npm package file that we need for our build workflow, and to specify dependencies that aren’t necessary in the actual NW.js application (e.g. build dependencies).
Creating the Manifest
Now that we’ve created the project structure and files, we can start with the NW.js manifest file src/package.json. According to the documentation, the file basically requires just two properties, name, the application name, and main, a path to an HTML file that’s used as an entry point. But we add further information such as the path to the icon of the window, as well as a min width and height to make sure users don’t see any unexpected things:
{
  "name":"nw.js-example",
  "main":"views/main.html",
  "window":{
    "min_width":400,
    "min_height":400,
    "icon":"assets/icon.png"
  }
}
That’s it! The application will later open src/views/main.html at the start, since the main path is relative to the manifest file.
Creating the Main View
We could, at this point, program a to-do app. But we want to focus on NW.js and its features. For this reason, I prefer to let you decide the functionality of our app. I’ve created an example project NW.js-examples on GitHub to demonstrate several NW.js features, such as Node.js integration and clipboard access. Please feel free to use it in your application to play around. But you can also use something else.
For whatever you decide, you must at least create the src/views/main.html file, since it’s our application entry point. It can look like something like this:
<!doctype html>
<html>
<head>
    <meta charset="utf-8">
    <title>NW.js-example | main</title>
    <link rel="stylesheet" href="../styles/common.css">
</head>
<body>
    <h1>Hello World :-)</h1>
    <script src="../app/main.js"></script>
</body>
</html>
In a real application, you’d probably have several other view files and load them with Ajax.
For the sake of simplicity, you can also create native hyperlinks and reference the other HTML files. For example:
<a href="something.html">Something</a>
Then, create the something.html file within src/views/. Here’s how I did this in my example project.
Installing NW.js
We’ve now created our NW.js project, including the manifest and a main view. We finally need a method to run NW.js in development directly on our development machine and implement a build process that generates native applications for several operating systems.
For this, we need the following two packages:
- nw (development)
- nw-builder (production)
Since they aren’t related to our actual app (they’re just for development purposes and the production build), we create them as devDependencies in our second package.json in the root folder beside the required name and version fields:
{
  "name":"nw.js-example",
  "version":"1.0.0",
  "devDependencies":{
    "nw":"^0.18.2",
    "nw-builder":"^3.1.2"
  }
}
Now we just need to run the following in the root folder of the project to install the devDependencies:
$ npm install
Done! Let’s build.
Packaging and Distribution
To ease packaging, we add npm scripts to our package.json file. They allow us to run CLI commands, defined on the right side with a shortcut on the left side using npm run. We add two scripts, one for development and production:
{
"name":"nw.js-example",
"version":"1.0.0",
"devDependencies":{
"nw":"^0.18.2",
"nw-builder":"^3.1.2"
},
"scripts":{
"dev":"nw src/",
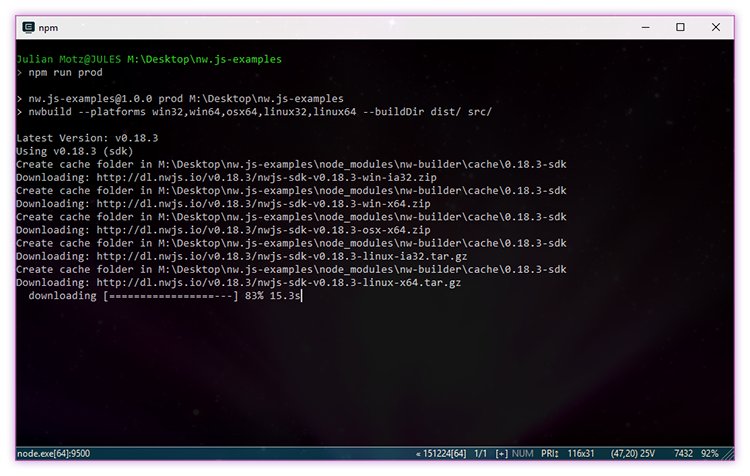
"prod":"nwbuild --platforms win32,win64,osx64,linux32,linux64 --buildDir dist/ src/"
}
}
Running NW.js directly
To start the NW.js application directly, simply run:
$ npm run dev
This shortcut will call the command we’ve defined in scripts under dev, using the nw package. A new window should be opened directly on your development machine showing src/views/main.html.
Production build
The production build will use nw-builder, which supports outputs for Windows, Linux and macOS. In our example, we build a package for all these platforms, in both 32 and 64 bit versions. For macOS, it’s currently only possible to build 32 bit in legacy mode. (See this issue on GitHub.) Therefore, build 64 bit only.
To run our production build, simply run:
$ npm run prod
Like running NW.js directly, this will use our CLI command defined in scripts.
It will take a while …
Once it’s finished, have a look at your dist/ folder. It should look like:
dist/
└── nw.js-example/
    ├── linux32/
    ├── linux64/
    ├── osx64/
    ├── win32/
    └── win64/
Fantastic, we’re almost finished!
Testing and Debugging
Manual
Since NW.js is based on Chromium, manually testing is as simple as in Chrome. When you encounter a bug — visual or functional — you can open the Developer Tools with keyboard shortcut F12 or programmatically using:
nw.Window.get().showDevTools();
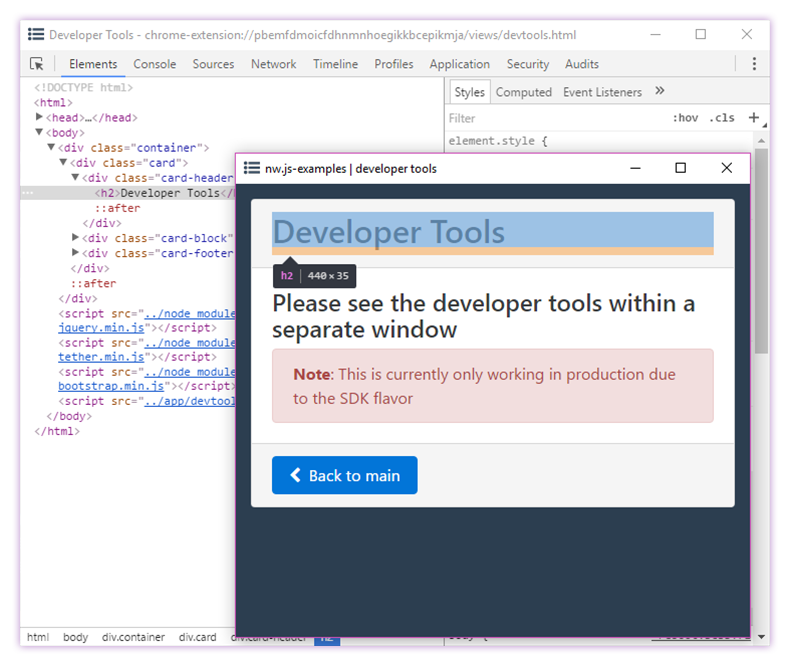
Note that this requires the SDK build flavor. If you want to disable the Developer Tools in production, you can build NW.js with a different flavor or suppress the F12 event.
Automated
Automated unit tests are (fortunately) widely used to ensure that things work in various implementations without constant manual testing.

If your application doesn’t use NW.js-specific API methods, you could theoretically remain at your usual web application workflow — for example, using Karma as a spec runner in combination with Jasmine as a testing framework.
But if you’re using a NW.js-specific API method, you need to run your tests in a NW.js application to make sure the API methods are defined. One way would be to use a NW.js launcher plugin for Karma, such as karma-nodewebkit-launcher. It works like with any other browser launcher plugin for Karma: it opens the application within the NW.js container to perform checks, and then closes it automatically.
However, since NW.js isn’t headless (in contrast to something like PhantomJS), it always requires a physical display. This means that running the tests on a pure CLI server isn’t possible. Luckily, you can use Xvfb in these cases to simulate a display. This works on Travis CI, for example. For Jenkins, you need to install the Xvfb plugin. Follow this issue on GitHub for more information.
Conclusion
Hopefully this article has given you an insight into the advantages and use cases of NW.js. There are so many reasons why using a hybrid app is better than something like distributing a .zip folder with HTML files that then run from the file system. NW.js may also be used as a replacement for your native applications, since you don’t need to concentrate on complex GUIs, and you have many built-in features, such as a video player. Since you can detect the environment, it’s also possible to develop an application that runs on both a normal web server and on the client machine using NW.js. And with a few tricks, and thanks to a powerful Chromium engine, users will hardly feel the difference to a native application.
When creating a new NW.js project, first determine the frameworks, module loaders and preprocessors you want to use — depending on what you’re familiar with — or just start from scratch. With these decisions made, you can find a NW.js boilerplate that fits to your needs. If there’s no boilerplate that suits, you may use an application based on this tutorial as a basis.
What are your preferred boilerplates, or what are your preferred technologies for developing NW.js applications? Did it work to have NW.js examples in this article instead of a to-do app implementation? Let me know in the comments.
Frequently Asked Questions (FAQs) about Cross-Platform Desktop App with NW.js
What are the key differences between NW.js and other cross-platform desktop app frameworks?
NW.js is a powerful tool for developing cross-platform desktop applications. Unlike other frameworks, NW.js allows developers to write in HTML, CSS, and JavaScript, languages typically used for web development. This makes it easier for web developers to transition into desktop application development. Additionally, NW.js has a unique feature that allows direct access to Node.js APIs in the DOM, enabling more complex and powerful functionalities.
How can I get started with NW.js?
To get started with NW.js, you first need to download and install it from the official website. Once installed, you can create a new project directory, add your HTML, CSS, and JavaScript files, and then run your application using the NW.js executable. The NW.js documentation provides a detailed guide on how to get started.
Can I use NW.js for commercial projects?
Yes, you can use NW.js for commercial projects. NW.js is open-source and free to use, making it a cost-effective solution for developing cross-platform desktop applications. However, it’s important to note that any third-party modules used may have their own licensing requirements.
How can I package and distribute my NW.js application?
Packaging and distributing an NW.js application involves creating a standalone executable that can be run on the target platform. This can be done using tools like nw-builder or webpack. Once packaged, the application can be distributed through various channels, such as direct downloads or app stores.
What platforms does NW.js support?
NW.js supports a wide range of platforms. It can be used to develop applications for Windows, Mac, and Linux. This cross-platform support is one of the key advantages of using NW.js, as it allows developers to write code once and run it on multiple platforms.
How can I debug my NW.js application?
Debugging an NW.js application is similar to debugging a web application. You can use the Chrome Developer Tools that come bundled with NW.js for debugging. These tools provide a wide range of features for inspecting and debugging your code.
Can I use Node.js modules in my NW.js application?
Yes, one of the key features of NW.js is its ability to use Node.js modules directly in the DOM. This allows for more complex and powerful functionalities in your application. You can use any of the thousands of modules available on npm in your NW.js application.
How can I update my NW.js application?
Updating an NW.js application involves replacing the old version of the application with the new version. This can be done manually by the user, or you can implement an auto-update feature in your application using modules like nw-updater.
Can I access native APIs with NW.js?
Yes, NW.js allows direct access to native APIs through Node.js. This means you can use native features like the file system, network, devices, and more in your application. This is a key advantage of NW.js over traditional web technologies.
How can I optimize the performance of my NW.js application?
Optimizing the performance of an NW.js application involves various techniques, such as minimizing and concatenating your JavaScript files, optimizing your images, and using efficient algorithms and data structures. Additionally, you can use tools like Chrome Developer Tools to profile and debug performance issues.