
Key Takeaways
- The article describes how to build a client part for a battery visualization service using Node.js, which updates the battery status at regular intervals without reloading the page. The client can pause or resume updates to avoid overloading the system when the information isn’t needed.
- Reactive design and declarative frameworks are used to automatically and efficiently update the Document Object Model (DOM) in response to changes in data. This is achieved using Ractive.js, a library that binds data to DOM elements and updates the DOM every time the data changes.
- The author demonstrates how to use Ractive.js to create a battery visualization, including setting up a mechanism to pause/resume updates, and asynchronously retrieving data from a REST service.
- The article concludes with a call to further explore the tools and concepts discussed, such as setting up an HTTP server using Node.js, RESTful APIs, running OS terminal commands on a Node.js server, and the basics of declarative frameworks and Ractive.js.
In the first part of this mini-series, we discussed the details of the service we’re building and what you’ll learn. We then covered why we need a server and why I chose to create a RESTful service. While discussing how to develop the server, I took the chance to discuss how you can identify the current operating system and also how to use Node.js to run commands on it.
In this second and final part of this series, you’ll discover how to build the client part to present the information to the users in a nice way. To achieve this goal, we should update the status of the battery every X minutes (or seconds), without reloading the page. Moreover, we should be able to pause/resume updates, to avoid flooding our system when we don’t need the information, or even when we are not looking at the page. To do that, we will:
- Schedule Ajax calls to our backend service over regular intervals of time;
- Use a declarative framework that updates the DOM automatically and efficiently in response to changes to the data;
- Use some jQuery utility function to make our life easier;
- Use some nice images and CSS to make the dashboard visual appealing (as a bonus!).
Reactive Design
Discussing Ajax and asynchronous calls is certainly out of scope of this article (I’ll provide a few useful links at the end of the post). For our purpose we can even treat them as black boxes that allow us to ask the server for some data, and execute some action once the data are sent back.
Let’s take a minute, instead, to discuss reactive design and declarative frameworks.
An HTML page is by default a static entity. That means that for a pure HTML page the content shown on the page remains the same every time it’s rendered in a browser. However, we know that with the use of JavaScript and maybe some templating libraries like Mustache we can update them dynamically.
There are many libraries that help developers binding data to DOM nodes. Most of them use JavaScript to describe the DOM elements to which the data should be translated, and requires updates to the page to be triggered manually (via JavaScript). So, we end up relying on the application’s logic for deciding when the visualization should be updated and what changes ought to be made in response to data changes.
Declarative frameworks bind the data to DOM elements, and automatically update the DOM, every time the data changes. This binding is also provided using templates in the presentation (the HTML markup) rather than in JavaScript.
The added value of these frameworks can be identified in a few key points:
- They enforce a greater degree of separation between content and presentation. This is achieved by letting you define in the presentation layer binding for data, event handlers and even the views’ structure (like for iterative and composite objects, for example tables);
- They provide an easy way to keep your data model and your presentation in sync;
- They generally do it in an extremely efficient way, making sure to reflow only the minimum possible subset of your DOM tree. On that regard, keep in mind that reflowing and repainting are usually bottlenecks for client-side browser applications.
Ractive.js
For Ractive.js, the library we are going to use, the synchronization between data and DOM is obtained through Container objects. The library creates objects which wrap around the data. These objects have access to the data, so every time you set or get any property, the library can capture your action and internally broadcast it to all the subscribers.
Hands-on
Now that we’ve seen what Ractive.js is useful for, It’s time to add our first Ractive template to our page. To do that you can add a script tag with an ID of your choice anywhere inside the <body>. I suggest you to choose the ID wisely as we’ll need it later. We’ll also need to add a type='text/ractive' attribute:
<script id='meterVizTemplate' type='text/ractive'></script>
type='text/ractive' would actually make no sense to your browser since it’ll ignore the script unless you add Ractive’s script to your page as well:
<script src='http://cdn.ractivejs.org/latest/ractive.js'></script>
Now, inside the Ractive script you can add HTML tags and template variables and conditionals/loops. Ractive.js will take care of evaluating everything inside the {{}} groups.
<script id='meterVizTemplate' type='text/ractive'>

    {{#batteryState}}

      <br>

      <div class='battery-div'>

        <div class='battery-shell'>

          <div class='battery-percent-text'>{{batteryPercent.toFixed(1) + '%'}}</div>

        </div>

        <div class='battery-level'>

          <div class='battery-mask' style="width:{{(100 - batteryPercent) + '%'}};">

          </div>

        </div>

        {{#batteryCharging}}

          <div class='battery-plug' intro-outro='fade:1000'></div>

        {{/batteryCharging}}

        {{#batteryPercent <= batteryRedThreshold}}

          <div class='battery-warning' intro-outro='fade:1000'></div>

        {{/batteryLife}}

      </div>

      <br>

      <br>

        <span class='key'>Battery state:</span> <span class='value {{batteryStateClass(batteryState)}}'>{{batteryState}}</span>

        <br>

        {{#batteryLife}}

          <span class='key'>Time to empty:</span> <span class='value {{batteryLifeClass(batteryPercent)}}'>{{batteryLife}}</span>

        {{/batteryLife}}

    {{/batteryState}}

    {{^batteryState}}

      <br>

      LOADING...

    {{/batteryState}}

</script>
In the example above, you can see:
- Variables:
{{batteryState}} - Conditionals:
{{#batteryState}} - Function invocations:
{{batteryStateClass(batteryState)}}
In order to have these things working, we have to add some binding in JavaScript. To do so, we have to create a new Ractive.js object:
ractive = new Ractive({

    el: 'panels',

    template: '#meterVizTemplate',

    data: {

        // Percentage at which the battery goes to 'red' zone (export for Ractive templates)

        batteryRedThreshold: BATTERY_RED_THRESHOLD,

        // Percentage at which the battery enters 'yellow' zone (export for Ractive templates)

        batteryYellowThreshold: BATTERY_YELLOW_THRESHOLD,

        // The capacity of the battery, in percentage. Initially empty

        batteryPercent: NaN,

        // How much more time can the battery last?

        batteryLife: "",

        // True <=> the update daemon for the battery has been paused

        batteryPaused: false,

        // True <=> the update daemon for the battery has reported an error at its last try

        batteryUpdateError: false,

        // Is the battery connected to power?

        batteryCharging: false,

        batteryStateClass: function (state) {

            return state === 'discharging' ? BATTERY_RED_CLASS : BATTERY_GREEN_CLASS;

        },

        batteryLifeClass: function (percent) {

            return percent <= BATTERY_RED_THRESHOLD ? BATTERY_RED_CLASS : (percent <= BATTERY_YELLOW_THRESHOLD ? BATTERY_YELLOW_CLASS : BATTERY_GREEN_CLASS);

        }

    }

});
The options we pass to the constructor are quite important. Firstly, el needs to match the ID of a DOM element inside which Ractive.js will render the template. In this case, we need to add a div to out HTML page:
<div id='panels'></div>
The point where you insert this tag matters. It will be the parent element for all the elements rendered by Ractive.js templating system. The second important parameter you have to be careful about is template. Its value will have to match the ID of the text/ractive script on your page. Finally, we assign to data an object whose keys are variables names we reference in our template, or functions we call.
With Ractive.js, we can even define custom events to which the library will respond:
ractive.on({

    "battery-pause": function () {

        clearInterval(batteryUpdateTimerId);

        ractive.set('batteryPaused', true);

    },

        "battery-play": function () {

        updateBatteryStatus(); //Checks the status immediately, then starts the daemon

        batteryUpdateTimerId = setInterval(updateBatteryStatus, BATTERY_CHECK_INTERVAL);

        ractive.set('batteryPaused', false);

    }

});
In a few lines, we have set up a mechanism to pause/resume our updates. However, we still need to define the updateBatteryStatus() function.
Asynchronously Retrieving Data
As promised, here it is a function that takes care of retrieving data from our REST service. By using the jQuery Deferred object, we set up a callback to be invoked as soon as some data is received from the server. Since we are also using Ractive.js inside this callback, we won’t have to go through the logic of how we updated the presentation layer. In fact, we just update the value of variables used in the template script, and Ractive.js will take care of everything.
What I’ve just described is implemented by the code reported below:
function updateBatteryStatus() {

    $.getJSON(BATTERY_SERVICE_URL)

        .then(function (battery) {

        ractive.set('batteryUpdateError', false);

        var batteryLife = battery.timeToEmpty,

            batteryState = battery.state;

        ractive.animate('batteryPercent', parseInt(battery.percentage, 10), {

            easing: 'easeOut'

        });

        ractive.set('batteryLife', batteryLife);

        ractive.set('batteryState', batteryState);

        ractive.set('batteryCharging', batteryState !== BATTERY_STATE_DISCHARGING);
    }).fail(function () {

        ractive.set('batteryUpdateError', true);

    });

}
//Start the daemons that will check the battery and networks status...

batteryUpdateTimerId = setInterval(updateBatteryStatus, BATTERY_CHECK_INTERVAL);
Putting It All Together
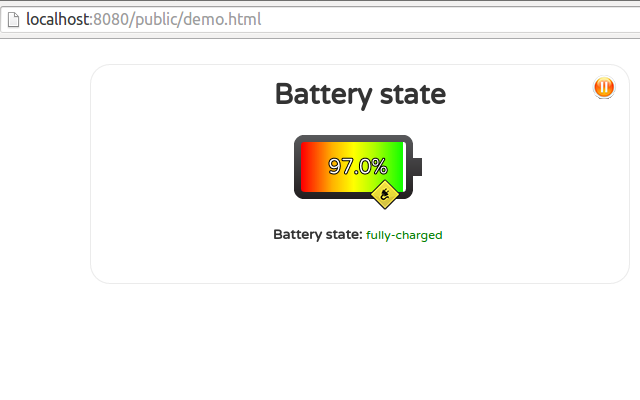
There is, of course, some more wiring to put in place to make all of this work together. We skipped altogether the design of the dashboard UX. That’s ultimately up to you, once you get how to make it work with the templating system! For example, how cool would it be if we could have the charge percentage shown both as text and visually with some cool power indicator, using images and animations? With Ractive.js, it is not so hard! Take a look at the final result:
If you’d like to inspect the code, you can once again find it on GitHub.
Conclusions
Our multi-platform battery dashboard should be ready to go now. But this should be a starting point rather than a final result, and the important points I hope you learned about along the way are:
- How to set up an HTTP server using Node.js
- RESTful APIs
- How to run OS terminal commands on a Node.js server
- Basics of declarative frameworks and Ractive.js in particular
If you want to take it to the next level, my advice is to start experimenting on these tools and dig the Net to deepen knowledge in these areas. If you want to deepen the topics covered in this article, I strongly suggest you to take a look at these good resources:
- Architectural Styles and the Design of Network-based Software Architectures
- Guidelines for creating a RESTful API
- What are the advantages/disadvantages of using REST API over native libraries?
- Template method pattern
- Asynchronous requests in JavaScript
- Crockford on JavaScript – Episode IV: The Metamorphosis of Ajax – great insight, as usual, plus a super funny story on the origins of the term Ajax, as a bonus!
- jQuery
$.getJSONmethod - RactiveJs tutorial
Frequently Asked Questions (FAQs) about Creating a Battery Visualization Using Node.js Client
How can I get the battery status using JavaScript?
To get the battery status using JavaScript, you can use the Battery Status API. This API provides information about the system’s battery charge level and lets you be notified by events that are sent when the battery level or charging status change. Here is a simple example of how to use it:navigator.getBattery().then(function(battery) {
console.log("Battery level: " + battery.level*100 + "%");});
This code will log the current battery level to the console.
What is the Navigator.getBattery method?
The Navigator.getBattery method is a part of the Battery Status API. It returns a promise that resolves to a BatteryManager object, which provides information about the system’s battery charge level and lets you be notified by events that are sent when the battery level or charging status change.
How can I visualize the battery status data?
To visualize the battery status data, you can use any JavaScript charting library, such as Chart.js or D3.js. These libraries allow you to create various types of charts and graphs from your data. You can also use HTML and CSS to create a simple bar or pie chart.
Can I get the battery status on all devices?
The Battery Status API is supported by most modern browsers, but not all. It’s also worth noting that some devices, such as desktop computers, may not provide accurate or any battery status information.
How can I handle battery status changes?
You can handle battery status changes by adding event listeners to the BatteryManager object. The Battery Status API provides several events, such as ‘chargingchange’, ‘levelchange’, ‘chargingtimechange’, and ‘dischargingtimechange’. Here is an example of how to use these events:navigator.getBattery().then(function(battery) {
battery.addEventListener('levelchange', function() {
console.log("Battery level: " + battery.level*100 + "%");
});});
This code will log the new battery level to the console whenever the battery level changes.
How can I use Node.js to get the battery status?
Node.js does not have a built-in way to get the battery status. However, you can use a child process to execute a system command that gets the battery status, and then parse the output. The specific command depends on your operating system.
Can I get the battery status without user permission?
Yes, the Battery Status API does not require any user permission to use. However, it’s always a good practice to inform your users if you are collecting any data about their system.
How accurate is the battery level provided by the Battery Status API?
The battery level provided by the Battery Status API is a number between 0.0 and 1.0, representing the current battery level as a fraction of the full charge. The accuracy of this value depends on the device and its battery.
Can I get the battery status in a web worker?
Yes, the Battery Status API can be used in a web worker. However, keep in mind that not all browsers support web workers, and not all browsers that support web workers support the Battery Status API in a web worker.
What can I do if the Battery Status API is not supported?
If the Battery Status API is not supported, there is not much you can do to get the battery status. You can use feature detection to check if the API is supported and provide an alternative functionality or a message to the user if it’s not.