

Key Takeaways
- The article provides a step-by-step guide to creating a Tetromino Puzzle game using Swift, Apple’s new programming language, and SpriteKit, Apple’s game development framework.
- The tutorial is not just for those interested in game development, but also for anyone wanting to learn Swift. Basic programming knowledge is enough to follow along.
- To start the project, the reader needs at least Xcode 6. The tutorial guides through the process of setting up the game project, including creating a new project, naming it, selecting Swift and SpriteKit as the language and technology, and setting up the project’s location and orientation.
- The tutorial then explains how to draw a block, the basic building unit of the game. It provides detailed instructions on how to update the code in the GameViewController.swift file, explaining concepts like semicolons, importing modules, classes, functions, constants, variables, type inference, accessing properties, comments, instantiation, enumerations, and accessing methods.
- The article ends by promising to cover drawing to the GameScene and more in the next part of the series. It also includes an FAQ section answering questions about the basic concept of a Tetromino Puzzle game, how to start developing one, its key components, implementing game logic in Swift, testing, improving performance, adding sound effects and music, making the game more challenging, monetizing it, and publishing it on the App Store.
Introduction
This series of articles will introduce you to two of Apple’s latest technologies, Swift and SpriteKit. Swift is a new programming language promoted as the “language for the future of Apple software development“. SpriteKit is Apple’s first game development framework that is standard with its SDK. It supports iOS starting from version 7 and Mac OS X.
We will not be discussing every detail, instead you will learn the fundamentals of Swift by creating a simple game. For a detailed discussion of the language, there is Apple’s official book on the subject. Although not a requisite for this course, it is a highly recommended read if you are serious about learning Swift.
As for SpriteKit, we will not be using it extensively in our game. We only need its most basic capabilities to display simple sprites on the screen. The focus of this course remains on Swift.
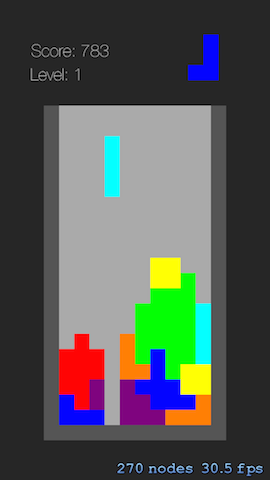
The game that you will be creating is inspired by a very popular puzzle game from the 80’s. You’re most likely familiar with this game and might have even played it once or twice, or more if you are a fan of the game like me. Here’s a sneak peek at what you are going to make:
Anyone interested in learning Swift is welcome. You don’t have to be aiming for a career in game development to benefit from this series. Creating a simple game is not an intimidating first step in introducing someone to a new technology. Learning becomes more effective when you’re having fun, and I hope you do have fun during this series.
You don’t have to be an expert programmer to be able to follow along. A fundamental knowledge of programming concepts such as variables, constants, control structures and other basic constructs are and their purpose is more than enough to be comfortable with the discussions.
With the recent releases of iOS 8.1, OS X Yosemite, Xcode 6.1, and a plethora of new Apple devices, now is definitely a good time to start learning them and investing in the future of Apple software development.
Creating The Project
You will need at least Xcode 6. If you have an older version, download the latest Xcode from the Mac App Store. Let’s create and set up the game project:
-
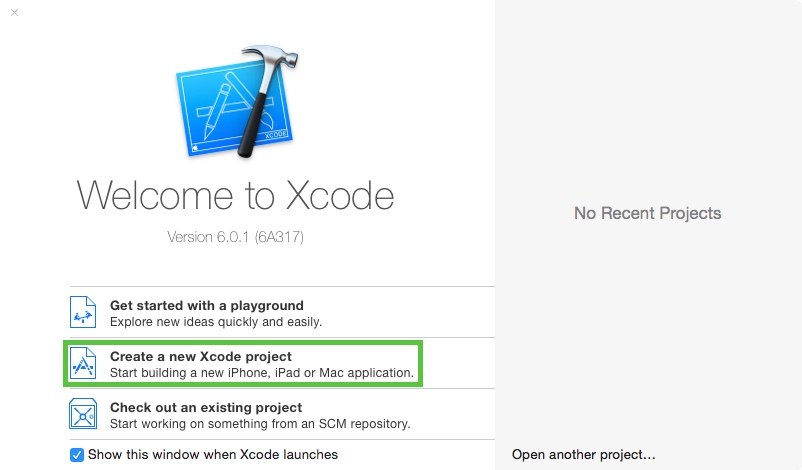
Run Xcode and create a new project.
-
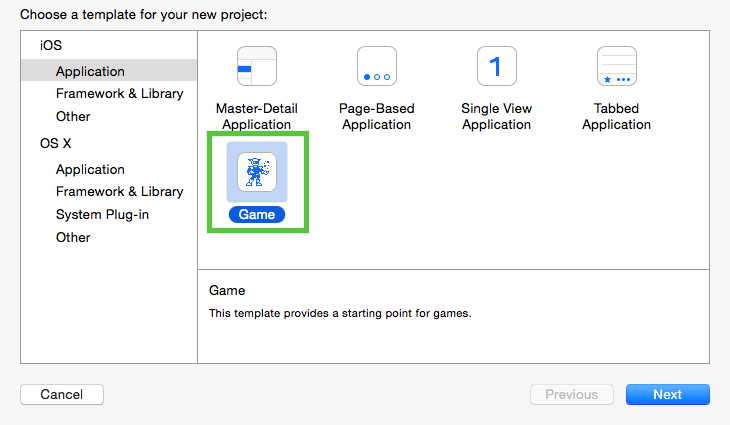
Select the Game template under the iOS platform and click Next.
-
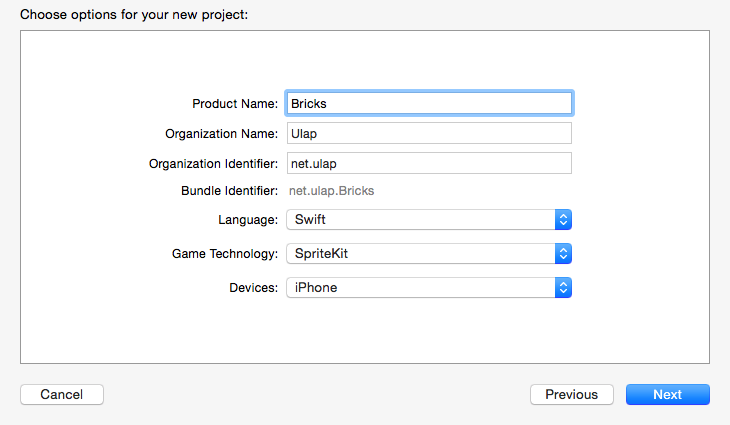
In the Options screen, fill out the Product Name field with the project name. You may name your project “Bricks”, “Tetrominoes” or something cooler that you have in mind. I’ll be naming mine “Bricks” for brevity.
Enter your Organization Name which can be your company or your own name. For the Organization Identifier, it is recommended to use a domain you own entered in reverse DNS notation. Using a domain you own ensures that the generated Bundle Identifier is unique.
Select Swift and SpriteKit for the language and technology to use. For now, let’s focus primarily on the iPhone as the target platform. Click Next to create and save the project.
-
Choose an appropriate location for the project. I personally prefer saving on-going projects on the Desktop for easy access. Make sure version control is enabled by marking the Source Control option as checked before creating the project. If you have no prior experience with Git and have a spare 15 minutes, check out try.github.io to learn more about it.

You now have a generic game project with some boilerplate code. Press ⌘ + R to run the project in the simulator. If you are seeing an oversized simulator, you can scale it down by pressing ⌘ + 3. Press ⌘ + 1 to return to its original size.
Play around to get a feel for the simulator and then return to Xcode. We will be modifying a few project settings that are appropriate for our game and deleting unneeded files.
-
Our game will only run in portrait orientation so let’s uncheck both landscape Device Orientation options under the Deployment Info section.
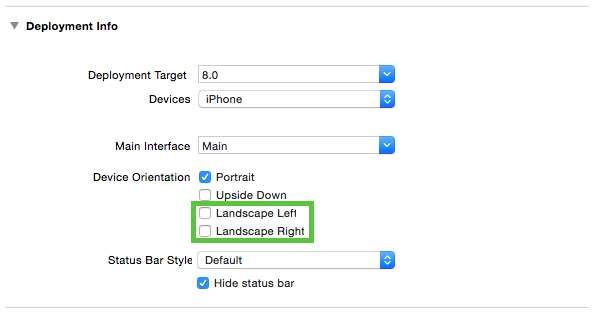
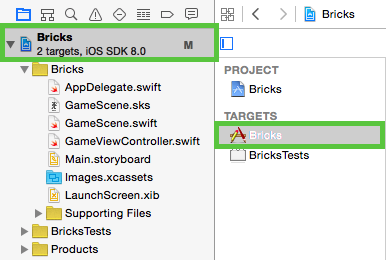
If you are not seeing this screen, make sure you are in the Project Navigator tab (⌘ + 1) and the main project is selected.
-
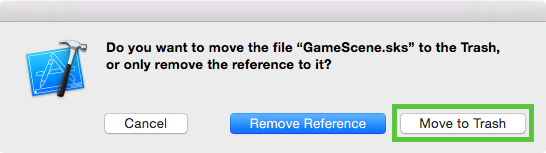
Select and delete GameScene.sks. Make sure you move the file to the trash.
-
We also won’t be needing the spaceship image so delete that as well. In fact, we won’t be needing any images in this project. Everything will be drawn programmatically using sprites and arrays.

Before building and running the project, perform a Clean operation first by pressing ⇧ + ⌘ + K (shift + command + K) to remove previous builds of the project that may still contain the resources we already removed.
When you run the project you’ll be presented with a blank view. In the next section, we will start drawing something on this blank screen.
Drawing a Block
Take a quick look at the short gameplay animation in the Introduction. Did you notice a pattern? A quick analysis of our game will tell us that everything in it is built with squares or blocks. Quite literally, blocks are the game’s building blocks!
These blocks are systematically arranged to form a finite set of shapes called tetrominoes. But before we attempt to draw these more complex tetromino shapes, let’s focus first on the simpler task of drawing a single block.
The GameViewController
Go ahead and update the default code in the GameViewController.swift file with the one below. Do not copy & paste though. Instead, try to determine which lines are new and which ones were removed or replaced. Manually typing and proactively selecting which code to add will give you a better feel for the language as well as improve your learning.
import SpriteKit
class GameViewController: UIViewController {
    override func viewDidLoad() {

        super.viewDidLoad()
        // Configure the view.

        let skView = view as SKView

        skView.showsFPS = true

        skView.showsNodeCount = true
        /* Sprite Kit applies additional optimizations to improve rendering performance */

        skView.ignoresSiblingOrder = true
        let scene = GameScene(size: skView.bounds.size)
        /* Set the scale mode to scale to fit the window */

        scene.scaleMode = .AspectFill
        skView.presentScene(scene)

    }
    override func didReceiveMemoryWarning() {

        super.didReceiveMemoryWarning()

        // Release any cached data, images, etc that aren't in use.

    }
    override func prefersStatusBarHidden() -> Bool {

        return true

    }

}
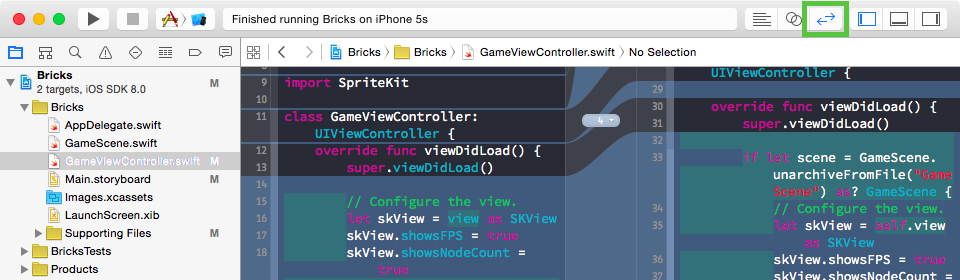
Only a handful of new code was added while several lines of unneeded code were removed. Toggle the Version Editor to see a detailed view of all the changes you made. You may also commit these changes to your repository either via the terminal or Xcode’s built in Source Control commands. If you are not yet comfortable working with Git, then don’t worry about performing any repository procedures in your code. It’s not required in this series but is a good habit to acquire early on.
Semicolons
The first thing you’ll notice especially when you’re coming from a C, C++, or Java background is the lack of semicolons. Python developers on the other hand will welcome this familiar style.
Semicolons in Swift are not required. Meaning you can, but you don’t have to put them at the end of every statement, except when you’re combining two or more statements on the same line:
let skView = view as SKView; skView.showsFPS = true
But for the sake of code readability, avoid combining several statements in one line.
Importing Modules
Unsurprisingly, import lets you import or access code from an external source and use it in your own projects. In our case, we want to utilize the SpriteKit framework so we declare this at the beginning of our source code file.
import SpriteKit
Classes
After importing the framework we need, we declare a class named GameViewController which inherits from UIViewController. The UIViewController class handles the view management for our game. You can learn more about this class and other framework classes by ⌥ + clicking (option + click) on their names.
A class is a type of object with its own behavior and properties. In our code, GameViewController is declared as a subclass of UIViewController which is referred to as the superclass. Thus, GameViewController inherits the behavior and properties of UIViewController.
class GameViewController: UIViewController {
Functions
As a subclass, GameViewController may alter or extend the predefined behavior of its superclass. In this case, we override the superclass’ viewDidLoad function to perform our own operations. For a class’ function, the more accurate term to use is method.
Functions in Swift are defined using the func keyword followed by the function’s name, parameters, return type then the function’s body enclosed in braces. As for viewDidLoad, we describe it as a function that takes no parameters and returns nothing.
override func viewDidLoad() {}
When overriding a parent class’ method, the subclass is still able to access the parent class’ own implementation of the method through the use of the super prefix. This allows you to build on top of the original implementation by adding your own procedures.
super.viewDidLoad()
We will learn more about functions and methods as we move along with this series. Expect to encounter examples that contain more elements such as return types and parameters.
Constants and Variables
Swift is a major advocate of immutability which adds another layer of protection from errors brought by unintentional modification of values. We use the let keyword to declare immutable values or constants.
let skView = view as SKView
On the other hand, we use the var keyword for mutable values or variables. Here’s the previous statement written as a variable declaration. However, we only declare variables if we are sure that their values will change at some point in our game.
var skView = view as SKView
Type Inference
At first glance, you might assume that Swift is a loosely typed language or does not require setting types for variables and constants. But Swift is a strongly typed language, or more accurately, a type-safe language.
Swift sets the type of your variables and constants during compile time using type inference. This mechanism enables the compiler to determine the appropriate type of a variable or constant by checking the value being assigned to them.
If you always set an initial value to your constants and variables, then you don’t have to explicitly declare their type every time.
Accessing Properties
Properties of skView can be accessed using dot syntax. We put a dot at the end of the instance name followed immediately by the property name.
Here, we set some helpful diagnostic information to show up in the view. Note however that the FPS (Frames Per Second) information is only accurate when the game is tested on an actual device, not on the simulator.
skView.showsFPS = true

skView.showsNodeCount = true
Comments
Comments allow you to annotate your code to aid in readability and clarity for the benefit of everyone involved in the project. Comments are also used to conveniently disable certain parts of your code without deleting them entirely.
There are two ways to write comments, multiline and single line. The default code provided by Xcode includes a single line comment expressed in a multiline syntax:
/* Sprite Kit applies additional optimizations to improve rendering performance */

skView.ignoresSiblingOrder = true
This can be more conveniently expressed as:
// Sprite Kit applies additional optimizations to improve rendering performance

skView.ignoresSiblingOrder = true
Unless you find the comment too long for a single line and prefer to split it into two separate lines:
/* Sprite Kit applies additional optimizations

to improve rendering performance */

skView.ignoresSiblingOrder = true
As for this line of code, we set skView‘s ignoresSiblingOrder property to true because we are not concerned about rendering order and there will be no overlapping elements in our game.
I intentionally did not put any of my own comments in the code to avoid duplicating what is already explained in the tutorials. However, you are advised to make writing sensible comments a habit and part of your workflow along with version control.
Instantiation
We create a new instance of a class using the initializer syntax. The simplest form of which is to pass nothing to the class name by using an empty parentheses.
let scene = GameScene()
But in our case, we need to pass in a size value based on the view’s bounding rectangle. Notice the use of the named parameter size which is required when initializing a new instance of a class. This is a useful language feature carried over from Objective-C to aid in readability.
let scene = GameScene(size: skView.bounds.size)
Enumerations
Enumerations, as with classes, also define a custom type but for a group of related values. Here, .AspectFill is one of the values defined by an enumeration type.
scene.scaleMode = .AspectFill
Notice .AspectFill‘s lack of a prefix. This is another demonstration of type inference. Looking deeper into scene‘s scaleMode property by ⌥ + clicking (option + click) on it in the editor, we find out that it is declared as a variable of type SKSceneScaleMode which is an enumeration containing .AspectFill as one of its members.
This means we can also express this as:
scene.scaleMode = SKSceneScaleMode.AspectFill
But such verbosity is not required in Swift.
Accessing Methods
Method access uses the same dot syntax as property access. You invoke a method the same way you invoke a function, passing in parameters within a set of parentheses.
skView.presentScene(scene)
Coming in Part 2
After covering a lot of the basic structure of Swift in this installment, next we’ll be covering drawing to the GameScene and much more!
Frequently Asked Questions (FAQs) about Creating a Tetromino Puzzle Game Using Swift
What is the Basic Concept of a Tetromino Puzzle Game?
A Tetromino puzzle game is a popular type of puzzle game where players have to manipulate different shapes, known as Tetrominoes, to complete lines on a grid. The game is over when the pieces stack up to the top of the screen. The objective is to score as many points as possible before the game ends. The concept is simple, yet it requires strategic thinking and quick decision-making skills.
How Can I Start Developing a Tetromino Puzzle Game Using Swift?
To start developing a Tetromino puzzle game using Swift, you need to have a basic understanding of the Swift programming language. You will also need to install Xcode, which is the integrated development environment (IDE) for macOS. Once you have these tools, you can start by creating a new project in Xcode and setting up the basic structure of your game, including the game board and the Tetromino pieces.
What are the Key Components of a Tetromino Puzzle Game?
The key components of a Tetromino puzzle game include the game board, the Tetromino pieces, and the game logic. The game board is the area where the game is played. The Tetromino pieces are the shapes that the player manipulates. The game logic includes the rules of the game, such as how the pieces move and rotate, how lines are completed, and how the score is calculated.
How Can I Implement the Game Logic in Swift?
Implementing the game logic in Swift involves writing functions to handle the movement and rotation of the Tetromino pieces, checking for completed lines, and updating the score. You can use Swift’s powerful features, such as classes, structures, and protocols, to organize your code and make it easier to understand and maintain.
How Can I Test My Tetromino Puzzle Game?
You can test your Tetromino puzzle game by running it in the Xcode simulator. This allows you to see how your game looks and behaves without needing to install it on a physical device. You can also use Xcode’s debugging tools to find and fix any issues in your code.
How Can I Improve the Performance of My Game?
To improve the performance of your game, you can optimize your code by eliminating unnecessary computations, using efficient data structures, and taking advantage of Swift’s performance features, such as optional chaining and lazy initialization.
How Can I Add Sound Effects and Music to My Game?
You can add sound effects and music to your game by using the AVFoundation framework, which provides APIs for audio and video playback. You can use this framework to play sound effects when the player moves or rotates a piece, completes a line, or achieves a high score.
How Can I Make My Game More Challenging?
You can make your game more challenging by increasing the speed of the falling pieces as the player’s score increases, adding more complex Tetromino shapes, or introducing obstacles on the game board.
How Can I Monetize My Tetromino Puzzle Game?
You can monetize your Tetromino puzzle game by offering in-app purchases, such as power-ups or additional levels, or by displaying ads. You can also offer a premium version of your game that removes ads and provides additional features.
How Can I Publish My Game on the App Store?
To publish your game on the App Store, you need to enroll in the Apple Developer Program, which requires an annual fee. Once you are enrolled, you can submit your game for review. If your game is approved, it will be available for download on the App Store.

