Create a Tetromino Puzzle Game Using Swift – Drawing Object
Key Takeaways
- Learn to set up and display a basic sprite in Swift using SKSpriteNode for a simple Tetromino game.
- Understand the structure and properties of the GameScene class, which is central to displaying content in a Swift-based game.
- Explore how to represent Tetromino shapes using enums and arrays, which facilitate random shape generation and rotation handling.
- Implement and manipulate tetrominoes within the game scene using touch input to interactively place shapes on the board.
- Gain insight into the use of Swift’s collection types, optionals, and control flow to manage game logic and data structures effectively.
The GameScene
Now it’s time to draw something on the screen. A GameScene class that extends SKScene was already declared for us by default in GameScene.swift. Update its definition with the following code:
class GameScene: SKScene {
    override func didMoveToView(view: SKView) {
        /* Setup your scene here */
        let block = SKSpriteNode(color: SKColor.orangeColor(), size: CGSize(width: 50, height: 50))
        block.position = CGPoint(x:CGRectGetMidX(self.frame), y:CGRectGetMidY(self.frame))
        self.addChild(block)
    }
    override func touchesBegan(touches: NSSet, withEvent event: UIEvent) {
        /* Called when a touch begins */
        for touch: AnyObject in touches {
        }
    }
    override func update(currentTime: CFTimeInterval) {
        /* Called before each frame is rendered */
    }
}
Let’s focus our discussion on the only non-empty method so far in this class, the didMoveToView method which we overrode from SKScene. As described in the comment, this is where we should setup our scene.
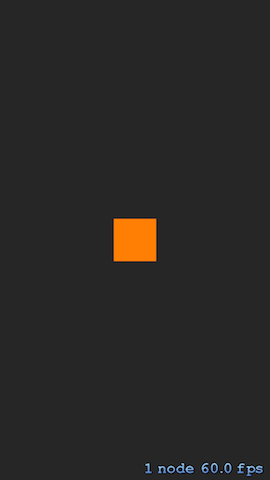
All we need at this time is to display a square in the middle of the screen. We accomplish this by using a SKSpriteNode object initialized with a color and size value. We formally call this square object a sprite. Sprites are the most basic visual elements of a game.
let block = SKSpriteNode(color: SKColor.orangeColor(), size: CGSize(width: 50, height: 50))We set the block’s position to the center of the screen by reusing code from the default spaceship example that was generated for us by Xcode.
block.position = CGPoint(x:CGRectGetMidX(self.frame), y:CGRectGetMidY(self.frame))To show the block on the screen, we need to add it as a child of the scene. Our block sprite becomes part of the scene’s tree of node objects and is rendered along with the other nodes, Although at this point, the square is the only node object in the scene.
self.addChild(block)Run (⌘ + R) our game to see the lone orange block on the center of the screen.
In the next section, we will describe and draw the seven tetromino shapes.
Drawing Tetrominoes
According to Wikipedia, a tetromino is a geometric shape composed of four squares, connected orthogonally. There are a few different types of tetrominoes and among these, we will be using the one-sided tetromino which has seven distinct shapes:


![]()
Each tetromino can be represented by a letter that abstractly resembles its shape. We use the letters I, O, T, J, L, S and Z to represent each of these tetrominoes. We also use colors to further differentiate between the shapes and of course to add some eye candy.
The Tetromino Class
Let’s create a new class to represent our tetrominoes.
-
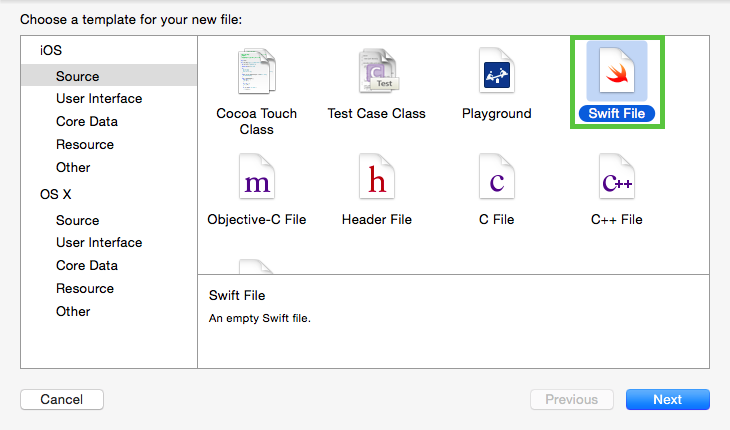
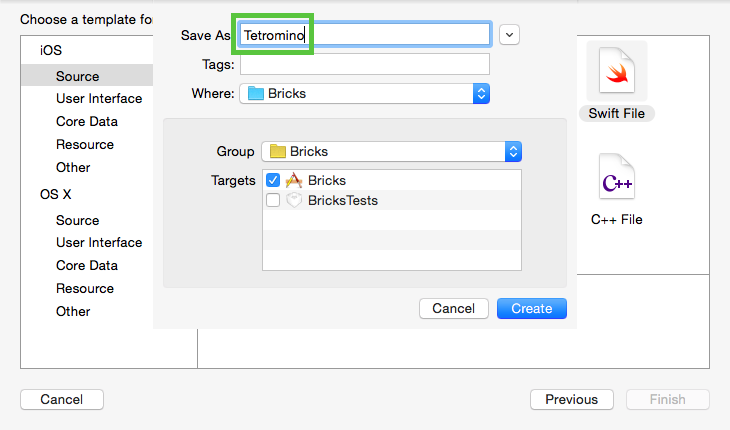
Press ⌘ + N to open the file template selection window and choose Swift File from the iOS Source group. Click Next to save the file.
-
Name the file Tetromino and click Create.
-
Add the following enumerations to the Tetromino.swift file after the
importstatement:enum Direction { case Left, Right, Down, None } enum Rotation { case Counterclockwise, Clockwise } enum Shape { case I, O, T, J, L, S, Z static func randomShape() -> Shape { let shapes: [Shape] = [.I, .O, .T, .J, .L, .S, .Z] let count = UInt32(shapes.count) let randShape = Int(arc4random_uniform(count)) return shapes[randShape] } }These three enums describe values that are intrinsic to our tetrominoes.
Direction, as the name suggests, enumerates the possible directions a tetromino can move to in our game. That’s either to the left, right, or down. It also includes a value for remaining stationary but no value for the up direction for obvious reasons.The
Rotationenum defines either a counterclockwise or clockwise value.The
Shapeenum defines the seven distinct one-sided tetrominoes we will be using in our game. One advantage of enumerations in Swift is the capability to define their own methods which include both type (defined with thestatickeyword) and instance methods.Looking at the gameplay animation above, we can easily deduce that tetrominoes are being generated randomly. So for convenience, let’s implement this consistent behavior as a type method named
randomShape. We use the built inarc4random_uniformmethod by passing in the total number of shapes to generate a random number. We then use this number to access an element from theshapesarray. -
Add the bitmap data representing the shapes. The
bitmapsdata is quite complex but don’t be intimidated. It is just a dictionary type which uses aShapeas key to a three-dimensional array value. These arrays represent all of the shape’s rotational configurations.let bitmaps: [Shape: [[[Int]]]] = [ .I: [[[0, 1], [0, 1], [0, 1], [0, 1]], [[0, 0, 0, 0], [1, 1, 1, 1]]], .O: [[[2, 2], [2, 2]]], .T: [[[3, 3, 3], [0, 3, 0], [0, 0, 0]], [[3, 0], [3, 3], [3, 0]], [[0, 0, 0], [0, 3, 0], [3, 3, 3]], [[0, 0, 3], [0, 3, 3], [0, 0, 3]]], .J: [[[0, 4, 4], [0, 4, 0], [0, 4, 0]], [[4, 0, 0], [4, 4, 4], [0, 0, 0]], [[0, 4, 0], [0, 4, 0], [4, 4, 0]], [[0, 0, 0], [4, 4, 4], [0, 0, 4]]], .L: [[[0, 5, 0], [0, 5, 0], [0, 5, 5]], [[0, 0, 5], [5, 5, 5], [0, 0, 0]], [[5, 5, 0], [0, 5, 0], [0, 5, 0]], [[0, 0, 0], [5, 5, 5], [5, 0, 0]]], .S: [[[0, 6, 0], [0, 6, 6], [0, 0, 6]], [[0, 0, 0], [0, 6, 6], [6, 6, 0]], [[0, 6, 0], [0, 6, 6], [0, 0, 6]], [[0, 0, 0], [0, 6, 6], [6, 6, 0]]], .Z: [[[0, 7, 0], [7, 7, 0], [7, 0, 0]], [[0, 0, 0], [7, 7, 0], [0, 7, 7]], [[0, 7, 0], [7, 7, 0], [7, 0, 0]], [[0, 0, 0], [7, 7, 0], [0, 7, 7]]] ]We can certainly implement matrix rotation algorithms here to dynamically rotate the shape bitmap but that would be too computationally expensive for our simple needs. There aren’t a lot of configurations anyway so “hardcoding” them is preferable. Also, we can use SpriteKit’s SKAction to rotate the sprites at a specified angle but that’s not how our game works data structure-wise.
We arranged the values horizontally to avoid adding unnecessary length to this section but feel free to format it in your own code to make the shapes stand out. The zeroes represent empty spaces while the non-zero integers represent an index value in an array of colors (to be added later). Here’s the T shape in a more readable format. You can clearly see the different configurations:
.T: [[ [3, 3, 3], [0, 3, 0], [0, 0, 0]], [ [3, 0], [3, 3], [3, 0]], [ [0, 0, 0], [0, 3, 0], [3, 3, 3]], [ [0, 0, 3], [0, 3, 3], [0, 0, 3] ]], [/code]Arrays and Dictionaries
Our
bitmapdata is a good example of Swift’s collection type. It is a dictionary containing a collection of arrays. Arrays and dictionaries store ordered and unordered collections of values respectively. Array and dictionary elements are accessed (and set) using subscript notation. It uses square brackets ([]) which may contain an index value starting with zero for arrays, or a key, aShapekey in our case, for dictionaries.For example, to access an element from the bitmaps dictionary, you may write it as:
bitmaps[.T]Optionals
Dictionaries return an optional value. Optional means that the key used to access an element of the dictionary may not exist requiring the dictionary to return
nilwhich represents the absence of a value. Optionals are used to determine whether a value exists or not and to aid in handling such cases. -
Let’s define the Tetromino class.
class Tetromino {
    let shape = Shape.randomShape()
    var bitmap: [[Int]] {
        let bitmapSet = bitmaps[shape]!
        return bitmapSet[rotationalState]
    }
    var position = (x: 0, y: 0)
    private var rotationalState: Int
    init() {
        let bitmapSet = bitmaps[shape]!
        let count = UInt32(bitmapSet.count)
        rotationalState = Int(arc4random_uniform(count))
    }
    func moveTo(direction: Direction) {
        switch direction {
        case .Left:
            --position.x
        case .Right:
            ++position.x
        case .Down:
            ++position.y
        case .None:
            break
        }
    }
    func rotate(rotation: Rotation = .Counterclockwise) {
        switch rotation {
        case .Counterclockwise:
            let bitmapSet = bitmaps[shape]!
            if rotationalState + 1 == bitmapSet.count {
                rotationalState = 0
            } else {
                ++rotationalState
            }
        case .Clockwise:
            let bitmapSet = bitmaps[shape]!
            if rotationalState == 0 {
                rotationalState = bitmapSet.count - 1
            } else {
                --rotationalState
            }
        }
    }
}
Property Initialization
Class instance properties in Swift must be either defined with a default value like the immutable
shapeproperty or be given a value during initialization as with the case ofrotationalState. This means we need to implement an initializer to set the value ofrotationalStateusing theinitkeyword.Again, we encounter Optionals in the statement
let bitmapSet = bitmaps[shape]!. Accessing an element of a dictionary returns an optional type so we need a way to access the value contained inside it, if there is one. We use an exclamation mark to unwrap the optional and expose the underlying value.Finally, we use
arc4random_uniformto assign a random initial rotational state for the tetromino.Computed Properties
The
bitmapproperty of our class is defined as a read-only computed property. This type of property does not store a value. Instead, it acts like a function to come up with the correct value every time it is accessed. Computed properties can also optionally receive values that it uses to set other properties in the class.Tuples
A tuple is a compound value composed of zero or more values of different types. Tuples in swift are written as comma delimited values with optional names contained within a set of parentheses. Here we use the
positionproperty, a tuple of type(Int, Int), to keep track of this tetromino’s x and y location on the game board.Conditional Statements
Our class defines two methods that control the movement and rotation of the tetromino. One is the
moveTomethod which takes a parameter of typeDirection, an enumeration we defined earlier. This method uses aswitchstatement to check all possible direction values to be able to adjust the tetromino’s position accordingly.Unlike
switchstatements in most other languages, Swift does not allow falling through the next case when a break is not encountered. This adds a layer of protection from unintentionally triggering wrong handlers because of missing breaks. It is also required to handle all cases. This means you will have to include adefaultcase for all other values if you do not have a finite set of cases like in our enums.The
rotatemethod takes in a parameter of typeRotationbut sets a default value –.Counterclockwise. It also utilizes aswitchstatement to check for both rotational directions. Traditionally, the player can rotate the bricks in both directions. But in our game, we will only allow the player to rotate in one to keep things simple. Our purpose for handling both is to be able to reset the tetromino to its previous state when a collision has occurred. We will discuss collision detection in more detail later.Aside from the
switchstatement,rotatealso utilizesifstatements to check for array out of bounds conditions. The if statement takes in a condition and executes a set of statements contained within braces if the condition is true. Unlike in other languages, the conditions in Swift’sifstatement do not need to be enclosed in parentheses. However, the pair of braces are required even if it’s empty or only has one statement to execute.
The GameScene Class
Let’s now update our GameScene class to display random tetrominoes with the following code:
import SpriteKit
let colors: [SKColor] = [
    SKColor.lightGrayColor(),
    SKColor.cyanColor(),
    SKColor.yellowColor(),
    SKColor.magentaColor(),
    SKColor.blueColor(),
    SKColor.orangeColor(),
    SKColor.greenColor(),
    SKColor.redColor(),
    SKColor.darkGrayColor()
]
let blockSize: CGFloat = 18.0
class GameScene: SKScene {
    override func didMoveToView(view: SKView) {
        /* Setup your scene here */
        self.anchorPoint = CGPoint(x: 0, y: 1.0)
    }
    override func touchesBegan(touches: NSSet, withEvent event: UIEvent) {
        /* Called when a touch begins */
        for touch: AnyObject in touches {
            drawTetrominoAtPoint(touch.locationInNode(self))
        }
    }
    override func update(currentTime: CFTimeInterval) {
        /* Called before each frame is rendered */
    }
    func drawTetrominoAtPoint(location: CGPoint) {
        let t = Tetromino()
        for row in 0..<t.bitmap.count {
            for col in 0..<t.bitmap[row].count {
                if t.bitmap[row][col] > 0 {
                    let block = t.bitmap[row][col]
                    let square = SKSpriteNode(color: colors[block], size: CGSize(width: blockSize, height: blockSize))
                    square.anchorPoint = CGPoint(x: 1.0, y: 0)
                    square.position = CGPoint(x: col * Int(blockSize) + col, y: -row * Int(blockSize) + -row)
                    square.position.x += location.x
                    square.position.y += location.y
                    self.addChild(square)
                }
            }
        }
    }
}
After our import statement, we created an immutable array of color objects that will be used to give life to our otherwise boring shapes. Conveniently, we have SKColor‘s (just a wrapper for UIColor) preset values that we can reuse. It’s as if they were created for this kind of game as they closely match the standard colors of the official game.
We set the size of each block then proceed with updating the GameScene class. We replace the previous contents of didMoveToView method with a single line of code that moves the anchor point from the default lower-left corner of the scene all the way to the upper-left corner. This essentially moves the origin (0, 0) to that particular corner.
In touchesBegan, we have to loop through all the possible touch points owing to the fact that we are running on a multitouch device. But since we disabled multitouch capability for this game, only the first touch will register. We then call the drawTetrominoAtPoint method passing in the location of the touch.
Anchor Points and the Origin
In the drawTetrominoAtPoint method, we start by creating a tetromino with a random shape and rotational state. SpriteKit’s coordinate system uses the traditional Cartesian system with an origin (0, 0) that is anchored on a particular location which is referred to as the anchorPoint. This differs from other screen coordinate systems where the y value increases from top to bottom and with the origin located on the upper left corner by default.
This runs counter to how our game’s arrays are defined. Bitmap array indexes start from 0, practically representing the top row then increments by one as you go down one row at a time. So to be able to conveniently work around this situation, we moved the view’s anchor point from its default location as described earlier. This means we are starting from the origin y value of zero and moving down along the negative y axis. We’ll have to compensate by negating our row index values using the unary - (minus) operator, to be able to correctly position the block along the y axis:
square.position = CGPoint(x: col * Int(blockSize) + col, y: -row * Int(blockSize) + -row)For Loops
The shape of tetrominoes in our game is expressed as a bitmap for convenience. Bitmaps have row and column (x and y) values that represent pixels of 2d images. We extract each pixel data by looping through all the rows and columns of the bitmap. Swift also has its own for in statement like in many other languages. In our drawTetrominoAtPoint method we have a nested implementation of the for in loop to access each element of the bitmap.
We need access to each bitmap index so we define this as a range of integers from 0 up to but not including the total number of rows or columns. We use the half-open range operator ..< to express this. If we want to include the total count we’ll have to use the closed range operator ... to define the range. The current value of the range is stored in whatever variable you put after the for keyword.
An element of the shape bitmap can either have a zero or non-zero value. We exclude the pixels with a zero value from being displayed using the conditional if statement. We proceed with creating each block sprite using the same process we used in the previous section on drawing a block. The color index is by design, mapped to the value of the block producing a consistent color scheme for the entire tetromino set.
Each block’s position is calculated based on the length of its side and its index in the array. To achieve the “space between blocks” effect, we add a gap with a single point width using the current value of the row or column. We also want the tetromino to be drawn near the area we touched so we adjust the position by adding the location value we received from the parameter. Setting the anchor point of the block sprites to the lower right corner also helped center the tetromino.
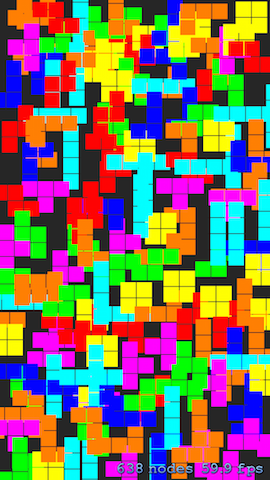
Run (⌘ + R) our game and touch anywhere on the simulator’s screen to draw random tetrominoes and create your own artwork like this:
In the next instalment we move on to the fun part, the gameplay mechanics!
Frequently Asked Questions about Creating a Tetromino Puzzle Game Using Swift
What is a Tetromino and how is it used in puzzle games?
A Tetromino is a geometric shape composed of four squares, connected orthogonally. This means that each square shares at least one edge with another square. In puzzle games, Tetrominoes are often used as the building blocks for the game. The player must manipulate these blocks, rotating and moving them to fit into a grid. The most famous example of a game using Tetrominoes is Tetris.
How can I create a Tetromino puzzle game using Swift?
Swift is a powerful and intuitive programming language developed by Apple for iOS, macOS, watchOS, and tvOS. To create a Tetromino puzzle game using Swift, you need to have a basic understanding of the language and its syntax. The process involves creating the game board, defining the Tetromino shapes, and implementing the game logic such as rotation and collision detection.
What are the key components of a Tetromino puzzle game?
The key components of a Tetromino puzzle game include the game board, the Tetromino shapes, and the game logic. The game board is the area where the game is played. The Tetromino shapes are the pieces that the player manipulates. The game logic includes the rules of the game, such as how the pieces move and rotate, and what happens when a line is completed.
How can I define the Tetromino shapes in Swift?
In Swift, you can define the Tetromino shapes using arrays. Each shape is represented by a 2D array, with each square in the shape represented by a 1 and each empty space represented by a 0. For example, the T-shaped Tetromino can be represented as [[0, 1, 0], [1, 1, 1], [0, 0, 0]].
How can I implement the game logic in Swift?
Implementing the game logic in Swift involves writing functions for the different actions in the game. For example, you might write a function to rotate a Tetromino, another function to move a Tetromino, and another function to check for collisions. These functions are then called in response to user input, such as pressing a button or swiping the screen.
How can I handle user input in Swift?
Swift provides several ways to handle user input. For example, you can use the UITapGestureRecognizer to detect when the user taps the screen, and the UISwipeGestureRecognizer to detect when the user swipes the screen. These gestures can be used to control the movement and rotation of the Tetrominoes.
How can I draw the game board in Swift?
In Swift, you can draw the game board using the drawRect method. This method is called whenever the view needs to be redrawn, such as when a Tetromino is moved or rotated. Inside this method, you can use the CGContext functions to draw the grid and the Tetrominoes.
How can I detect when a line is completed in Swift?
To detect when a line is completed in Swift, you can iterate over the rows of the game board from bottom to top. For each row, if all the squares are filled, then the line is completed. You can then remove this line and move all the lines above it down one row.
How can I add a scoring system to my Tetromino puzzle game?
Adding a scoring system to your Tetromino puzzle game involves keeping track of the number of lines completed by the player. You can increment a score variable each time a line is completed, and display this score on the screen using a UILabel.
How can I make my Tetromino puzzle game more challenging?
There are several ways to make your Tetromino puzzle game more challenging. For example, you can increase the speed at which the Tetrominoes fall as the game progresses. You can also introduce new, more complex Tetromino shapes. Another option is to add power-ups or obstacles to the game board.
17+ years in the software industry. Experienced CTO in blockchain and cryptocurrency. Community leader, developer advocate, mentor, entrepreneur, and lifelong learner.

