

Photoshop is a great tool for image creation and editing. Photoshop CS6 in particular has some impressive new functions that allow you to easily create a variety of abstract backgrounds. Instead of searching online for well-suited backgrounds or browsing through stock photography libraries, you should consider making your own background; you’d be surprised at how little time or technique is involved.
Key Takeaways
- Photoshop CS6 offers functions that allow for the creation of a variety of abstract backgrounds, saving the need to search online or through stock photography libraries.
- The new blur settings in CS6 can transform an unsuitable photo into a useful bokeh background, with the Field Blur feature imitating natural lens blur found in photography.
- Photoshop CS6 can also turn a good photo into a useful background by using the Single Column Marquee Tool or the Single Row Marquee Tool to create an interesting linear effect.
- Creating a solid background in Photoshop does not require a photo, but can be achieved using custom brushes and a blank canvas. The program also allows for the creation of a diagonal spectrum effect.
Turning a Bad Photo Into a Useful Bokeh Background
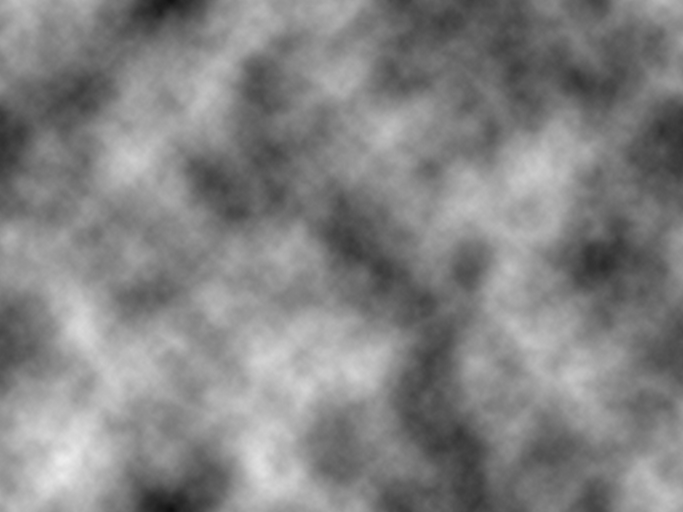
The image below is pretty unusual, and I couldn’t imagine using it for anything in particular, but with Photoshop CS6, we can transform this impractical image into a useful bokeh background in just a matter of minutes. Next time you have some “throwaway” photos with interesting (accidental) colors or patterns, make it a bokeh background instead.
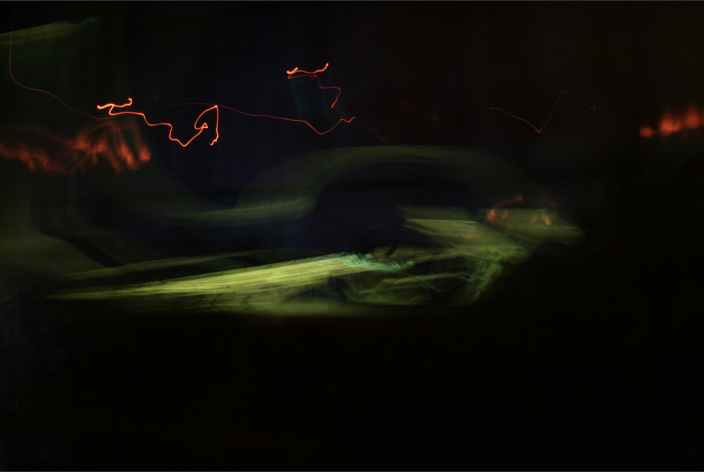
The new blur settings in CS6 are a real asset to Photoshop’s filter arsenal. The image above is really dark with hints of light, which is ideal for a bokeh effect. For this effect, go to “Filter” > “Blur” > “Field Blur,” and a dialog box will pop up.

Field Blur is different from the other blur filters, because it is meant to imitate natural lens blur found in phot0graphy. Check the Field blur checkbox and increase the slider to a high amount. The intention is to blur the light areas until there are no sharp color areas. Since this image is so dark, I set the light bokeh amount to a high value. Bokeh color intensifies and colorizes the colors within the blurred image.
One critical part of this bokeh technique involves the light range slider at the bottom. You can increase the light bokeh and bokeh color values to anything you would like, those won’t result in a bokeh look, no matter what combination you try. The Light Range is what will truly create the effect. The key information to know about this slider is that wherever you move the values, the black and white points of the slider need to be right next to each other. The results are shown below:

Turning a Good Photo Into a Useful Background
Our first example started with a poorly-taken photo, so let’s try some similar techniques with slightly better images. The image below is a little blurry, but the colors are nice. You might normally delete a photo like this one along with photo from the bokeh background example, but in Photoshop CS6, we can turn it into a nice background.
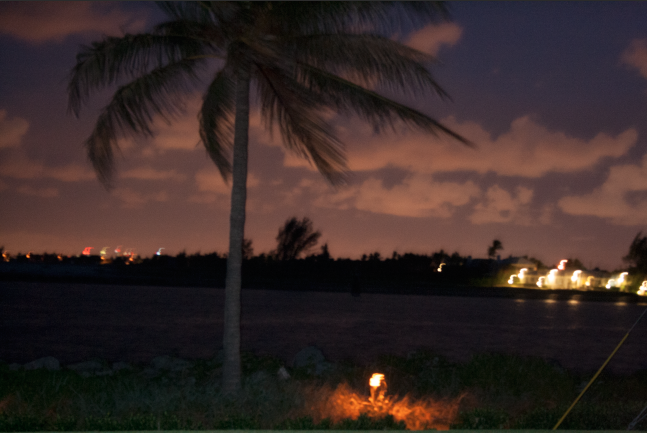
Select your choice between the Single Column Marquee Tool or the Single Row Marquee Tool. Click on an area that has a wide range of colors from one edge to the other end. As you can see below, the right side was chosen because of the lights, giving variation to the colors in the selection.

With the selection active, hit Command/Ctrl + “T” the enter transform mode and grab the left and right middle handles, dragging each end across the entire canvas. This creates an interesting linear effect that you can use on just about any photo, regardless of its quality.
Create a Useful Background With A Custom Brush
You don’t have to start with a good photo, a less-than-good photo, or any photo at all to create a solid background in Photoshop. Let’s create one using nothing but custom brushes and a blank canvas.
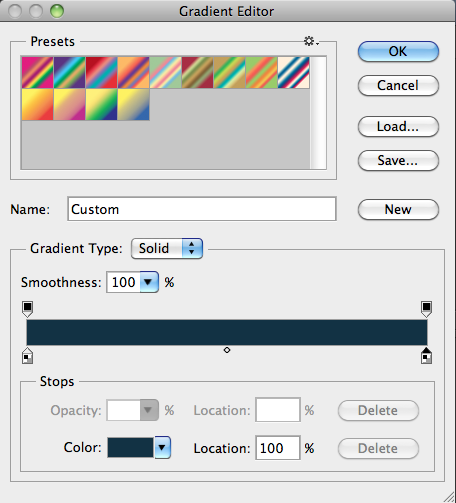
Create a new document in Photoshop. The dimensions for our example are 1024 x 768 pixels. Create a new layer and select the gradient tool. Click on the gradient icon to bring up the options dialog box. Create a linear gradient that starts with #27324c and ends with #133146. Drag the Gradient Tool diagonally from the top left to the bottom right.

Select the Brush Tool and Select a soft-edged brush sized at roughly 50 pixels. Click the Brushes Panel icon in the options bar to control the different options for your brush.
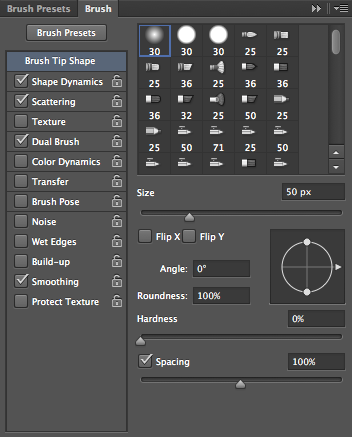
Go to the Shape Dynamics tab and make sure that Size Jitter is set to 100%. Turn control off, and set the minimum diameter to a value between 5 and 10%.
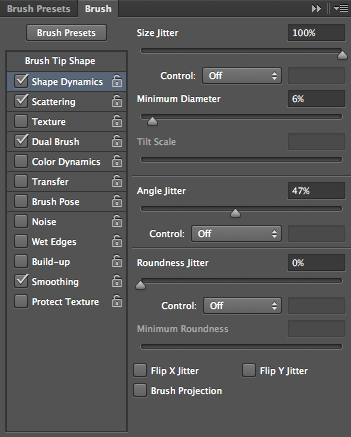
Next, click on the Scattering tab, set scattering to both axes, and set the scatter value to 1000%. You can see from the preview that the globes are spread apart. You should always examine the preview to fully understand how your values are being visualized.

Select Dual brush and choose a soft-edged 30 pixel brush. You are essentially multiplying the brush by itself. The result is a dense sparkle brush. As we paint with this brush, the result should be a varied sparkle effect. Some will seem small and far away, while others will be large and blurred, adding depth and dimension to our work.

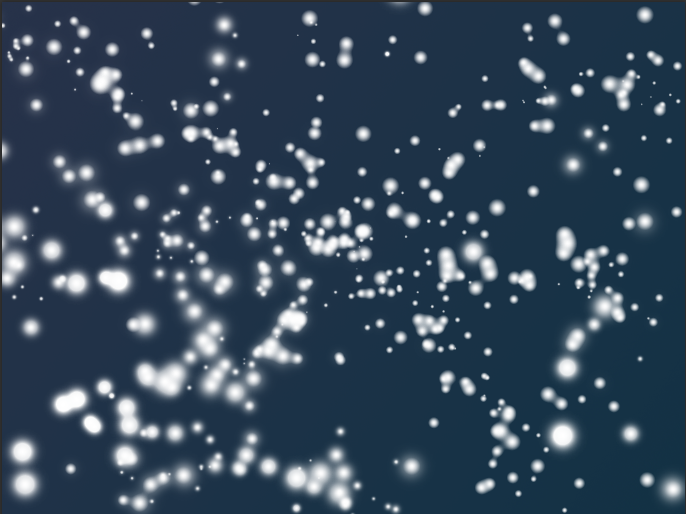
Create a new layer, and with white as your foreground color, click and drag across the canvas, and you should get a scattered glow effect. The sparkles should range from large to small and appear to be random. If there are areas that are too bare, then you can single click and it with fill in those areas. Feel free to try this several times until you get a desirable distribution from your custom brush.
Double-click the layer to bring up your layer styles options. The colors you choose here will depend on your background color, but the effects themselves should be roughly the same. Select an Inner Glow and choose a color that complements your background color. I chose #00e4ff. Set the size to 1px and change the blend mode to hard light.
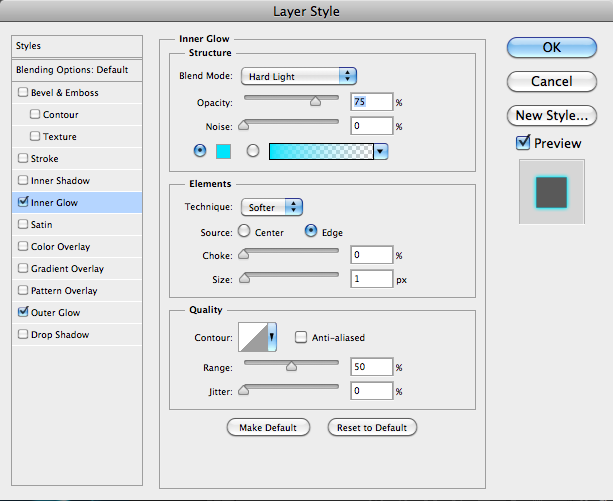
Then, select Outer Glow and choose a color that is a little more vivid than the one we chose earlier. I chose #00c5fe. Leave the size at 5px and set the blend mode to Hard Light. With these settings, you should see similar effects to the ones shown below:


Create a Diagonal Spectrum Effect
This background effect is an interesting one, and it is amazingly simple to create. Create a new document and fill it with black.

Next, make a new layer, and with your foreground colors set to the default black and white options, go to “Filter” > “Render” > “Clouds.” You can repeatedly hit Command/Ctrl + “F” to repeat the filter until you get the results that you like.
The effect is too bright, so next we will create a layer mask. On the layer mask, run the Clouds filter again, and then go to “Filter” > “Render” > “Difference Clouds.” This will create a stronger mask to make the cloudy effect more subtle and blended.

Next, go to “Filter”> “Blur” > “Motion Blur.” When the Dialog box comes up, set the angle to 45° and the strength to roughly 200px. This will create a nice diagonal blur effect.


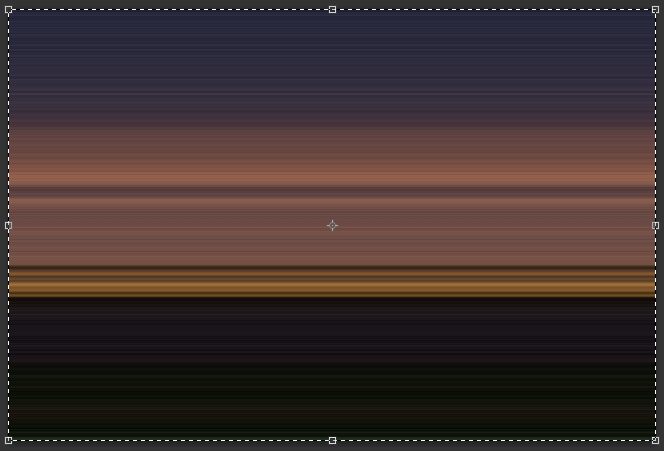
Create a new layer and select your Gradient Tool. Go to the options bar and click to edit the gradient. Select a nice spectral gradient, with a lot of different variations in color. You can create your own or select a preset.

Click and drag to draw a gradient across the document. Start from the top left and drag across to the bottom right. Your gradient should look something like this:

Below are the best two outcomes from changing the blend mode of the spectral gradient layer to Multiply and Overlay, respectively.
Multiply:

Overlay:

Conclusion
You can search online for hours looking for just the right backdrop for your work, or you can save a lot of time by creating a custom background from scratch. The possibilities are endless, and it will make your work much more unique. You can create just the look you want, use otherwise-useless photos, and integrate colors that work specifically with your designs.
Do you have any other techniques for creating backgrounds?
Frequently Asked Questions on Creating Abstract Backgrounds in Photoshop CS6
How can I change the foreground and background color in Photoshop CS6?
Changing the foreground and background color in Photoshop CS6 is quite simple. First, select the foreground color box, located at the bottom of the toolbar. A color picker window will appear, allowing you to choose the desired color. Repeat the same process for the background color box. Remember, the foreground color is used when painting, filling, and creating paths, while the background color is used to make gradients and fill in the erased areas of an image.
What is the use of fiber fill in Photoshop CS6?
Fiber fill is not a feature in Photoshop CS6. It might be confused with the term ‘Fibers’, a filter in Photoshop used to create a fibrous texture or increase the detail in an image. To use it, go to Filter > Render > Fibers, then adjust the variance and strength to your liking.
How can I remove the background of an image in Photoshop CS6?
To remove the background of an image in Photoshop CS6, use the Quick Selection Tool from the toolbar. Drag it over the area you want to keep. Then, go to Select > Inverse to select everything but your initial selection. Hit the delete key to remove the background. Remember to save your work as a PNG or GIF to maintain transparency.
Where can I find abstract backgrounds for Photoshop CS6?
There are numerous online resources where you can find abstract backgrounds. Websites like Pexels offer a wide variety of high-quality, royalty-free images. Simply search for ‘abstract background’, download your preferred image, and open it in Photoshop CS6.
How can I contrast foreground and background colors in Photoshop CS6?
Contrasting colors can be achieved by selecting colors that are opposite each other on the color wheel. In Photoshop CS6, you can use the Color Balance or Hue/Saturation adjustments to alter the colors of your foreground and background until you achieve the desired contrast.
How can I create a gradient background in Photoshop CS6?
To create a gradient background, select the Gradient Tool from the toolbar. Choose your desired colors for the foreground and background. Click and drag across your canvas to create the gradient. The length and direction of your drag will determine the gradient’s spread and angle.
Can I use custom shapes while creating abstract backgrounds in Photoshop CS6?
Yes, you can use custom shapes. Photoshop CS6 has a Custom Shape Tool in the toolbar. You can select a shape from the options panel and draw it onto your canvas. You can also import your own custom shapes into Photoshop.
How can I add texture to my abstract background in Photoshop CS6?
You can add texture by using the Texturizer filter. Go to Filter > Texture > Texturizer and choose from the different texture options. You can adjust the scaling, relief, and light direction for the texture.
Can I use brushes to create an abstract background in Photoshop CS6?
Absolutely! Brushes are a great way to add unique elements to your abstract background. Photoshop CS6 comes with a variety of brushes, and you can also download more from the internet. You can adjust the size, hardness, and opacity of the brush as needed.
How can I save my abstract background in Photoshop CS6?
Once you’re satisfied with your abstract background, go to File > Save As. Choose the desired format (JPEG, PNG, etc.) and location for your file. If you want to preserve layers for future editing, save your file as a Photoshop (.PSD) file.