

Photoshop allows you to create your own patterns (or use an existing one) and apply it to an image as a fill layer. This means you can scale the pattern, as well as changing opacity and blending modes to make it look like the pattern was always part of the image.
In this example, we’re going to change the texture of the woman’s suit in this image using an existing pattern. You can download the image for free here. Thanks to Plethr. Note: I’m using CS5 for the screen grabs, but the method is the same for older versions of Photoshop.
1. Open up the photograph in Photoshop.

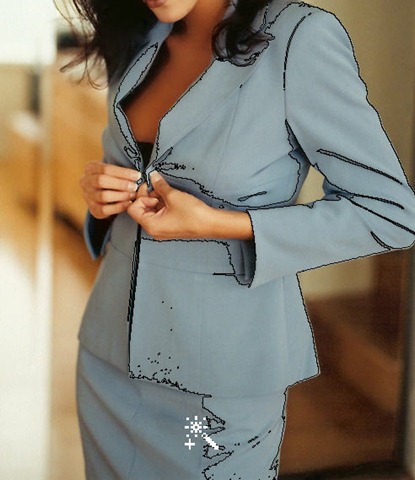
2. Before we apply a pattern fill we need to select only the parts of the image that we want to apply it to. In this case the blue suit is fairly easy to select and there are several ways to do it. I’m using the Color Range command. Choose Select > Color Range. The Color Range dialog box opens up. Use the Eyedropper to select part of the suit. In the Color Range dialog box you’ll see a black and white preview of the parts of the image that are selected. Drag the Fuzziness slider to the left and right to refine how much of the blue color is selected.

To add to the selection using similar colors, use the eyedropper with the + symbol, to remove a color from the selection use the eyedropper with the – symbol. When you’re happy with the selection click OK.
3. If you find that this method has not picked up all of the suit, select the Magic Wand tool in the tool box and Shift + Click any areas that have not been selected. By holding down the Shift key, you add to the selection and don’t lose what has already been selected. Keep Shift + Clicking until you’ve selected every part of the suit.
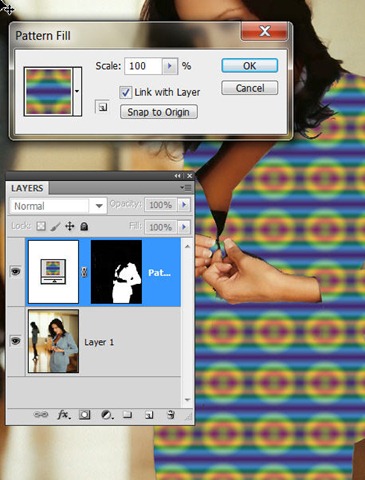
4. Now that you have an active selection of the woman’s suit, click and hold on the Create New Fill or Adjustment Layer button at the bottom of the Layers panel, and choose Pattern.

The Pattern Fill dialog box appears and in the Layers Palette you’ll see a new pattern layer mask above your current layer. You’ll also notice that suddenly the woman’s suit is filled with the default pattern.
5. To apply a different pattern (because that default one is pretty hideous), click on the small triangle beside the pattern swatch in the Pattern Fill dialog box. Then click on the small triangle in the upper right corner of the drop down box. At the bottom of the menu that appears you will see lots of patterns available in groups such as Artist Surfaces, Nature Patterns and Rock Patterns. Choose Artist Surfaces. You will more than likely see a dialog box asking if you want to Replace Current Patterns, just choose Append to add to your existing patterns.
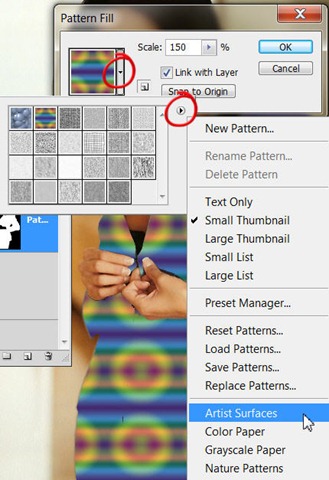
6. Choose a pattern that you like from the thumbnails, I’ve picked Gauze and set the scale to 150%. You’ll see the pattern applied instantly to the suit. Click OK if you’re happy with that pattern, otherwise choose another one.

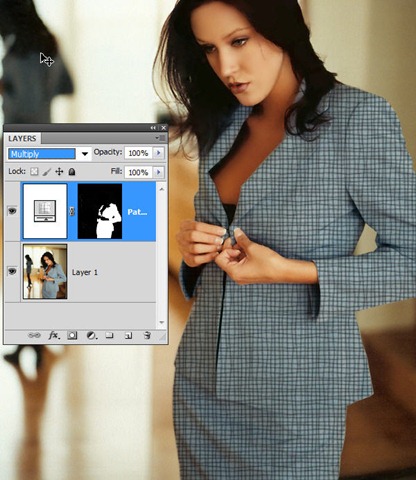
The result will appear a little heavy handed and completely unnatural, but that’s where our blending modes come in.
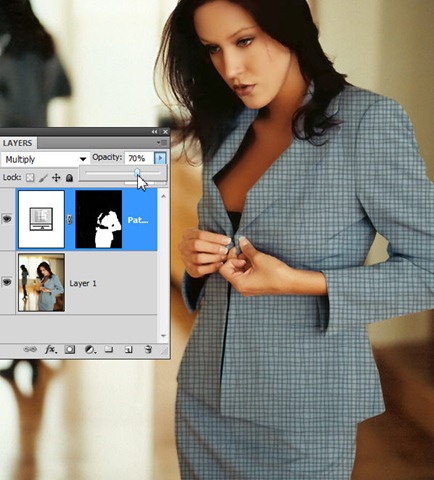
7. With your new Fill layer still selected, click and hold on Normal in the blending mode drop-down menu on the Layers panel, and choose Multiply. By choosing Multiply, the white part of the pattern is knocked out and we just see that Gauze effect. Importantly though, we see the creases and seams in the suit.
You can also reduce the opacity of the pattern fill if it is too overwhelming.
8. You can experiment with other blending modes to see how they affect the final rendering of the pattern. Overlay tends to work very well, too.

The best thing about this method is how easy it easy it is to change the pattern. Simply double click on the Pattern Fill thumbnail (the one on the left side of the layer) to quickly choose and apply other patterns. Here’s a few more examples with the same image and the Red Fleck, Blue Daisy and Wood patterns which come with Photoshop.


Frequently Asked Questions on Changing Clothes with a Pattern Fill in Photoshop
How can I ensure the pattern fill matches the folds and contours of the clothing?
To ensure the pattern fill matches the folds and contours of the clothing, you need to use the Displacement Map. This tool in Photoshop uses the grayscale information in an image to distort the content of another image. It’s perfect for making the pattern follow the folds and contours of the clothing. First, create a displacement map of the clothing area. Then, apply this map when adding the pattern fill. This will make the pattern bend and warp along with the clothing, giving a realistic look.
Can I change the color of the pattern fill after applying it to the clothing?
Yes, you can change the color of the pattern fill after applying it. To do this, create a new adjustment layer above the pattern fill layer. Choose the Hue/Saturation adjustment layer. This will allow you to change the hue, saturation, and lightness of the pattern fill, giving you complete control over its color.
How can I make the pattern fill blend seamlessly with the clothing?
To make the pattern fill blend seamlessly with the clothing, use the Blend Modes in Photoshop. After applying the pattern fill, change the blend mode of the layer to Overlay or Soft Light. This will make the pattern blend with the underlying colors and textures of the clothing, giving a natural look.
What if the pattern fill looks too sharp or too soft on the clothing?
If the pattern fill looks too sharp or too soft on the clothing, you can adjust its sharpness using the High Pass filter. Duplicate the pattern fill layer, then apply the High Pass filter to it. Adjust the radius to control the sharpness. Then, change the blend mode of this layer to Overlay. This will sharpen the pattern fill without affecting the rest of the image.
Can I use a custom pattern fill instead of the default patterns in Photoshop?
Yes, you can use a custom pattern fill instead of the default patterns in Photoshop. To do this, open the pattern image in Photoshop. Then, go to Edit > Define Pattern. Give your pattern a name and click OK. Now, you can use this custom pattern when filling the clothing.
How can I remove the pattern fill from certain areas of the clothing?
To remove the pattern fill from certain areas of the clothing, use a layer mask. After applying the pattern fill, add a layer mask to the layer. Then, paint with black on the mask over the areas where you want to remove the pattern. This will hide the pattern in those areas, revealing the original clothing underneath.
Can I apply the pattern fill to multiple clothing items at once?
Yes, you can apply the pattern fill to multiple clothing items at once. To do this, make a selection of all the clothing items using any selection tool. Then, apply the pattern fill to this selection. The pattern will be applied to all the clothing items within the selection.
How can I make the pattern fill look more realistic on the clothing?
To make the pattern fill look more realistic on the clothing, adjust its opacity and blend mode. Lowering the opacity will make the pattern less prominent, while changing the blend mode will affect how the pattern interacts with the colors and textures of the clothing. Experiment with different settings to achieve the most realistic look.
What if the pattern fill doesn’t cover the entire clothing item?
If the pattern fill doesn’t cover the entire clothing item, you can duplicate the pattern layer and move it to cover the uncovered areas. Alternatively, you can increase the scale of the pattern fill when applying it to ensure it covers the entire clothing item.
Can I save the pattern fill for future use?
Yes, you can save the pattern fill for future use. After defining the pattern, it will be saved in the Pattern Picker. You can access it anytime by going to Edit > Fill and choosing Pattern from the Contents dropdown. Your saved patterns will be available in the Custom Pattern dropdown.