

Key Takeaways
- The Symfony PHP Framework, while powerful and flexible, can be daunting for newcomers due to its steep learning curve. With a basic understanding of PHP and HTML, and modern web site development, one can develop a fairly good website using Symfony.
- Setting up Symfony involves downloading the Symfony Standard without vendors package, unpacking it in your web root directory, and downloading the PHP packaging system called Composer. Running ‘php composer.phar update’ will install the necessary bundles to make Symfony functional.
- A Symfony application is structured into bundles, which can be seen as collections of files serving particular functions in the website. These bundles contain controllers, views and entity files, forming the foundation of an MVC-structured website. Symfony also supports pretty URIs through its routing feature, and links up with databases through configurations in the ‘app/config/parameters.yml’ file.
Introduction
The Symfony PHP Framework is powerful, scalable and flexible. Yet it is considered by many, especially those new to frameworks, to have a very steep learning curve.
This is true to a certain extent. At first glance, Models, Views, Controllers, Entities, Repositories, Routing, Templating, etc, altogether can appear very terrifying and confusing.
However, if you have grasped the fundamentals of PHP and HTML, have a basic understanding of modern web site development (in particular, Pretty URIs, MVC), and know how to CRUD a database/table, you are not far from developing a fairly good website, be it for your personal usage or business application.
In this series, I will capture a few key steps and some advanced techniques (image manipulation, pagination, dynamic contents, NativeQuery, etc) to help anyone who is considering using Symfony (note, to avoid future confusion, Symfony here refers to the Symfony 2, not the obsolete Symfony 1) as their PHP framework to develop a website.
I will use my personal book collection site as the starting point. It is up and running, so the project I use here is not a demo but a real running site (hosted at http://www.rsywx.net, in pure Chinese).
The final source code of the site for this part of the tutorial can be found at the Github repository. Any comments and queries, please feel free to contact me.
Quick setup
Setting up Symfony is fairly easy. My favorite way is to download the Symfony Standard without vendors package. Visit the official download site and make sure you choose the right package. Unzip/Untar the archives to your planned web root directory and you are almost there (my project for this series will be located at f:\www\rsywx_test). After unzipping the Symfony package, you will see a directory structure not unlike this one:
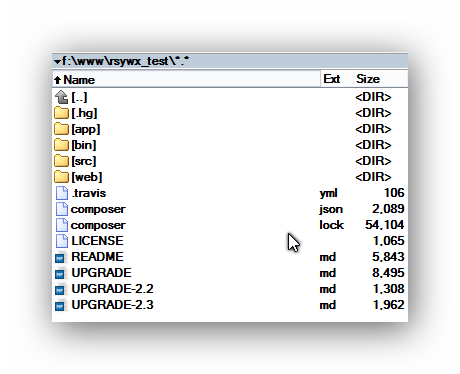
Be sure the above directory is correct (you may not see the .hg directory as this is for version control only).
The next step is to download the PHP packaging system called Composer. Most modern PHP frameworks use Composer for package management.
If you have the cURL utility installed, you can issue the following command:
curl -S https://getcomposer.org/installer | phpor if not (but you really should install cURL), punch in the following:
php -r "eval('?>'.file_get_contents('https://getcomposer.org/installer'));"There will be one new file downloaded, called composer.phar. This file is the entry point for our PHP package management.
As the name of the archive suggests, the files we have now contain no libraries (or bundles) to make Symfony really work. To do that, you need to run:
php composer.phar updateThe above will install the latest and necessary bundles normally required. If you run into any errors (missing utilities, critical dependencies that cannot be met..) composer will kindly let you know. The installation procedure should be done within a couple minutes at most, depending on your connection speed.
If you have setup your web server (I am using Apache) correctly, you can visit the site already:
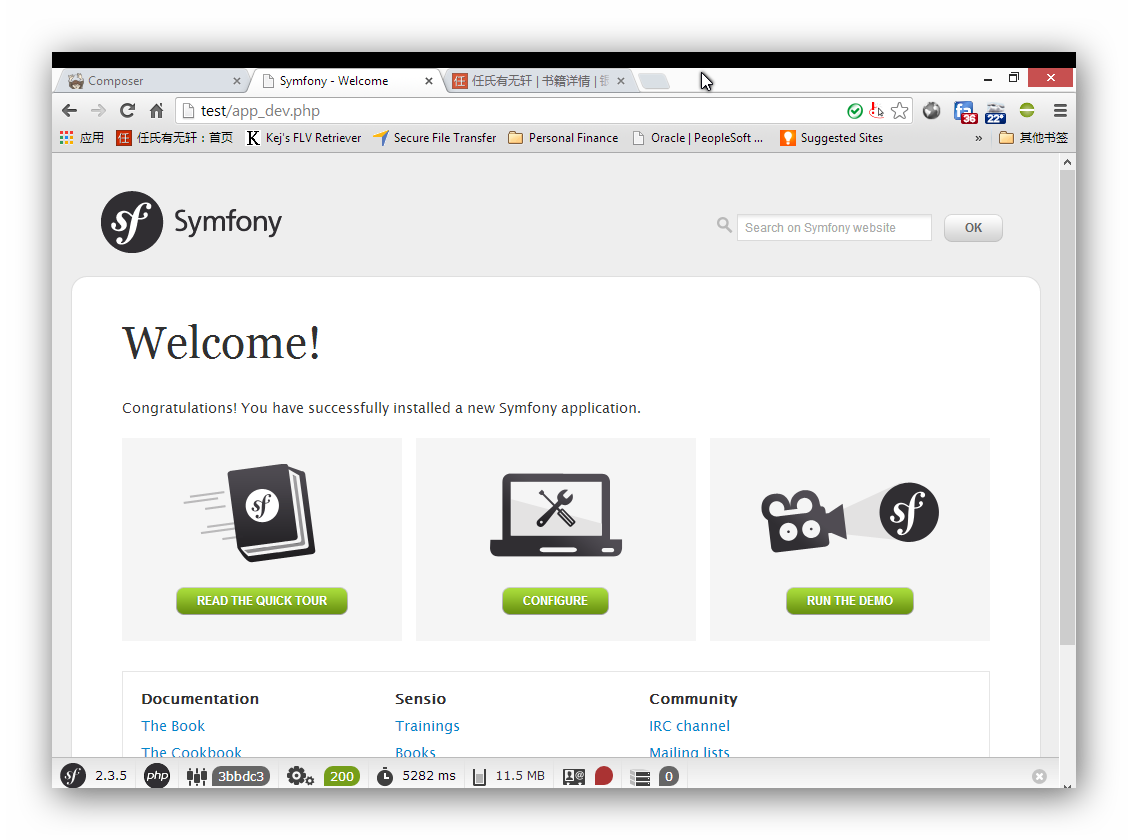
With Symfony, it is common practice to use app_dev.php as the entry page during development. In a production environment, app_dev.php would be omitted.
Feel free to navigate around to get a feeling of the framework and familiarize yourself with the toolbars and debug messages it offers.
Detailed setup instructions can be found here, in case you need more help.
It is always a good idea to run
php composer.phar selfupdateperiodically to get the latest composer.phar distribution.
Note: The Symfony package always has a built-in bundle called AcmeDemoBundle. That bundle is a demo app that proves Symfony is up and running, and serves as an example which you can use to build your own app. To remove that bundle out of your web site setup, please follow the instructions in this article.
After removing, if you visit the site again, you will see a 404 page (No route found for “GET /”) as we have not started to create our own application yet.
Bundle, Controllers, Views, Models (Entities)
In short, Symfony relies on bundles (often called modules in other frameworks). A bundle can be treated as a collection of files – it serves as the container for data retrieving, logic control and presentation of a particular function set or sets in your website. My site has only one bundle and serves to list all of my books, the detail of one book, the articles I wrote after reading a book, my favorite NBA team (Lakers) scores, etc. These functions (or modules as they’re counterintuitively called in Symfony) are all encapsulated in one bundle (trrsywxBundle).
A bundle will contain controllers, views and entity files (models). These constitute the foundation of an MVC-structured website.
To generate a bundle and start our application development, issue the below command:
php app/console generate:bundleBefore creating the bundle, the console will ask you several questions:
- Bundle namespace: in this example, I am using tr\rsywxBundle. Be sure to have “Bundle” at the end.
- Bundle name: use the suggested name derived from the namespace. In this case, “trrsywxBundle”.
- Target Directory: use the suggested lcoation (“F:/www/rsywx_test/src” in this case).
- Configuration format: there are 4 options available: PHP, YAML, XML and annotation. Choose the one your prefer and feel comfortable with. If you’d like to follow along, I will use YAML, so type “yml” as your choice.
- Do you want to generate the whole directory structure: Not necessary.
- Confirm the generation, kernel update and Routing generation.
More detailed instructions about this process can be found here.
Routing
Consider routing as a mapping mechanism from the HTTP request to the module/function that really handles it (processing the request, grabbing data, and rendering the proper response back to the web browser).
Like most other frameworks, Symfony has a routing feature to support pretty URIs. This is done by creating routes in routing.yml (and by having the right .htaccess configuration, which is located in the web/ directory of your Symfony setup).
To make the encapsulation stronger, I do recommend you add your own routes in the bundle’s routing.yml file (located under path-to-your-site-root/src/tr/rsywxBundle/Resources/config). This comes in handy when you eventually want to port the whole bundle into another site. Please note how the namespace of the bundle is reflected in the directory structure.
A common pitfall when defining routes is that routes have their precedence. The earlier a route appears, the earlier it will be matched. In other words, if the routes are not arranged properly, weird, difficult to debug problems will occur.
For example, in an earlier version of my site, I had two routes looking like this:
tag_list:
  pattern: /books/{tag}/{page}
  defaults: {_controller: trrsywxBundle:Book:taglist, page:1}
...
reading_list:
  pattern: /books/readings/{page}
  defaults: {_controller: trrsywxBundle:Reading:list, page:1}
See the problem? /books/readings will actually be mapped to tag_list route, in which the parameter tag will take readings as its value and directs us to a totally different controller. I can’t simply switch the order of these two routes (which would solve most of the issues, but crash when someone is really looking for books containing ‘readings’ as a tag). The only way to get around this is to change the route pattern for the first one:
tag_list:
  pattern: /books/tag/{page}/{tag}
  defaults: {_controller: trrsywxBundle:Book:taglist, page:1}
Derived from the fact that the earlier a route appears, the earlier it is matched, you need to put the most frequently used routes at the beginning of the routing.yml file. This has the added benefit of being faster, since the framework has fewer routes to check before hitting a match.
I am not covering the whole aspect of routing in Symfony here. The official documentation says it all.
Database
In this project, the database used is relatively simple. A few tables are created to reflect the book information (title, author, publisher, purchase date, location, etc), my reading thoughts, the Lakers score, Quote Of The Day, etc. Most of the tables (books, readings, publisher, purchase place, etc) are related to each other with a One-To-Many relationship. The tags table and books table are linked with Many-To-Many relationships.
The rsywx.sql file in the project’s misc folder will let you import the database (MariaDB or MySQL) – simply import it via the mysql command line tool, or through a web GUI like PhpMyAdmin. Though Symfony official documentation suggests databases/tables be created from within the Symfony framework, I strongly suggest using another 3rd party tool. The advantages of using a 3rd party tool include:
- More intuitive and straightforward definition of the database;
- Less typings when defining the data type, relationships, indexes, primary keys, etc.
We can now link up the database by configuring app/config/parameters.yml:
parameters:
  database_driver: pdo_mysql
  database_host: 127.0.0.1
  database_port: null
  database_name: symfony
  database_user: root
  database_password: null
Normally, you will only change the dabase name, user and password to reflect your own choices.
After creating the database/tables, it is easy to import these database structures into Symfony:
php app\console doctrine:mapping:importAnd then create the corresponding entities by:
php app\console doctrines:generate:entity tr(where tr is the namespace of the bundle).
Note: Symfony supports two ORMs for now: Doctrine and Propel. I am using Doctrine in this application.
In general, the import will succeed with next to no problems. However, there are at least two things to notice:
- The tool is not good at mapping a table with a compound primary key (i.e., a primary key with 2 or more fields) in which at the same time, one of the fields is also a foreign key to another table
- You can edit the generated entity files (located under path-to-your-site-root/src/tr/rsywxBundle/Entity/). But if you modified the field names, types and other information, be sure to “reflect” those changes back to the database via the
php app/console doctrine:database:createcommand. Don’t worry, Syfmony is stronger and smarter now. The command will not destroy the data you loaded before.
Conclusion
In this part of the tutorial, we set the project and the Symfony framework up, put the database in place and did a clean-up job (removing the built-in AcmeDemoBundle).
Having the framework ready for proper further development is often the most difficult part of starting a project, especially when dealing with a framework you’ve never dealt with before. So far, I hope the setup is still easy and straightforward enough. Symfony is the most well-documented framework that I have ever come across, so if you still have problems be sure to visit the Official Documentation and The Cookbook for help, or just get in touch. Again, the final code of this part of the tutorial is available on Github.
Next time, we’ll create routes, controllers (to guide the application flow and logic), entities/repositories (to retrieve data), and templates (for presentation) to make the site functional.
Frequently Asked Questions about Building a Web App with Symfony 2
What are the prerequisites for building a web app with Symfony 2?
Before you start building a web app with Symfony 2, you need to have a basic understanding of PHP as Symfony is a PHP framework. You should also be familiar with object-oriented programming (OOP) concepts as Symfony is based on OOP principles. Additionally, knowledge of Composer, a dependency management tool in PHP, is beneficial as it is used for installing Symfony.
How do I install Symfony 2?
To install Symfony 2, you need to use Composer. First, make sure you have Composer installed on your system. Then, you can use the following command to create a new Symfony project: composer create-project symfony/framework-standard-edition my_project_name. Replace my_project_name with the name of your project.
What is the structure of a Symfony 2 application?
A Symfony 2 application is structured into bundles. A bundle is similar to a plugin in other software, but it is much more because everything is a bundle in Symfony, including both the core framework functionality and the code written for your application. This structure promotes code reuse and modularity.
How do I create a new page in Symfony 2?
To create a new page in Symfony 2, you need to create a new route, a new controller, and a new template. The route defines the URL of the page, the controller contains the PHP code that is executed when the route is matched, and the template contains the HTML code of the page.
How do I use a database in Symfony 2?
Symfony 2 uses Doctrine, an object-relational mapper (ORM), to interact with databases. You can define your database connection details in the app/config/parameters.yml file. Then, you can create entity classes that map to database tables and use the Doctrine’s methods to query the database.
How do I handle forms in Symfony 2?
Symfony 2 provides a Form component that you can use to create, process, and reuse forms. You can create a form class that defines the form fields and validation rules, create a form object in your controller, and render the form in your template.
How do I handle user authentication in Symfony 2?
Symfony 2 provides a Security component that you can use to handle user authentication. You can configure your authentication method (e.g., form login, HTTP basic, or a custom method) in the app/config/security.yml file. Then, you can use the Security component’s methods to authenticate users and control access to your pages.
How do I handle errors and exceptions in Symfony 2?
Symfony 2 provides an error and exception handling system that you can customize. By default, all exceptions are converted to instances of the Symfony\Component\HttpKernel\Exception\HttpException class. You can create an event listener that listens to the kernel.exception event to customize the error page or log the exceptions.
How do I test my Symfony 2 application?
Symfony 2 provides a testing framework based on PHPUnit. You can create functional tests that simulate a browser and make requests to your application, and unit tests that test the individual units of your code. You can run your tests using the phpunit command.
How do I deploy my Symfony 2 application?
To deploy your Symfony 2 application, you need to upload your code to your server, install your dependencies using Composer, and configure your server to point to the web/ directory of your Symfony application. You should also ensure that your app/cache/ and app/logs/ directories are writable by the server.

